
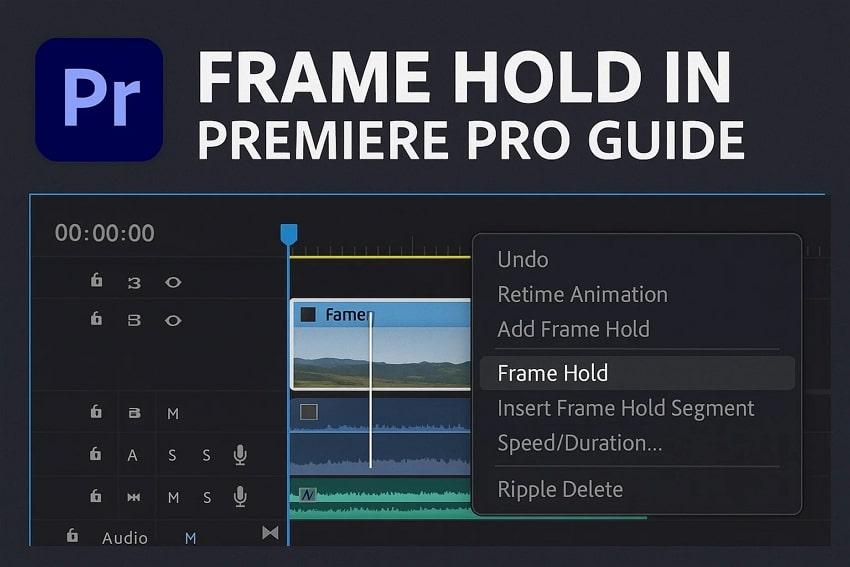
Whether you’re editing a vlog, tutorial, or any cinematic shot, there are moments that deserve a pause. Maybe you want to highlight an action, emphasize an expression, or create a dramatic beat overall. That’s precisely what a frame hold in Premiere Pro serves; it lets you stop the timeline at the perfect frame. This simple technique gives viewers a moment to absorb what’s happening without breaking the flow.
Instead of battling constantly moving footage, keep reading the guide and master the capabilities of frame hold in Premiere. You’re even guided on how to customize frame hold and export visuals without quality loss.
Table of Contents
-
- Method 1: Add Frame Hold in Premiere Using Frame Hold Options
- Method 2: Add a Frame Hold Segment in the Premiere Pro Timeline
- Method 3: Use Time Remapping for a Cinematic Frame Hold Premiere Pro Effect
- Method 4: Export a Still Image & Re-import for a Manual Premiere Pro Frame Hold
- Method 5: Use Adjustment Layers or Nesting for Advanced Frame Hold Edits
Part 1. What a Frame Hold in Premiere Really Is and Why Editors Use It
A frame hold works by instructing Premiere to keep showing a specific source frame as long as the segment lasts. Premiere Pro frame hold, reference the original clip and its full-resolution media, so there’s no extra compression when you add the hold. As frame hold is just a clip-level setting, you can move or trim, and the existing effect can be frozen with “hold filters.
1. Internal Mechanics vs Exporting Still Frames
Internally, Frame Hold is metadata on the clip in your timeline: Premiere marks a frame to "Hold On." Exporting this still frame, by contrast, creates a new image file that you can import and place on the timeline. Essentially, it becomes independent and can be used without the original clip, but it adds extra files to manage.
This feature keeps your project cleaner and updates automatically only if you slip the clip or move the Marker. In fact, the exported stills are static snapshots that won't update if you later trim or shift the underlying footage anyway.
2. Frame Hold vs. Freeze Frame vs. Time Remapping
Each of these tools pauses or manipulates motion, but they serve different editing aspects, as outlined in the comparison below:
| Aspect / Method | Frame Hold | Freeze Frame | Time Remapping |
| How It Works | Ask the clip to hold one frame for part of its duration without creating new media. | Export one frame as a still image, then place or extend it on the timeline. | Uses speed keyframes so a specific part of the clip plays at 0 percent speed. |
| Media Management | Continues referencing the original video file with only timeline metadata changes. | Generates a separate still file stored inside the project bin and disk. | Requires no additional files since changes rely on clip speed keyframes. |
| Quality / Re-encoding | Maintains original resolution with no extra rendering or scaling. | Displays quality based on the chosen frame without re-encoding. | Quality remains source dependent, while the final output relies on render settings. |
| Best Use Cases | Ideal for a short pause in action while staying within the same clip. | Best when a still image is needed externally, such as for graphics work. | Useful for cinematic slow motion, sports analysis, or dramatic freeze moments. |
3. When Editors Choose a Hold Frame Premiere Pro Technique
For the right pause technique, editors look closely at the story’s rhythm and the listed details with Hold Frame Premiere Pro:
- To pause on a key moment, hold a frame, and continue with the rest of the original clip.
- They use frame hold to keep projects non-destructive, because it's easy turn hold on/off.
- With hold filters enabled, Premiere freezes keyframed effects at that particular moment.
- Inserting a Frame Hold Segment automatically splits the clip and inserts a default two-second freeze inside the timeline.
- Editors use a frame hold inside a speed-ramping sequence to slow down motion and then accelerate.
Part 2. How to Add a Frame Hold in Premiere Pro: Top 5 Methods
A clean, professional pause in your footage doesn’t have to be complicated; Premiere Pro provides multiple ways to do so. The following section is helpful to understand how each method shapes pacing and the impact of your frame hold in Premiere:
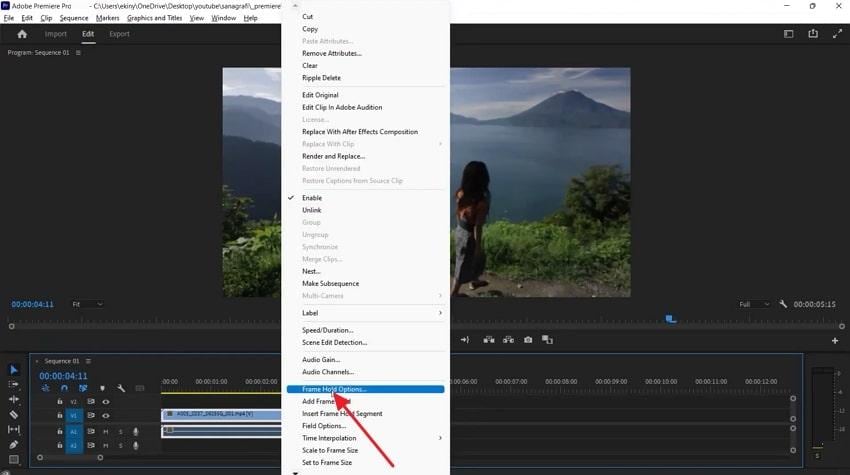
Method 1: Add Frame Hold in Premiere Using Frame Hold Options
The Frame Hold option in Premiere gives you precise control over the exact moment you want to freeze. It's beneficial because it's a non-destructive workflow and can lock perfect frames without altering your clip structure. To proceed, follow the guidelines and learn how to avail a frame hold in Premiere:
Step 1. Enter the main workspace for Premiere, import your video, and right-click it to reveal further options. Here, choose the “Frame Hold Options” option to hold your video at a certain moment.
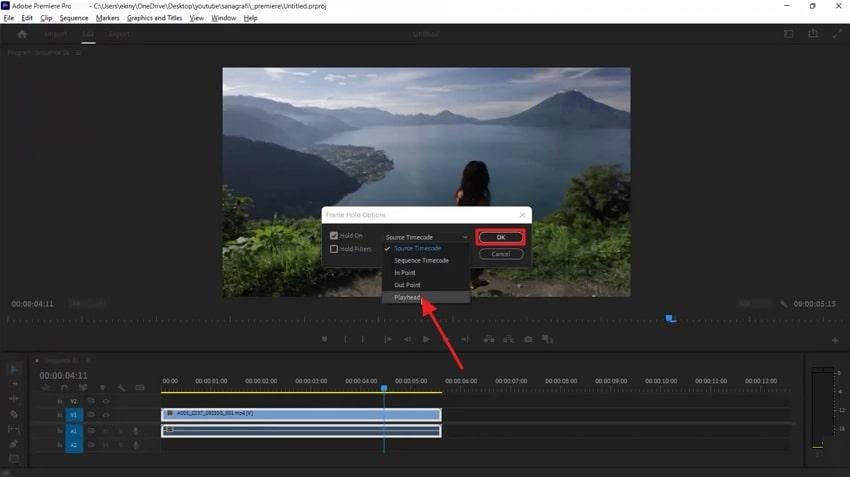
Step 2. Here, expand the menu for Hold On and select the “Playhead” option. Next, press the “OK” button to confirm and hold footage from the playhead position by selecting the “Add Frame Hold” option.
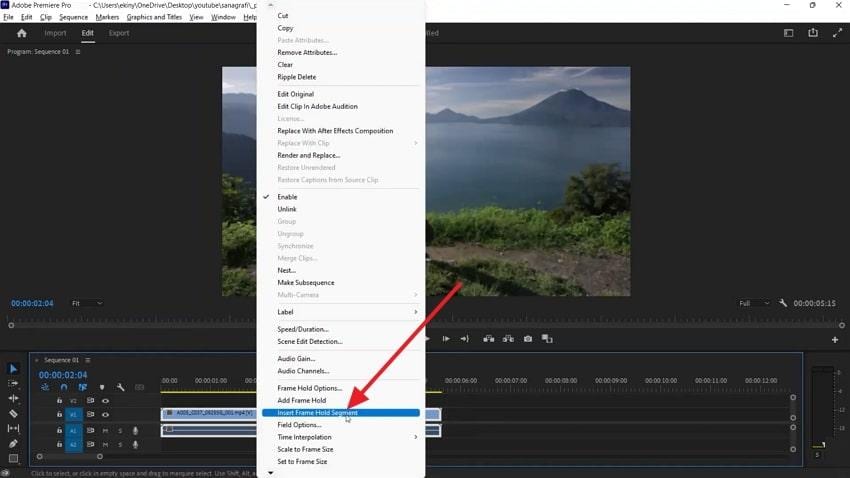
Method 2: Add a Frame Hold Segment in the Premiere Pro Timeline
A Freeze Hold Segment is applied when editors need speed and convenience, both because it creates a frozen section. This frozen section behaves like another clip that can be trimmed, moved, or embellished with ease. For more clarity, follow the guidelines to apply the frame hold segment in Premiere's timeline:
Step 1. To do so, make a right-click on the timeline and choose the “Insert Frame Hold Segment” option from the menu.
Step 2. Following this, the video will be segmented into a separate clip that can be prolonged or shortened by dragging its edges.
Method 3: Use Time Remapping for a Cinematic Frame Hold Premiere Pro Effect
Another possibility for Premiere Pro frame hold is Time Remapping, which transforms a simple frame hold into a cinematic moment. It's valuable because you can build tension, add emotional weight, and create a smooth speed transition. Adhere to the tutorial and understand how to utilize time remapping in Premiere:
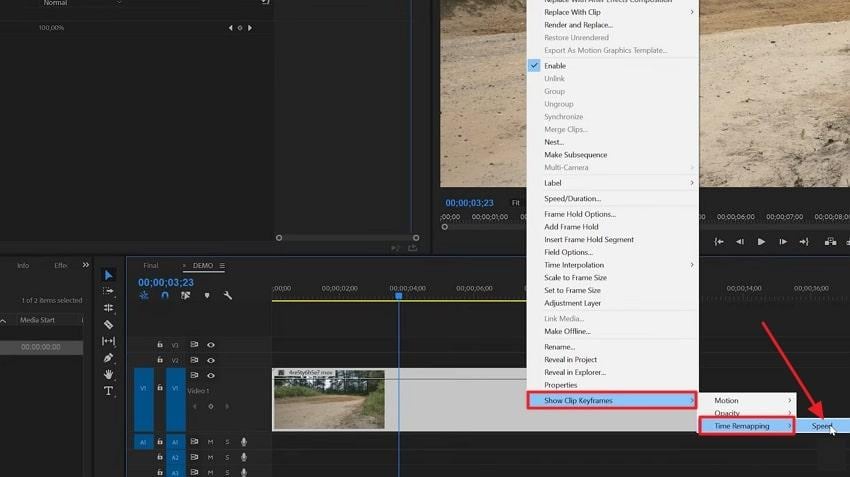
Step 1. First, right-click the FX badge on your clip in the timeline and expand the menu for “Show Clip Keyframes.” Next, choose the “Time Remapping” option and press the “Speed” option from the sub-menu.
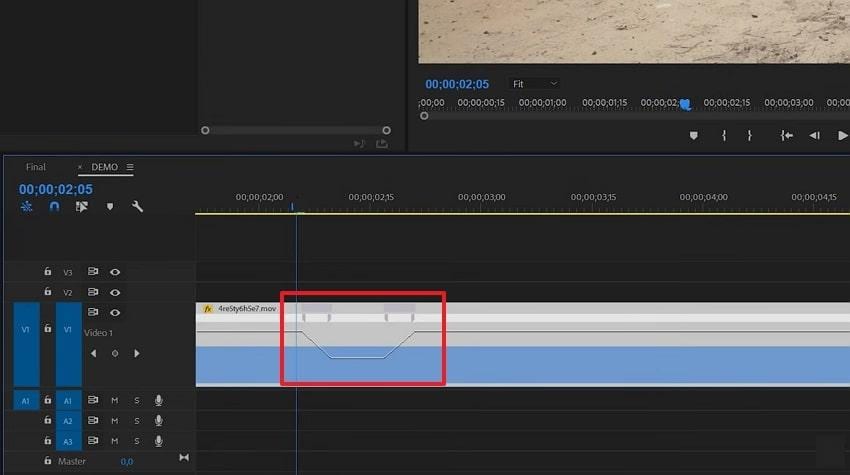
Step 2. Move the playhead to the frame where you want to start slowing down into freeze, then press “Control” and click the speed line. Later, move the layhed a bit later and add a second speed keyframe, to define a slowdown region. Next, drag the right half of the second keyframe to create a freeze section between vertical markers.
Method 4: Export a Still Image & Re-import for a Manual Premiere Pro Frame Hold
This way of exporting a still image gives you unmatched flexibility, as you can re-import and apply design elements. You’re even allowed to reuse the frame across multiple scenes and have complete control over styling and consistency. Dive into the tutorial and gain knowledge about this method to hold frames:
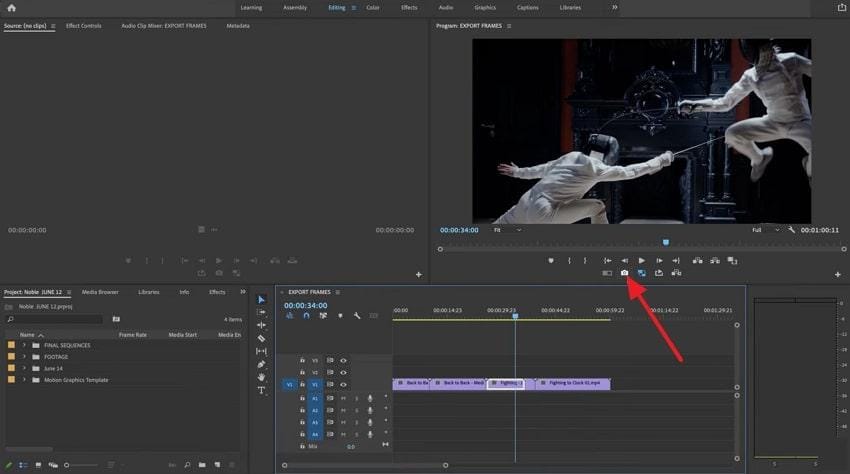
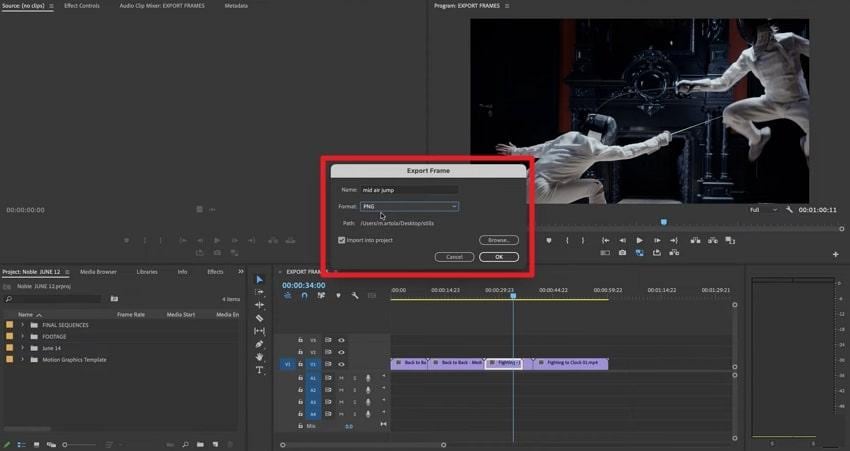
Step 1. Park the playhead on the exact frame you want to freeze, and press the “Export Frame” icon.
Step 2. In the Export Frame window, name the clip and choose a format of your preference. After this, click the “OK” button to allow the still image to appear as a separate item.
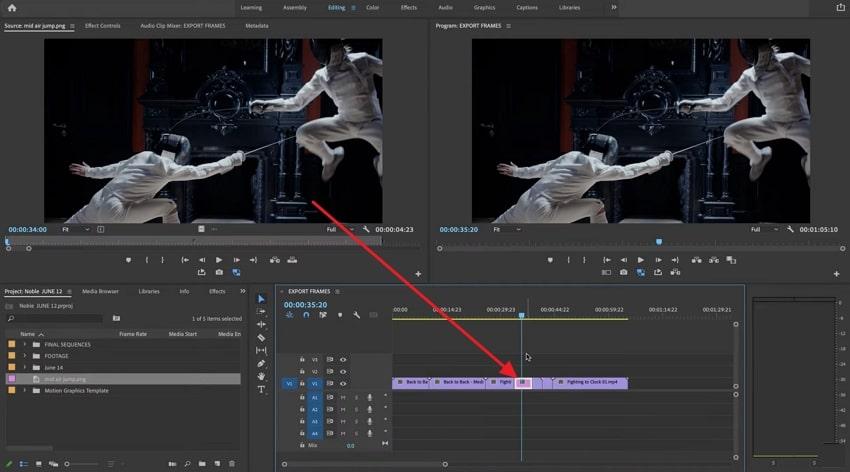
Step 3. To re-import the clip, drag it to the timeline at the desired point and expand its duration by dragging its edges.
Method 5: Use Adjustment Layers or Nesting for Advanced Frame Hold Edits
Both Adjustment Layer and Nesting are important for scalable editing as they let you apply effects and grading without cluttering. This technique is workable for complex sequences where you want a frame with professional-level control. Explore the provided guidelines and make use of adjustment layers and nesting for advanced frame hold clips:
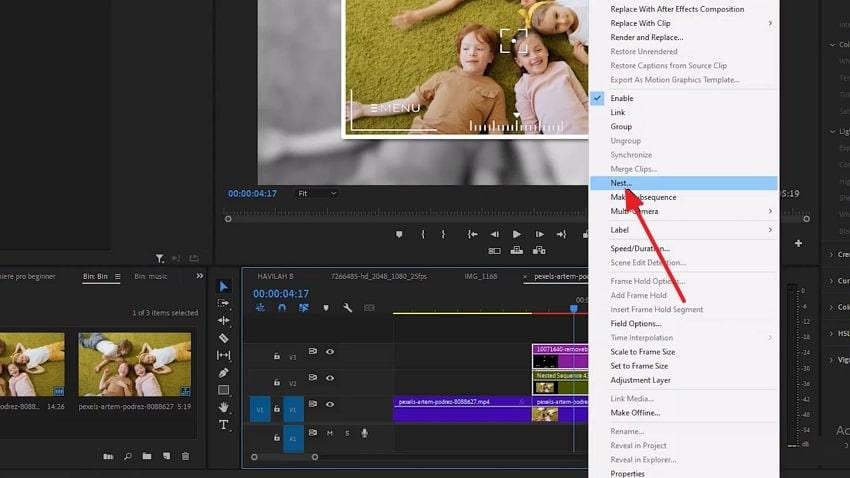
Step 1. At first, create a basic freeze (using frame hold) to have a held-frame section on the timeline. Afterward, select the freeze clip and right-click to choose the “Nest” option from the menu.
Step 2. Now, press the “New” icon and select the “Adjustment Layer” option from the menu.

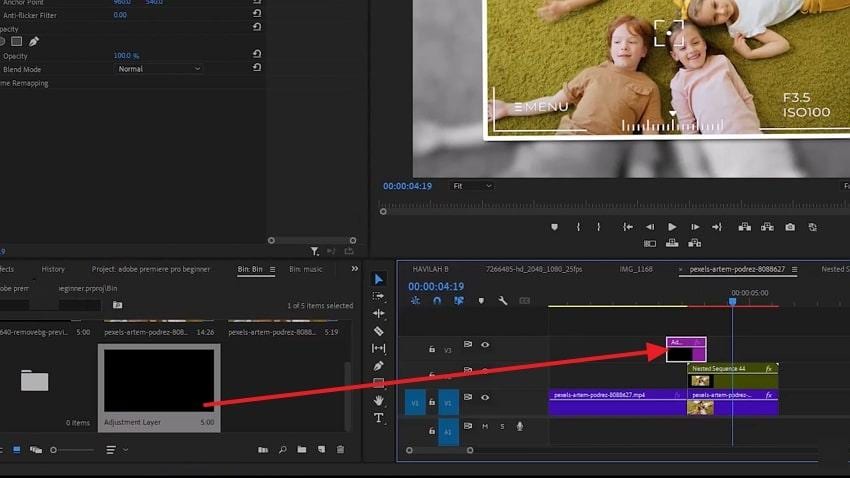
Step 3. Once a new adjustment layer is created, drag and drop it above the nested freeze section on the timeline. Next, from the Effect Control section, apply effects to the adjustment layer to affect the whole freeze setup at once.
Part 3. Creative Ways to Customize a Frame Hold in Premiere Pro
A Premiere Pro frame hold moment doesn’t have to look plain; follow some creative ways that the program offers for customization:
1. Add Dynamic Zooms and Camera Moves
You can animate scale and position on the held frame to create a slow push-in or pull-back across the frozen image. This makes the pause feel like a deliberate “camera move” instead of a static still. Use Ease In/Ease Out on keyframes in the Effects Controls panel to start and stop zoom smoothly during frame hold.
2. Make Use of Color Grading
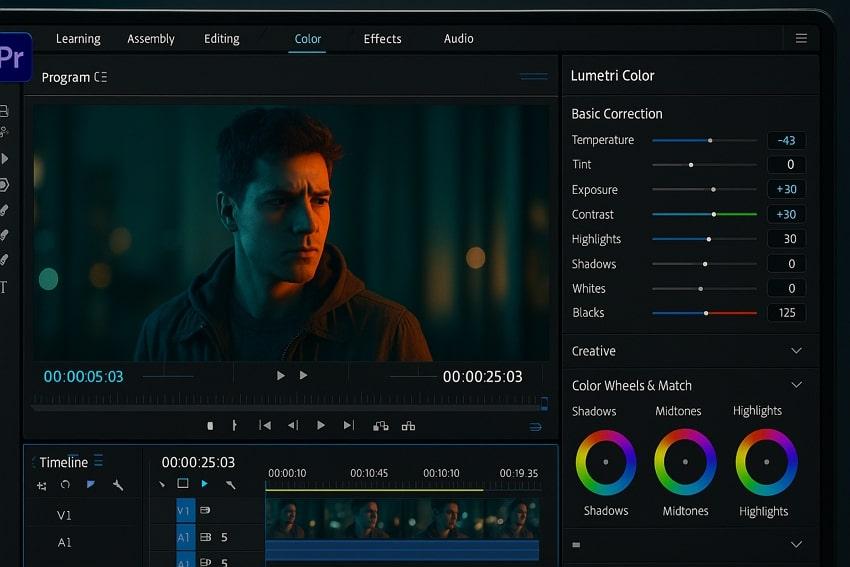
Apply a dedicated Lumetric color grade to the held segment (to an adjustment layer) to give the freeze a different mood. Combine creative LUTs, vignette, or glow effects on the freeze to make it a “highlight moment” in the edit.
3. Incorporate Text, Titles, & Character Intros
Place essential graphic titles over the frame hold to introduce a character, location, or key fact while the action is paused. Animate the text in/out (scale, position, or opacity) during the hold so viewers have time to read without competing.
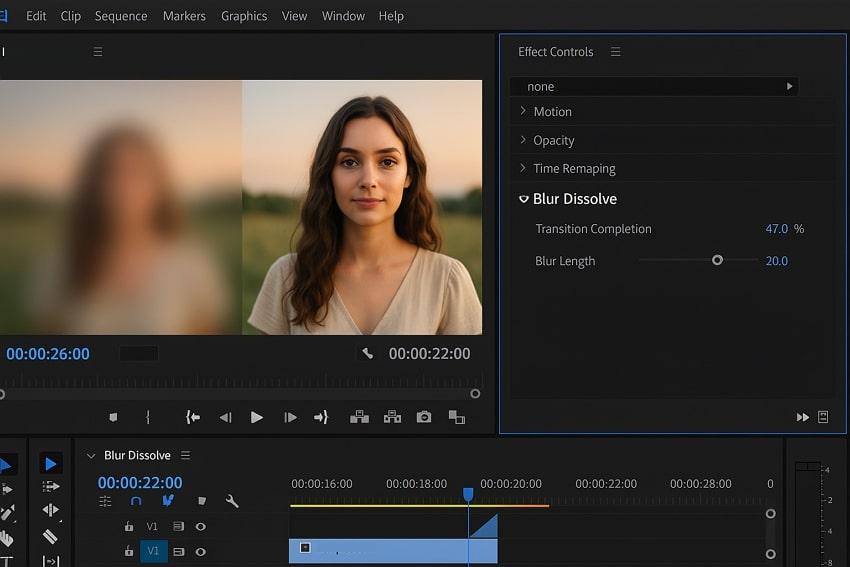
4. Insert Transition Effects In/Out of the Hold
Make use of quick transitions (dip to white/black or blur) before or after the frame hold for a stylized moment. You can pair a flash or exposure spike with a sound effect when entering the hold to mimic a camera shutter.
Part 4. How to Export Edits with Frame Hold in Premiere Pro Without Quality Loss
To protect details of your frame hold in Premiere Pro, explore the provided rendering settings and techniques for motion issues:
Best Render Settings for Preserving Frame Hold Quality in Premiere
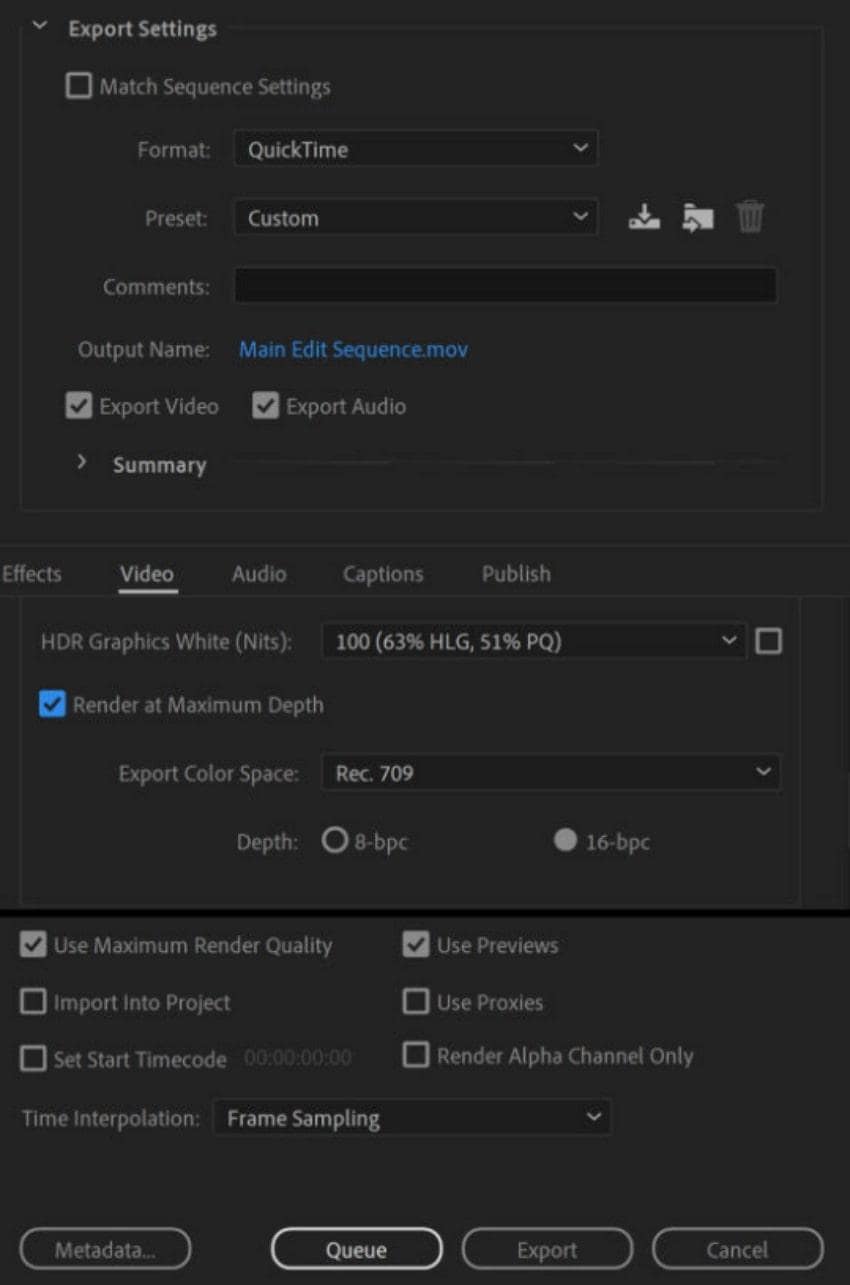
- Set export Format to H.264 and use a preset, then confirm the frame size and FPS match your sequence.
- Enable “Render at Maximum Depth” and “Use Maximum Render Quality” to reduce banding and scaling artifacts.
- Don’t export a 4K sequence as 720p because downscaling can soften the still frames.
- For web platforms, H.264 with “Match Source-High Bitrate” and a reasonable target bitrate balances quality and size.
- Disable proxy viewing before export or switch the export to use full‑resolution media to render from the original file.
Fixing FPS or Motion Issues When Using Frame Hold Premiere Pro Techniques
- In Export Settings, set Frame Rate to “Match Source” or manually pick the same FPS you used in the sequence.
- Set Time Interpolation to “Frame Sampling” for simple frame holds so Premiere just repeats the held frame without blending.
- Check for unwanted frame blending on motion segments when the parts of your video appear blurry when exporting.
- If you see blur only when motion keyframes change, lengthen the animation or slightly increase the export bitrate.
- For complex edits with multiple holds and speed ramps, export a short test segment using your chosen settings and review it.
Pro Tip: Improve Your Frame Hold Premiere Pro Results with Repairit Video Repair
Instead, you directly start frame hold Premiere Pro action, adhere to the provided underlying reasons why Repairit matters:

-
It fixes corrupted or damaged video encoding, so Premiere is less likely to glitch.
-
Restores playback for HD and 8K footage from GoPros to avoid broken pixels in the frame.
-
Quick Repair lets you batch-fix common errors across multiple clips before editing.
-
Advanced Repair can rebuild severely corrupted files using a sample clip from the same camera.
For the urgent need of instant repair before frame hold, Repairit Video Repair facilitates multiple corruption scenarios. Either your clip is broken due to recording or encoding issues, or you're sorted anyway. With the support of 4K videos, the program delivers a 99.5% success rate across all devices. Besides this, you can repair anytime on Windows, Mac, or directly online due to its broad compatibility.
Comprehensive Guide to Repair Frame Hold Clips via Repairit
Follow the systematic repair process and ensure your Premiere Pro frame hold remains smooth and glitch-free:
Step 1. Access the “Video Repair” toolkit and press the “Start” button to import all the broken frame hold clips. Here, click the “Repair” button to initiate the repair process on the added footage.

Step 2. When the process is complete, press the “Preview” button to analyze and save the clips once satisfied.

Improve Your Frame Hold Premiere Pro Results With Repairit
 Security Verified. Over 7,302,189 people have downloaded it.
Conclusion
In summary, it's clear that frame hold in Premiere gives editors the ability to freeze moments and guide viewer attention. From adding dramatic emphasis to creating clear instructional pauses, this technique brings both creativity and precision. Regardless of what frame-holding technique you choose, repairing clips using Repairit before the action makes each paused moment count.
Frequently Asked Questions
-
Q1. Why does my exported video not show the hold frame correctly?
This usually happens when export settings don’t match your sequence settings or the codec compresses the still frame. -
Q2. Can I use frame hold in multicam or nested sequences?
In multicam sequences, make sure the hold frame is applied to the active angle you want frozen. For nested sequences, it’s best to apply the frame hold within the nested clip itself rather than the parent timeline. -
Q3. How do I combine time remapping with a frame hold?
Time remapping allows you to gradually slow down footage to 0% speed for a cinematic pause. To combine it with a frame hold in Premiere Pro, set a keyframe at the frame you want to freeze, then adjust the speed ramp.
