

 TL;DR:
Resolve website images failing to load by configuring Google Chrome site permissions, disabling blocking extensions, resetting local network DNS settings, or repairing corrupted source files.
● Ensure image accessibility by enabling both JavaScript and global image visibility under Chrome Privacy and Security settings, or eliminate corrupted browser data by deleting the Default folder via the %localappdata% directory command.
● Bypass Content Delivery Network fetching errors by accessing your active network adapter properties and manually changing the IPv4 preferred and alternate DNS servers to 8.8.8.8 and 8.8.4.4.
● If the downloaded image files are fundamentally damaged, restore them using Wondershare Repairit, applying the desktop application for comprehensive format support or the web version strictly for files smaller than 300MB.
Ask AI for a summary
 ChatGPT
 Perplexity
 Gemini
 Claude
 Grok
Grok
A while back, when I was browsing the net on Google Chrome, I faced an uncommon issue in which I couldn't load any image. Every page I visited had broken pictures or showed an "image not available" icon instead. Needless to say, the issue can affect your browsing experience and should be fixed instantly.
After trying several methods, I have come up with some tried and tested solutions to resolve the "images not showing on website" issue. In this guide, I’ll share what I learned and walk you through some proven ways to fix pictures not showing on websites.


Part 1: Possible Reasons for "Images Now Showing on Website"
Why are images not showing on website?Before we learn how to resolve the images not showing problem on any website, let's quickly consider some of its major causes.This will help you check if the problem is with the web browser or the images you are trying to load.
The image's file path is not correct: You might already know that every image is stored on the database with a unique path. Therefore, it is likely that you entered the wrong path for the image.
Wrong spelling or extension: Besides that, if you have entered the wrong name for the image or its extension, then it would cause image not available on website.
Database-related problems: The database where your images are stored could be down or unavailable. You might have passed a bad or corrupt SQL command as well. Besides, here is an article of Repair Microsoft Access Database File and Recover Data.
Service issues: Furthermore, even the site's server that is hosting the image could be down. The image can also be missing or unavailable from its storage.
Other problems: There could be some issues with your browser, or the file might not be transferred entirely from its source. You might not be connected to a stable internet connection, virus infected or a browser extension could be blocking those images.
Part 2: 6 Smart Methods to Resolve the "Images Not Showing" Problem
Now when you know the possible reasons for causing the unavailability of images on any website, let"s quickly fix this issue by following these fixes:
Method 1: Use Another Browser or Update Chrome
One of the most common reasons for displaying broken images could be related to an old or corrupt web browser. For instance, if you are facing this issue in Google Chrome, consider using an alternative browser, such as Firefox, Opera, Safari, Brave, or others.
Besides that, you can also resolve the problem of images not showing by updating the browser. To do this, just launch Chrome and click on the hamburger (three-dot) icon in the top-right corner. Now, go to Help > About Google Chrome to open its settings. From here, you can check the present version of the browser and click on "Relaunch" to update it.

Method 2: Clear Browser"s Cache and Cookie Data
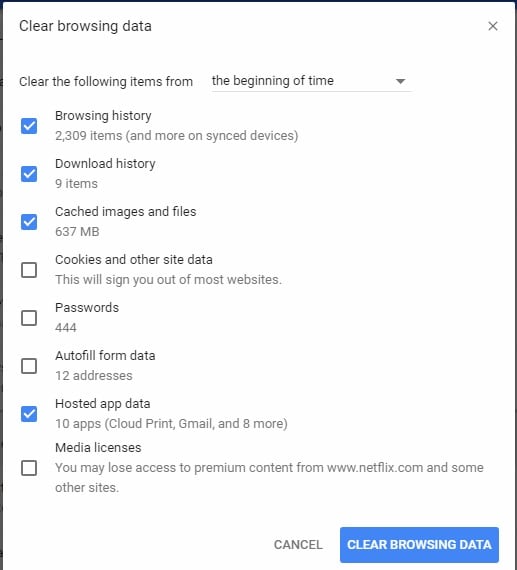
Another reason for this issue could be the accumulation of old cookies or cache data on your browser. Thankfully, the problem can easily be resolved by simply clearing all the accumulated browser data.
Let's consider the example of Google Chrome. To clear its data, you can just launch Chrome and click on the three-dot icon from the top-right corner. Now, go to its Settings > Advanced > Clear Browsing Data. This will open dedicated options from where you can choose to remove your browser's cache, cookies, history, and so on.
Method 3: Grant Relevant Permissions for the Website
You might not know this, but you can set up different permissions for various websites (like location, camera, images, and so on). Therefore, if you are not able to view images for a particular website, then chances are that you have disabled this option before.
To fix it, just launch Google Chrome and go to its Settings from the three-dot icon on the top. Now, from the sidebar, you can go to its Privacy and Security settings and click on the "Site Settings" feature.

Here, you can get a list of various websites and can just search for any site for which you are facing this issue. Click on the dropdown icon to manage permission for the selected website. From here, you need to allow permission to load images on the website that you have selected.

Method 4: Disable any Unwanted Extension on Google Chrome
At times, a browser extension (particularly an Ad Blocker) can also stop images from loading on any website. The easiest way to resolve the "images not loading on website" problem is by disabling the extension for a while.
You can first launch Google Chrome and go to its Settings from its Menu > Settings option. Now, just click on the Extensions feature from the sidebar to view the installed plugins and extensions.

From here, you can just check the details for any Chrome extension and toggle the switch off to disable it. Once an extension is disabled, you can launch Chrome again and try loading any image.

Method 5: Delete Google Chrome's Default Folder
If you have been running Chrome for a while on your system, then some of its data can get corrupted. In this case, you can choose to remove the default data from Chrome that would be downloaded again when you restart it.
To resolve the problem of images not showing, just close Chrome and open the Run prompt. Now, enter the "%localappdata%" command to go to your PC's local storage. From here, you can browse to Google > Chrome > User Data and simply rename or delete the Default folder.

Please note that I have taken the example of Google Chrome while listing these solutions, but you can implement these methods on any other browser as well.
Method 6: Try Different DNS Servers
A helpful troubleshooting step is to experiment with different DNS servers to see if this resolves your issue. When a webpage loads images, it uses URL links to fetch them. The choice of DNS server is especially important for websites that use Content Delivery Network (CDN) services, which distribute images from multiple servers around the world. If your current DNS servers have incorrect IP addresses for local CDN servers, your browser may not load images correctly. Switching to Google DNS servers can help determine if this is the root cause of the problem. Here’s how to do it:
Step 1: Load the images to fix on Wondershare Repairit
Step 1: Open the "Control Panel."

Step 2: Navigate to "View network status and tasks" under the "Network and Internet" category.

Step 3: In the left-hand navigation menu, click on "Change adapter settings."

Step 4: You will see a list of all network adapters. Right-click on the active network adapter you’re using and select "Properties" from the menu.

Step 5: In the "Wi-Fi Properties" window, select "Internet Protocol Version 4 (TCP/IPv4)" under "This connection uses the following items." Then, click the "Properties" button.

Step 6: Select "Use the following DNS server addresses." Enter 8.8.8.8 for the Preferred DNS server and 8.8.4.4 for the Alternate DNS server, then click "OK."

Part 3: How Do I Fix Corrupted Images That Are Not Loading on My Browser?
Besides that, chances are that the images that you are trying to load could be broken. To repair your broken or corrupted images, consider the following suggestions.
1. Fix Broken or Corrupt Images with Wondershare Repairit
Lastly, if your images are still not loading properly, then there could be an issue with them instead. In this case, you can use Wondershare Repairit to fix broken, corrupt, or damaged images in all scenarios.

Wondershare Repairit - Photo Repair
 Security Verified. Over 7,302,189 people have downloaded it.
-
Repair damaged photos with all levels of corruption, such as photos not showing or opening, photos low quality, dark photos, pixelated photos, faded photos, missing headers, etc.
-
Repair images of 15+ diverse formats, such as JPG, JPEG, PNG, CR3, CR2, NEF, NRW, etc.
-
Repair critically damaged or corrupted photos available on SD cards, phones, cameras, USB flash drives, and more.
-
The "AI Image Upscaler" feature can enlarge the repaired photos to 2X, 4X, and 8X.
-
Intelligently restore old/scratched photos and colorize black and white photos with various AI effects.
-
Compatible with Windows PC, Mac OS, and supports PC to mobile transferring/sharing.
-
Fix corrupted images with a very high success rate with simple clicks.
Step 1: Load the images to fix on Wondershare Repairit
At first, you can just launch Repairit and go to its "Photo Repair" section from "More Types Repair". Click on the "+Add" icon to load a browser window that lets you locate and open your corrupt photos.

As your corrupt photos are loaded, you can get their details and click on the "Repair" button to commence the process.

Step 2: Repair your photos and preview the results
Wait for a while and let Repairit fix any minor issues with your images. When the process is completed, Repairit will let you know. You can now click on the eye icon or the Preview button to check the results.

Here you can also use the "AI Image Upscaler" to enlarge the repaired photos. In case you are not satisfied with the results or the image was severely damaged, then you can click on the "Advanced Repair" feature instead. For this to work, you have to load a sample image of the same format and shot on the same device as the corrupt picture.
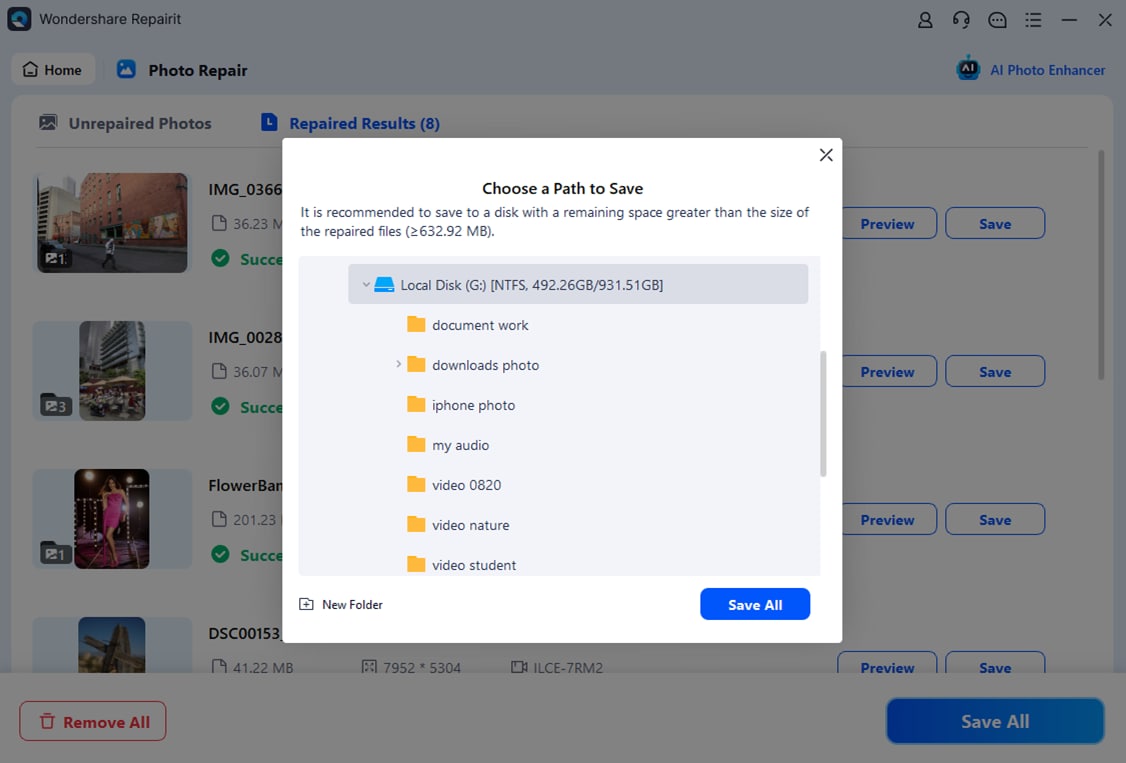
Step 3: Save the repaired images on your system
In the end, you can just click on the "Save" button and select any location of your choice to export the repaired images from Repairit.
Attention:
If your corrupted photo is smaller than 300MB, you can try the online version of Repairit Photo Repair to repair photo online for free. It's a quick way to fix corrupted images or handle issues like "image not available online" without installing any software.
If your images get corrupted during sharing or uploading, this video will walk you through practical steps to repair and recover them using Repairit.
2. Enable the Option to Show All Images
As I have listed above, browsers have dedicated permission to disable or enable images for any website. Apart from that, there is an additional option that can disable the accessibility of all images on the browser.
In this case, you can just launch Google Chrome and go to its Settings > Privacy and Security and select the "Images" option under the "Content" section. From here, you need to make sure that the option to show all images on your browser is enabled.

3. Let Websites Use JavaScript on Chrome
JavaScript is one of the most popular development languages that is responsible to load media files on websites. Therefore, if you have disabled JavaScript on your browser, then it might not show your images.
If you want to resolve the images not showing problem due to this, then just go to Chrome"s Settings > Privacy and Security > Content and select the JavaScript feature. As the dedicated JavaScript section is opened, make sure that the feature is enabled on your browser.

Final Words
There you go! I'm sure that after following this guide, you will be able to resolve the problem of images not showing or pictures not loading in Chrome. As you can see, I have covered both browser-related fixes and how to handle image not available issues caused by file corruption. Ideally, if you are not able to load your images properly or can't open them on your system, then consider repairing them. Most likely, a tool like Wondershare Repairit would come in handy in these situations as it can easily fix corrupt or damaged photos without any hassle.
FAQs
-
Why are images not displaying correctly on my website?
The path of the image on your website could be wrong, or you might have put the wrong file extensions. The image could also be moved to any other location on the server. These common issues can lead to images not showing on website or appearing as broken. -
Why are pictures not showing in my phone's Gallery?
You might have not saved the image on your phone’s memory from any other app or the media visibility option for the photo could be disabled. -
Why are images not loading on Chrome?
If images are not loading on Chrome, it could be due to a slow or unstable internet connection, disabled site permissions, or a browser extension blocking images (like an ad blocker). Try updating Chrome, clearing cache, or switching to another browser.