There are times when you want to rewind old memories, especially of close friends and families. These pictures are usually in hard copies, which is the popular format of capturing moments in the past.
Now, these pictures have spent years in an album and are beginning to look faded. Many times, the problem of faded photos takes away the magic of those photos. It is a widespread problem many people face, especially when pictures are not adequately protected.
If you encounter this problem too, you're in the right spot. This informative article will guide you on how to fix faded photos, please keep reading to discover the solutions to restore a faded picture and bring it back to life .
Table of Contents
Part 1. The Reasons That Lead to Faded Photos
Sometimes, it's hard to discern why our photos are faded.
One of the top causes of faded photos is light damage caused when the photo's tones and dyes are exposed to sunlight. Another popular cause is air exposure; this could result from dust, chemicals, micro-particles, and more. Exposure to humidity is also a leading cause of faded photos.
Although many people do not like to think of it, one of the possible reasons for faded photos is fungus and mold. Mold spreads quickly, and if your home faces exposure to sunlight, mold could destroy your pictures fast. Improper storage is also a leading cause, especially when stored where the pictures could get wet.
Part 2. 4 Proven Ways to Fix Faded Photos In Minutes
Once your photos are faded, getting back to their original state can be pretty tricky. It is even more difficult when you're trying to fix faded photos manually. There are many tools available digitally that you can use to fix faded photos.
These tools ensure that the colors, contrast, brightness, pigments, and even alignment of your photo are editable to repair the picture. Some of these tools include Adobe Photoshop, Paintshop Pro, and Lightroom. Before you get started using these tools to improve your photos, note that you need a digital scan of the image you want to fix. Ensure you use a high-quality scanner that offers high resolution to scan the photo.
Doing this will help you avoid any form of issue. Once you have a scanned version of the photo, you can try one of the multiple ways below to fix faded photos.
#1 Use Wondershare Repairit
If your photos are faded, you can use photo repair tools to get your pictures refresh. The best option for the job is Wondershare Repairit, it can colorize your faded photos within clicks.
If you have faded photos, follow the steps outlined below to fix color-faded photos with Wondershare Repairit. This repair software works on Windows and Mac and supports different file types. It also helps users save up on storage space, so you don't have to worry about not having enough storage space to repair files.

Wondershare Repairit - Photo Repair

-
Repair and colorize old faded photos with advanced AI technology in seconds.
-
Repair images of diverse formats, such as JPG, JPEG, PNG, CR3, CR2, NEF, NRW, etc.
-
Restore photos available on SD cards, phones, cameras, USB flash drives, and more.
-
The "AI Image Upscaler" feature can enlarge the repaired photos to 2X, 4X, and 8X.
-
No limit to the number and size of the repairable photos compared with the online version of Repairit.
-
Support Windows 11/10/8/7/Vista, Windows Server 2003/2008/2012/2016/2019/2022, and macOS 10.10~macOS 14.
First, download Wondershare Repairit and open it, choose "AI Photo Enhancer" from the "More Types Repair" section.

Here click on "+Add" to upload the faded photos.

Second, choose the "Old Photo Restoration" and "Photo Colorizer" model and click the "Repair" button to restore and colorize the faded photos.
Note: You can also use the "Output Resolution" feature to sharpen the restored and colorized photos.

Once the repair process finishes, you can preview the colorized photos. If you're satisfied with the result, save the colorized photos to any location you want.
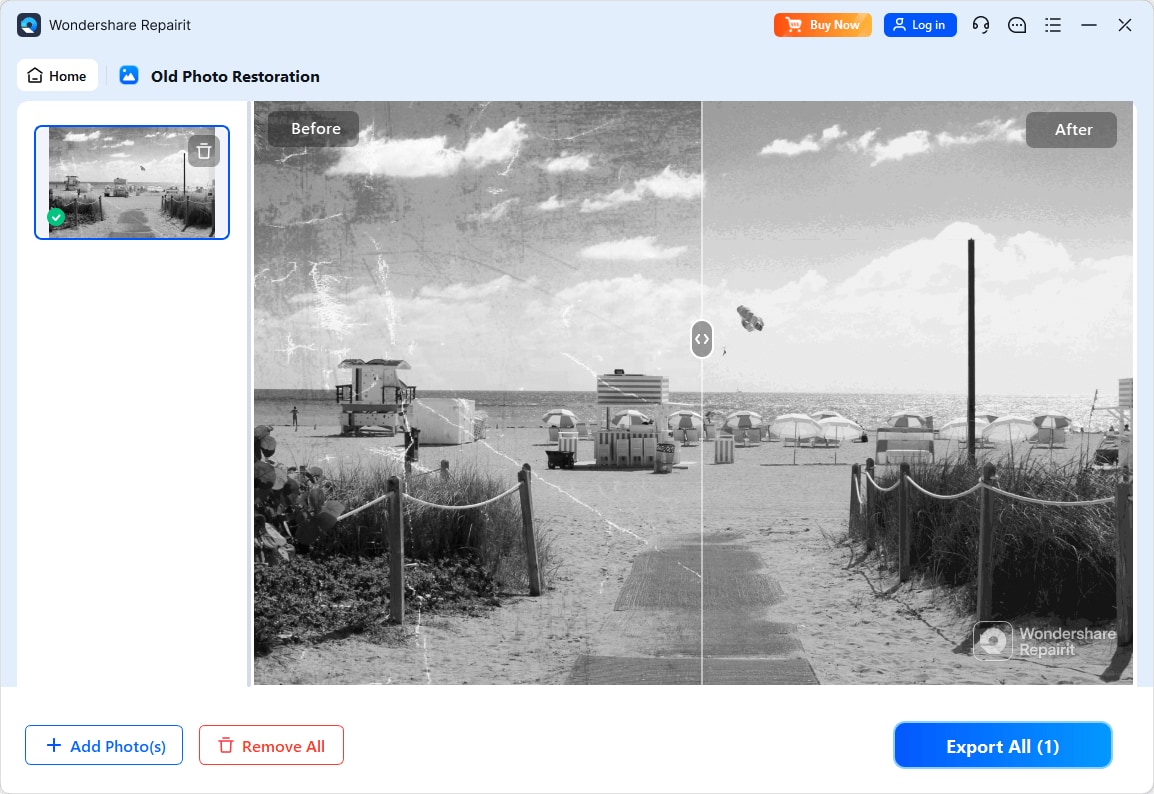
That's it. Now you have your photos back as good as new and free of any corruption on the file.
Attention:
If you want to colorize faded photo online and your faded photo is no more than 300MB, you can try the Repairit AI Photo Colorizer to get your photo colorful online with ease.
Pros
- ✔ One-click AI colorization and photo restoration.
- ✔ No editing skills needed, beginner-friendly.
- ✔ Supports JPG, PNG, RAW, and more.
Cons
- ✖ Advanced repair requires desktop version.
- ✖ Needs sample image for heavily corrupted photos.
#2 Adobe Photoshop
This image editing tool is a popular tool that you can use on Windows and Mac to fix faded photos. This tool allows you to edit the image settings, clear out zones, and efficiently repair your old photographs. Follow the steps below to fix faded photos in Adobe Photoshop:
-
First, open Adobe Photoshop and open your photo. Create two layers; it allows you to track whatever progress you have made. You can switch between these layers as you edit in Adobe Photoshop. If you want, you can create multiple layers to edit different aspects of the faded photo.
-
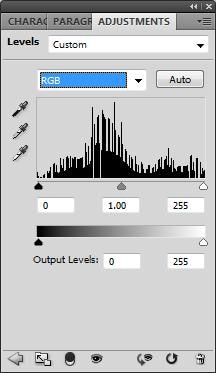
Once you create two layers, choose the auto-color option. From the sliders provided, switch between saturation and hue and make adjustments to your photographs. Keep touching up the sliders to get the original color of the faded photo back.
-
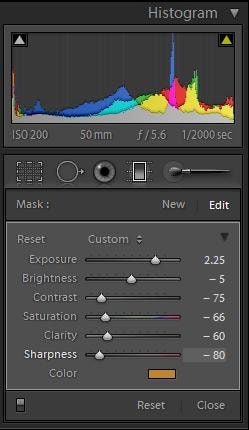
From the sliders provided, switch between saturation and hue and make adjustments to your photographs. Keep touching up the sliders to get the original color of the faded photo back.
-
Next, use the levels adjustment layer to touch up the image's black point. To do this, pick the eyedropper tool and click areas on the adjustment layer you think should be entirely black. Once you highlight the part, the software will base the black point on your choice. You can also adjust the slider till you achieve the tone you're looking for.
-
Other features you can use to fix faded photos are highlights and shadows. Adjust them to get the effect you want on your faded photo.
The key to using Adobe Photoshop is experimentation. Experiment with different techniques till you get the result you're looking for.
Pros
- ✔ Full control over image restoration and color correction.
- ✔ Professional-grade editing features and precise adjustment tools.
Cons
- ✖ Steep learning curve for new users.
- ✖ Requires a paid subscription to access full features.
- ✖ Manual editing process can be time-consuming.
#3 PaintShop Pro
PaintShop Pro is another tool you can use to restore faded photos to their original state. It can restore the colors to your faded images with just a few clicks. Follow the guide below to fix faded photos using Photoshop Pro.
-
First, you have to download the software on your PC. The Paintshop Pro software works on Mac and Windows operating systems. Once you've downloaded the software, launch it and opened the scanned faded image through it.
-
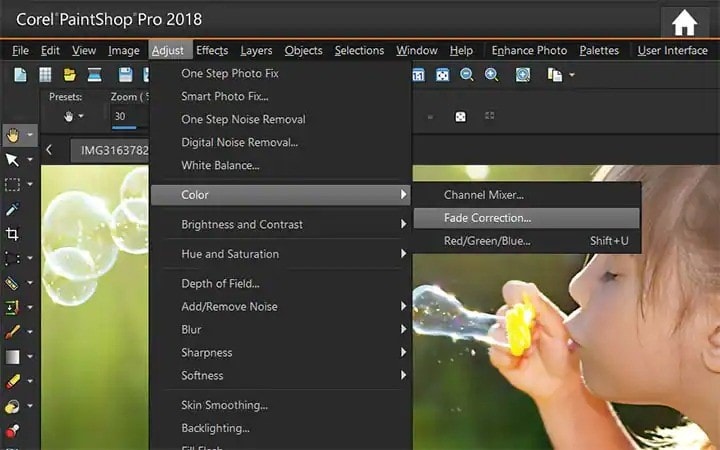
Next, head to the menu and select the 'adjust' option. Scroll to the color, and when you hover over it, a set of options will appear; click on 'Fade Correction.'
-
The process is automatic, and it will correct the fading by default. If you don't like the correction settings, you can edit them based on your preference.
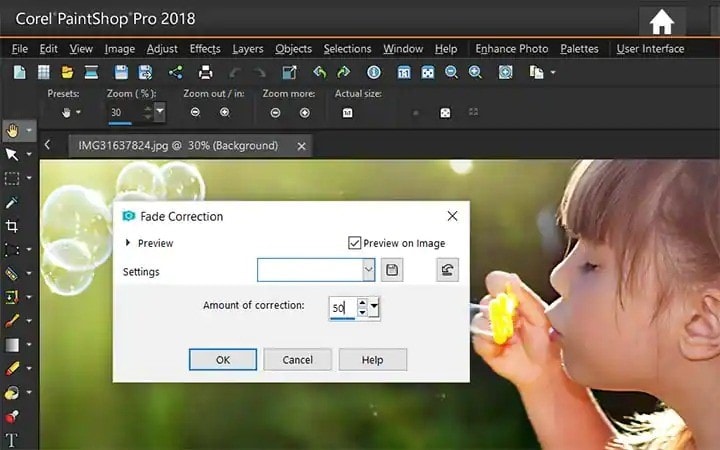
Once you like the photo correction and it is back to its original color, you simply have to save the photo, and that's it.
Pros
- ✔ Beginner-friendly interface with auto fade correction.
- ✔ One-click tools for restoring faded images.
Cons
- ✖ Results may require manual fine-tuning.
- ✖ Limited community resources compared to Photoshop.
- ✖ Performance can lag with larger files.
#4 Lightroom
Lightroom is a processor and organizer for your photos. You can use it to view, organize and touch your photos whenever you want. Lightroom works with highlights, color, and tones, and people love it because it allows you to edit your pictures in little time. You can use Lightroom to restore old photos, especially those with color defects. Let's find out how you can fix faded photos with Lightroom below.
-
Once you launch the Lightroom software, you have to import the photo. After importing, navigate to 'Develop.' You will see a couple of options, with the white balance being the first.
-
Click 'color' and touch up the temp and tint as you want.
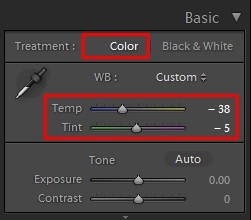
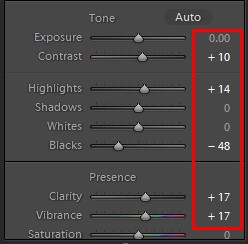
- Next, pick contrast, clarity, highlight, and vibrance alternatively and edit them till you get the effect you want.
-
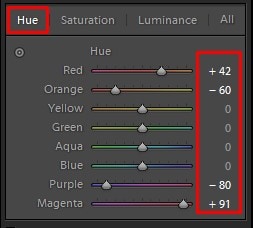
You need to visit the hue panel and slide it till you get the hue you prefer. Move to split toning and luminance; change the numbers slightly to see its effect. If your picture gets overcolored, you can undo the change made and try again.
- Apart from that, you need to visit the hue panel and slide it till you get the hue you prefer. Move to split toning and luminance; change the numbers slightly to see its effect. If your picture gets overcolored, you can undo the change made and try again.
Once you get the desired outcome you want with your faded picture and back to the original color, you can then save your photo.
Pros
- ✔ Ideal for color grading, exposure, and tone correction.
- ✔ Non-destructive editing with intuitive sliders. Great for batch editing.
Cons
- ✖ Primarily focused on color/exposure, not full photo repair.
- ✖ Some faded photos may require external tools for complete restoration.
- ✖ Subscription required for Adobe Creative Cloud access.
Part 3. How to Protect Photos From Fading?
If your pictures are not yet damaged and you want to ensure that never happens, you're in luck. There are several preventive measures you could take to ensure that your photos are safe in the future. Below are some of the steps you could take to protect pictures from fading.
Store from sunlight
As we stated earlier, one of the top causes of faded photos is the picture's exposure to UV rays. To prevent this, you should always store your pictures away from sunlight. It ensures that the dyes and tones are not affected and, therefore, keeps photos from fading. You should also ensure pictures are safe from moisture, air exposure, and smoke.
Scan your photos
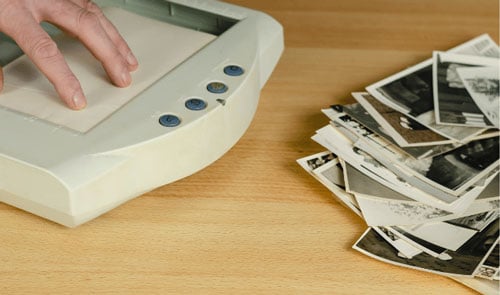
One of the top methods to ensure that your photos are safe from fading forever is by scanning the photo. You can save it on your PC or in the clouds. This action will ensure that your pictures are always in perfect shape. When you store them in the clouds, you can retrieve them any time you want and on any device.
Use high-quality albums
Another way to protect your photos from fading is by ensuring that you use top-quality albums when storing your photos. Top-quality albums have features to mitigate common issues that cause damage to photographs. Also, store the album in a dark place away from sunlight and moisture to keep it dry.
Create backups
While you're digitally scanning your photos, ensure that you create a backup for your photos. It ensures that you always have the original in case of damage to devices or any distortion to pictures. You can always restore the backup if your PC gets infected by a virus or damage.
Wondershare Ubackit is a convenient tool for you to habituate the regular backup behavior. If the original photo gets faded, you can use the backup to restore your photo if any of the solutions we share don't work for you.
Further Reading:
Here are the useful articles to help you.
1. Fix Blurry Videos on Facebook.
2. Effective Way to Fix Low-quality Images.
3. Easy Ways to Fix Video Lag Issue.
Closing Words
It can be saddening to discover that your photos are starting to fade. Nobody likes to lose pictures that remind them of an essential point in their history. However, there are solutions to this issue, and that's what this article is for.
We have provided a straightforward guide on how to fix faded photos using three authentic and efficient tools. You can also take the necessary steps we outlined to prevent your photos from fading. If you scan your faded pictures and find that they're corrupt, there's an easy way to undo the damage.
Wondershare Repairit will help users repair photos that are damaged or corrupt. In addition to Adobe Photoshop, Lightroom, and Paintshop Pro, Wondershare Repairit ensures you fix faded photos and keep them in their original format forever.
FAQs
-
Can you restore faded photographs?
Yes, faded photos can be restored using various editing or AI tools designed for old photo repair. -
How can I restore color to old photos?
You can scan old photos and use editing software or AI tools to recover color through tone and saturation adjustments. -
How do I restore my pictures to their original look?
Use a high-resolution scan and digital tools to restore brightness, contrast, and color to achieve the original photo look. -
Can I fix faded images online?
Yes. If your faded image is under 300MB, you can use tools like Repairit Online Photo Colorizer to restore them without downloading software. -
How can I fix faded pictures on my phone?
You can upload faded photos directly to an online restoration tool like Repairit via your mobile browser and restore them on the go.


 ChatGPT
 Perplexity
 Google AI Mode
 Grok
Grok
