
The word "exposure" means how much light falls on your camera's lens. It's directly linked to the darkness or brightness of an image captured. The exposure could be under and over, depending upon the light falling on the camera.
Nothing is more frustrating than capturing a photo and finding it brighter than it should be. But don't throw it away! There are a couple of tools designed to fix overexposed photos. If you’re concerned about how to fix overexposed photos, this guide will surely be your helping hand. So let's get the discussion going.
Part 1: What Causes Photos Overexposed?
When we say that a photo is overexposed, it gives a brighter look compared to what it looks like in real life. In such a scenario, white colors start glowing, whereas black shades often get pixelated. Therefore, when too much light falls on the lens, you will face "photo overexposed" problems.
The "photo overexposed" challenges usually occur when you take a photo in the presence of a too strong light source. Mostly, it happens while capturing a photo in the sunlight. The photographers usually call this problem “washed out”.
Recognizing an overexposed photo is pretty easy because the white color gives a whitish look, whereas others become brighter than they should be. Some cameras can reduce overexposure, but there are certain limitations. Therefore, third-party tools are recommended if you are worried about how to fix overexposed pictures.
Part 2: How to Fix Overexposed Photos with 3 Clicks?
Many photo repair tools can do wonders when fixing overexposed photos. But are you looking for a reliable and trusted tool to help you get out of this trouble within a few minutes? This section presents a top-rated software that explicitly resolves "photo overexposed" problems.
Wondershare Repairit
It doesn't matter if your have overexposed, corrupted or damaged photo. Repairit - Photo Repair will reduce your headache with just a single click. It is highly compatible with various photo formats and repair photos captured from any device. The best part of using Repairit is that it allows you to repair seriously damaged photos by adding sample videos. Moreover, your data remains highly secured throughout the process, and you get 24/7 tech support to answer your queries.

Wondershare Repairit
Security Verified. Over 7,302,189 people have downloaded it.
-
Support to repair damaged photos with all levels of corruption, such as overexposed/underexposed photos, pixelated photos, faded photos, grainy photos, etc.
-
Support to repair images of diverse formats, such as JPG, PNG, CR3, CR2, NEF, NRW, etc.
-
Repair critically damaged or corrupted photos available on SD cards, phones, cameras, USB flash drives, and more.
-
The "AI Image Upscaler" feature can enlarge the repaired photos to 2X, 4X, and 8X.
-
Intelligently restore old / scratched photo and colorize black and white photos with various AI effects.
-
No limit to the number and size of the repairable photos compared with the online version of Repairit.
-
Compatible with Windows PC, Mac OS, and supports PC to mobile transferring/sharing.
Step 1: Download Repairit and install it on PC/Mac.
After launching Repairit on your PC/Mac, select the "Photo repair" option in the "More Types Repair" section, and click the "+Add" button to upload your overexposed photos.

Step 2: Initiate the photo repairing process after uploading the overexposed photos.
As soon as you upload the images, you will see their name, sizes, resolution, and other parameters on the screen, as shown below. Then click on the "Repair" button to initiate the photo repairing process. Once you press this button, an autonomous repair process will start fixing overexposure problems.

Step 3: Preview and save the repaired photos.
Before you save the repaired photo on your computer, Repairit allows you to preview it to ensure it is appropriately recovered. If you are satisfied with the recovered photo, you can press the "Save” button to get it into your system.
If the processed or repaired image is appropriately recovered, tap on “Save” or “Save All” to save it on your laptop or computer.

Before saving the repaired photos, you can use the feature "AI Image Upscaler" to enlarge the repaired photos to 2x, 4x, or 8x.
Besides, if you are unhappy with how the standard method has repaired your overexposed photos, try benefiting from the "Advanced Repair". For this, Repairit will need a sample image to be uploaded. The sample photo must be uploaded through the same device and in the same format as the overexposed one. See the detailed guide for "Advanced Photo Repair".
Attention:
If you don't want to download a software on your PC/Mac and your corrupted photo is no more than 300MB, you can try the online version of Repairit Photo Repair.
Part 3: How to Fix Overexposed Photos with Other 4 Software?
Are you still looking for ways to fix overexposed photos? Or wonder about how to edit overexposed photos. Great! All you need to do is read through the discussion below as it presents four more software to lend a helping hand in this regard. Let's look at how these tools can make things easier for you.
1. Adobe Photoshop
How to fix overexposed photos in Photoshop? It is one of the frequently asked questions being inquired on the internet. Photoshop is an incredible software designed to serve the graphics industry. Millions of graphic designers and photo editors have used this tool for a while. From creating to editing, Photoshop has everything to offer. It can fix overexposed images within a few minutes. The whole process consists of just a few steps, as listed below.
Step 1: Download, install and launch Photoshop on your laptop or computer.
Step 2: Tap on "File" and then hit the "Open" option to insert an overexposed photo into the software.
Make sure that you have inserted it as a background.
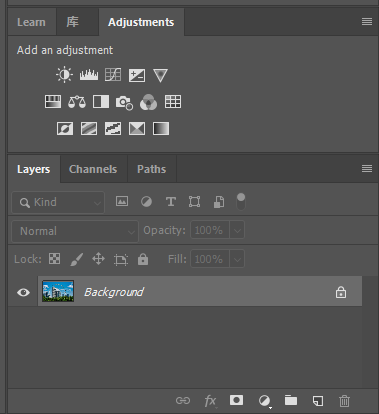
Step 3: Open the "Layers" panel to see the inserted image. You will find it in the Background layer.
Step 4: Go to the "Level Adjustment" layer.
Step 5: Click on the "Layers" tab in the Properties menu.
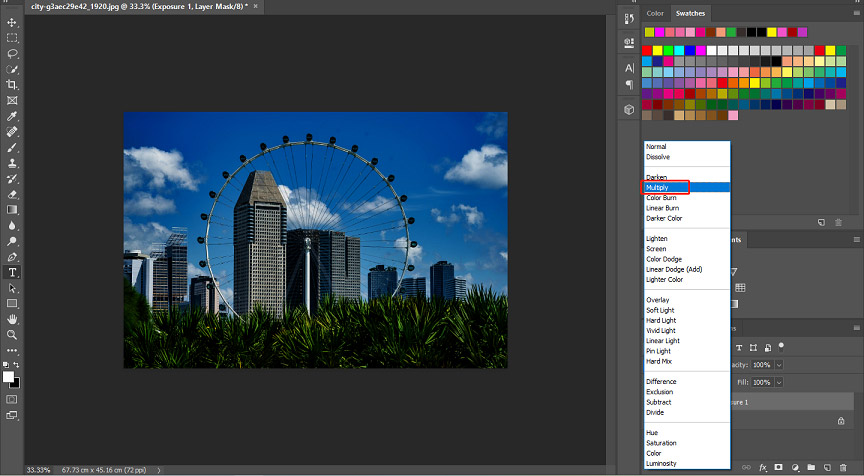
Next, go to the Bend Mode and you will see a box with the word "Normal".
Step 6: Hit the “Normal” and select “Multiply”.
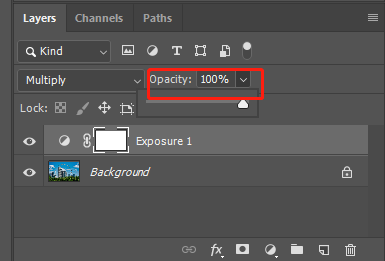
Step 7: Go to the Properties panel again and change your photo's darkness.
For this, open a dropdown menu in front of "Opacity” and lower the percentage value. Moving the slider will also result in changing the value of Opacity.
Step 8: Go to the "File” option from the top menu and click on “Export” to get the fixed photo.
2. Adobe Lightroom
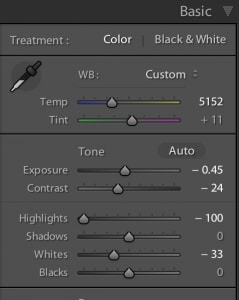
Adobe has introduced this premium picture-editing tool. Though the interface is tricky to use, it gives you complete control over your photo properties. When dealing with "photo overexposed” problems, Lightroom is considered one of the finest tools to benefit from. How to fix overexposed photos in Lightroom? To get an idea of the overexposed parts of your image, a histogram - graphical representation - helps you a lot. The vertical and horizontal axis show pixel counts for every tonal value and the whole tonal spectrum (dark to light), respectively.
Step 1: Tap on the “triangle” sign, You will find it in the histogram’s top-right corner.

Step 2: Go to the “Develop Module” and then click “Basic Panel”.
Step 3: You need to adjust the "Exposure" slider.
It is sensitive so that a slight movement can result in significant outcomes. For example, when you select the photo, it will show a 0.00 value. Try moving it to the left, and the value will enter negative digits. Usually, the value for a raw photo should lie in the range of -1.00 and 1.00.
Step 4: Adjust the “Highlights Slider” to set the brightness level.
The value for a raw photo will be 0.00. Move it to the left (the value will become negative) to adjust the brightness.
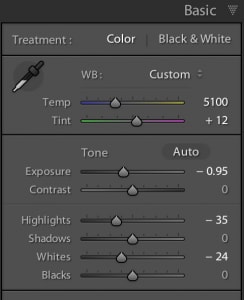
Step 5: Adjust the mid-tones to set the photo’s overall brightness.
Whites Slider can help you do that. Moving this slider to the left or right will decrease and increase the mid-tone brightness, respectively.
Note: How much you should move these sliders from their initial positions depends on how badly your image is affected by overexposure.
3. PaintShop Pro
It is an AI-based photo-editing and graphic design tool perfect for retouching and editing any image. PaintShop Pro should be your number one choice if you are looking to fix overexposed photo issues. With the latest AI protocols, this software gets your original photo back in minutes. You can get this tool for free with limited features and 40% OFF is available on the paid version.
Step 1: Download, install and launch PaintShop Pro on your system.
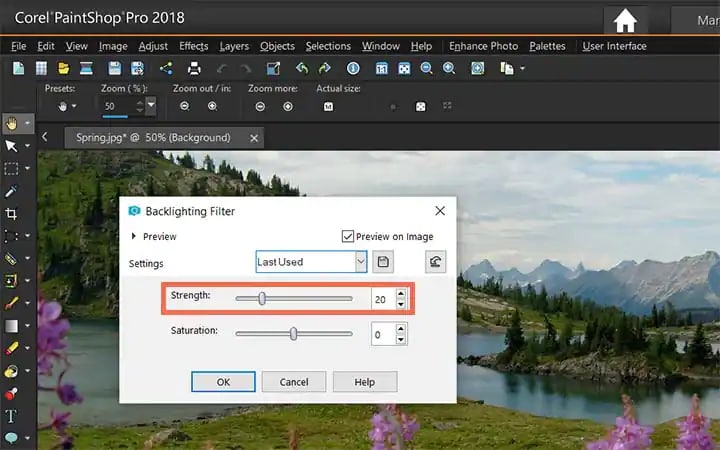
Step 2: Go to "Adjust" and tap on the "Backlighting" option.

Step 3: Set the strength.
This step is all about setting the strength. Change the value between 0 and 100 in front of "Strength". It'll help you get the idea of how much darkness should be introduced to eliminate lighter parts of the photo.
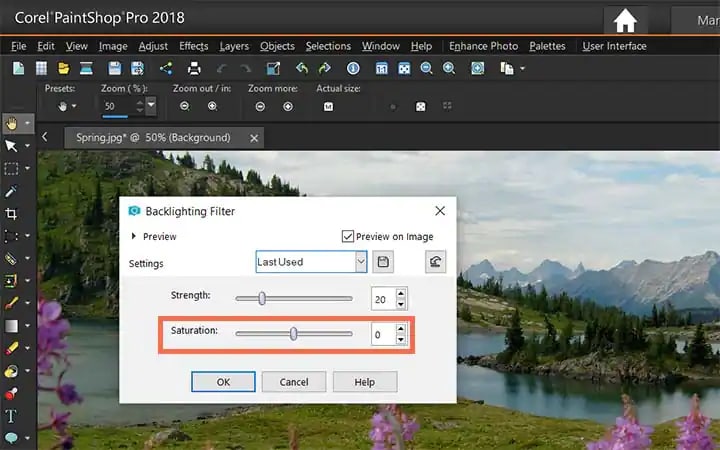
Step 4: You can increase and decrease the Saturation value by moving the slider right and left, respectively.
4. Movavi Picverse
If you don't have advanced editing skills, Movavi Picverse will be your best friend. It comes with a user-friendly interface and a range of AI-powered features. The best part of using this software is that it fixes the overexposed problems even before using any of its tools. That is something that sets it apart. Let's see how it helps you out.
Step 1: Start benefiting from the tools available in the “AI Adjust” panel. To set all the colors, play with the HDR lighting and Enhance.
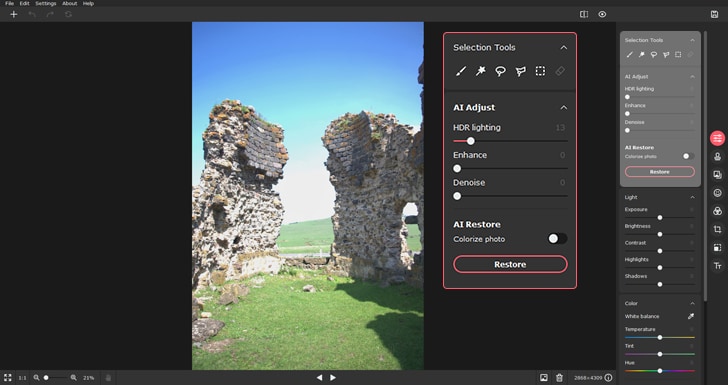
To eliminate the overexposure problem, use the same tab to find the Light section.
Step 2: To make the colors lighter or darker, use the "Exposure” slider.
Move it to the left for severely overexposed photos.
Step 3: To effectively deal with the most overexposed parts of your photo, benefit from the Highlights tools by dragging the slider to the left.
Step 4: If you want to clear the darker areas of your image, move the “Shadows” slider to the left side.
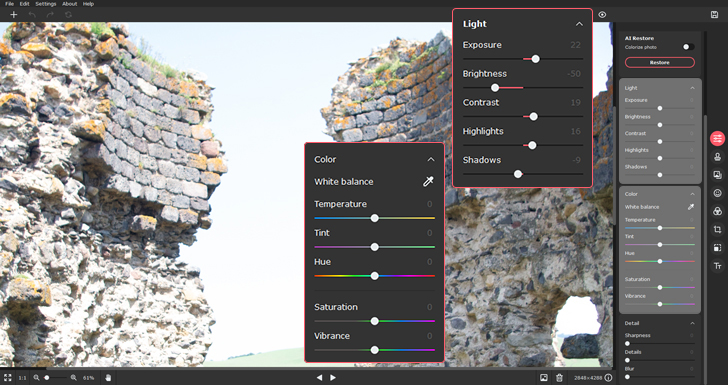
Step 5: Apart from the above-listed sliders and tools, “Contrast” and “White balance" tools are equally important.

Comparison of 5 Photo Repair Tools
Here is a comparison of five popular photo repair tools, to help you choose the proper solution for fixing overexposed or corrupted photos.
|
Feature |
Wondershare Repairit |
Adobe Photoshop |
Adobe Lightroom |
PaintShop Pro |
Movavi Picverse |
|
Supported Formats |
JPG, PNG, CR3, CR2, NEF, etc. |
JPEG, TIFF, RAW, PNG |
JPEG, TIFF, RAW, PNG |
JPG, TIFF, PNG |
JPEG, PNG, TIFF |
|
Ease of Use |
3-click, beginner-friendly |
Complex, requires expertise |
Intermediate, manual adjustments |
AI-assisted, easy for beginners |
Very user-friendly, AI-powered auto-fix |
|
Repair Features |
Fix overexposure, pixelation, fading, etc. |
Manual adjustments for overexposure |
Adjust exposure, highlights, whites |
AI-powered backlighting adjustment |
AI auto-correction for overexposure |
|
AI Features |
AI Image Upscaler, AI Repair |
No AI features |
No AI features |
AI-based repair |
AI-powered auto-fix for exposure |
|
Privacy |
Local repair, no data upload |
Local repair |
Local repair |
Local repair |
Local repair |
|
Limitations |
No limit on file size/quantity |
Manual adjustments, time-consuming |
Requires manual adjustments |
Free version has limited features |
Free version has limited features |
|
Platform |
Windows, macOS |
Windows, macOS |
Windows, macOS |
Windows, macOS |
Windows, macOS |
Conclusion
Do you often experience photo overexposed challenges? Looking online for how to fix over-exposed pictures to get your memories back? All you need to do is to read through the above discussion. It has presented the 5 best photo editing software, including Repairit - Photo Repair, to get out of this trouble.
-
Q1. How to Fix Overexposed Photos?
-
A1: To fix overexposed photos, open the image in editing software and lower the exposure slider to darken it. Use the "Highlights" slider to recover details in bright areas, then adjust "Whites", "Blacks", and "Shadows" as needed. These steps will restore balance to your photo.
-
Q2. How to Avoid Overexposed Photos?
-
A2: To prevent overexposure, shoot in manual mode to control settings like aperture, shutter speed, and ISO. Use a neutral density filter to reduce light, adjust your metering mode for different lighting, and expose for shadows in high-contrast scenes. These tips will help you achieve balanced, properly exposed photos.
 ChatGPT
 Perplexity
 Google AI Mode
 Grok
Grok
