
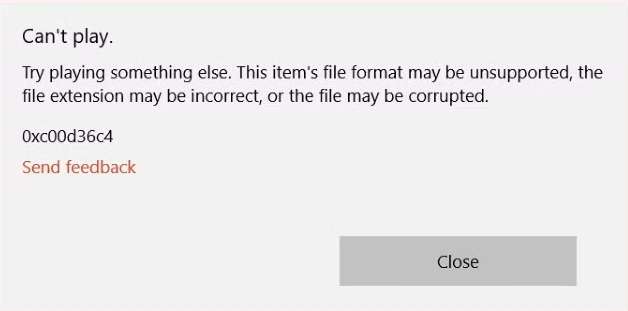
Nowadays, people rely heavily on videos for communication and entertainment purposes. Therefore, a problem such as “videos not playing” can cause frustration, so it must be resolved to ensure smooth video playing. Moreover, addressing this issue can help users access their content without any workflow disruption.
Thus, let's look at the top fixes with step-by-step guides in this informative article and various reasons why this problem occurs. We also explore a robust video repair toolkit to help you fix damaged or corrupted videos of any type.
In this article
-
- Fix 1. Use a Powerful Video Repair Tool to Fix Damaged or Corrupted Videos
- Fix 2. Update the Display Driver
- Fix 3. Uninstall and Re-install the Display Adapter
- Fix 4. Convert Your Video Format
- Fix 5. Change/Update the Video Player
- Fix 6. Run the Video Playback Troubleshooter
- Fix 7. Update the Windows Firmware
Part 1. What Are the Reasons Behind Videos Not Playing on the Computer?
There are several factors that can cause the “cannot play video” problem on a computer. Therefore, understanding these reasons first can help troubleshoot and resolve the issue effectively.
- Outdated System: If your computer system is outdated, it can cause the videos to not play on your computer. So, updating the Windows itself can help you easily resolve the issue by upgrading old firmware and drivers.
- Driver Outdated: An outdated driver means that the computer's graphic card is not up to date to run advanced video formats. Only updated graphic drivers can properly play such videos.
- Hardware Issues: Using older computers or devices with limited hardware capabilities might cause the “videos not playing” issue to occur. Besides, the hardware would be unable to process the 4K or high-resolution videos properly.
- Unsupported File Format/Codec: Sometimes, the videos are encoded in specific formats that are not playable on your computer. Therefore, due to the lack of the required codec for the video, it won’t play on your computer.
- Corrupted Video File: Another reason why you face the “video won’t play” issue is due to partial downloads. These can corrupt the video during transfer, thus damaging them in the process.
Part 2.Tested and Efficient Fixes for Videos Not Playing
Now that we understand the core of why people experience the “videos not playing” issue on their computers. Let’s look at the top fixes that can help you resolve this matter in seconds.
Fix 1. Use a Powerful Video Repair Tool to Fix Damaged or Corrupted Videos
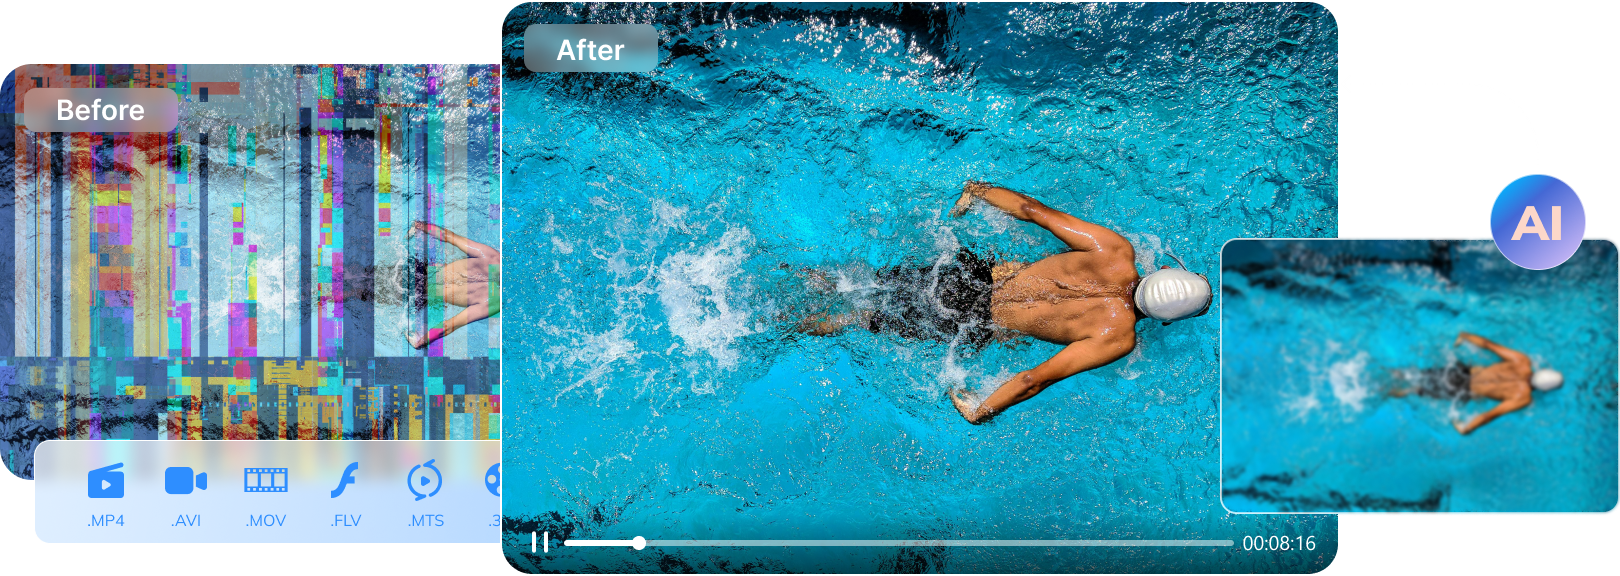
With various repair tools available, finding the right and effective tool to fix your “won’t play videos” problem can be a challenge. Therefore, we introduce you to Repairit, an AI-powered data repair expert. This software deals with any type of video-playing issue and rescues the corrupted files within seconds. Moreover, with its supported GoPro gyroscope data repair system, users can easily repair any damaged or corrupted files.
Besides, this tool supports various video repair scenarios and can securely fix your video in three simple steps. Repairit Video Repair also has the power to mend HD, 4K, and 8K videos captured by any camera and mobile device. With its remarkable success rate compared to its competition and robust repair technology, you can expect exceptional results.
Key Features:

-
Supported Video Formats: Repairit supports all kinds of video formats, like MOV, MP4, M2TS, and more, and can even repair severely corrupted ones.
-
Sample Polling Algorithm: This tool has a massive sample library of video repair scenarios, which helps it identify the root problem of videos.
-
Batch Video Repair: You can quickly repair multiple videos at once with this software, regardless of the video format.
-
Preview Videos: Once you’re done repairing the video, you can preview the fixed videos to verify the visual and playback quality.
-
Repairit has a quick and advanced scanning mode. You can use either depending on the level of corruption the video file has undergone.
-
No limit to the number and size of the repairable videos.
-
Support Windows 11/10/8/7/Vista, Windows Server 2003/2008/2012/2016/2019/2022, and macOS 10.12~macOS 13.
Comprehensive Steps on How to Fix Damaged or Corrupted Videos via Repairit:
After learning how expertly Repairit handles corrupted videos, let’s dive into the following steps to resolve the “cannot play video” problem.
Step 1. Install and Import the Corrupted Video File
Open the “Video Repair” tab from the left panel and hit the “+Add” button to open the dialog box.

Step 2. Initiate the Video Repair Process
Once the damaged or corrupted video is loaded, press “Repair” to initiate the repair process.

Step 3. Preview and Save the Newly Restored Video File
From the box, click the “Preview” button to access the restored video window. Once satisfied with the restoration process, hit the “Save” button to download the file onto your computer.

Repair Corrupted Videos
 Security Verified. Over 7,302,189 people have downloaded it.
Fix 2. Update the Display Driver
We learned that you could face the “videos not playing” issue due to outdated drivers, which disrupts your workflow. Therefore, updating the drivers can ensure that your graphics hardware can easily handle the video playback standards. Follow the given steps to learn how you can update the display drivers and fix any bugs or issues it's facing:
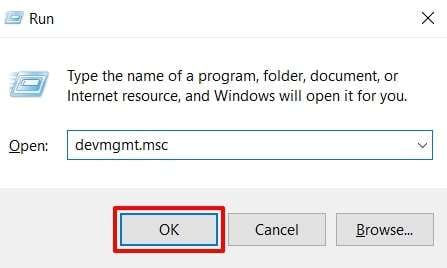
Step 1. Access the “Run” dialog box upon pressing the “Win + R” keys on your keyboard. Once it opens, type in “devmgmt.msc” and hit “OK” to access the device manager.
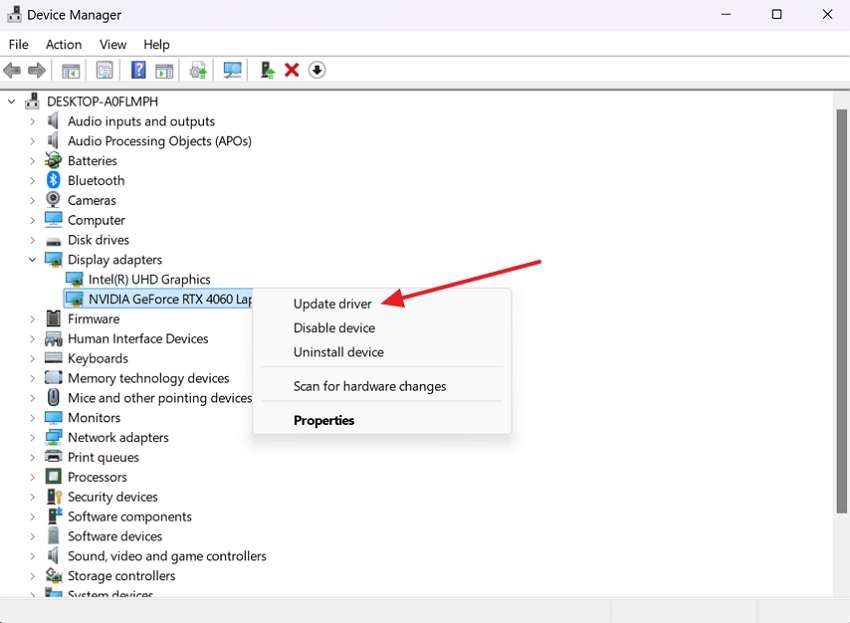
Step 2. On the “Device Manager” window, expand the “Display adapters” option and right-click on the desired driver. Now, click the “Update Driver” option and choose any of the two available options in the “How Do You Want to Search for Drivers” window.
Fix 3. Uninstall and Re-install the Display Adapter
Sometimes, the main issue is the display adapter itself, which prevents the video from playing on your computer. Reinstalling it can remove any potential faulty files and refresh the adapter. So, let's dive into the given steps and learn how to uninstall and re-install the display adapter:
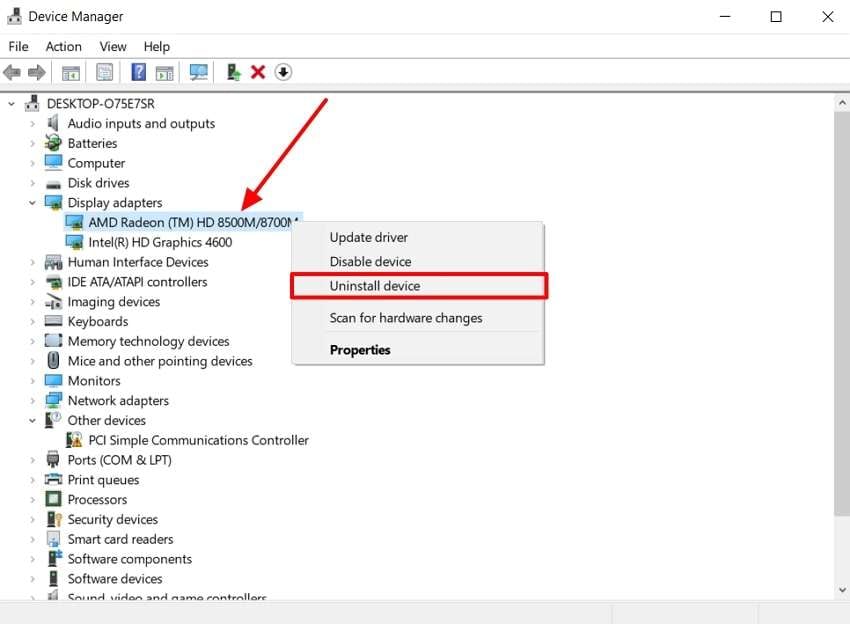
Step 1. Type “Device Manager” in the search bar at the bottom taskbar of the window. When it opens, expand the “Display Adapters” option and hit the “Uninstall Device” option from the required drivers drop-down menu.
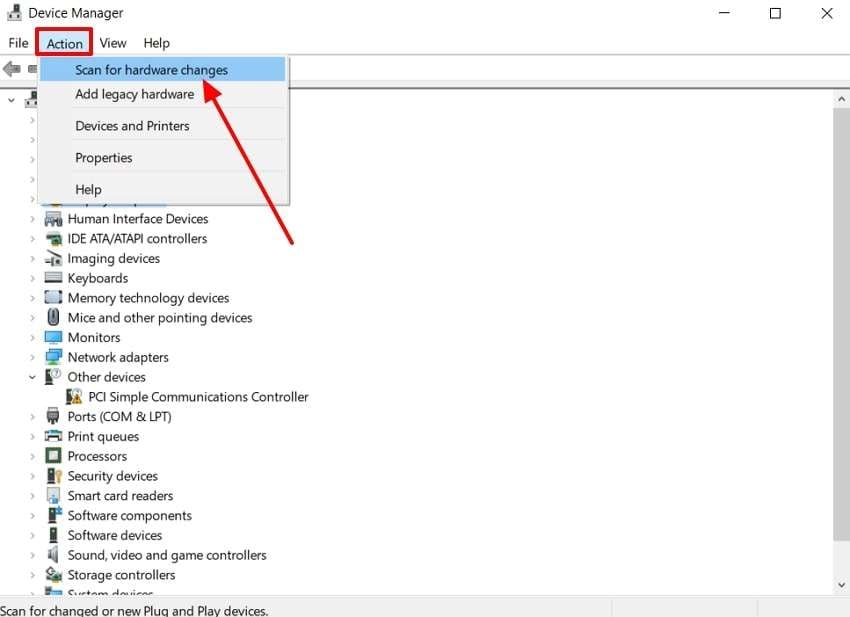
Step 2. When the device is uninstalled, head to the top toolbar and open the “Action” option. In the drop-down menu, press the “Scan for Hardware Changes” option and install the device adapter.
Fix 4. Convert Your Video Format
Often, you face the “video won’t play” issue when the video format isn't compatible with the current player you're using. That is why we present UniConverter, which supports over 1000 video formats for conversion. Users can also convert HDR and 8K videos into any format without losing quality. To do so, they can mimic the simple instructions given ahead:
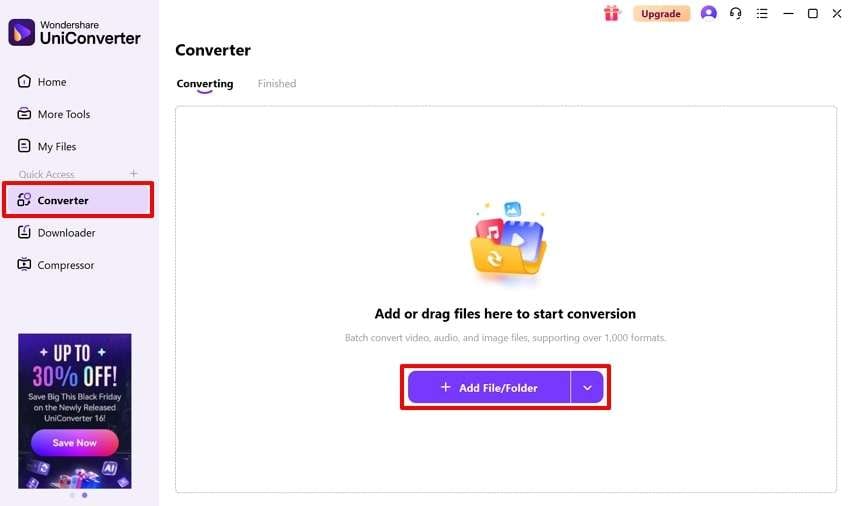
Step 1. Launch this video converter on your computer and open the “Converter” tab from the left panel. Now, click the “Add File/Folder” button and import the desired video file.
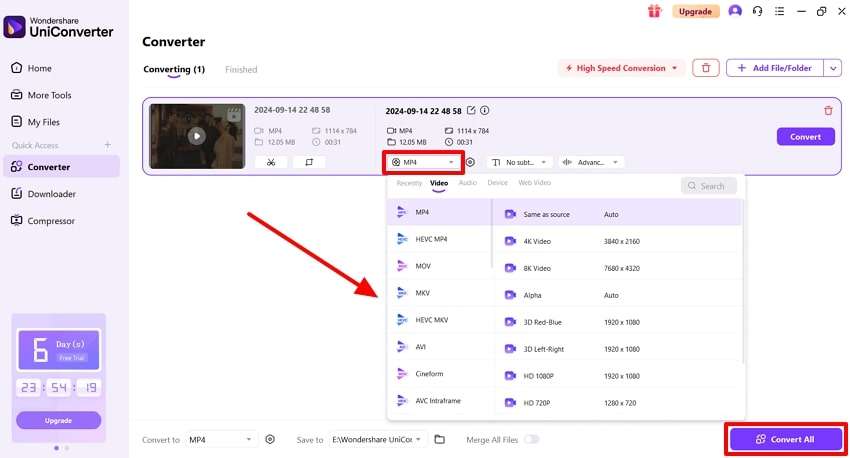
Step 2. After that, press the video format box in the imported video file and open “Video” formats. From here, make one video format selection and hit the “Convert All” button to start the conversation.
Fix 5. Change/Update the Video Player
After trying the above solutions, if you're unable to fix the “won’t play videos” problem, switching to another latest video player can help. You can try updating the video player or changing it entirely by going to the “App” settings in the “Settings” app.
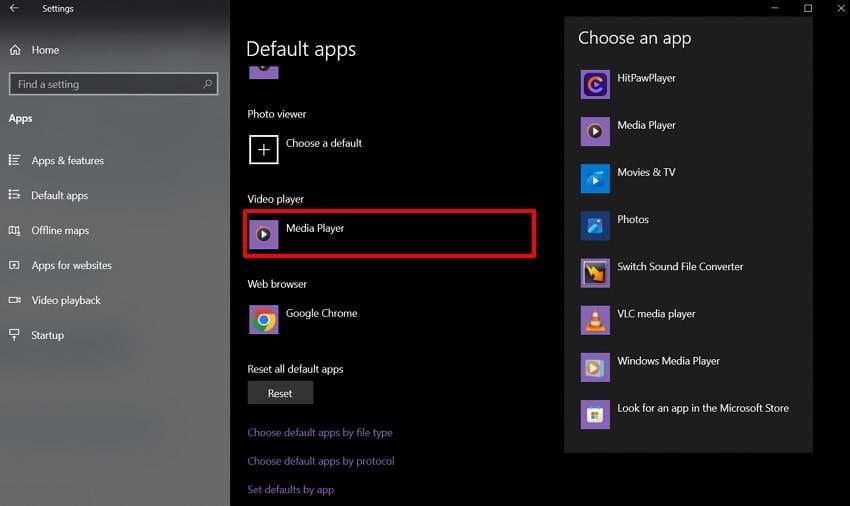
By doing so, you get to change the default video player in an attempt to solve this frustrating problem. Moreover, while changing the player, ensure it is compatible with the video standards.
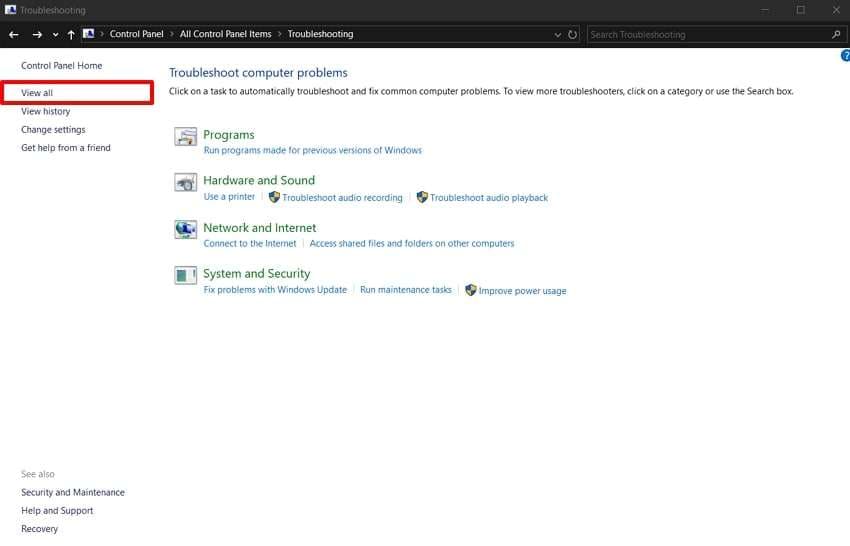
Fix 6. Run the Video Playback Troubleshooter
Windows offers a built-in video player troubleshooter designed to resolve any “cannot play video” issue you're having. Furthermore, it thoroughly scans for problems, like the codec, hardware issues, and more. We've provided steps below that will guide you on how to perform video playback troubleshooting:
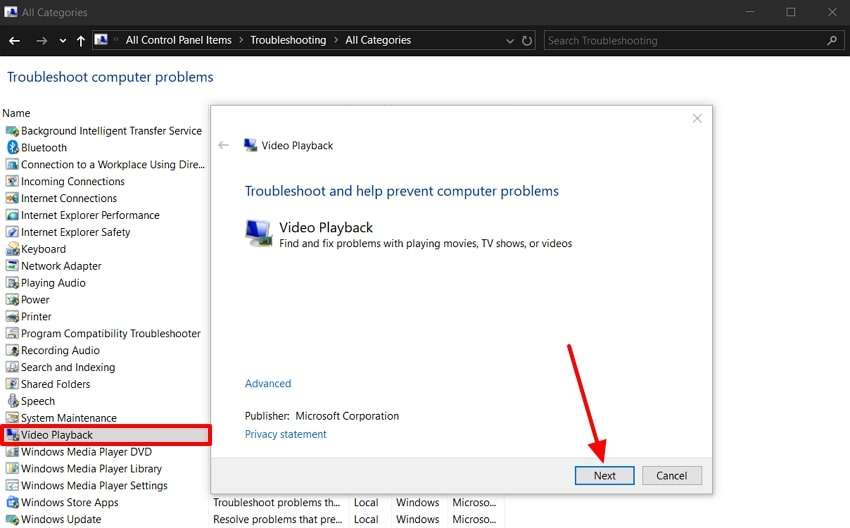
Step 1. To access this option, head to your computer's “Control Panel” window. Next, click the “Troubleshooting” option and choose the “View All” option on the next screen from the left side.
Step 2. Upon doing so, press the “Video Player” option in the “Troubleshoot Computer Problems” window. This will lead to a dialog box where you need to hit the “Next” button to run the video playback troubleshooting.
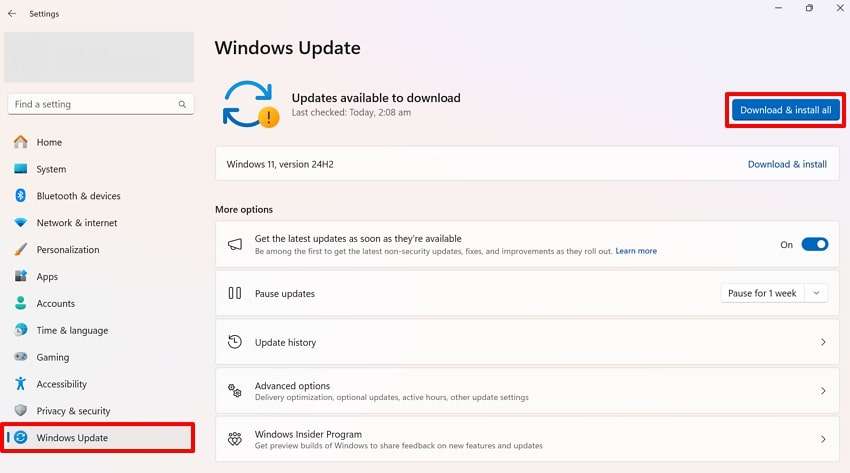
Fix 7. Update the Windows Firmware
Finally, after trying everything, if the issue still has not been resolved, try updating Windows itself. It will resolve any bugs or malware hindering the video playback and enhance the overall video-playing experience for users. Now, follow the given instructional guide on how to update the Windows firmware in Windows 11.
Instructions: Go to the Windows “Settings” application and open the “Windows Update” tab from the left-side panel. Now, click the “Download & Install All” button if available to start updating the Windows.
Conclusion
We checked in on some of the most common causes for the “videos not playing” issue, including outdated players, incompatible formats, and more. Therefore, to address the issue, we explored the top effective solutions that helped cope with different parts of the problem. However, if you want the most effective video repair tool, Repairit is the ideal solution for you as an all-in-one video repair tool.
FAQ
-
Q1. What if the video file is only partially damaged?
Our software can often repair partial damage, allowing you to play the undamaged portions of the video while it works on fixing the rest. In some cases, it may be able to fully restore the video. -
Q2. Is there a risk of losing data when using the repair software?
We take data integrity very seriously. The software is designed with a safe, read-only scanning process and a separate repair process to minimize the risk of further data loss. -
Q3. Can the software repair videos that won't play on any platform?
Yes, our software is designed to fix video files that are unplayable across various platforms and devices. Whether you're experiencing issues on your computer, mobile device, or streaming service, our software can help.
