

 TL;DR:
DiskTuna JPEG Repair is a paid Windows utility for fixing complex image corruption like shifted data or missing headers, best suited for technical users willing to manually patch bitstreams.
● Software installation requires Windows 7 64-bit or later, .NET 4.5, and a minimum of 8GB of RAM, whereas Mac users are restricted to the developer's online service which costs between $0.10 and $10 per file with a $20 minimum order.
● Utilizing the Repair (Header) mode strictly mandates providing an intact reference photo alongside the corrupted file, and the Patch mode requires manually altering byte counters to realign colors and remove grey blocks.
● Wondershare Repairit serves as the recommended alternative for users requiring an automated repair process or native macOS compatibility, as it fixes formats like PNG and CR3 without requiring manual data manipulation.
Ask AI for a summary
 ChatGPT
 Perplexity
 Gemini
 Claude
 Grok
Grok
DiskTuna JPEG Repair
Review the detailed information of DiskTuna JPEG Repair, including features, advantages, disadvantages, etc.
With the inception of cameras, the management of photos was introduced as an element. The complete procession of posting a picture follows the adoption of enhancements. To counter this, the use of different photo management tools was popularized. Photo repair kits became part of the system, which allowed users like you to avoid going through loops. While they saved time, different repair kits became known across the market.
This article is all about discussing a JPEG repair toolkit designed for repairing photos. While it does it perfectly, the DiskTuna JPEG Repair tool will be the highlight. Let's look at how you can fix your photos with this toolkit.
Part 1: Features of DiskTuna JPEG Repair
We will be starting our review with an overview of multiple aspects. It is necessary to check whether this JPEG repair toolkit is worth using or not. Let’s move ahead to find out more about the features of this toolkit:
1. Supported Formats
DiskTuna JPEG Repair toolkit provides support to a wide variety of file formats. Apart from it being a JPEG repair toolkit, it can support the following formats:
2. Supported Reasons That Causes Image Corruption
We will examine the reasons that can entangle a user across image corruption. It is an important aspect to look into for understanding the need for the repair tool. Let's consider some reasons for understanding the need for DiskTuna JPEG Repair:
· Errors in Download
If the image is downloaded across a computer, it may be incomplete or corrupt. Try selecting the right source to download in the first place. If the download remains incomplete, the image will be corrupted.
· Crash of System Processes
While working on the images, if the system faces unnecessary power outages, it will crash. This leaves the procedures midway, which corrupts the JPEG file. Unexpected shutdowns of the system are also included in this.
· Hard Drive Problems
The hard drive used across the system may get damaged for some reason. This corrupts all the data that is present across the specific sector. Since the files are not accessible in any way due to data distortion, it is corrupted.
· Virus Attacks
The virus attacks and malicious threats can be a great reason for corruption. The immediate change in the file extensions and integrity makes it difficult for the user to access. Thus, virus attacks can become a significant problem that corrupts everything that becomes part of it.
3. System Compatibility
Regarding system compatibility, you can use both Windows and online sources. Mac users cannot download this repair toolkit across their devices.
4. Supported Devices
To understand which devices support this JPEG repair toolkit full, realize two aspects. DiskTuna provides users with the option of featuring online or offline services. You must have a Windows computer if you seek to work on an offline source. It should be greater than Windows 7 64-bit with .NET 4.5, as per requirement. Along with that, it should have a minimum of 8GB in RAM size.
Considering you opt for online services, you have to send corrupt photos to the developers. The rest is done and managed by the team themselves.
5. Supported Photo Corruption Types
Every photo repair tool has boundaries and directions to opt for while repairing corrupt images. It all comes to the photo corruption types supported by the service. For DiskTuna JPEG Repair, we have outlined these types below:
· Corrupt JPEG Headers
The first of this kind is represented by the headers the image holds. If by any chance, the header is misplaced or mismanaged, the image will get corrupted. This image detail is quite important in holding the image's integrity intact. If there is any change across the JPEG marker of the image, it will show malfunctioning. It is essential to check every JPEG marker of the image header.
· Errors in JPEG Bitstream
Certain media damages cause any bit of error across the image. This bit error leads to multiple issues across the image. However, everything starts from the problems in the JPEG bitstream, which need to be assessed.
· Damaged Colors in Image
Is the color across your JPEG image not perfect? It is not always the issue with the camera that takes the image. Misalignment of data can also cause damage to colors. Thus, problems with color gradients can also be a corruption type.
· Shifting Image Data
If you had tried to shift the image data across another platform, it would have caused problems. Any forceful shift in the image data can corrupt it at any instant. You need to realize this while making changes across your image.
· Grey Block in Image
Do you find a grey space across the captured image? This can be a very prominent image corruption indication. Any unnecessary use of photo editors during touch-ups can also bring problems. Thus, you need to recognize a photo as corrupted if it shows greyed area.
· Partially Loading Images
Is the image continually loading but not showing results? This directs to the case where the image is corrupted and there is some incomplete data. The incompletion keeps it in the buffering state, which shows it to be corrupted.
6. Free or Paid
This photo repair tool is not free. It is available on trial; however, you must pay for its complete services. DiskTuna JPEG Repair offers multiple services, which come along with its packages. Next, we have outlined some packages for you to streamline your decision:

|
Package |
Deliverables |
|
JPEG-Repair Toolkit, Recover, and Repair ($29.95) |
Repairs corrupt and damaged JPEG files and fixes corrupt headers. |
|
JPEG-Repair, Utility to Repair Corrupt Photos ($19.95) |
Repairs corrupt and damaged JPEG files and fixes corrupt headers. |
|
JPEGDIGGER, Utility to Recover Corrupt Photos ($19.95) |
Takes inputs of different professional camera images. |
7. Repair Modes of DiskTuna JPEG Repair
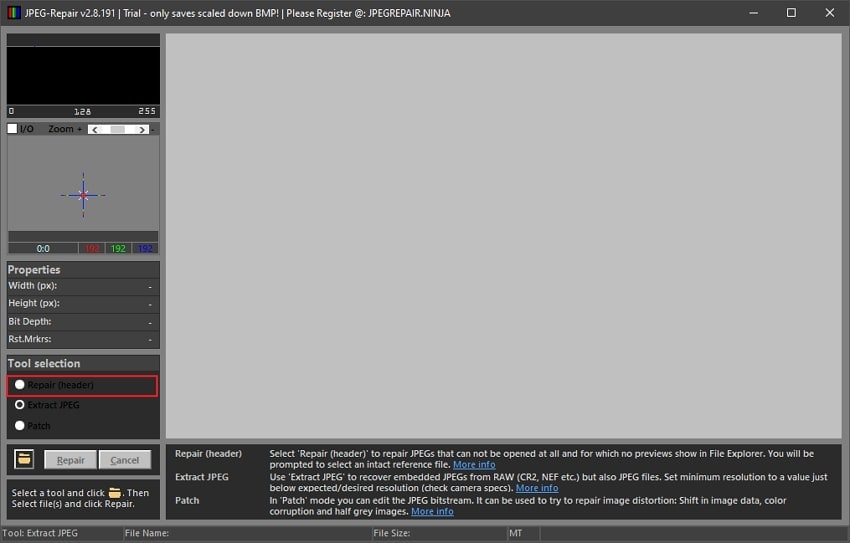
Multiple modes can be accessed across DiskTuna JPEG Repair. While working across the tool, you will find these modes serving different purposes. Let’s look into the repair modes to understand more about this repair toolkit:
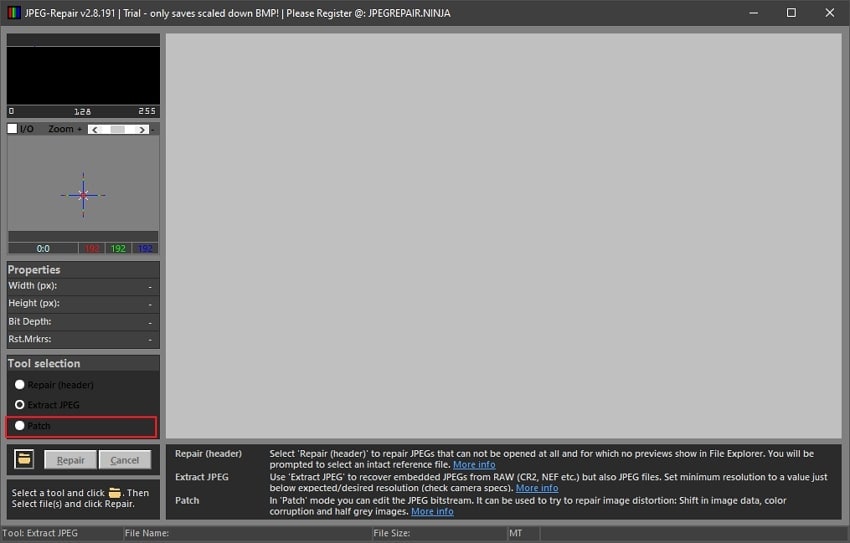
· Repair (Header)
If your file does not open or has no previews, this mode is designed for them. For this, input a reference file alongside the corrupted photo. This mode also supports batch processing of corrupt images.
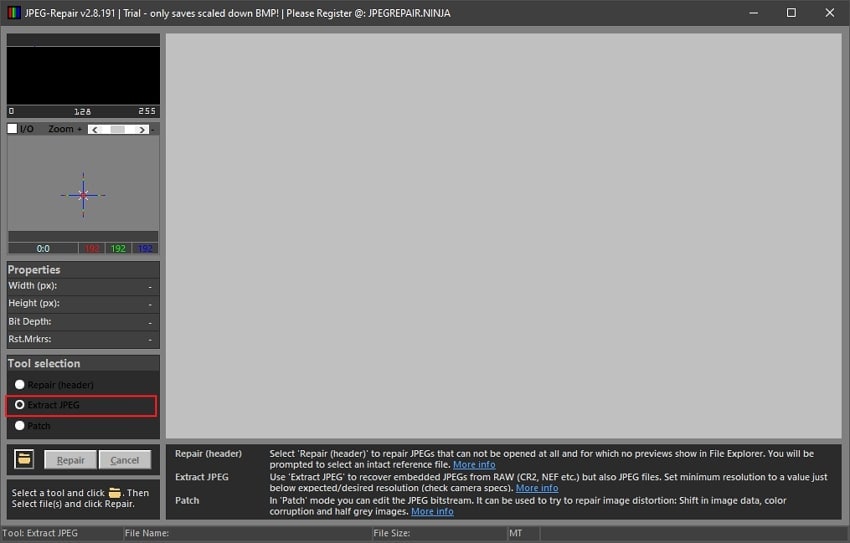
· Extract JPEG
The RAW and JPEG files are inserted across the tool to recover embedded JPEGs. You must set a resolution limit and the desired resolution across the camera specs. It also contains an error log window during the process.
· Patch
This repair mode provides you the option of editing the JPEG bitstream. It covers the major corruption types, such as image data shifting. You can also repair half-grey images with the help of this repair mode.
Part 2: System Requirements
Processor: No specific CPU requirement for operating the platform.
Operating System: It should be Windows 7 (64-bit) or later with .NET 4.5.
Hard Disk Space: 1MB of Space
RAM: 8GB Minimum
Developer: Joep van Steen
Part 3: Setup Details
Setup File Name: JRT28191
Setup Size: 1MB
Setup Type: .zip
Part 4: Advantages & Disadvantages of DiskTuna JPEG Repair
We shall now look into the advantages and disadvantages of considering this toolkit. Let’s see how the JPEG repair toolkit helps out users. For maximum operability, you need to be aware of these points:
Pros
Features a professional digital photo repairing system for users.
It helps recover damaged data from devices across its toolkit.
The results provided are quick and efficient.
It is easy to follow through the procedure of repairing photos across it.
Cons
The user interface is outdated and does not match its competitors.
User has to pay for the online services, with the range between $0.10-$10 per file.
The minimum order for the JPEG repair toolkit online feature needs to be $20.
Does not provide a Mac-supported toolkit.
Part 5: How to Use DiskTuna JPEG Repair?
Let's see how you can use the DiskTuna JPEG Repair in the proper ways. The steps for each mode have been mentioned ahead for the ease of the user:
Way 1: Repair (Header)
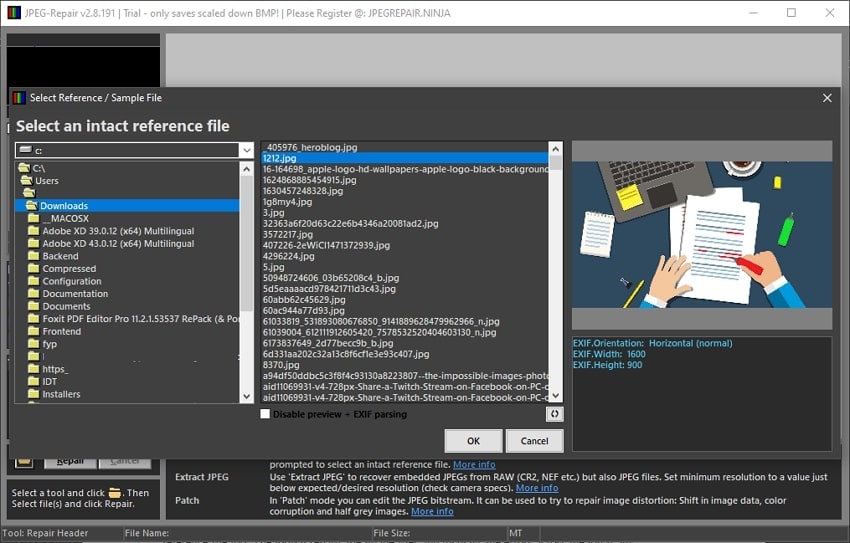
Step 1: You need to select a repair mode out of the available options.
Select “Repair (header)” from the options.
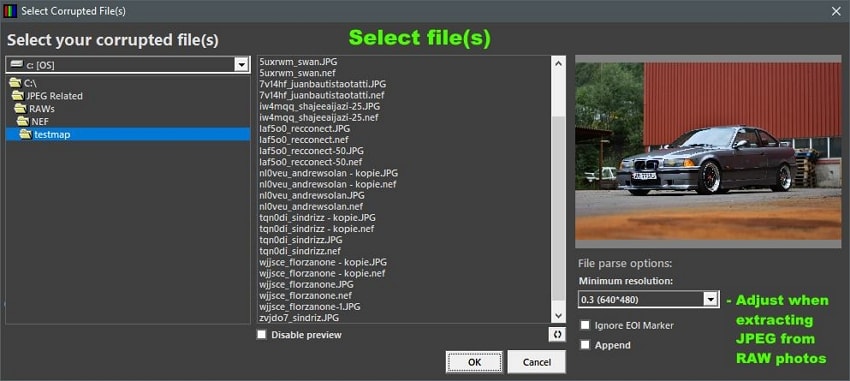
Step 2: Next, click on the “Folder” icon to select the corrupted images.
The screen prompts to add the reference file too. The toolkit repairs the image files and displays the errors across the log, if any.
Way 2: Extract JPEG
Step 1: Launch the platform and select "Extract JPEG" from the available options.
Step 2: Select the "Folder" icon to add the images from which you want to extract and also set the minimum resolution.
Next, click on "Repair" to start. The tool repairs the files for you and displays any error across the log.
Way 3: Patch
Step 1: Open the repair toolkit and click on “Patch.”
Select the folder icon and browse the image that needs repair.
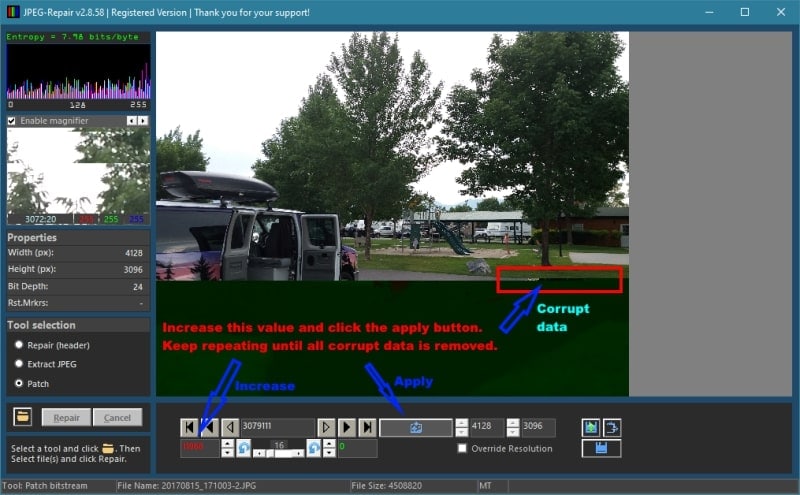
Step 2: Find the location of the image where it starts to corrupt.
Double-click it and use a magnifier to look closely. Increase or decrease the byte counter to observe the effect.

Step 3: This would essentially change the red value across the toolbar.
To check results, you have to click on ‘Apply” every time. Once it is set, then look across the green value and change it accordingly. As the image gets placed correctly during the change, it is repaired.
Part 6: Cannot Work With DiskTuna JPEG Repair? Try Wondershare Repairit!
Are you confused while working with DiskTuna JPEG Repair? If you wish to increase your operability boundaries, you need to look for other tools. Finding a JPEG repair toolkit free leads you to Wondershare Repairit. This platform is designed to provide users with effective results of image repair.
It does not require users to work across the tool. With an automatic system, its dual-repair mode is another impressive highlight. You should consider looking into this repair toolkit for effective utility.
The main features of Wondershare Repairit:

-
Repair damaged photos with all levels of corruption, such as grainy photos, dark photos, pixelated photos, faded photos, etc.
-
Repair images of diverse formats, such as JPG, JPEG, PNG, CR3, CR2, NEF, NRW, etc.
-
Repair critically damaged or corrupted photos available on SD cards, phones, cameras, USB flash drives, and more.
-
Compatible with Windows PC, Mac OS, and supports PC to mobile transferring/sharing.
Step 1: Import Corrupted Image Files.
Start Wondershare Repairit on your computer and lead to “Photo Repair” from the left. From there, click “Add” to import corrupt images.

Step 2: Begin the Repairing Process.
As you import the images successfully, click on “Repair” to start the process.

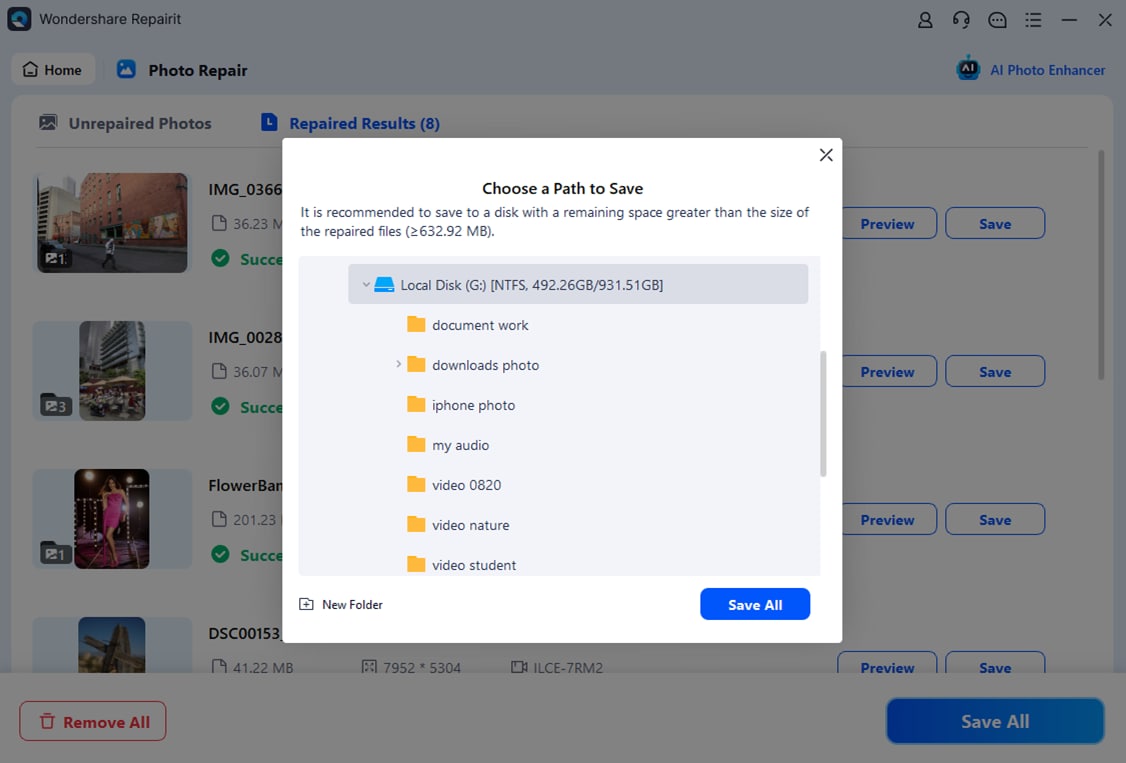
Step 3: Preview and Export Fixed Images.
Once the images are repaired, you can preview them in the next window. Find the "Save" or "Save All" button to save the repaired images across the computer.
Conclusion
This article has provided a clear overview of the DiskTuna JPEG Repair. You will know about all its features with an overview of the image repair toolkit.
The in-depth overview will also help you decide on the best thing for you in your condition. Therefore, review the whole article to determine the best application for your corrupt JPEG images.