

Users sometimes experience random restarts when working on important projects on their PC. The “computer is restarting randomly" issue can result from a variety of causes, starting from overheating to hardware issues. When this issue is left unsolved, it not only interrupts productivity but may also lead to data loss or further hardware damage.
Although various practical and accessible solutions exist, it can be challenging to determine which to pick. This article will guide you through the best solutions, covering everything from basic troubleshooting to more advanced techniques.
In this article
Part 1. What is Computer is Restarting Randomly Without Any Error Message Problem
It's essential to understand the possible reasons behind automatic PC shutdowns before learning how to overcome this issue. By identifying the main cause, you can apply targeted solutions to restore your system’s stability. This section will explore the common reasons why a computer restarts randomly without any notification.
- Overheating: Excessive heat from clogged vents, broken fans, or inadequate cooling forces the system to restart. This happens to protect components like the CPU or GPU from permanent damage. Thus, maintaining proper airflow and regular cleaning must be done to prevent overheating issues.

- Issues in Hardware Parts: Malfunctioning hardware like RAM, storage devices, or motherboards can result in instability that triggers unexpected reboots. The “PC restarts itself” problem can arise from production errors, deterioration over time, or external damage.
- Malware or Viruses: Malicious software can manipulate system settings, overload processes, or exploit vulnerabilities. When this happens, the malware may cause issues in system functions, triggering a sudden restart issue on the PC.
- Power Supply Problems: A malfunctioning power supply unit or unstable power delivery can interrupt the electricity flow to the computer. As a result, the system might face abrupt shutdowns or reboots because the power cannot stay stable.
- Driver Conflicts: A corrupted or damaged driver can hinder the computer's ability to communicate effectively with hardware components. This may lead to multiple problems, including system instability and even restarts.
Part 2. Top 5 Fixes to Resolve Computer is Restarting Randomly Problem
Now that you are aware of the reasons for the auto PC shutdown, let's move forward with the discussion about the solutions. This section explores the top 5 fixes that can help you overcome this issue and ensure your system operates smoothly again.
Fix 1. Check the Power Connection
An unstable power connection is a frequent reason for unexpected restarts. So, you have to make sure the power cable is firmly attached to both the computer and the electrical outlet. Loose cable connections may disrupt the power supply, leading to unexpected shutdowns. Moreover, ensure that a surge protector or power strip is operating correctly when in use.
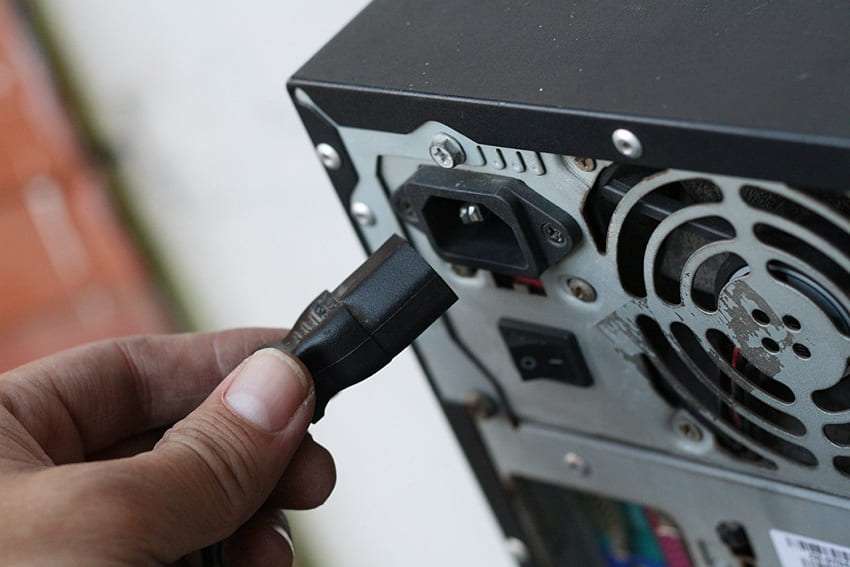
Other than that, we recommend you examine the battery connection to ensure it is installed correctly and that the charging port is functioning well while operating a laptop. For desktop computers, verify that the power supply unit is delivering consistent power. Still, if the automatic PC shutdown issue is not resolved, try a different outlet or PSU to rule out power-related issues.
Fix 2. Disable the Automatic Restart Feature
Typically, Windows does not allow an error message to pop up and instead attempts to solve the problem by restarting the entire computer. However, once the automatic rebooting feature is disabled, there will be messages visible on the screen that can help identify the problem to let it be fixed. In order to make sure the error messages can be viewed, ensure to follow the steps below:
Step 1. Start by entering the “System” setting of your computer and clicking “Advanced System Settings” within the “About” window.
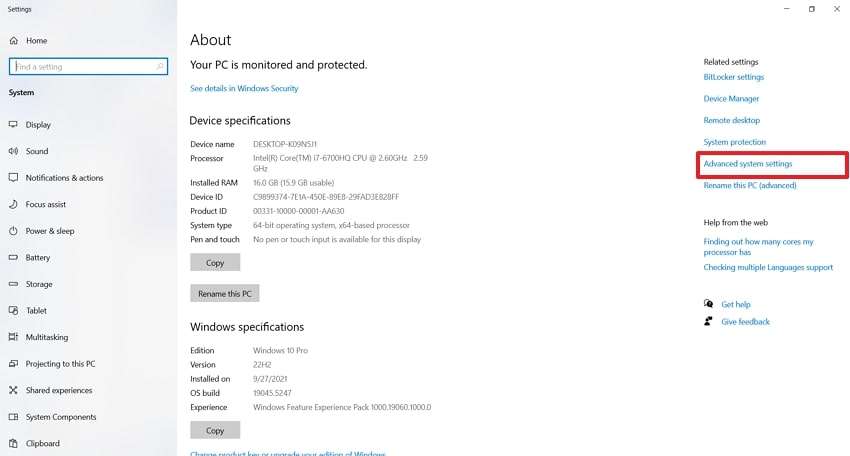
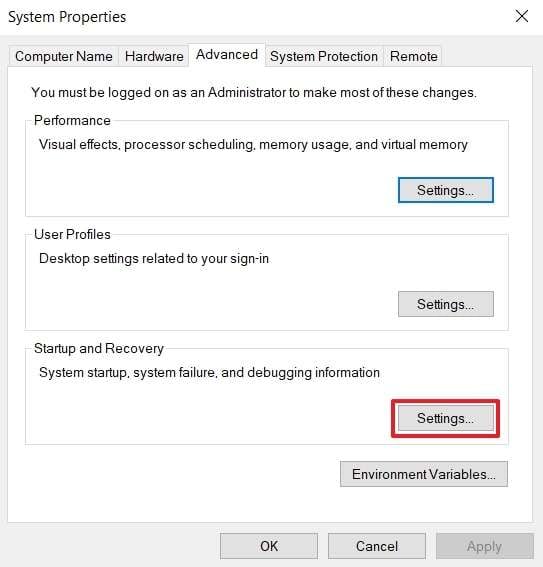
Step 2. In the Advanced System settings window, hit “Settings” under the “Startup and Recovery” section to open the related settings.
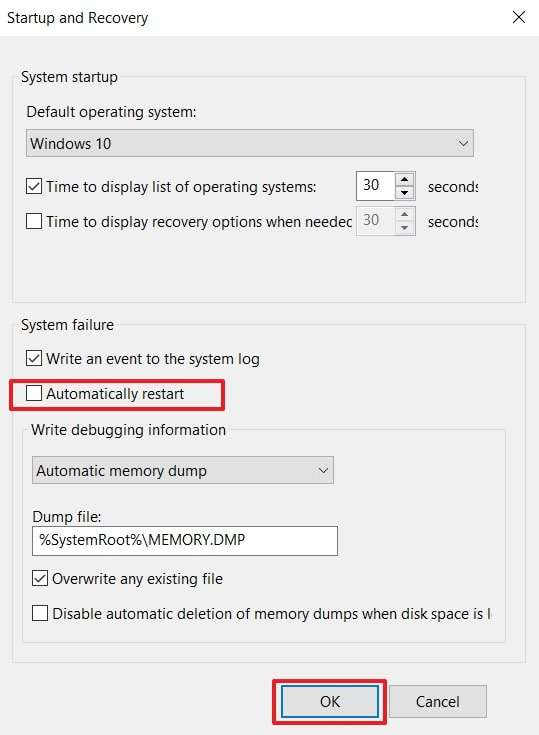
Step 3. Uncheck the box next to “Automatically Restart” under the “System Failure” section and click “OK” to disable this feature.
Fix 3. Reinstall/Update Graphics Driver
Graphic drivers are critical pieces of software that allow the computer to communicate with its display. When these drivers become old, your computer may restart randomly. You would need to update or reinstall the graphic driver to resolve this problem. We've outlined this detailed guide, where we describe how to update the graphic drivers to fix the “auto PC shutdown” error.
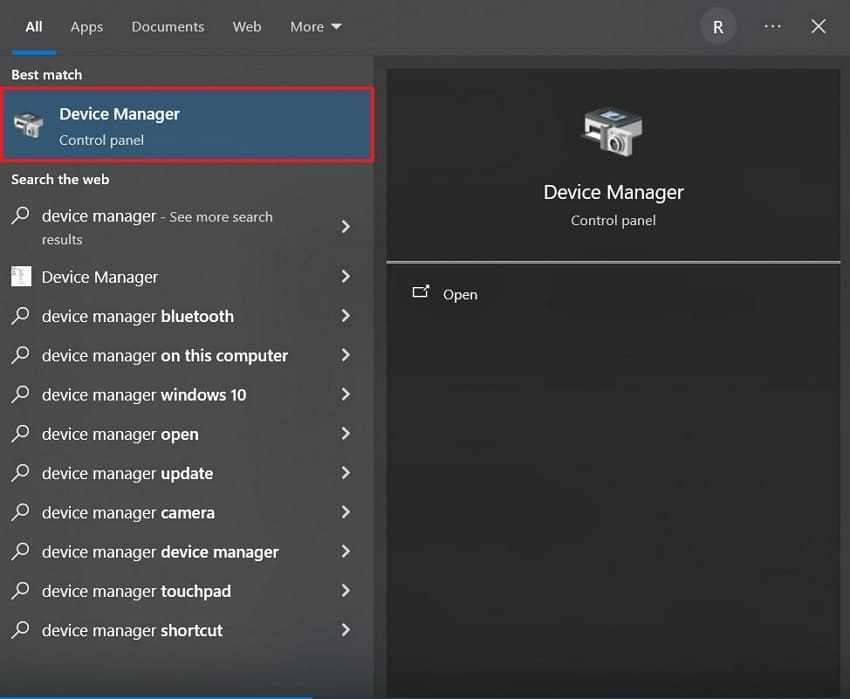
Step 1. To initiate this task, click the “Start” button on your PC, type “Device Manager” in the search bar, and select it from the search results.
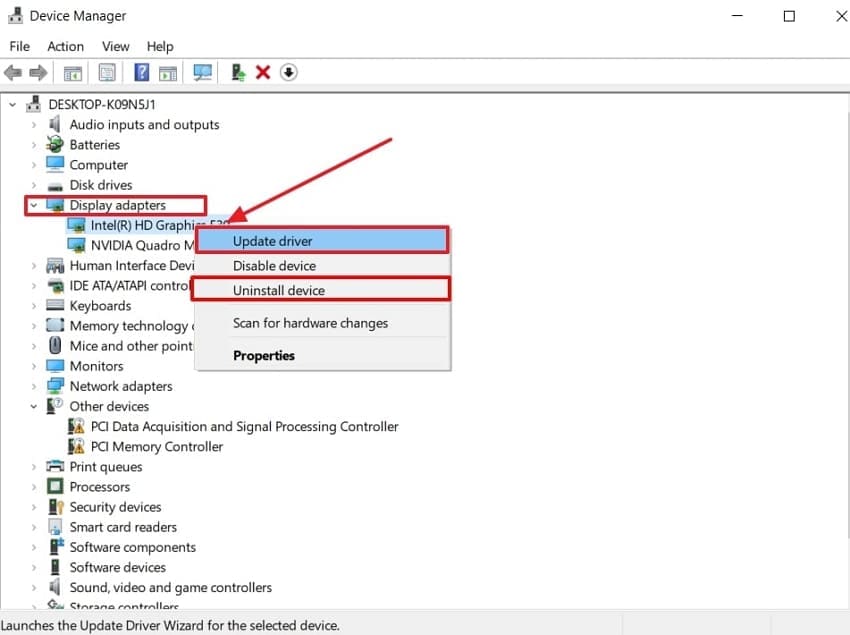
Step 2. Expand the “Display Adapters” section in the Device Manager window. After that, right-click your graphics card and choose the “Update Driver” option. From the same menu, you can choose “Uninstall Device” and restart your PC to reinstall it automatically.
Fix 4. Check RAM Errors
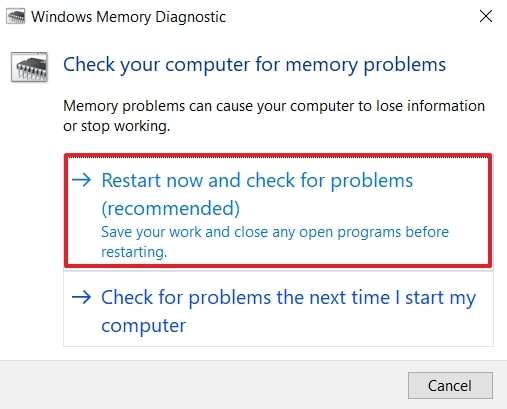
If you’re facing the “PC suddenly restarts” problem, you must check your RAM for any issues. For that, running a memory diagnostic will help identify and address any problems with your RAM. When the faulty memory is detected, it can be replaced or repaired to improve system stability. Follow the steps below to learn how to perform a memory check on your PC:
Instructions: Begin by typing “mdsched.exe” in the “Run” window and press the “Enter” key. After that, a small window will appear, giving you two options to check for memory problems. From the two options, select the first one, “Restart Now and Check for Problems.” This will prompt your system to restart and begin scanning for any RAM-related issues.
Fix 5. Check for Hardware Issues
After performing all the previous fixes, if your PC automatically restarts, check for potential hardware issues. Defected hardware components like the power supply unit, motherboard, or storage drive can be the main cause of system shutdown.
These issues are difficult to detect because they don't always show up through software troubleshooting. However, testing your hardware can help diagnose whether a component is malfunctioning and causing the issue.
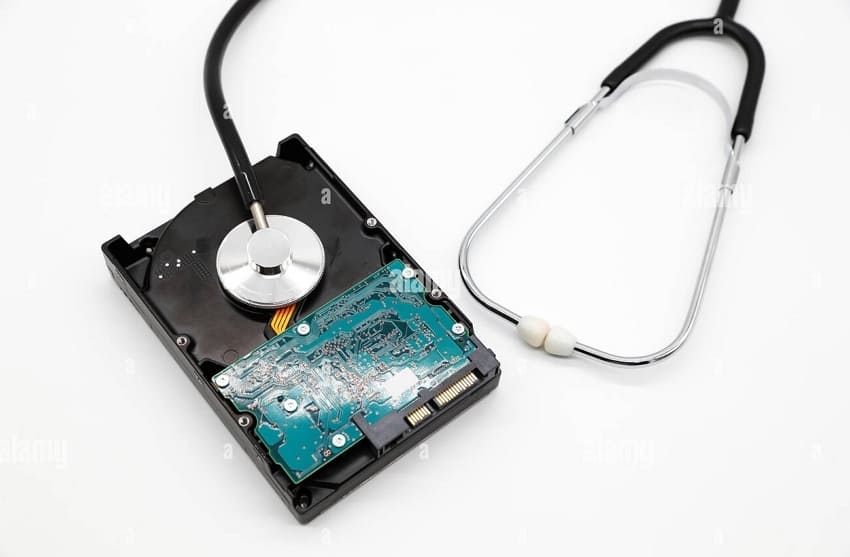
Ensure that all your internal and external connections, such as the cables running to the motherboard or the PSU, are well connected. Apart from that, a hard drive diagnostic is carried out to look for issues. If the restart issue persists, then start replacing the components one at a time until the faulty part is found.
Part 3. How to Fix Videos Corrupted Due to Auto PC Shutdowns in a Single-Click
Sometimes, while you’re working with a video, your PC suddenly restarts due to an unexpected shutdown. This abrupt interruption can corrupt the video file, making it impossible to open or play. Fortunately, advanced software like Repairit is there to help you restore your video files without the need for complex processes. This software has a high success rate in repairing videos, even those with high-level corruption.
Moreover, when repairing videos with Repairit, users face no limits on the size or number of videos. This makes it an excellent option for those who need to repair several video files or large files. With the batch processing feature, users can repair several videos in one go, saving significant time and effort. The best thing is that Repairit can fix videos from all leading camera brands, such as Canon, Nikon, and more.
Key Features

-
Repair damaged videos with all levels of corruption, such as video not playing, video no sound, out-of-sync video or audio, playback errors, header corruption, flickering video, missing video codec, etc.
-
After facing the “computer is restarting randomly” issue, you can use this tool to repair videos in up to 20 formats, including MP4, MOV, and more.
-
With Repairit, users can preview repaired videos before finalizing the saving process, ensuring the visual quality is intact throughout the playback experience.
-
It repairs HD, 4K, and 8K videos from various cameras and smartphones, maintaining the original quality throughout the process.
-
Quick repair mode fixes common video errors, while Advanced mode tackles corrupted videos using a sample file from the same device for precise restoration.
-
No limit to the number and size of the repairable videos.
-
Repaired videos are more compatible with professional editing software such as DaVinci, Composer, Final Cut Pro, and Premiere Pro.
-
Support Windows 11/10/8/7/Vista, Windows Server 2003/2008/2012/2016/2019/2022, and macOS 10.12~macOS 15.
Simplified Tutorial to Use Repairit Video Repair for Fixing Corrupted Videos
After having a detailed overview of Repairit video repair features, let's now walk through the stepwise guide on how to repair corrupted videos due to auto PC shutdown.
Step 1. Click the “+ Add” button or drag and drop videos to the import area and enter the repair interface.

Step 2. You can review the information and then tap the “Repair” button to start the video repair process.

Step 3. Click “Preview” in the notification dialog box to view the repaired videos. If the repaired videos meet your expectations, hit the “Save” button to store them in your desired location.

Repair Corrupted Video Files
 Security Verified. Over 7,302,189 people have downloaded it.
Conclusion
To wrap up, users often experience the “PC suddenly restarts" issue when working, which can lead to issues, including video file corruption. This article explored the common reasons for the sudden PC shutdown and provided details of the fixes. Still, if a shutdown occurs and your video file gets corrupted, you can use Repairit to restore it and recover your precious data with a single click.
FAQ
-
Q1. How can I check if overheating is the reason behind the automatic computer restart?
To check this issue, check both CPU and GPU temperatures using software like HWMonitor. When the temperature exceeds safe limits, clean dust and check Event Viewer logs for thermal errors. -
Q2. What can be the consequences of random system shutdown?
When the PC restarts itself, it may interrupt ongoing tasks, leading to issues like data loss, unsaved work, and video files corruption. To repair these files specialized tools like Repairit can help restore videos by fixing damaged or incomplete files. -
Q3. Does restarting the computer close all running programs?
Restarting a computer closes all running programs and processes, including active applications, services, and background tasks. Any unsaved data will be lost unless saved before initiating the restart process, which is crucial to prevent data loss.
