
VLC Media Player is more than just a video player as it offers features to fix damaged video files. Many users experience playback issues like stuttering and freezing when trying to play a video. In this case, instead of searching for complex solutions, one can explore VLC’s quick and free repair video features.
However, the platform may not always provide a perfect fit, especially for severely corrupted files. In such cases, you need more advanced repair tools that offer better results and support for various file formats. Hence, this guide will help you explore the ways to repair video in VLC and introduce you to a more advanced tool.
In this article
Part 1. How to Utilize VLC Fix Video Features to Repair Your Videos?
As said above, when your video is not playing correctly, VLC can help restore smooth playback. The VLC fix video functions allow you to repair minor corruption, convert files, and even fix broken AVI videos. For only AVI files, it includes an automatic repair tool that detects and fixes errors during playback. Thus, the following section provides you with the two best ways to fix your videos seamlessly.
Method 1. Convert a Corrupted Video to Fix It
To start, converting the video is the easiest way to fix playback issues using VLC. It allows you to select a new video format, adjust encoding settings, and save the repaired file. Plus, the media player ensures your damaged videos are playable without needing complex steps.
However, altering a video does not always guarantee a perfect fix. Still, let’s dive below to use VLC fix MP4 conversion to restore your videos:
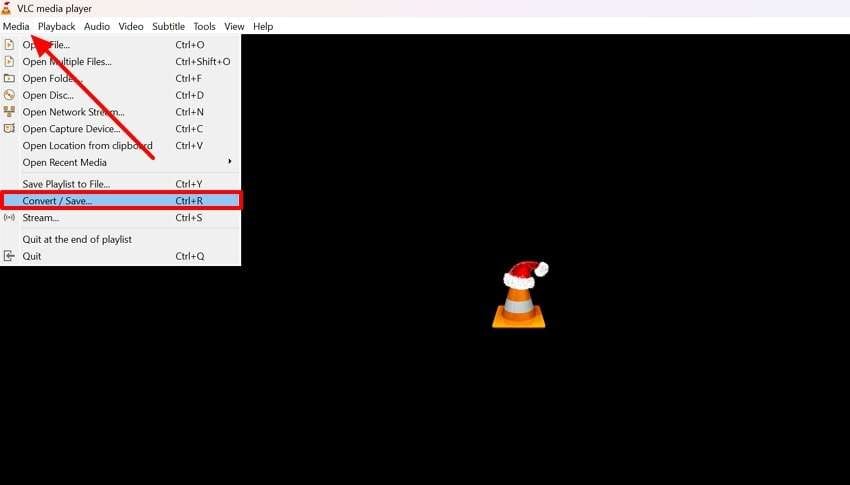
Step 1. Initiate by opening the VLC media player on your device and going to the “Media” tab from the primary interface. Then, select the "Convert/Save" option from the newly displayed menu to bring up its window.
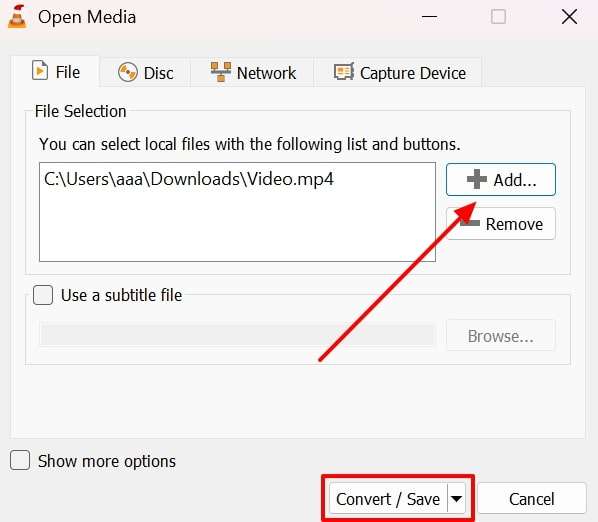
Step 2. Upon seeing the “Open Media” window, press the “+Add” button to import your video files for conversion. After adding the files, click the “Convert/Save” button to continue to the next stage.
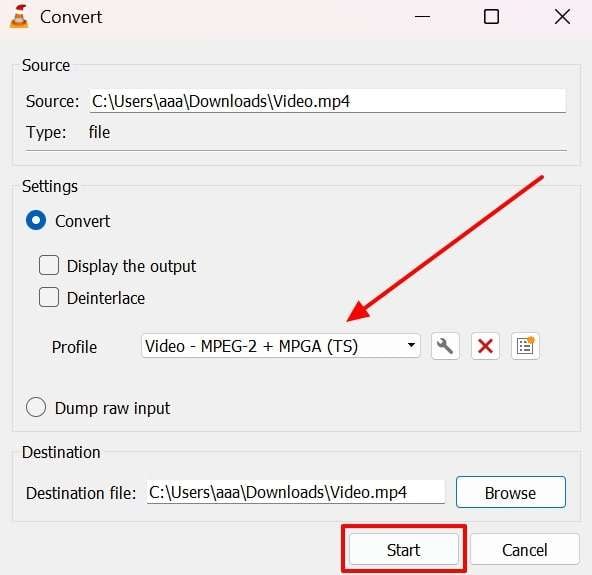
Step 3. Go ahead, navigate to the “Settings” area in the "Convert" window, and choose your preferred format from the “Profile” drop-down. Once you select the desired option, just press “Start” to begin the conversion procedure.
Method 2. Utilize the AVI Video Repair Feature
Besides changing the video format, you can use its dedicated repair features, specifically designed for AVI files. When an AVI file refuses to open or plays with glitches, this repair option can help resolve the issue.
Nevertheless, as we said, it is limited to AVI format and does not work for MP4, MKV, or other video types. So, go through the steps below to use this VLC fix corrupted video feature:
Step 1. After changing your file's extension to “.AVI” format, open the VLC media player on your desktop. Now, click the “Tool” tab and select “Preferences” from the displayed drop-down menu.
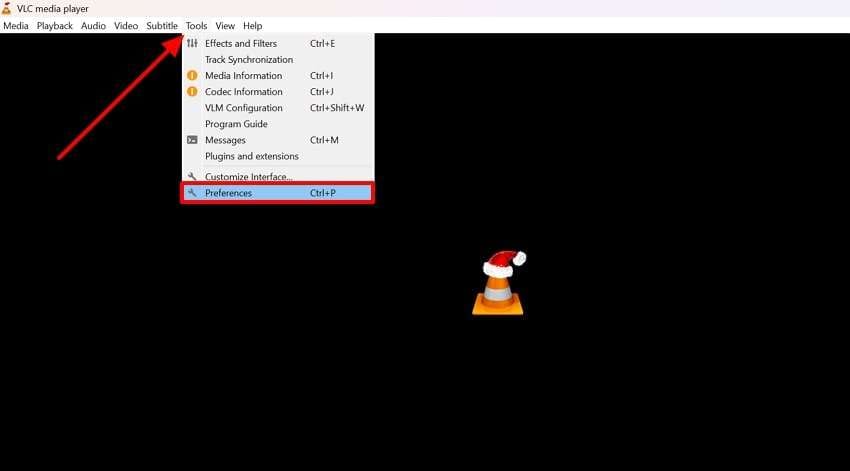
Step 2. When you access the newly appeared settings interface, navigate to the “Input/Codecs” tab to display additional options. In the “Damage or Incompatible AVI File” menu, select “Always Fix” and then click the “Save” button.

Part 2. The Most Powerful Alternative to VLC Player Repair Features
Although VLC provides 2 simple ways to fix minor video issues, they have limitations, especially when dealing with severe corruption or unsupported file formats. That’s the reason many users want an alternative tool and we recommend Repairit as it offers an advanced video repair feature without any limitations. Below, you will find a comparison table between VLC Media Player and Repairit, showcasing their capabilities.
| Feature | VLC Media Player | Repairit |
| Supported Formats | Limited (Mainly AVI) | 20+ formats (MP4, MOV, M2TS, MKV, 3GP, AVI, FLV, etc.) |
| Fixes Severe Corruption | No | Yes, with Intelligent Repair |
| Advanced Repair Mode | No | Yes, it uses sample videos for deep repair |
| Success Rate | Moderate | Highest |
| HDR/LOG Optimization | No | Yes, it supports color processing |
| AI Video Enhancement | No | Yes, it stabilizes and enhances quality |
Hence, the above-detailed table explains that Repairit is always the best choice for repairing damaged videos.
Innovative Features
- Maintain Quality: This robust video repair tool ensures that video resolution, colors, and audio remain intact after repair.
- Batch Repair: Users can repair multiple corrupted videos simultaneously, regardless of their format and errors.
- Gyroscope Data Repair: This feature restores gyroscope metadata in GoPro and DJI videos, which makes it perfect for action camera users.

-
Repair damaged videos with all levels of corruption, such as video not playing, video no sound, out-of-sync video or audio, playback errors, header corruption, flickering video, missing video codec, etc.
-
Repair full HD, 4K, and 8K videos and support 20+ popular formats, including MOV, MP4, M2TS, MDT, RSV, WMV, MPEG, DAT, etc.
-
Repair damaged or corrupted videos caused by video compression, system crashes, video format changes, etc.
-
Repair critically damaged or corrupted RAW/LOG/HDR videos from professional cameras such as Blackmagic Design, RED Digital, ARRI, etc.
-
Repairit has a quick and advanced scanning mode. You can use either depending on the level of corruption the video file has undergone.
-
No limit to the number and size of the repairable videos.
-
Repaired videos are more compatible with professional editing software such as DaVinci, Composer, Final Cut Pro, and Premiere Pro.
-
Support Windows 11/10/8/7/Vista, Windows Server 2003/2008/2012/2016/2019/2022, and macOS 10.12~macOS 15.
Simplified Tutorial to Use Repairit to Fix Corrupted Videos
Apart from the above methods, where we repair video in VLC, Repairit is the best tool to restore even severely damaged videos. Hence, without wasting any time, follow the detailed steps below to explain how to repair videos using this software:
Step 1. Access Repairit Interface to Fix Videos

Step 2. Click the “Repair” button located at the bottom right to repair all your damaged videos.

Step 3. Preview or Save the Repaired Video Files

Repair Corrupted Video Files
 Security Verified. Over 7,302,189 people have downloaded it.
Conclusion
To wrap up, fixing damaged videos is important to recover precious memories and important footage. For this need, VLC offers basic repair options, mainly for AVI files. However, its success rate is limited, and it may not restore severely damaged videos. Many users still face playback issues even after using VLC’s repair feature.
While the VLC player repair video tool works for minor issues, Repairit is the superior choice for serious video restoration. It supports over 20 formats and ensures compatibility with most devices. So, you must download and try Repairit today to fix corrupted videos with ease and efficiency.
FAQ
-
Q1. Why is my video still unplayable after using VLC?
This media player tool works mainly on AVI files and provides basic fixes. If your video remains unplayable, the corruption may be too severe for VLC to handle. In such cases, you need a professional tool like Repairit, which repairs videos having any issues while preserving original quality. -
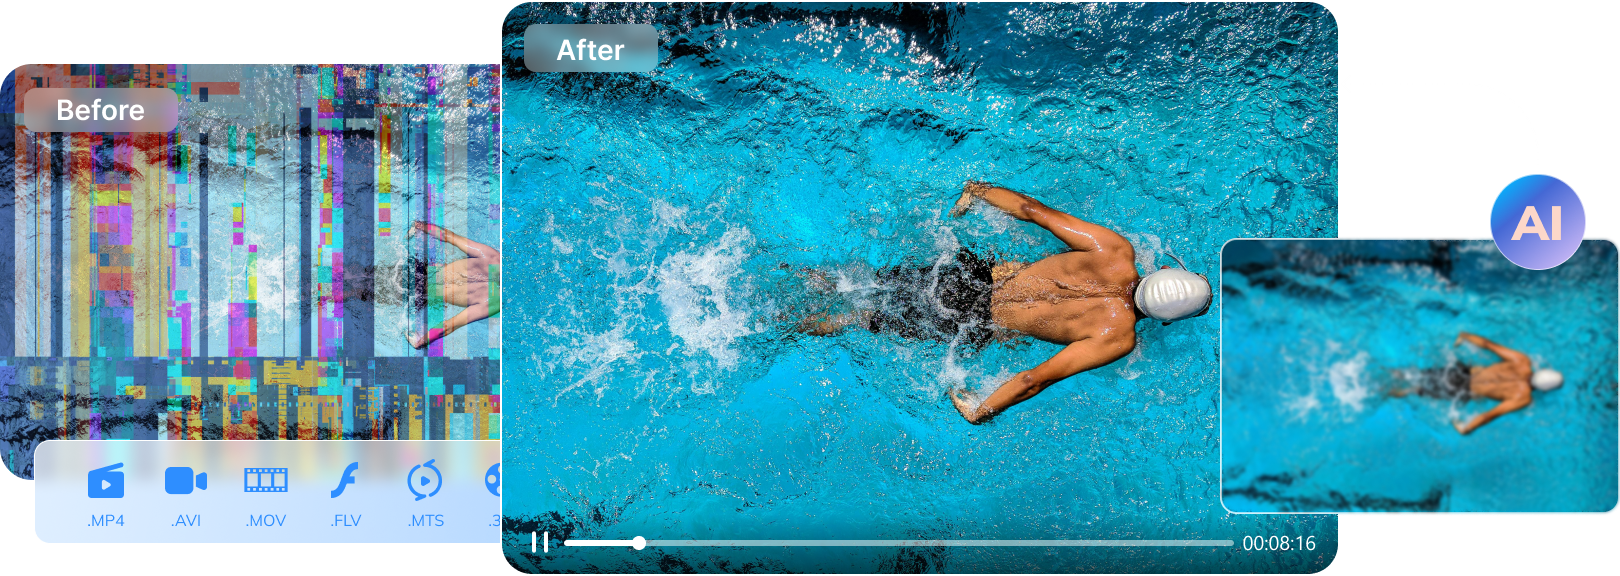
Q2. How does AI Video Enhancement improve video quality?
Repairit’s AI Video Enhancement improves sharpness, reduces noise, and stabilizes shaky footage. This feature enhances the clarity of damaged or low-quality videos to ensure professional-grade results. Unlike VLC, which only plays or converts videos, Repairit actively repairs and enhances them. -
Q3. Does Repairit work on all video formats?
Yes, Repairit supports a wide range of video formats, including MP4, MOV, AVI, FLV, MTS, and MKV. You can repair videos recorded on various devices, such as smartphones, DSLRs, action cameras, and drones. Plus, its advanced repair mode allows fixing even the most damaged files by using sample videos.
