Have you ever experienced the sound from your laptop speakers suddenly not working? It can happen due to multiple causes that can ruin your mood and user experience on your laptop. It may worsen with time if you don't fix this problem through effective solutions.
If your laptop speakers are not working, we will discuss simple and effective solutions in this article that are easy to follow and can be applied on Dell, HP, and ASUS laptops.
Part 1: What are Some Common Laptop Speaker Problems?
If the speakers are not working on the laptop, there can be multiple reasons, but all the laptop brands such as Dell, HP, and ASUS have the same type of sound problems. Here are some of the common sound problems that you can face on your laptop:
- The sound coming from your laptop speakers may get interrupted abnormally. Due to this, you may feel that the sound coming from the speakers is distorted.
- Some users have reported that the new Windows 10 update or upgrade to Windows 11 has impacted the sound quality of their speakers. If you are facing the same problem, you won't be able to hear the sound from your laptop properly.
- In another scenario, your system can crash or shut down automatically whenever you are trying to play a sound on your laptop.
- Some users also receive the error message "Sound not working", which indicates that there is some problem with your laptop speakers.
- Often, the headphones that are attached to the laptop work normally, but the speakers do not function well. It means that the speakers of your laptop are not properly configured.
Part 2: Why Do the Speakers on Laptop Not Working?
Have you ever wondered why your Dell speakers not working? In this part, we will highlight some of the main reasons for this issue to comprehend this laptop speakers not working error better:
1. Speakers Not Configured
If you manually disable the speakers from your computer's settings, the playback device won't recognize the speakers. Due to this, even if your speakers are functioning well, they won't be appropriately connected to your laptop.
2. Improper Sound Settings
Many users mute the volume of their laptops unknowingly. Due to this, the playing audio from the laptop speakers will not be audible. That's why it's essential to check the sound settings if laptop speakers are not working.
3. Corrupted Audio File
Audio files that you have downloaded from an unauthorized site can get corrupted due to a virus attack. So, if you are trying to play a corrupted audio file, you can get an error message like the sound system is not working.
4. Problem in Audio Drivers
Audio drivers are essential to play the audio files on your laptop smoothly. However, if your audio drivers are corrupted or outdated, you should install the latest and most functional audio drivers to resolve this problem.
5. Outdated OS
If your operating system is not upgraded to the latest version, there is a high chance that you will encounter the HP laptop speakers not working error. Due to this, your laptop's speaker may not function as well.
Part 3: Troubleshoot Laptop Not Working on Dell, HP, Lenovo, and Asus
To fix issues like speakers not working on the laptop, here are the simple and effective troubleshooting methods that you can apply easily. You can learn about practical solutions and detailed steps through this part.
Fix 1: Restart your Laptop
It may be possible that your laptop is encountering a temporary glitch due to which the sound is not audible from your speakers. To resolve the Lenovo speakers not working, it's better to restart your laptop to fix any unidentified glitches.
Step 1: Tap on the "Windows" button available on the bottom left side of your laptop.

Step 2: Now click on the "Power" button to display multiple options.
From there, tap on the "Restart" button. By doing so, your laptop will restart instantly.

Fix 2: Set Speaker as Default Device
Sometimes, users change the default sound settings of the laptop accidentally. Adjust the settings accordingly if you have not selected speakers as your default device. For that, follow these steps to get rid of ASUS speakers not working:
Step 1: Navigate to the "Start" menu.
And click on the "Gear" icon to open the "Settings."

Step 2: Once the "Settings" window opens, click on the "System" from the displayed options.
Now tap on "Sound" from the left sidebar to proceed.

Step 3: Go to the "Output" section on the sound window.
From the drop-down menu of "Choose your output device," select the speakers you want to use.

Fix 3: Try Using Headphones
If your laptop speakers are not working properly, try connecting your laptop with your headphones or hands-free. If the sound is audible from your headphones, it means that there is some hardware issue with your speakers. For this, you can contact the help center of HP, Dell, or ASUS, depending upon your laptop's model to repair the hardware issue properly.

Fix 4: Check your Speaker Connections
If you have connected external speakers to your laptop, make sure to check its connection to identify the reason behind the speaker not working on the HP laptop problem. Make sure to connect the jack of the speakers with a suitable port.
Moreover, check whether the wires connecting the speakers and laptop are damaged. If the LED light turns on while connecting the speakers with the power source, the connection has been established well. If not, there may be a problem with your speakers' wire or your power source.
Fix 5: Run Audio Troubleshooter
The troubleshooting feature in the laptop can also help with the audio issue with the speakers. By running the audio troubleshooter, the solution will detect the ongoing problem, such as laptop speakers not working, and fix it with an effective solution. To access the "Audio Troubleshooter," use the instructions mentioned below:
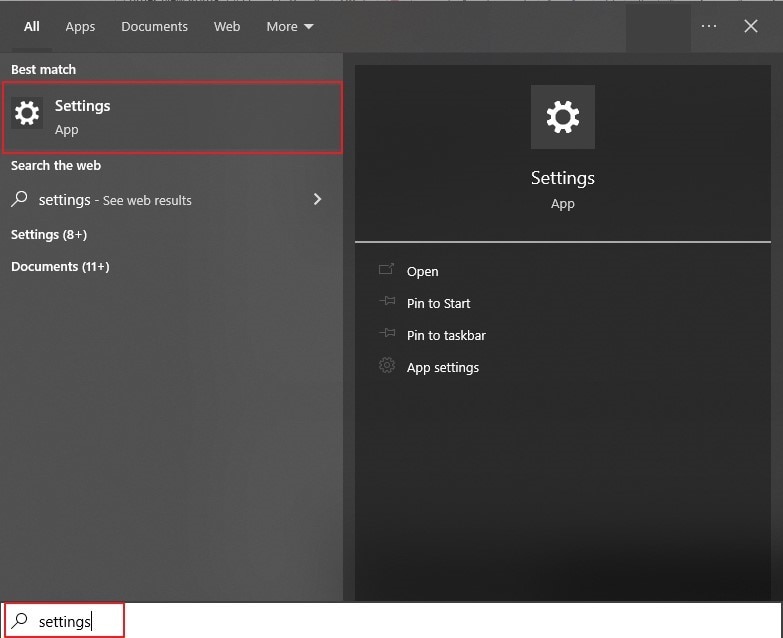
Step 1: Click on the "Search" icon displayed on your taskbar and type "troubleshoot."
You will see the results displaying "Troubleshoot settings." To proceed, you have to click on this option.

Step 2: Following this, tap on the option of "Additional Troubleshooters."
A new window will open where you have to locate the heading "Get Up and Running." Under this heading, tap on "Playing Audio." Once done, click on "Run the Troubleshooter."

Step 3: The troubleshooting process will start smoothly.
Wait till the process ends to check the suggestions. You can resolve the speaker issues and improve audio quality from the given options. Explore the options and apply what you find suitable.

Fix 6: Troubleshoot Hardware Issues
Before Windows 10 1809 Update, the troubleshooter app was identified as a single app that could resolve and identify issues. However, with the update of Windows 10 1809, the single app has been split into multiple small versions. So, you cannot access the hardware troubleshooter directly from the "Windows Settings." However, if you want to run a complete troubleshoot, then follow the steps described below:
Step 1: Press the "Windows + R" buttons from your keyboard to open the "Run" box.
Once the "Run" box opens, type "msdt.exe -id DeviceDiagnostic."

Step 2: Next, press "Enter," and then the hardware troubleshooter will open.
Follow the on-screen instructions to identify and resolve the hardware problem efficiently.

Fix 7: Update Audio Drivers
Audio drivers are essential to run the audio of your laptop smoothly. However, if your audio drivers are outdated or comprise any error, you must update the audio drivers using the below steps:
Step 1: Start by right-clicking on the "Windows" button.
And then click on "Device Manager."

Step 2: Now expand the "Sound, video, and game controllers" option and choose your audio drivers.

Step 3: Now, right-click on your audio drivers that will display a few options.
From there, tap on "Update Driver" and select the option of "Search automatically for drivers." By doing so, your audio drivers will be updated automatically.

Part 4: How to Fix Unplayable Audio Files on Your Laptop?
Is the audio file you are trying to play corrupted? No need to worry, as we recommend a fantastic tool that can effectively repair your corrupted audio files. Wondershare Repairit is a professional tool that can perform audio repair with multiple advanced features. This tool instantly identifies the actual problem, whether your audio file got damaged due to an interruption while downloading or a malware attack. See more features of Wondershare Repairit below:

Wondershare Repairit - Audio Repair

-
Repair damaged audios with all levels of corruption, such as audio not working, clipping audio, humming audio, rumbling audio, sibilant audio, out-of-sync audio, etc.
-
Repair audios of diverse formats, including MP3, M4A, FLAC, AAC, WAV, etc.
-
Repair damaged or corrupted audio from multiple devices: portable voice recorder, recording software, shooting apparatus, SD cards, phones, hard drives, USB flash drives, etc.
-
Support Windows 11/10/8/7/Vista, Windows Server 2003/2008/2012/2016/2019/2022, and MacOS 10.13~MacOS 15.
How to Use the Audio Repair Function of Repairit?
Step 1: Import the Corrupted Audio File
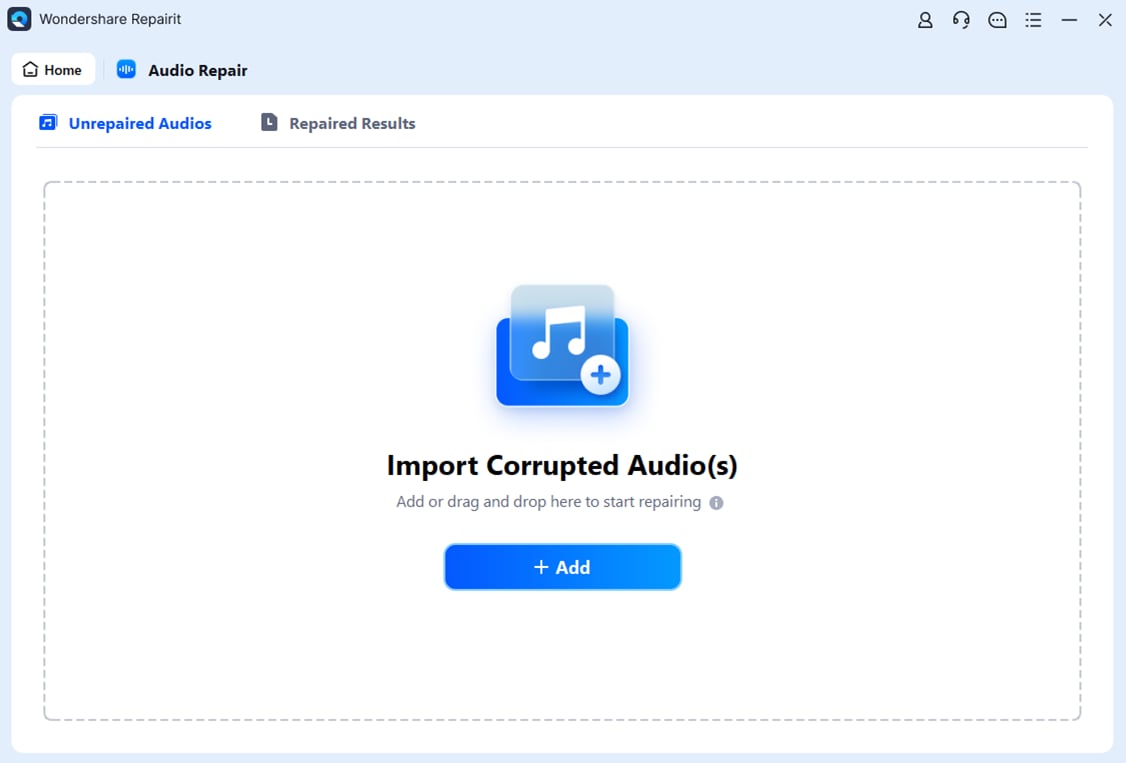
Run Wondershare Repairit on your computer to open its user-friendly interface. After opening this tool, tap on "More Types Repair" from the left section and choose "Audio Repair". Once done, tap on the "+Add" button to import the corrupted audio file by browsing through your computer.

Step 2: Initiate the Repairing Process
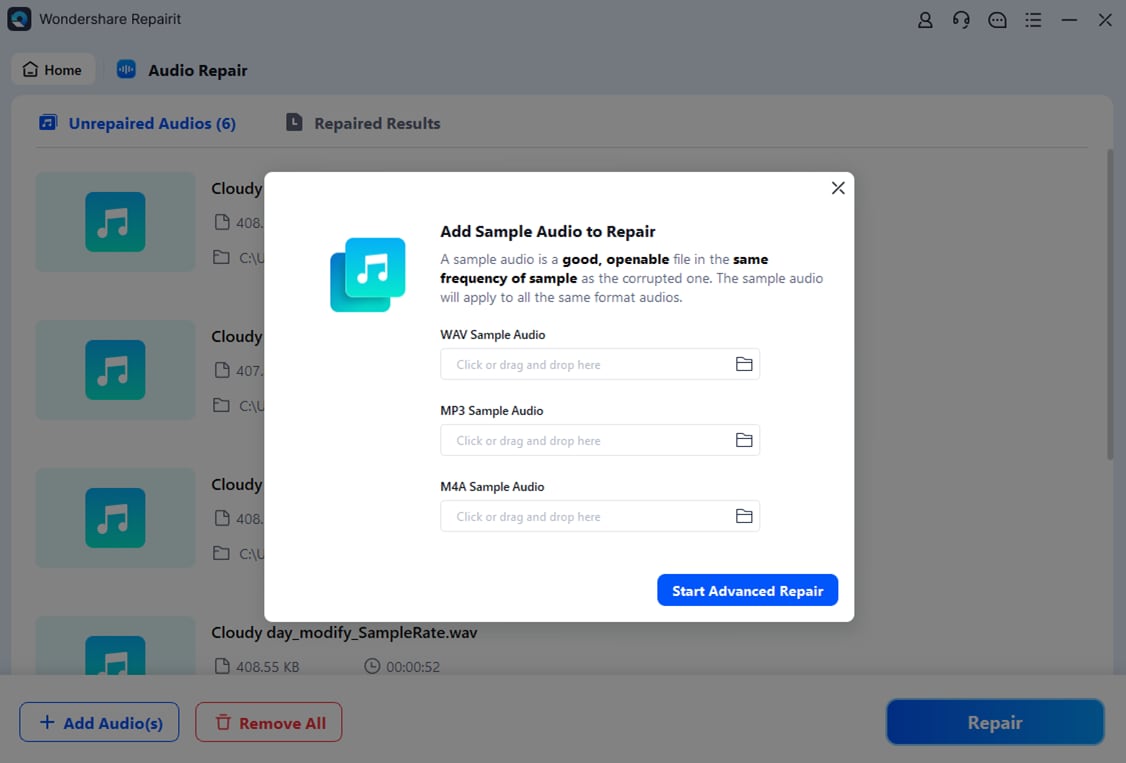
Once done with the uploading, the tool will display the complete information of the corrupted audio file, like its name, size, and path. Click on the "Repair" button to initiate the repair process of your audio file. Following this, you will be asked to import a sample audio file of the same format as the corrupted audio file. Next, tap the "Start Advanced Repair" button to begin the process.

Step 3: Save the Repaired Audio File
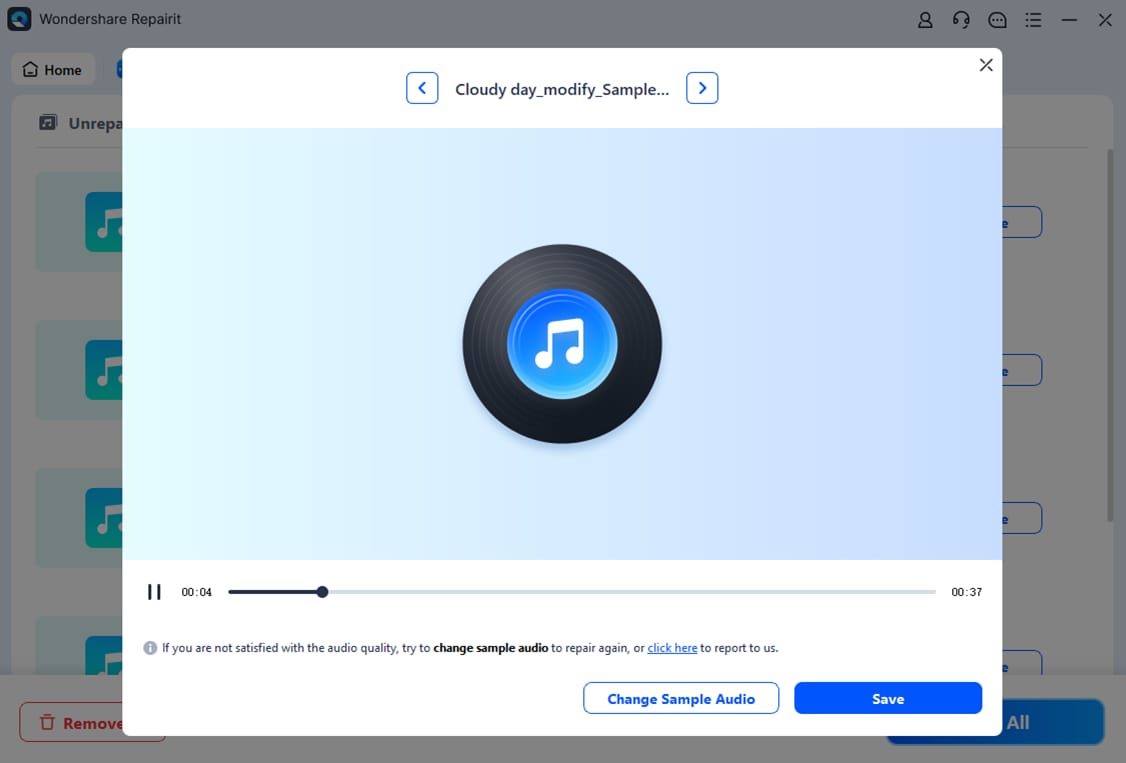
Wait till the repairing process is completed. If you see the status "Completed", it means that your audio file has been repaired successfully. You can tap on the "Preview" button to see the actual results. If you find it satisfactory, click the "Save" button to save the repaired file on your PC.

Conclusion
Now, are you figuring out the problem of laptop speakers not working? No need to panic as this article has discussed the effective solutions that can resolve the sound issue on laptop models like HP, Lenovo, Dell, and ASUS.
Explore each fix to make your laptop speakers audible easily. Moreover, if you have encountered any corrupted audio files that cannot be played on your laptop, you can try the Wondershare Repairit tool for audio repair comfortably.
People Also Ask
-
What are the causes of the damaged speakers?
One of the significant causes that damages the speakers is loud volume. Due to the loud volume, the drivers can generate excessive heat, resulting in mechanical damage. In addition, every speaker has a power rating that needs to be taken care of. If you increase the volume control or amplifier, it can ruin the driver coil and negatively impact your speakers. -
What are the issues a user faces daily due to bad speakers?
Many users complain about speaker issues like distorted audio quality, low volume, blown speakers, or rumbling sounds. Make sure to keep the volume control balanced by avoiding high-volume sounds. Moreover, it would help if you tried changing the output channels and replacing the driver coils or wires to ensure the excellent sound quality of the speakers. -
How to check my speakers?
There is no scientific method to check the speakers. You can quietly play a signal through them and then evaluate if it produces a fine sound or not. If the sound quality is not up to mark, you need to replace your speakers. -
What do you mean by Realtek Audio?
It's an audio driver comprising Dolby, DTS, and Surround Sound Support. Through this audio driver, you can easily choose the audio configuration for your speakers. Also, it includes a tab called "Room Correction," through which you can control the volume of your speakers separately.


 ChatGPT
 Perplexity
 Google AI Mode
 Grok
Grok
