

 TL;DR:
⚡ Quick Fix: Play and Fix Xvid Videos in VLC
If Xvid videos fail to play, stutter, or trigger codec errors in VLC, resolve it immediately with these 3 steps:
● Adjust VLC Settings: Go to Tools > Preferences > Input / Codecs and change the hardware acceleration settings to instantly bypass decoding lags.● Install Standalone Codec: Download the official installer from the Xvid website. Run it to add native system-level support so VLC can read the file structure.
● Repair Damaged Files: If the video remains unplayable, the file is corrupted. Use Wondershare Repairit Video Repair to automatically fix broken video headers and frames.
Ask AI for a summary
 ChatGPT
 Perplexity
 Gemini
 Claude
 Grok
Grok
Good video quality leads to immersive experiences in the world of watching shows and movies. Enter Xvid, the secret sauce for boosting that quality. It's a tool that makes your videos look better by compressing them without losing much detail. Pair it with VLC, the jack-of-all-trades of media players, and you have a powerful team set to turn any watching time into a cinematic adventure. With Xvid video codec for VLC, every frame becomes a masterpiece, and every viewing is a journey into the heart of entertainment. Understand the Xvid video codec, and the troubleshoots to solve common Xvid installation issues in this guide.
In this article
What is Xvid Video Codec?
Xvid is a video codec commonly used for compressing and decompressing digital video files. It is widely supported across various platforms and devices, making it a popular choice for video encoding and playback.
| Xvid Codec Features | How Xvid Differs from Other Codecs |
| ✅Compression for smaller video file sizes | With Xvid, the goal is to find a balance between reducing file sizes to save space. But it ensures that it delivers top-notch quality, whether you're streaming online or watching offline. |
| ✅Free to use and open-source | Unlike some codecs, Xvid is freely available for anyone to use. It’s like having a free pass to enjoy all the features without any cost. Whether you're a filmmaker, a student editing videos, or just a video lover, you can use Xvid without cost worries. |
| ✅No requirement for special hardware | Xvid does not require specific hardware for decoding, enhancing its accessibility. You don't need fancy equipment or expensive gadgets to play Xvid-encoded videos. |
How to Install Xvid Video Codec for VLC
By incorporating this codec, you can unlock a world of high-quality video playback and enjoy your favorite content with unparalleled clarity and definition. Follow these simple steps to seamlessly integrate the Xvid video codec into your VLC media player:
Step 1: Visit the official Xvid website and navigate to the Download section.

Look for the appropriate version of the Xvid codec for your operating system.

Step 2: After you finish downloading, find the file you downloaded and click it twice to start installing.
Step 3: Follow the on-screen instructions provided by the Xvid installer. Typically, you'll need to agree to the license terms and choose the installation directory.
Step 4: After the installation completes, you may need to restart your computer for the changes to take effect.
Troubleshooting Common Xvid Installation Issues
Getting Xvid up and running smoothly can be a cinch for many, but when glitches rear their heads, troubleshooting becomes the name of the game. Let's dive into unraveling those pesky knots that might tangle your Xvid installation journey.
Troubleshoot 1. Update VLC
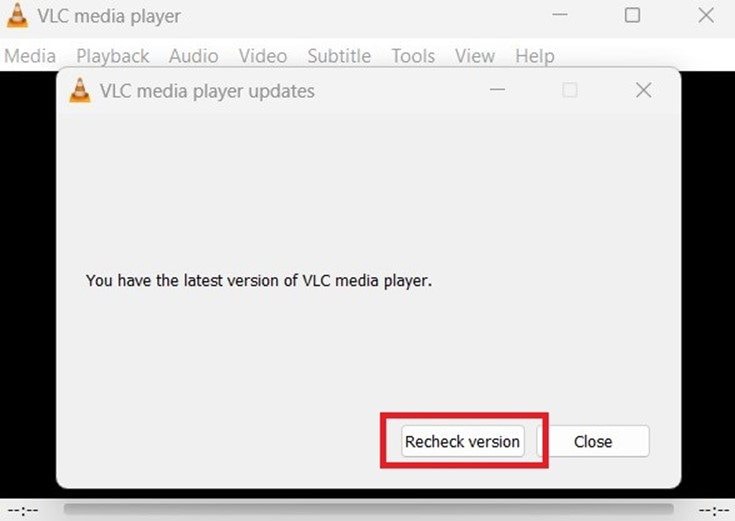
- Run the VLC media player and press on Help at the top.

- Pick Check for Updates.

- If there's a newer VLC version, get it. If it says you already have the latest one, you can still double-check. Just click the Recheck version button.
Troubleshoot 2. Reinstall VLC
To troubleshoot common Xvid installation issues with VLC, you can try reinstalling VLC media player. This process involves removing VLC from your computer and then installing it again. By doing this, you can refresh the software and potentially resolve any problems related to the Xvid codec.
Troubleshoot 3. Install Xvid Codec Separately
Installing the Xvid codec separately can be important when troubleshooting common installation issues related to Xvid compatibility. Here's why:
- Customization: Installing the Xvid codec separately allows users to customize their codec settings according to their specific needs and preferences.
- Updated Versions: The standalone installation of the Xvid codec ensures that users have the latest version available.
- Dependency Management: Separately installing the Xvid codec helps manage dependencies more efficiently.
- Isolation of Issues: When troubleshooting installation issues, separating the Xvid codec installation from the media player installation allows users to isolate problems more effectively.
- Community Support: Installing the Xvid codec separately opens up avenues for seeking support and troubleshooting tips from the Xvid community.
Troubleshoot 4. Adjust VLC Settings
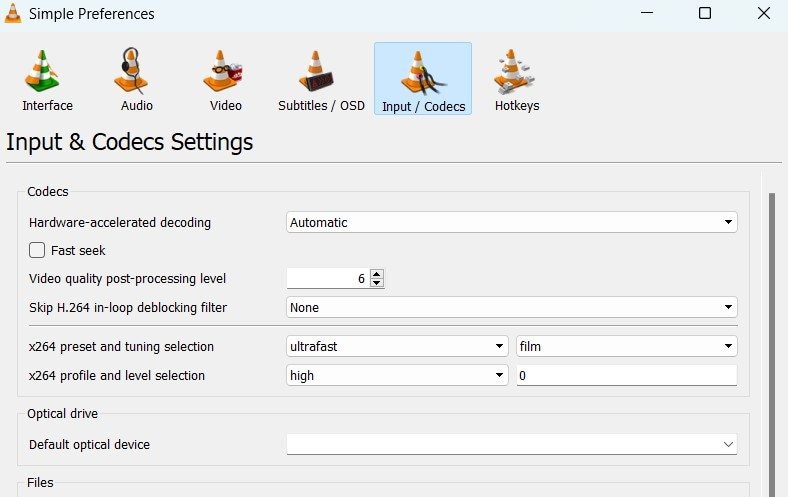
- In VLC's preferences, navigate to Tools and select Preferences.

- Go to Input / Codecs. Experiment with changing settings related to hardware acceleration, as conflicts can sometimes cause codec issues.
Troubleshoot 5. Check Codec Information
- When playing a video, go to Tools then click Media Information.

- Choose Codec Details and confirm if Xvid is listed as one of the codecs. If not, it may indicate a recognition issue that requires further investigation or codec installation.

My Xvid Files Were Damaged: What Should I do?
Ever encountered the frustrating situation of damaged Xvid files? It's a common headache for many. But fret not! There's a straightforward solution for you: Wondershare Repairit. This nifty tool is designed specifically to tackle such issues effortlessly. Let's delve into how Repairit can be your saving grace when facing damaged Xvid files.
Wondershare Repairit helps fix corrupted Xvid files by employing advanced algorithms that analyze and repair damaged data within the files. It scans the corrupted Xvid files thoroughly, identifying errors and inconsistencies. Then, it reconstructs the damaged portions, restoring the files to a playable state. Wondershare Repairit's intuitive interface makes the process simple, allowing users to repair their Xvid files with just a few clicks. With its efficient repair capabilities, Wondershare Repairit ensures that your damaged Xvid files become usable again.

-
Repair damaged videos with all levels of corruption, such as video not playing, video no sound, out-of-sync video or audio, playback errors, header corruption, flickering video, missing video codec, etc.
-
Repair full HD, 4K, and 8K videos and support 18 popular formats, including MOV, MP4, M2TS, INSV, M4V, WMV, MPEG, ASF, etc.
-
Repair damaged or corrupted videos caused by video compression, system crash, video format change, etc.
-
Repair critically damaged or corrupted videos available on SD cards, mobile phones, cameras, USB flash drives, etc.
-
Repairit has a quick and advanced scanning mode. You can use either depending on the level of corruption the video file has undergone.
-
No limit to the number and size of the repairable videos.
-
Support Windows 11/10/8/7/Vista, Windows Server 2003/2008/2012/2016/2019/2022, and macOS 10.10~macOS 13.
How to Use Xvid Video Codec for VLC Player
Integrating Xvid with VLC for optimal performance doesn't require any special configurations if you've installed the Xvid codec properly on your system. Here's what you need to do:
- Once your computer has restarted, open VLC Media Player
- Go to the Media in the menu section.

- Select Open File to choose the Xvid video you want to watch.

That's it! VLC should now be able to play Xvid-encoded videos smoothly, taking advantage of the codec you installed. If you encounter any issues, ensure that you've installed the Xvid codec correctly and that your video files are encoded using the Xvid format.
Conclusion
In the wide world of digital entertainment, the search for better video quality begins with Xvid and VLC as trusted partners. Integrating the Xvid video codec with a VLC media player opens doors to enhanced video quality and seamless playback experiences. Xvid acts as a reliable translator, compressing videos without sacrificing clarity. Its compatibility with VLC and other media players ensures accessibility and convenience for users across various platforms. By following simple installation steps and troubleshooting common issues, users can harness the power of Xvid to unlock vibrant visuals and immersive entertainment. With Xvid, make every viewing a captivating journey into the heart of digital media.
FAQ
-
Do I need to install anything extra to play Xvid files in VLC?
No, VLC comes with built-in support for Xvid, so you don't need to install any additional software or codecs to play Xvid-encoded videos. -
Why does my Xvid video not play smoothly in VLC?
Choppy playback of Xvid videos in VLC can be due to various factors such as insufficient system resources, outdated graphics drivers, or the complexity of the video itself. Try closing other applications or updating your graphics drivers. Lowering the video resolution can also help improve playback performance. -
Can VLC convert Xvid videos to other formats?
Yes, VLC has basic video conversion capabilities that allow you to convert Xvid videos to other formats. You can access the conversion feature by going to "Media". Choose “Convert/Save'' in VLC and then select your Xvid video file. Lastly, choose the desired output format.
