If you’re having problems playing MP4 files in your VLC player, you’ve come to the right place. When playing a video in any video player, the last thing you think about is the format of the video file.
Our guide will help you understand common playback errors with MP4 files and why VLC won’t play them. Moreover, we’ve prepared ten proven ways to show you how to fix VLC media player problems. Your VLC not playing MP4 files will be as good as new.
In this article
-
- Method 1: Disable Hardware Decoding
- Method 2: Turn on Automatic Repair in VLC
- Method 3: Repair Corrupted MP4 Files
- Method 4: Change Audio/Video Settings in VLC
- Method 5. Convert Your MP4 Files to Another Format
- Method 6: Change Video Output Mode
- Method 7: Update VLC
- Method 8: Update Your OS
- Method 9: Update Codecs
- Method 10: Update Video Drivers
- Method 11: Repair the Location Drive
Reasons Your VLC Player Can’t Play MP4 Files
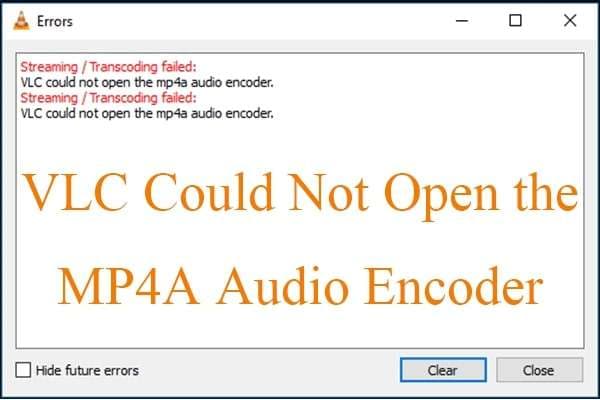
Playback errors, video freezing, and codec issues are among the common problems you may experience while playing MP4 videos in VLC. These issues occur when the video player doesn’t support the video file you want to play or due to video corruption.
VLC may greet you with error messages when the file you wish to play isn’t compatible with VLC’s selection of codecs. Below are some of the most common reasons VLC can’t play your MP4 files.
Reason 1: Missing Codecs
VLC must have the required MP4 codec to play the video file. If the required codec isn’t available, VLC won’t be able to play the file because it can’t recognize the audio/video codec. Simply download the missing MP4 codec from the official Media Player Codec Pack.
Reason 2: Outdated VLC Player or OS
If you haven’t updated your VLC player to the latest version, it may not play some audio/video files, including MP4. Open VLC and navigate to Help > Check for updates. If an update is available, click Yes to upgrade your player.
Reason 3: Incorrectly Configured Video Settings
The incorrect VLC video and playback settings configuration can cause all sorts of video playback problems, including the VLC not playing MP4 files issue. It can also prevent VLC from playing videos at all.
Reason 4: Corrupted MP4 Files
Though VLC can play most video formats, it can’t play corrupted video files. No media player can play such files. You must fix the corrupted file before playing it with VLC or any other media player.
Reason 5: External Device Isn’t Working Properly
If you’re playing an MP4 file with VLC directly from an external device, you might experience a playback problem if the media device isn’t working correctly or due to connection issues.
Repair Corrupted Files With a Professional Repair Tool

Here are the best methods to repair corrupted MP4 files and fix the VLC Not Playing MP4 Files problem.
Method 1: Disable Hardware Decoding
Deactivating the hardware decoding in your VLC player might solve many video playback issues, including crashing or hanging while playing MP4 files. Here’s how to turn off this setting:
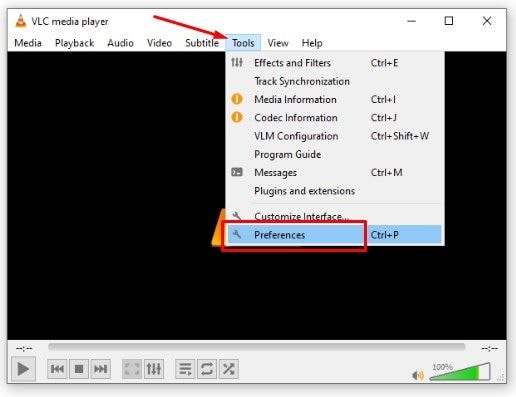
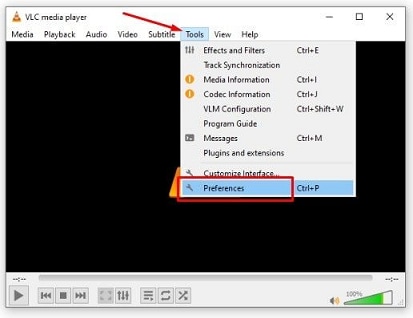
Step 1: Open VLC and navigate to Tools > Preferences.
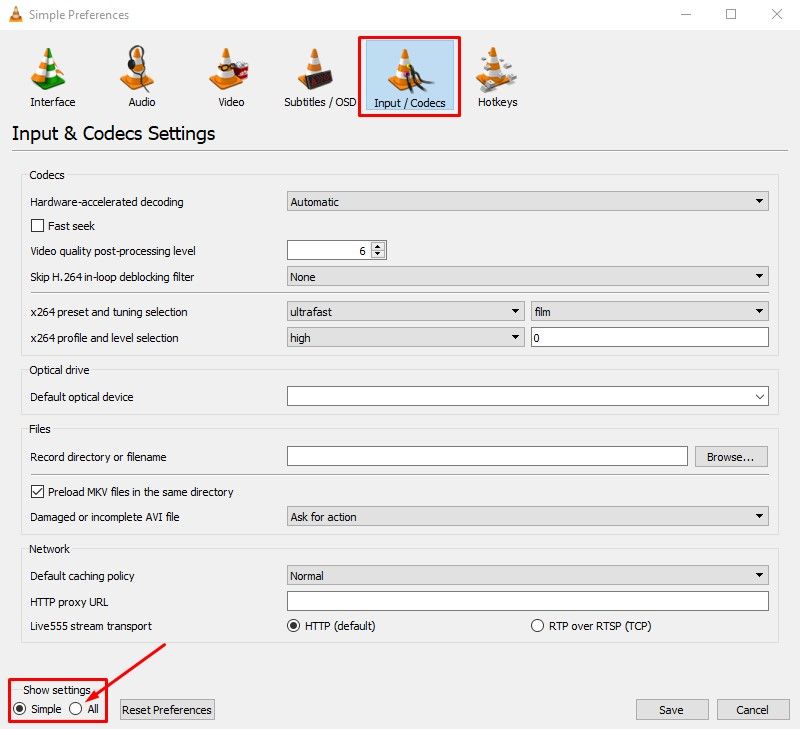
Step 2: Select the Input/Codecs tab and click All in the Show settings section.
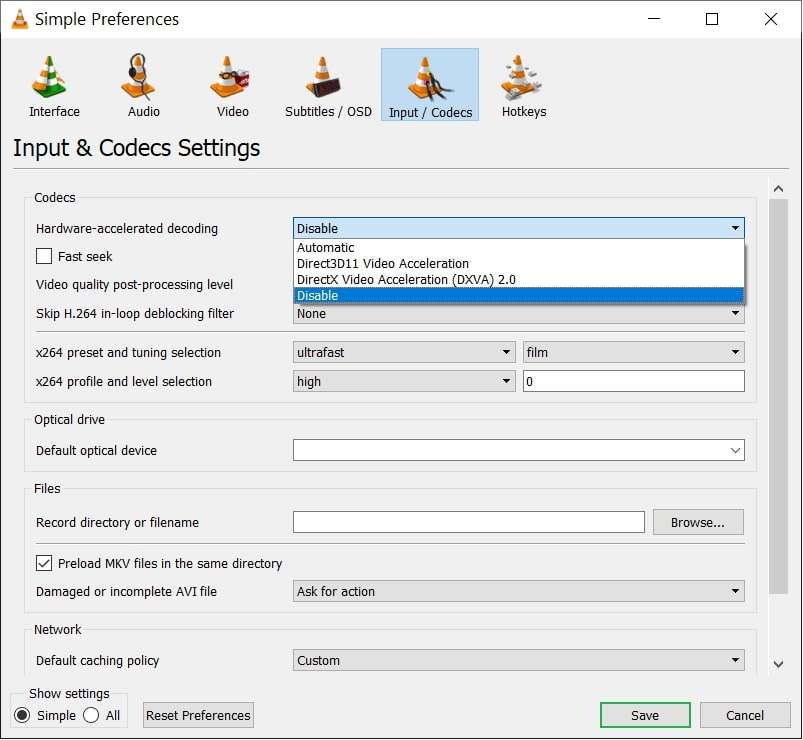
Step 3: Select Disabled in the Hardware-accelerated decoding section and click Save.
Method 2: Turn on Automatic Repair in VLC
VLC has a built-in feature to repair video files automatically, including MP4 videos. You can fix a corrupted video file by enabling the VLC Automatic Repair feature. Here are the steps to turn on this feature in VLC:
Step 1: Open VLC and navigate to Tools > Preferences > Input/Codecs.
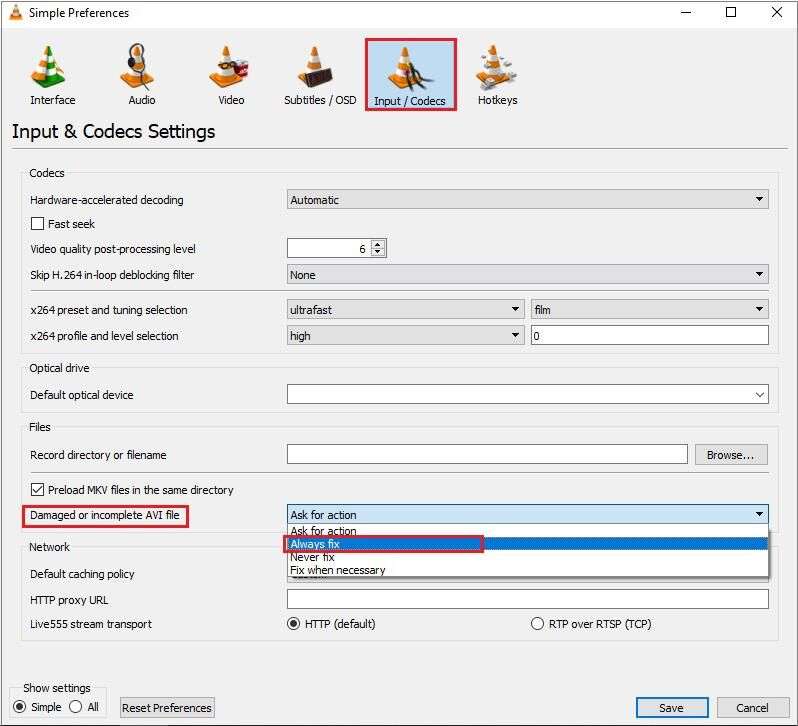
Step 2: Navigate to Files > Damaged or incomplete AVI file, select Always fix in the Ask for action section, and click Save.
Method 3: Repair Corrupted MP4 Files
VLC might be one of the most effective video players out there, but it can’t play corrupted MP4 files. Thankfully, you can fix your MP4 files using top-grade video repair software. Enter Repairit MP4 Repair.
Wondershare Repairit is a professional video repair tool that can fix corrupted video files, regardless of the format or cause of video corruption. In addition, its user-friendly interface and powerful video repair features enable you to restore your MP4 files with a few clicks.
This program lets you fix your video files online or via a desktop computer. Aside from repairing corrupted MP4 files, Repairit can eliminate various video problems, including blurry videos, black/blue screens of death, no sound, etc.
To repair corrupted MP4 files on your PC, download, install, and launch Wondershare Repairit and follow the steps below:
Step 1: Navigate to the Video Repair section and click Add to import corrupted video files or drag and drop your files.

Step 2: Preview the added files and click Repair to initiate the process.

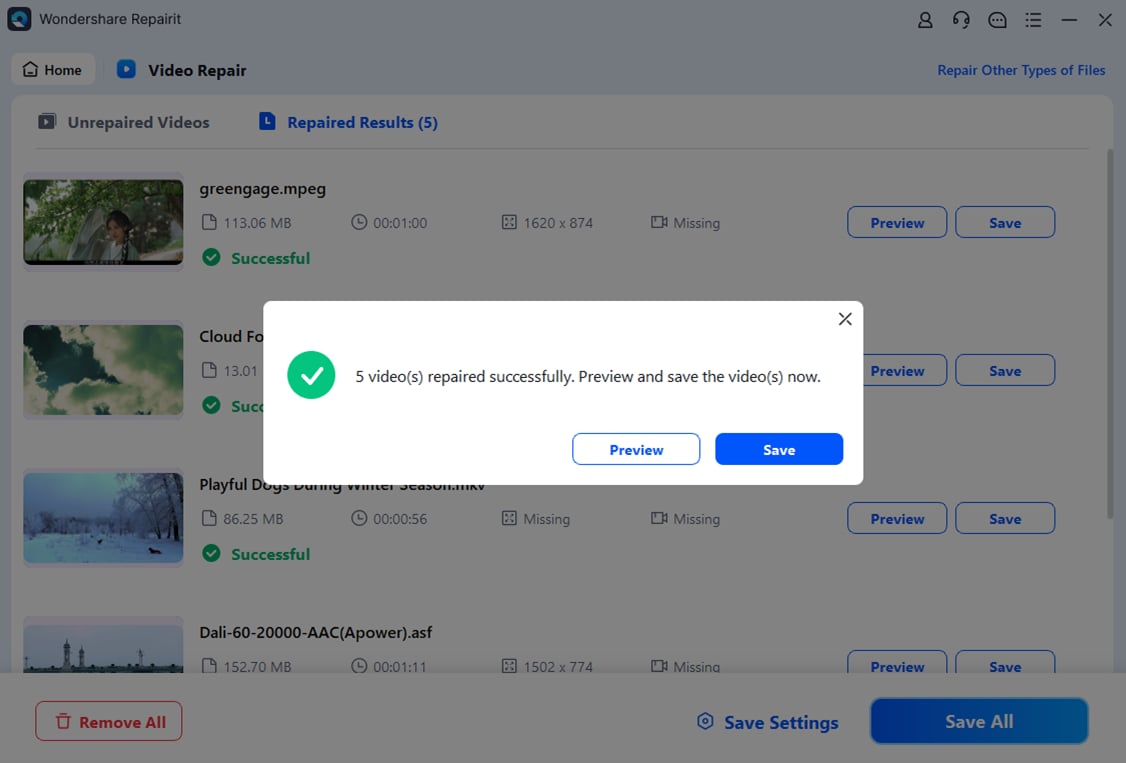
Step 3: Click OK to preview and save the repaired video files.
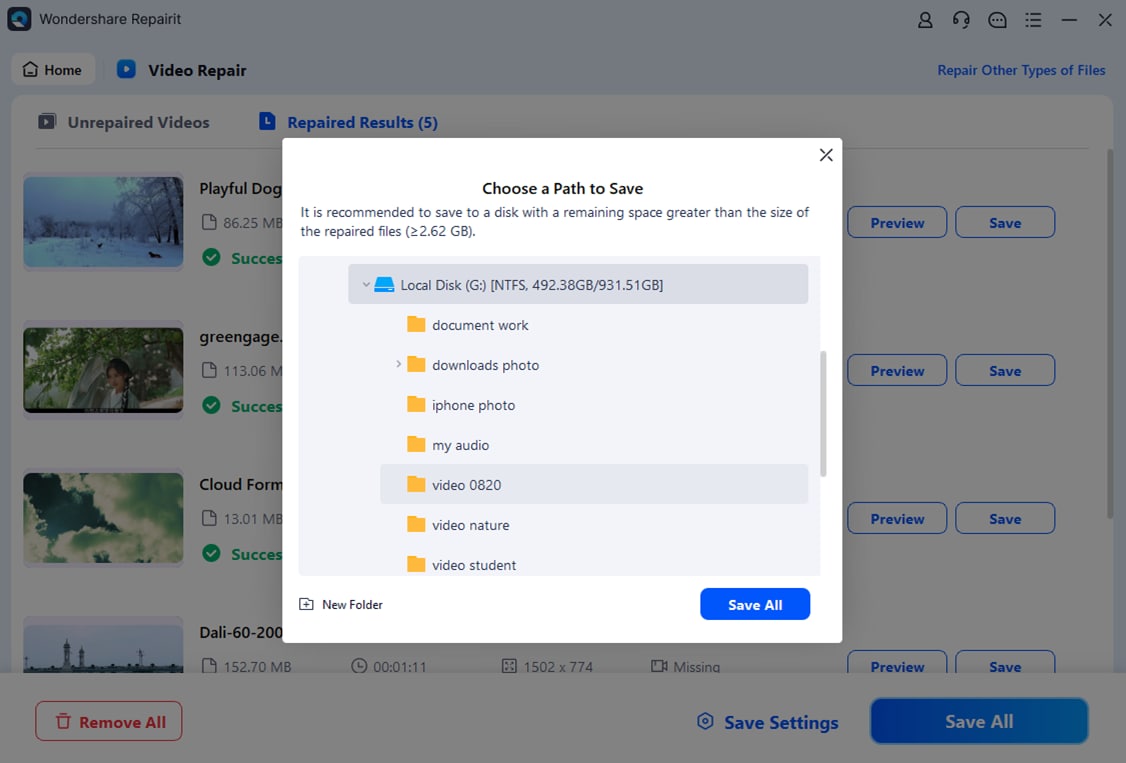
Step 4: Choose a location to save the repaired files and click Save All.
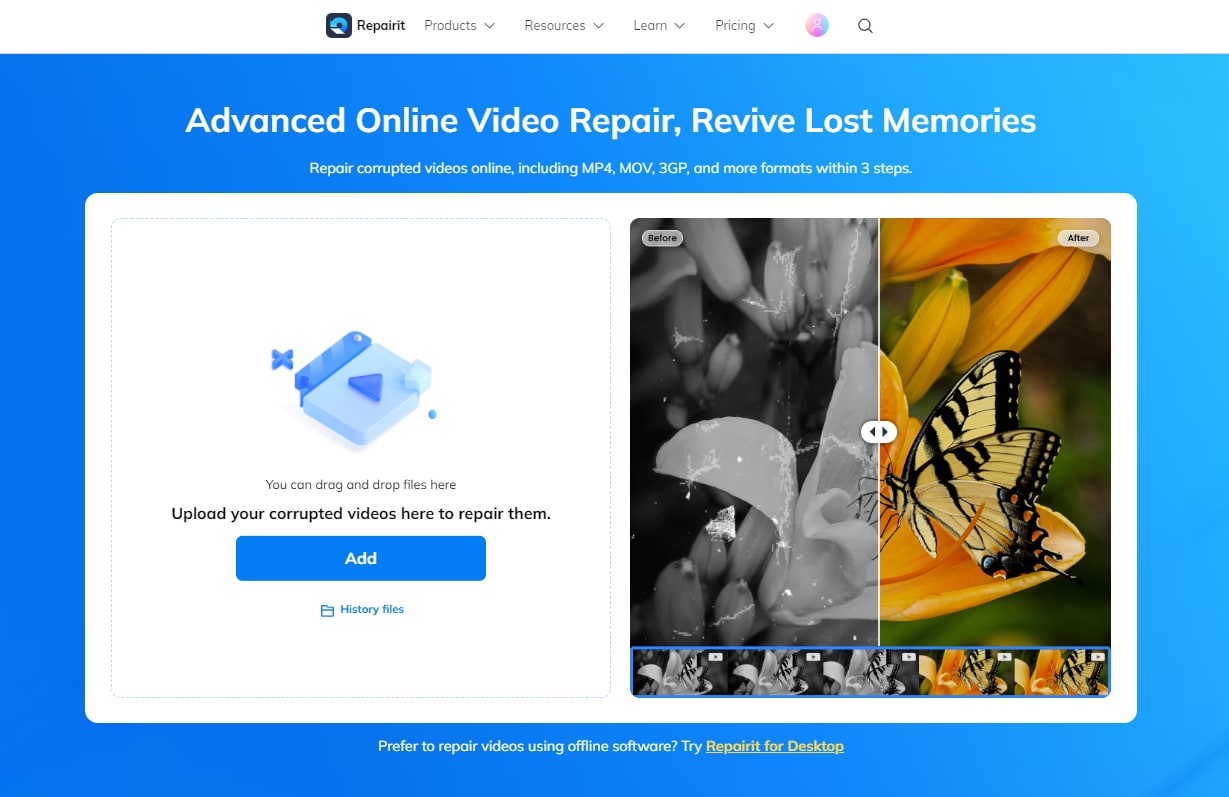
Step 1: Visit the official Wondershare Repairit website and click Add to upload corrupted video files (or drag and drop them). The process will start automatically.
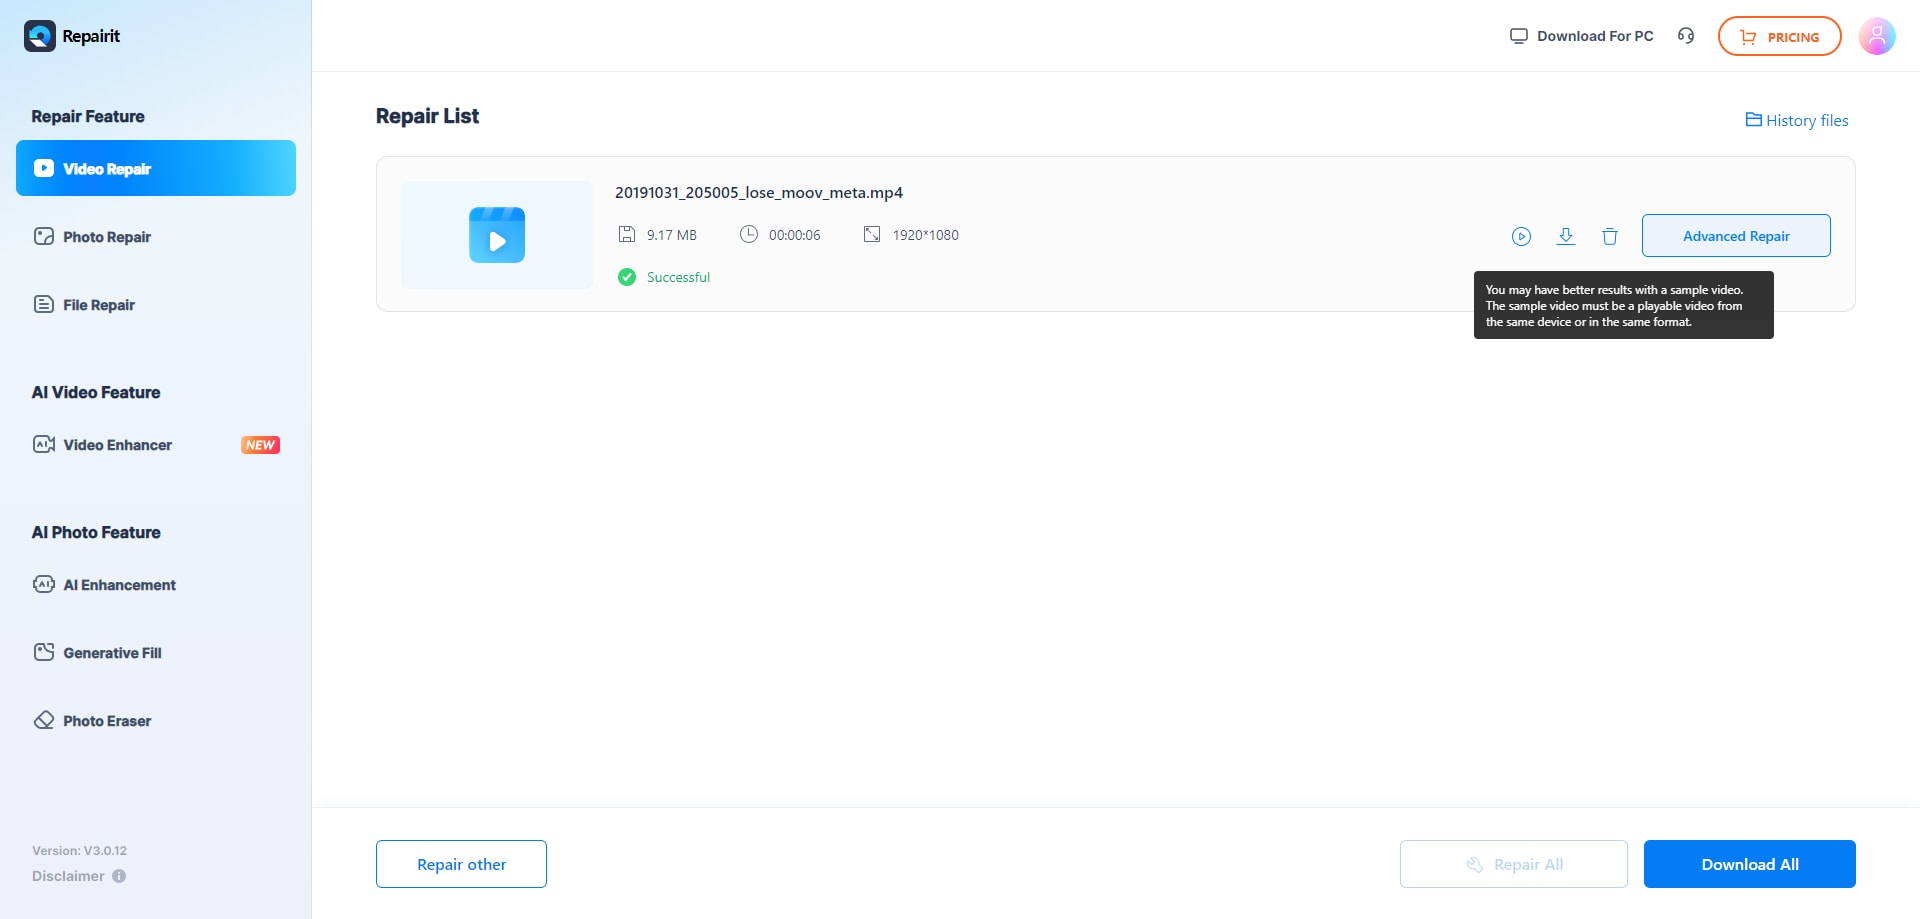
Step 2: Preview the fixed files and click Download All to save your videos.
Method 4: Change Audio/Video Settings in VLC
VLC is an ideal video player for MP4 files. However, incorrect audio and video settings may cause problems such as choppy playback, black screen, etc. Follow the steps below to change your VLC video settings and fix these issues:
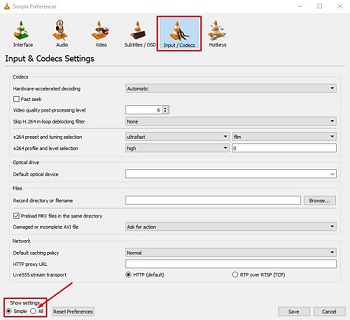
Step 1: Open VLC and navigate to Tools > Preferences.

Step 2: Select Input/Codecs and click All in the Show settings section.
Step 3: In the Advanced section, select Input/Codecs again.
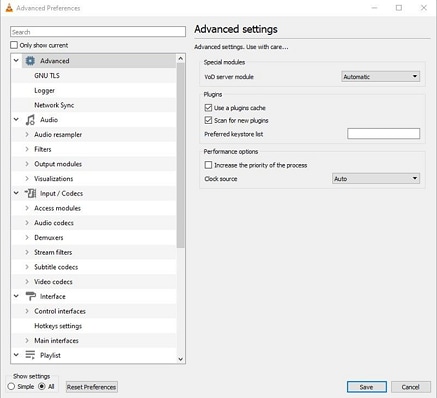
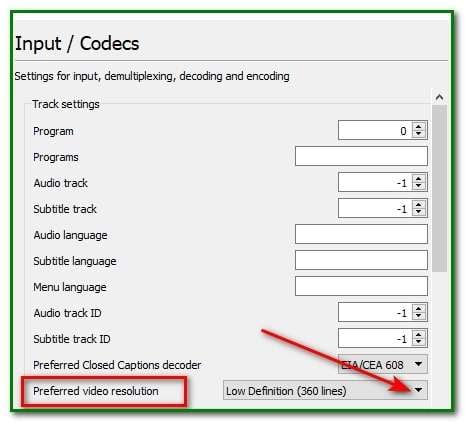
Step 4: Change the Preferred video resolution setting (if it’s set to Low Definition (360 lines)).
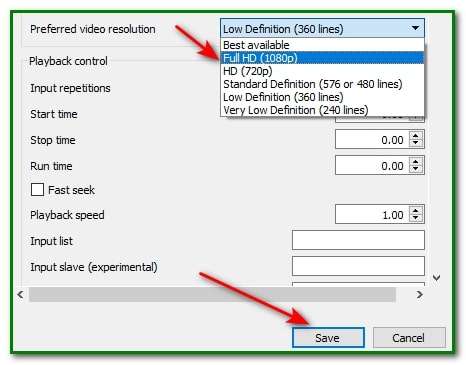
Step 5: Set the Preferred video resolution to Full HD (1080p) and click Save.
Method 5. Convert Your MP4 Files to Another Format
If your VLC media player doesn’t support MP4 files, it won’t be able to play them. Thus, the easiest fix is to convert your MP4 videos to another format that VLC can handle, like MOV or AVI. That can resolve compatibility issues and let you play your videos in VLC smoothly.
Follow these steps to convert your MP4 files to another format:
Step 1: Open your VLC media player.
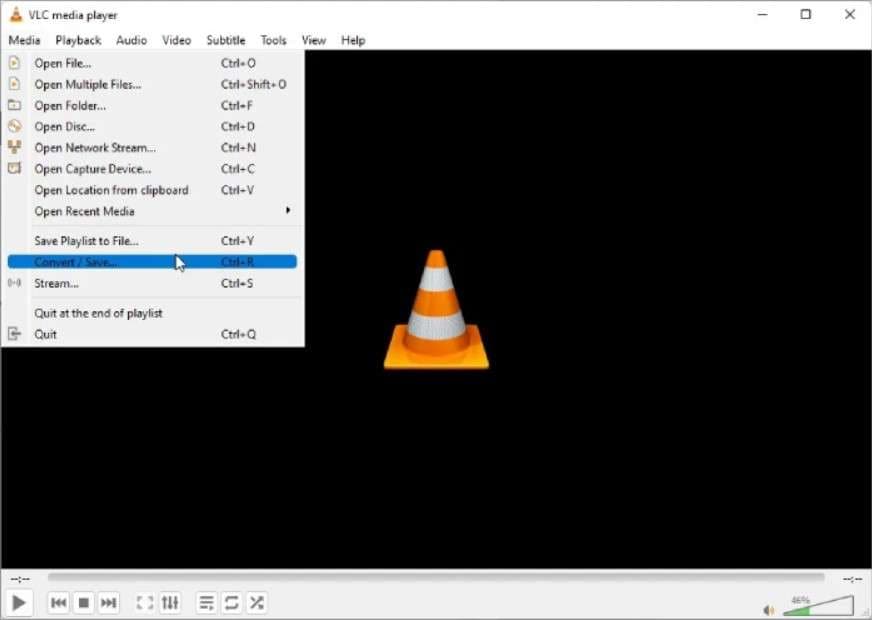
Step 2: Click Media in the top left corner and select the Convert / Save option.
Step 3: Click Add under File Selection to upload your MP4 file.
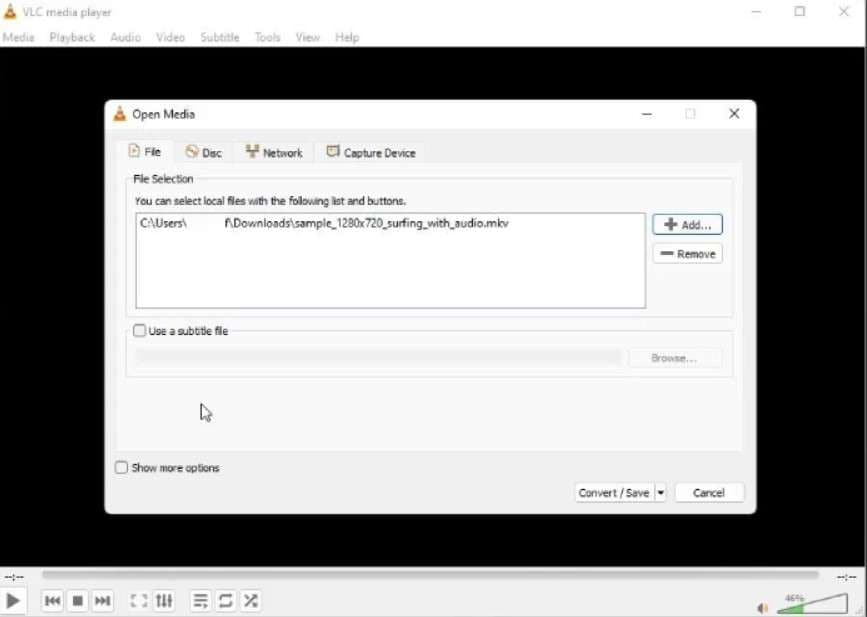
Step 4: Once you import your MP4 video, click the Convert / Save button at the bottom of the screen.
Step 5: Expand the Profile drop-down list in the Convert dialog box and select the preferred video output format.
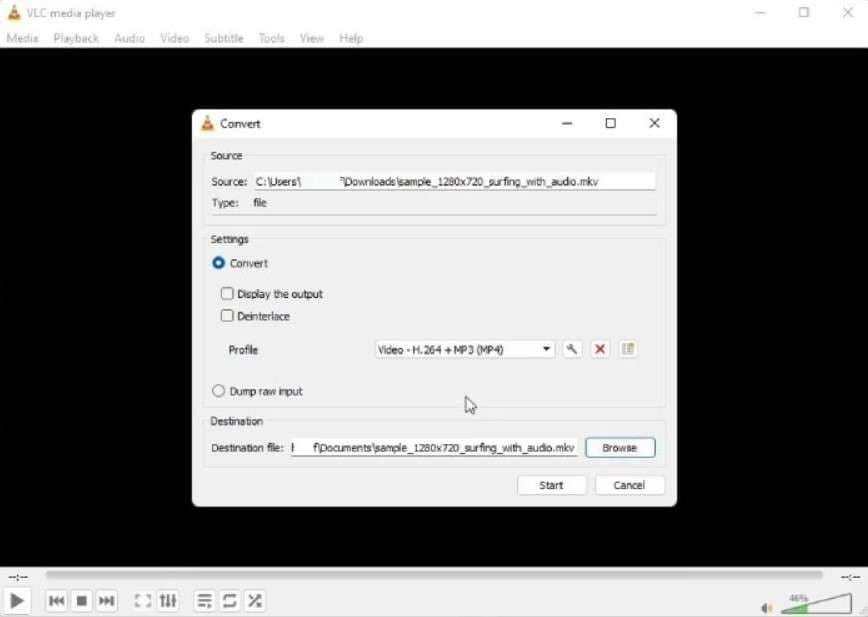
Step 6: Set the desired destination and click Start to convert your MP4 file into another format.
Once VLC completes the process, open your converted video to see if it works.
Method 6: Change Video Output Mode
Changing video output (rendering) settings can solve video playback issues and fix distorted or unplayable MP4 video files. This option is ideal in distortion scenarios, such as seeing a black or white screen when playing MOV or MP4 video files. Here’s how to change your VLC video settings:
Step 1: Open VLC and navigate to Tools > Preferences > Video.
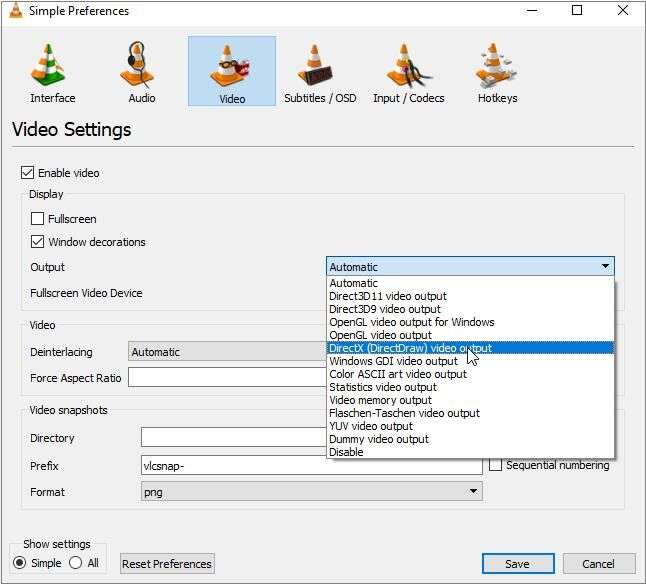
Step 2: Change the Output from Automatic to DirectX (DirectDraw) video output in the Video Settings tab and click Save.
Restart VLC and try playing your MP4 file again.
Method 7: Update VLC
Updating your VLC to the latest version can solve many video playback problems. It can also upgrade your player with the newest app improvements, security updates, and additional features. Here’s how to check for updates:
Step 1: Open VLC and navigate to Help > Check for Updates.
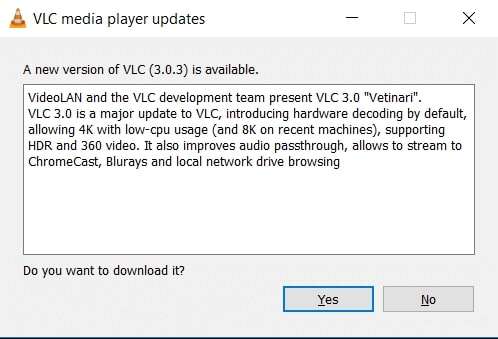
Step 2: Click Yes to download the update file and select Install to install the latest VLC version.

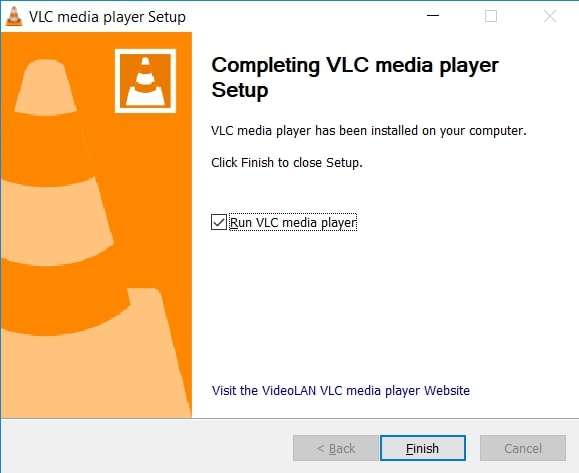
Step 3: Follow the installation wizard and click Finish to complete the process.
Method 8: Update Your OS
In some cases, your VLC might be unable to play MP4 files because its program components aren’t compatible with the outdated version of your Windows operating system. You can quickly resolve this problem by checking for OS updates. Here’s how:
Step 1: Head to the Windows search bar, type Windows updates, and click Open.
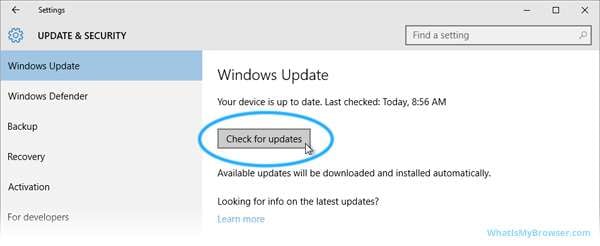
Step 2: Under Windows Update, click Check for updates.
Method 9: Update Codecs
Though you get all the codecs when you update VLC to the latest software version, you can also manually check for available codec updates. Here’s how:
Step 1: Open VLC and navigate to Help > Check for updates.
Step 2: If a new VLC version is available, click Yes to download the new app and the latest codecs.
Method 10: Update Video Drivers
Updating your video drivers can solve many video issues, bugs, and playback optimization problems. Here’s how to do it if your VLC videos aren’t running correctly or are blurry:
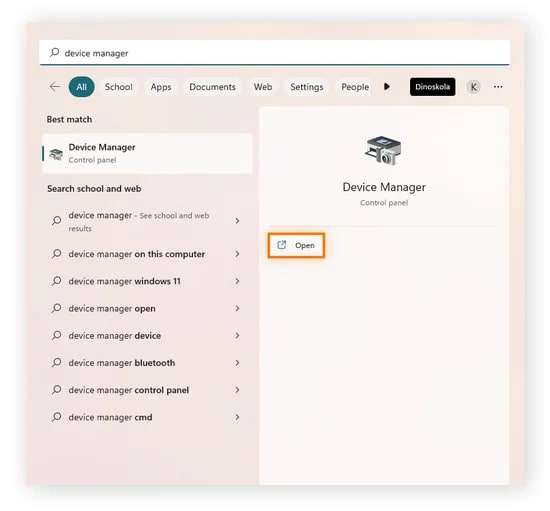
Step 1: Type Device Manager in the Windows search bar and click Open.
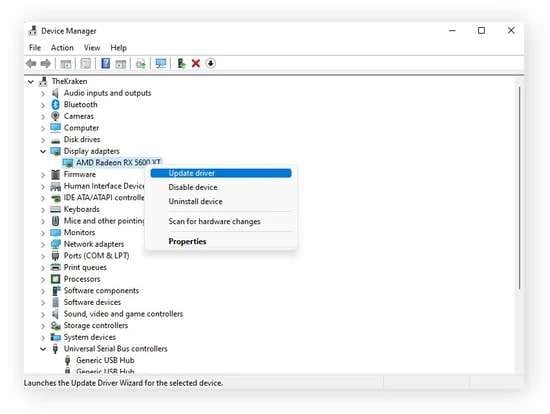
Step 2: Select Display adapters, right-click your graphics card, and click Update driver.
Method 11: Repair the Location Drive
The last resort is to use the CHKDSK command to repair the VLC location drive. Sometimes, the location drive may become inaccessible due to system errors in your Windows.
When that happens, the drive containing the VLC folder may become unresponsive and corrupt the files, causing problems like the “VLC Not Playing MP4 Files” error.
Here’s how to repair the location drive:
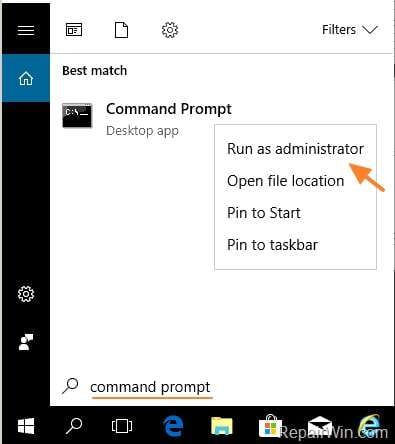
Step 1: Type Command Prompt in the Windows search bar and click Run as administrator.
Step 2: Type chkdsk X: /R in the Command Prompt window and hit Enter (replace X with the drive letter where VLC is installed).
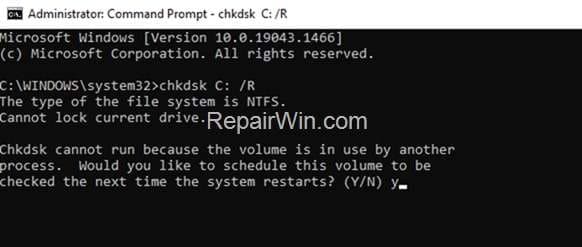
Step 3: Type Y and hit Enter to dismount the drive. Allow CHKDSK to repair it.
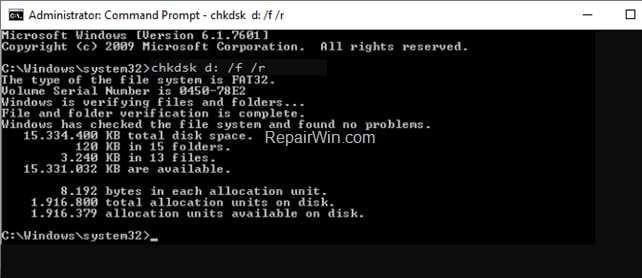
Step 4: Wait for CHKDSK to complete the process. Once it does, explore the contents of the fixed drive. Open VLC and try playing any MP4 file to see if the fix worked.
How to Avoid Future Issues With MP4 Files
Here are some helpful tips to avoid future VLC video playback problems and MP4 file issues:
- Avoid opening multiple video files simultaneously.
- Do not exit VLC while the MP4 file is playing.
- Don’t power off or restart your PC when the MP4 file is playing.
- Convert non-compatible video files to VLC-supported formats before playing.
- Regularly check for the latest VLC updates.
- Only download VLC from the official website.
- Avoid tampering with critical VLC settings, such as codec scheme, file caching, output modules, etc.
- Don’t change the meta component or header of the MP4 file.
How to Repair Corrupted MP4 File? You can fix the problem quite easily by following this video.
Conclusion
Facing video playback issues when you least expect them can be pretty frustrating. Thankfully, you can take matters into your own hands and fix these annoying problems. This guide should help you understand why you keep seeing the notorious “VLC Not Playing MP4 Files” error message that has been plaguing PC users for years.
Apply any of these methods to attempt to fix the issue. If the problem persists, use Wondershare Repairit to repair corrupted MP4 files. In addition, ensure you have the latest VLC version on your Windows to avoid leaving anything to chance.


 ChatGPT
 Perplexity
 Google AI Mode
 Grok
Grok

