Questions: "I have recently created a university project. In that project, I was supposed to shoot a video. Now that I have made the video, I want to send it to my professor. Sadly, I see this error that the file is too large and can't be sent. I want to know how to compress my video file size without losing quality. The quality of the video holds great significance. I want to know the easiest ways to compress my video without losing quality."
All the fruitfulness of a video is certainly in its quality. Sometimes, the quality comes with size. Transporting/sending a video in good quality becomes a hurdle for the people. There is no doubt that a video can be compressed without losing its quality. In this guide, you will have several methods to reduce the size of your video without losing quality. You will also get to know how to repair your blurry videos in just a few minutes. Just stick around and, go through all the methods carefully which are mentioned in the guide below.
In this article
Part 1: How to Compress Video Files without Losing Quality?
People often think that compressing the video file might take a lot of time or is not even possible. That is not true, you can easily compress your video without losing quality. Compressing the video with an inappropriate method can cause the video to lose quality. Instead, you can read these methods mentioned below properly to solve your problem. You just have to follow the steps properly. In the first place, let's try compressing your video without losing quality using VLC and Handbrake.
Method 1: Using VLC
VLC Media player is versatile enough to compress video files without losing quality despite its many other features. The VLC media player is the most used tool to reduce the size of a video without losing quality. Let's use VLC, following these steps;
Step 1: first of all, download the VLC media player. Make sure you have downloaded the right version according to your computer.
Step 2: Open VLC and click on the drop-down menu. After that, click on the option of convert/save.
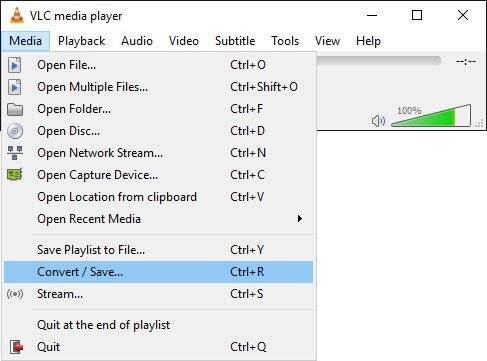
Step 3: hitting the convert/save option will open a new window on your screen.
Step 4: Click on the "Add button to select the video file which you want to compress.
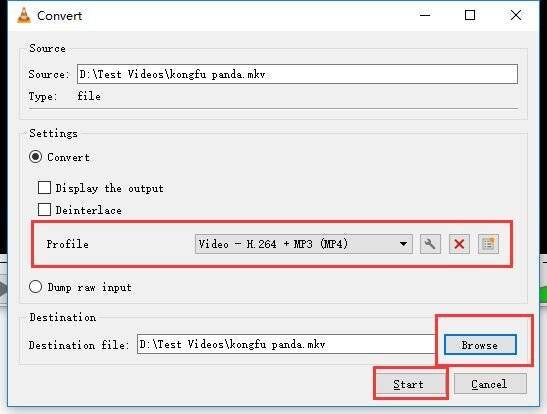
Step 5: Now, click on the convert/save option.
Step 6: Click on settings under the profile section.
Step 7: Open up the codec tab, now enter the height and the width of the video. Please keep the ratio the same as before for better quality. Key factors for minimizing the video are bitrate and resolution.
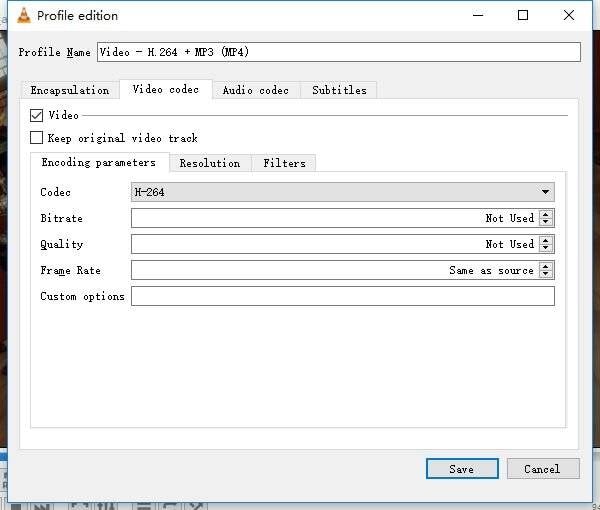
Step 8: Now, chose the folder where you want to save the file and click "start".
Step 9: Wait for the VLC to compress the video, don't stop the process in between or it will corrupt the video.
Part 2: How to Online Reduce Video File Size without Losing Quality?
Some people want less time-consuming solutions, that is the reason why most people go for online tools to solve this issue. The good part is that you can also reduce the size of the video without losing quality just by using any efficient online tool. Online tools are usually underestimated, online tools can solve your problem in many different situations. There are several online tools out there to help you out. You can use these tools;
1. Clideo
A compressed video is an online tool. The tool is capable of compressing large-size files also in a decent period. Follow the step to proceed;
Step 1: Open the website "Clideo"
Step 2: You will be given an option of choosing a file, chose and upload the file you want to compress without losing the quality.
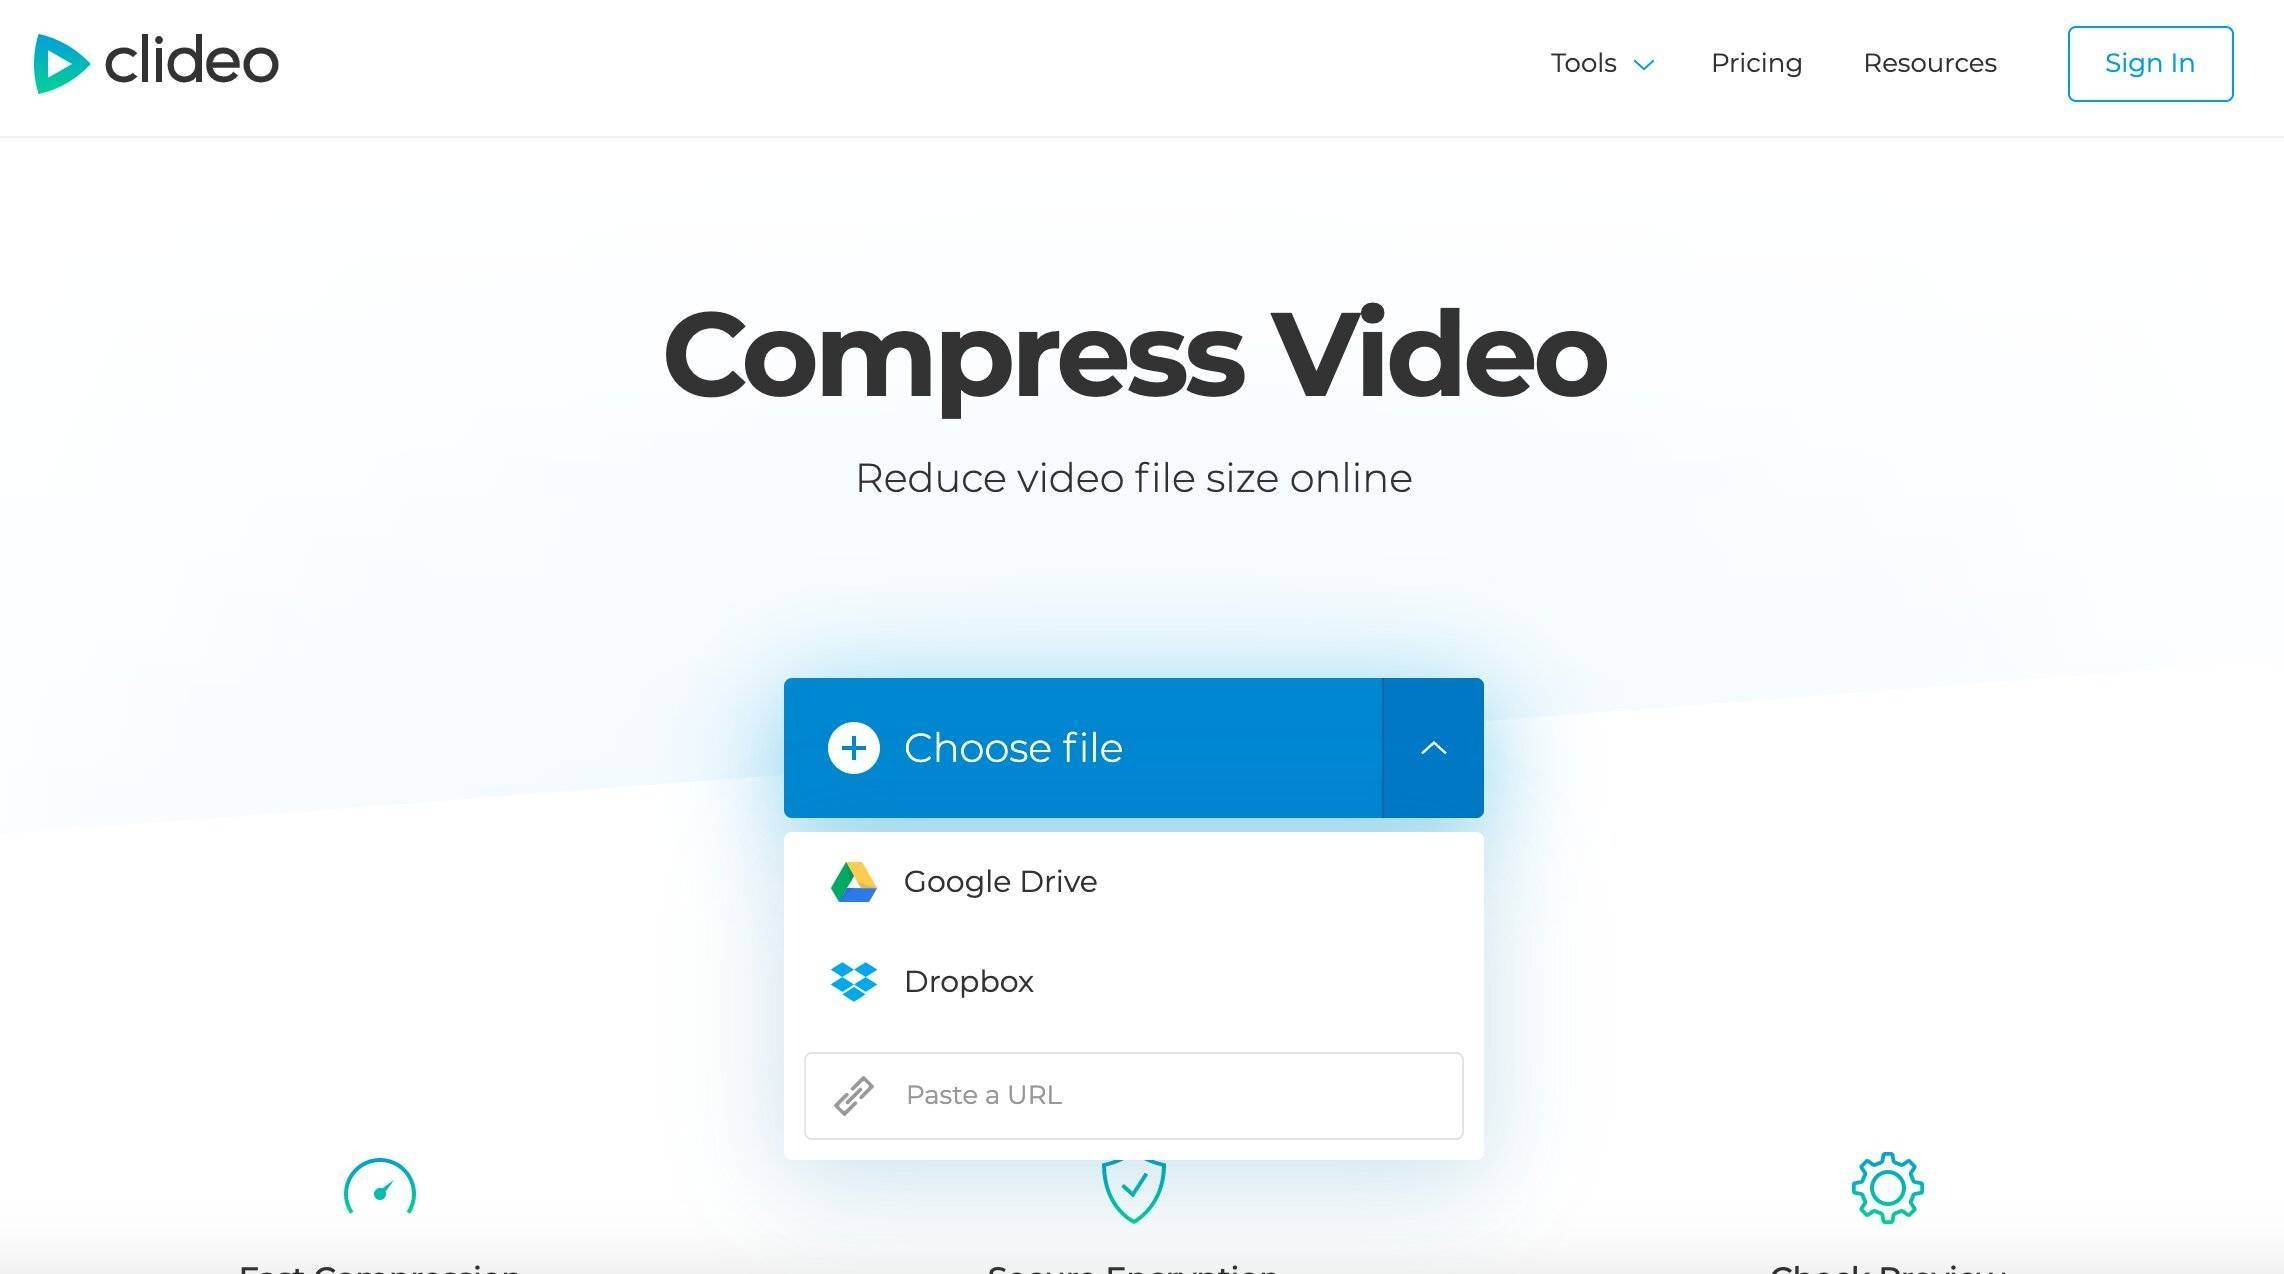
Step 3: Once the file is uploaded, click on the option of "compress"
Step 4: Wait for a while until the online tool compresses the video.
Step 5: Lastly, download the compressed video on your device.
2. You compress
You compress is also a widely used free online tool to compress a video file without losing the quality of the video. You just need an internet connection to access this astonishing online tool. Follow these steps;
Step 1: Open the website "you compress"
Step 2: Now, when the website is opened in front of you, select your file using the upload file option.
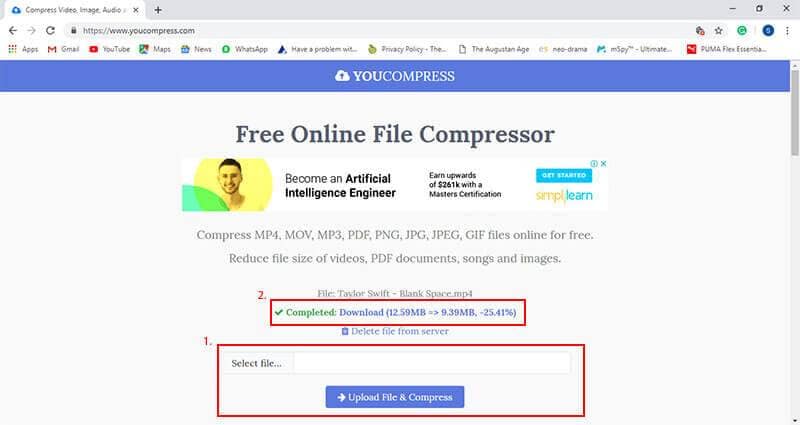
Step 3: After uploading your file, click on the option of compress video.
Step 4: Wait till the video is under the process of compression.
Step 5: Once it is done, you can finally download your compressed video in good quality.
Bonus Tip: How to Repair Blurry Video with Low Quality?
There are several cases when the video is blurry and has low quality. This is because the video is corrupt. Blurry videos simply are useless for any person. People give up when they think of repairing blurry videos. Blurry videos are surely the most irritating thing. The bright side is that blurry videos are curable, you just need the right assistance to do that. You can repair your blurry videos with Wondershare Repairit Video Repair software. The astonishing software is proficient in repairing blur videos in-lined with its multiple features.
You can fix your blurry video in no time using Recoverit as it supports multiple video formats and can allow you to repair more than one file at a time. Recoverit has multiple repairing modes for its users all around the world. Recoverit supports windows 10/8.1/8.7/ vista and macOS. Recoverit has no limitations when it comes to repairing large size video files. Recoverit can repair blurry videos from different devices which include memory cards, SD cards, computer hard drives, etc. Unlike any other software, it allows you to preview the repaired video before saving it to the desired destination Many of the users of Recoverit are not aware of its distinctive features. Repairing a blurry video file is an exceptional feature. These are the following steps you need to follow to solve your issue;
Step 1: Add your blurry video
Download and install Wondershare Repairit video repair. Run the software on your PC, once the application is open click on the option of "Add" and select your blurry video file.

Step 2: Repair your videos
After you have added the blurry video file, click on the option of repair. Wait for a while, let the application repair the video.

Step 3: Preview the repaired videos
The repairing process might take a while. Once it is done you will see information about the fixed video. Preview your repaired video and press "OK" to proceed.

Step 4: Advance mode for severely corrupted video (optional)
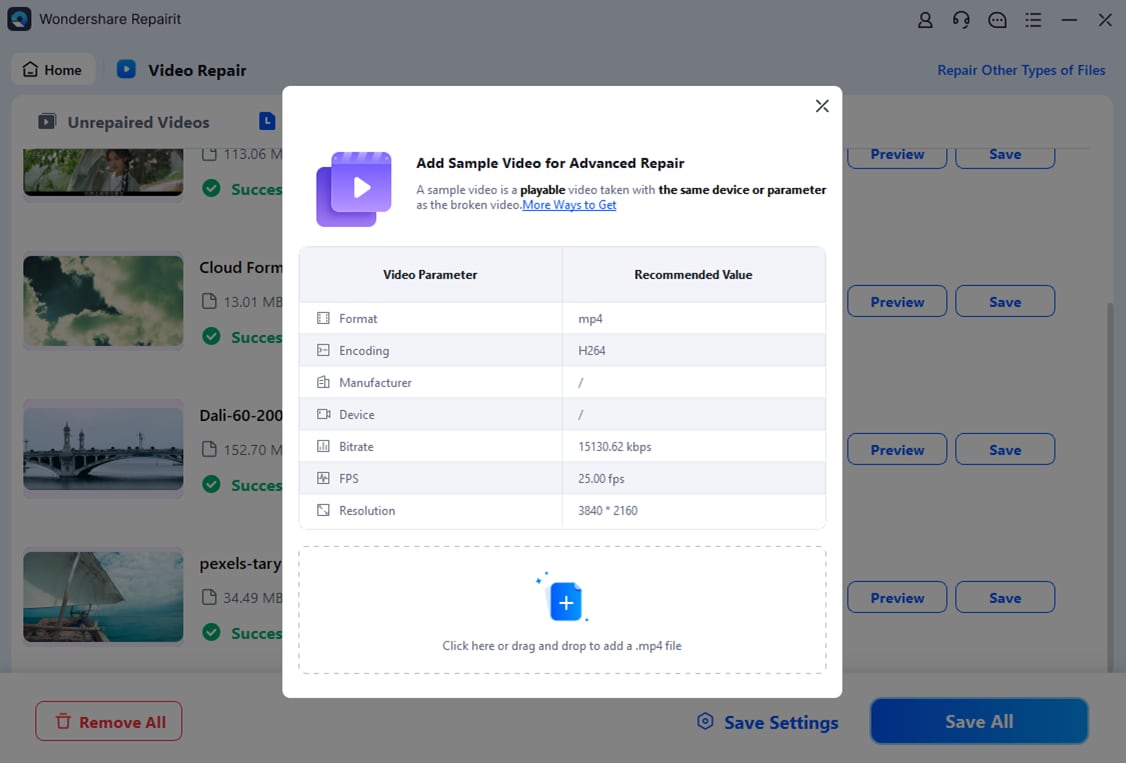
If the videos are severely corrupted and not repaired successfully, please go to the advanced repair mode. Just click the "Advanced Repair" button.
Then add a sample video and repair it now.
Step 5: Save repaired video
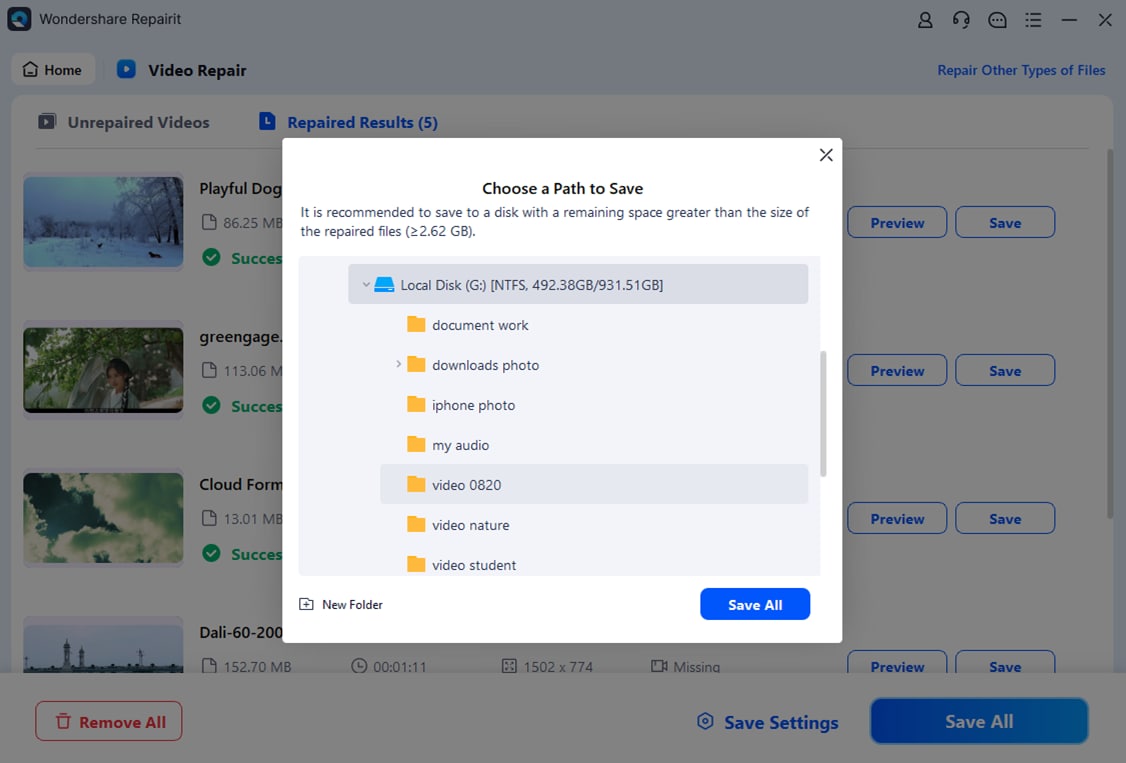
When all corrupted videos are repaired, you can click the "Save" button to store videos to any location on your computer.
You may also be interested in the following relevant tips:
Tip 1: How to repair damaged VOB files?
Tip 2: How to repair MTS video files?
Tip 3: How to tell and repair AVI files?


 ChatGPT
 Perplexity
 Google AI Mode
 Grok
Grok
