A zip file is a compression file format that contains compressed files and folders to archive, storage, or transmission.
However, there are several reasons that make you unable to expand ZIP file on Mac, such as corrupted files, incomplete downloads, improper compressions, and more. Fortunately, this guide offers practical solutions to quickly resolve the issue and get your files back on track.
Part 1. Abstract of Expand Zip File
Zip is one of the most commonly used formats for the compression of files. It is represented by the .zip extension and contains a set of compressed files. Compressing or zipping files is a convenient way of giving your computer some extra space when you are close to reaching its storage limit. It can compress anything, be it photos, media, or documents.
When files are compressed into the zip format, their size gets reduced, making them easy to share. This format is generally used for emailing or sharing files over the web. Since compressed files take less disk space, these are also useful for creating backup copies of your data. When a user receives a zip file, he can easily access the zipped file or folder by double-clicking. If you are unsure about how to view zip files on Mac, you can simply double-click on the zip file to preview its contents before extracting them.
However, sometimes users are unable to expand a zip file owing to several reasons, including permissions on that file, incomplete downloads, size of the file, and more. If you get stuck in such a situation, then look no further as you’ve landed on the right page.
If you are struggling with how to open zip files on Mac, you're not alone. The guide will take you through some of the common reasons that trigger this error, effective methods to get rid of this trouble quickly, and some tips to avoid this problem in the future.
Part 2. Are You Unable To Expand Zip Files? Check the Reasons!
Various reasons make you unable to expand Zip file on Mac. Some of them are mentioned here.
1. Incomplete Downloads: The damaged zip file is one of the significant reasons that trigger this error message. When you are downloading files in a browser on Mac OS, it might be possible that the file might not be downloaded completely and correctly.
A bad internet connection or inconsistency in the network can cause transfer errors and make the files unable to open. Owing to this, the user cannot extract the file even if it is present in the Download folder.
In this case, you can resolve this "Mac os: archive utility unable to expand" issue by downloading the file again either through the Terminal or without closing the downloading website.
2. Permission on the zip files: The permission to read/ write on the zip files or directory of the file is yet another reason to generate the error. In such cases, you can opt for the 3rd party tool and get the issue resolved in no time.
3. Zip folder comprises huge files and archive utility unable to expand: Users might face error Mac unable to expand zip file if they try to unzip or decompress a very large file. Since Archive Utility doesn’t allow you to extract large files, you can use Terminal with the unzip command to troubleshoot the error. The terminal can easily decompress huge files that are primarily resistant to other techniques.
4. Improper Compression: To extract the data in the zip file, it’s essential to compress it properly. File compression gets affected for several reasons, such as sudden system shutdown, abrupt power failure, and more. Consequently, the file undergoing the compression process gets damaged and thus refuses to open.
Wondering how to extract zip file in Mac? there are several methods available.
Part 3. 3 Super Easy Methods to Fix the Unable to Expand Zip File on Mac" Issue
Method 1: Unzip File by Using Terminal
If you are unable to expand the zip file on Mac by simply double-clicking, then use Terminal and try to unzip them. Sometimes, large files don’t decompress in the Archive Utility, and hence, they need to be decompressed in the Terminal.
Carry out the steps mentioned below to unzip files by using Terminal.
-
Firstly, hold Command and press the Spacebar to access Spotlight. There, you need to type “Terminal” to search and Enter.

-
After that, use the unzip command to open the zip file. You can drag and drop the zip file here.
-
Click “Enter,” and it will then begin the unzipping process.
-
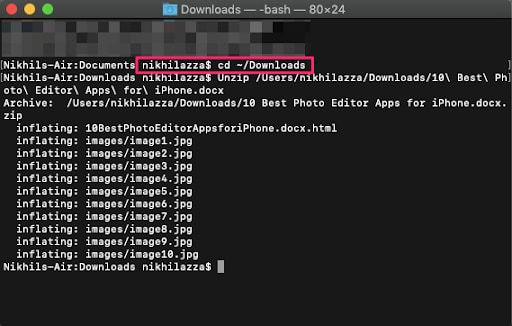
For most cases, If the “No such directory Error” or “cannot find” message appears on the screen, then you can manually use the “cd” command to access the directory and unzip the file. For example: cd Desktop, Unzip timer.zip
Method 2: Using Decompression Utility Software
Sometimes, there is a problem with permissions which makes users unable to expand zip files normally. In that case, you can simply use decompression utility software to fix the error. There are various utility software options available on the App Store and you can choose any of them.
Download Stuffit Expander from the Mac App Store and unzip files on Mac with ease. Here’s the step-by-step guide for how to unzip file on MacBook using this decompression utility software.
-
Locate the “App Store” icon on your Mac OS and click on it.

-
Type “Stuffit Expander” in the app store to initiate the search.
-
Once you find the app, tap on the “Get” option to install Stuffit Expander on your system.

-
Once you are done with downloading the app, you can either tap on the “Open” or go to Spotlight (Command + Space) to launch the Stuffit Expander application.
-
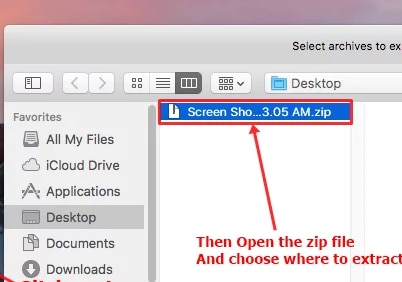
Find out the zip file that you wish to extract.
-
Thereafter, select the folder where you want to keep the unzipped file. It will then start the decompressing process.
Method 3: Use Simple 3rd Party Tool – Wondershare Repairit
Still unable to expand Zip File on Mac? Opt for the Wondershare Repairit ZIP File Repair tool and resolve the error in the best possible way. This powerful tool can easily repair the damaged Word, PowerPoint, PDF, and Excel files and unzip them on your Mac OS.

Wondershare Repairit - ZIP File Repair
Security Verified. Over 7,302,189 people have downloaded it.
-
Repair damaged files with all levels of corruption, including blank files, files not opening, unrecognizable format, unreadable content, files layout changed, etc.
-
Support to repair all formats of Zip, PDF, Word, Excel, PowerPoint, and Adobe files.
-
Perfectly repair corrupted files with a very high success rate, without modifying the original file.
-
No limit to the number and size of the repairable files.
-
Support Windows 11/10/8/7/Vista, Windows Server 2003/2008/2012/2016/2019/2022, and macOS 10.10~macOS 14.
Follow the step-by-step procedure to get the job done.
Step 1: Load your files on Repairit
-
First of all, install the Wondershare Repairit on your system. Now, go to the Other Types Repair>File Repair section available on the left side.
-
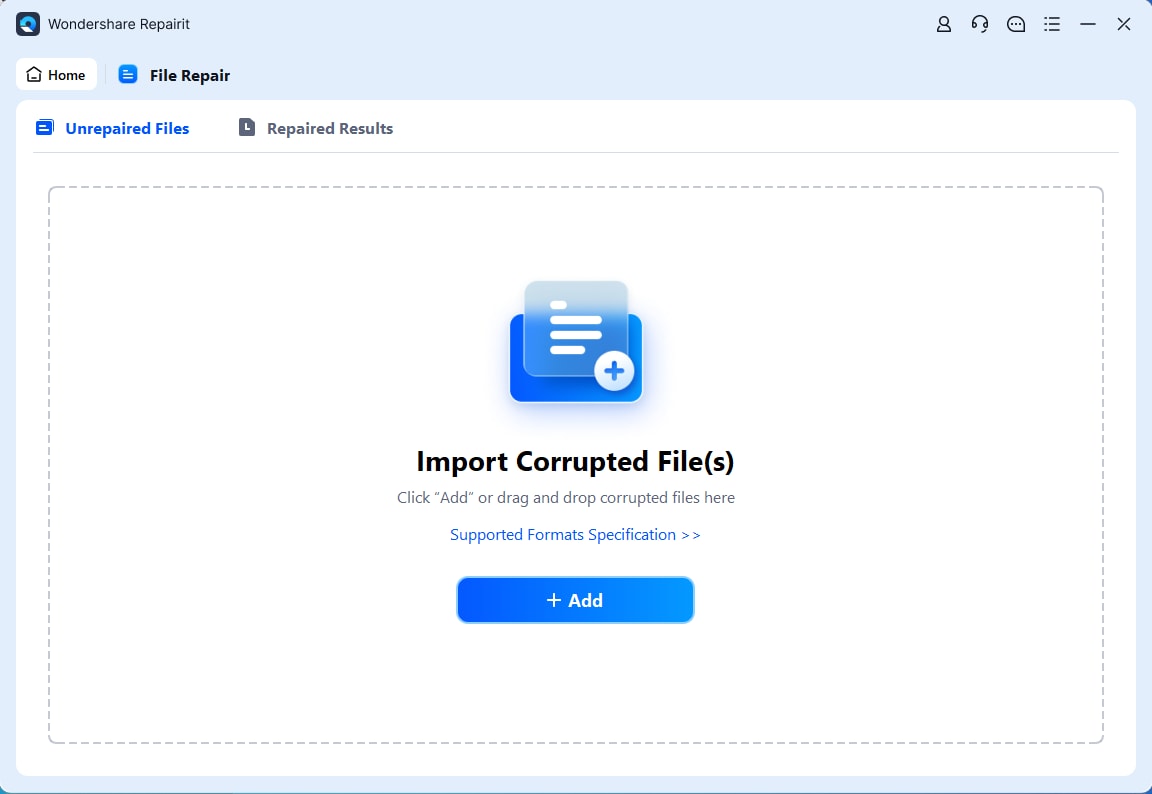
Click on the “Add” button, and it will redirect you to the browser window from where you can go to the location where the corrupted file is stored. The user can choose multiple documents and upload them on the tool.
-
The application will notify you if you try to upload any incompatible format. Once you start uploading the files, it will display the progress on the screen.
-
If you have uploaded the wrong file, you can easily delete the same by clicking on the Trash icon adjacent to the file details.
Step 2: Let the repairing process begin
-
Once you are done with uploading the documents, tap on the “Repair” option at the bottom to commence the process. The tool will then scan the loaded documents and resolve all kinds of issues related to them.
-
It will also display the progress of the repairing process on the screen and can terminate it if the user wants to do so. Additionally, the tool will let you know the status of files that are being scanned, waiting to be repaired, or already fixed.

-
A pop-up message will be prompted on the screen notifying the number of files that have been repaired.
-
The “Completed” sign will be displayed adjacent to those files that are successfully repaired.
-
Also, if the document is corrupted badly and cannot get repaired, then the tool will notify you about the same.
Step 3: Preview the repaired files and save them
-
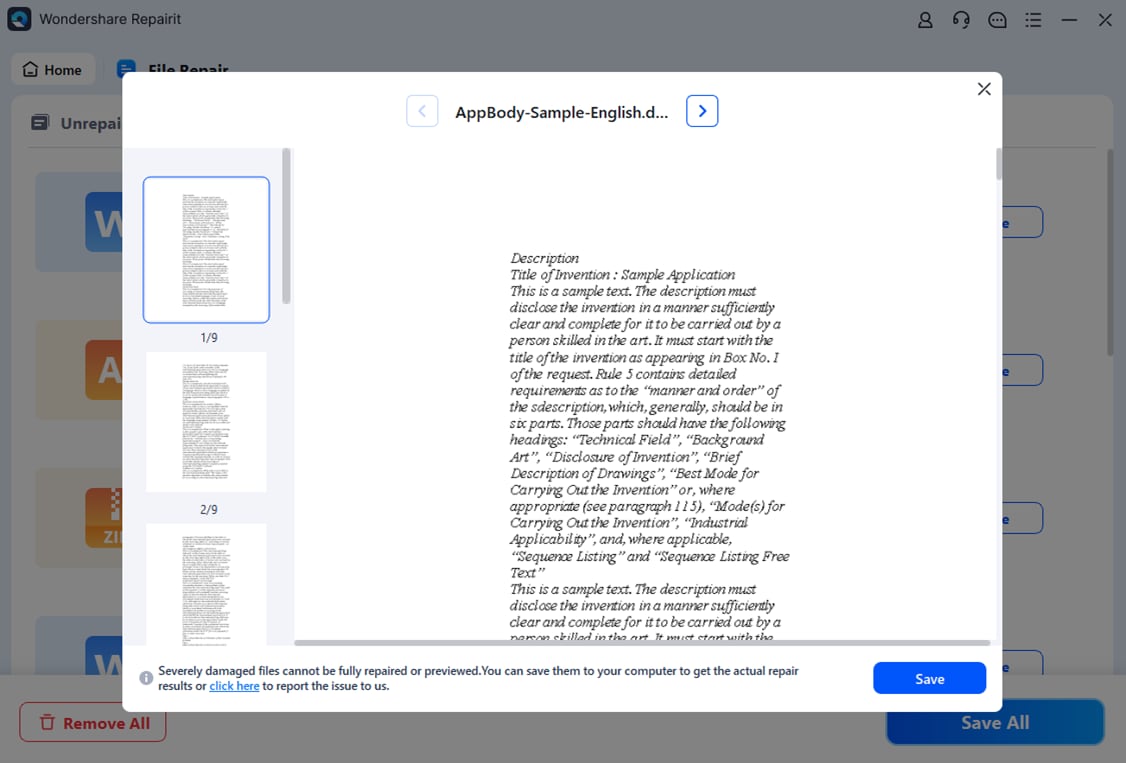
Tap on the “Preview” button and check the repaired file before saving the document. If you find it correct, then export the file to your desired location by clicking on the “Save” button.
-
Click the “Save All” button from the bottom panel to save all repaired files at once. The tool lets you know how many files are being exported.
-
You can now visit the specific location where your repaired files are saved.
Expanding zip file on Mac is super easy if you know to use the correct methods and the tools. We hope our stepwise guide has helped you with all your doubts and solve zip expand issues. Further, we have also highlighted a few tips that you should keep in mind to avoid any problem.
Check this video guide for more solutions to fix the "Zip file won't open on Mac" error.
Further Reading:
Here are the useful articles to help you.
1. For Mac Users Only: Fix Archive Utility Error 1 .
2. Repair Damaged Zip Files: 3 Online And Free Solutions .
3. Methods to Recover Corrupted Macro Enabled Excel File.
Part 4. Few Tips to Avoid Zip File Problems
Since now you are well-aware of the reasons and solutions to resolve the “Mac unable to expand zip” problem, it’s high time to know the effective tips to avoid this trouble in the future.
-
Never leave the website or browser while downloading the zip file.
-
Compress the file again before sharing if your system gets shut down while the file is undergoing the compression process.
-
Make sure that your network is consistent or your internet connection is strong before downloading the zipped file.
-
Keep a check on the permissions to read/ write the zip file or folder before extracting them.
-
Do not change the extension of the zipped file to the format which is not supported by macOS.
-
Since users are unable to open the damaged zip files, it is suggested to keep them safe and secure from virus attacks.
Can't open zip files in Windows 10/11? You can fix the problem quite easily by following this video.
Sum Up
We hope this guide will help you in resolving the issue how to extract zip file in Mac within the least possible time. In total, there are three ways to fix the “unable to expand zip file” trouble on MacOS - by using Terminal with appropriate command, through decompression utility software like Stuffit Expander, and by downloading the Wondershare Repairit tool to quickly fix corrupted zip files.
All of them are worth trying and will troubleshoot the error. However, if you are looking for an exclusive solution, then install the Wondershare Repairit tool on your system and get the error resolved with ease.Enjoy hassle-free file extraction and repair on your Mac!
People Also Ask
-
Why am I unable to expand a ZIP file on Mac?
There are several reasons why you might be unable to expand a ZIP file on Mac, including incomplete downloads, permission issues, file size, or corrupted files. You can try using Terminal, decompression tools, or file repair software to fix this issue. -
How to unzip files on Mac?
To unzip files on Mac, simply double-click the ZIP file, and it will open in the default Archive Utility. If the file is too large or corrupt, you may need to use Terminal or third-party decompression software like Stuffit Expander to extract it. -
How to fix a corrupted ZIP file on Mac?
If a ZIP file is corrupted, you can repair it using Wondershare Repairit. This tool can help fix corrupted ZIP files by scanning and repairing them efficiently without modifying the original content.


 ChatGPT
 Perplexity
 Google AI Mode
 Grok
Grok
