At times, you may find out that your Windows Media Player has stopped working. You might face symptoms like nothing happens when you try clicking the player's icon, or you may see a blue circle that keeps running around, indicating that the player is loading. If you have experienced something similar, then read this post to get solutions and learn more about the "Windows Media Player not working" error.
In this article
Part 1. Diagnose Why Windows Media Player Stops Working
Most people use Windows Media Player to play their video files and to find any kind of disruption in WMP can be frustrating and can ruin the video viewing experience. Below are some of the most common Windows Media Player errors that you can face in your daily life.
Error 1. Video Codec Issues
If you get this error - "Windows Media Player cannot play the file because the required video codec is not installed on your computer." This means that your system lacks the supporting codec required for a specific video file format. Remember, codec files are crucial for decoding and encoding digital data.
You need to go to Windows Media Player to download the codecs directly. And if the error says "the codec does not support the video," you might have to uninstall the older codec and get the preferred codec pack. The codec can also be obtained from a third-party vendor.
Error 2. Video Format Issues
If you see "Windows Media Player encountered a problem while playing the file" error, this implies that WMP does not support the file format, which may include WAV, AVI, or MOV video formats.
Usually, the AVI format works fine with other video formats, but when you play AVI format with WMP, you may experience a glitch. This may happen because AVI is encoded with codecs that are not supported by WMP. To fix this error, you may have to switch to another media player or download codecs.
Error 3. Video Corruption Issues
If the video file itself is corrupted, it can also cause Windows Media Player to stop working. When this happens, you may see error messages or experience issues such as black screen, freezing or crashing. To resolve this issue, you can try playing a different video file to see if the problem persists. If the issue only occurs with a specific video file, you may need to repair or replace the file to ensure it is not corrupted.
Error 4: Windows Media Player Freezes in Full-Screen Mode
Sometimes, when you switch Windows Media Player to full screen, it might stop working. This issue mostly occurs when your computer's graphic card is incompatible with full-screen mode. To avoid this problem, you can try updating your graphics card driver.
Part 2. Tested Solutions to Fix Specific Media Player Not Playing Errors
If you rely on Windows Media Player (WMP) to watch videos on your computer, it can be disappointing to encounter "Windows Media Player not opening" error every time you try to play a video file. However, you do not have to worry as there are several tested solutions to fix this issue. Let's have a look!
Solution 1: Use a Reliable Software to Fix Video Corruption
When the "Windows Media Player not opening" issue is caused by video codec issues or video itself corrupted, you must use a dedicated video repair tool like Wondershare that will solve your issue within a few minutes.
Wondershare Video Repair software is a reliable tool that comes with a user-friendly interface and helps to repair all corrupted video files with different Windows Media Player formats and sizes. The fowllowing are its main features:

-
Repair damaged videos with all levels of corruption, such as video playback errors, video header corruption, missing video codec, video not playing, video no sound, etc.
-
Repair damaged or corrupted videos caused by video compression, system crash, video format change, etc.
-
Repair videos of diverse formats, including MOV, MP4, M2TS, MKV, MTS, 3GP, AVI, FLV, MXF, KLV, INSV, M4V, WMV, MPEG, ASF, etc.
-
Repair critically damaged or corrupted videos available on SD cards, mobile phones, cameras, USB flash drives, etc.
-
Repairit has a quick and advanced scanning mode. You can use either depending on the level of corruption the video file has undergone.
-
No limit to the number and size of the repairable videos.
-
Support Windows 11/10/8/7/Vista, Windows Server 2003/2008/2012/2016/2019/2022, and macOS 10.10~macOS 14.
To fix your damaged video files through Wondershare, follow the simple steps described below:
Step 1: Add Corrupted Video
You need to download and install "Wondershare Video Repair" software in your compute before you start with the repair process. Once it is successfully launched, you can add the files that you want to fix. You can either directly drag them into the software window or add them from a folder on your computer.

Step 2: Repair Video
Now, the software will start uploading the video files you want to repair. It may take a couple of minutes to complete. It entirely depends on the size of the video. If you have added multiple video files, they will be uploaded one by one. When you see that all the videos have been added, you can click the "Repair" button. This will initiate the repairing process.

Step 3: Preview the Repaired Video
Your videos will be repaired within a few minutes. Once they are fixed, a "success" message will appear on your screen. Now, you can preview the repaired video and see if you are satisfied with the result. You can then save it to a safe location and not the one where you saved the corrupted files.

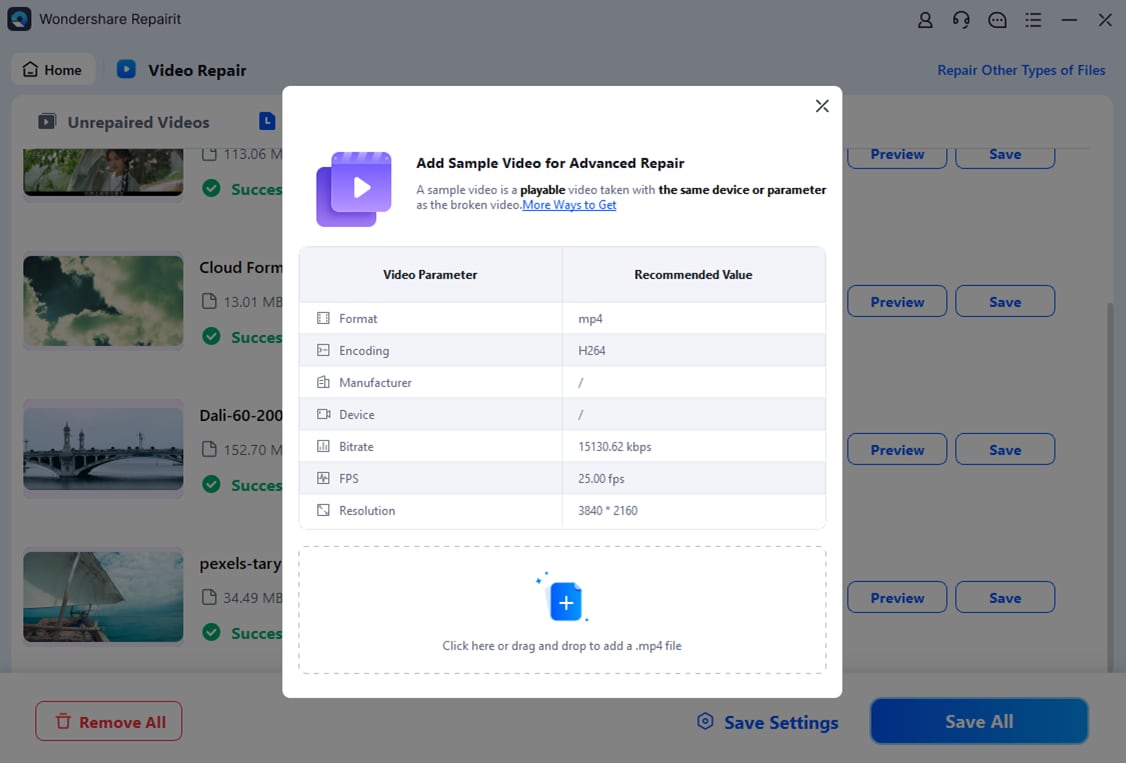
Step 4: Add a sample video (Optional)
If you are not satisfied with the video repair result, you can choose the advanced repair option in the software to fix the video effectively. You just have to add the sample video and select the "Repair" button to start with the repairing process.
Step 5: Save Video
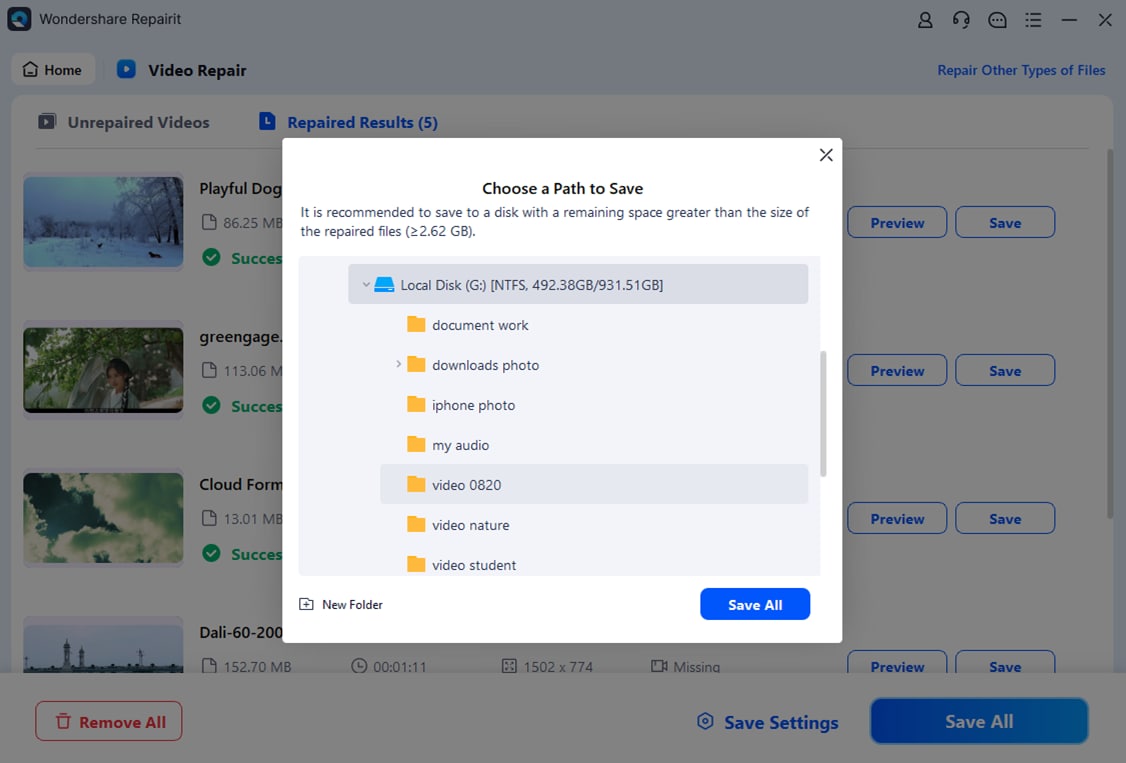
It will just take a few minutes for the repairing process to finish. Once complete, you can save the video file anywhere on your computer, except the location where you saved the corrupted file. You are now ready to play the file without any interruption.
Attention:
If you do not want to download software on your computer and your corrupted video is no more than 3GB, you can try the online version of Repairit Video Repair.
Solution 2. Wrong Audio Device Fix
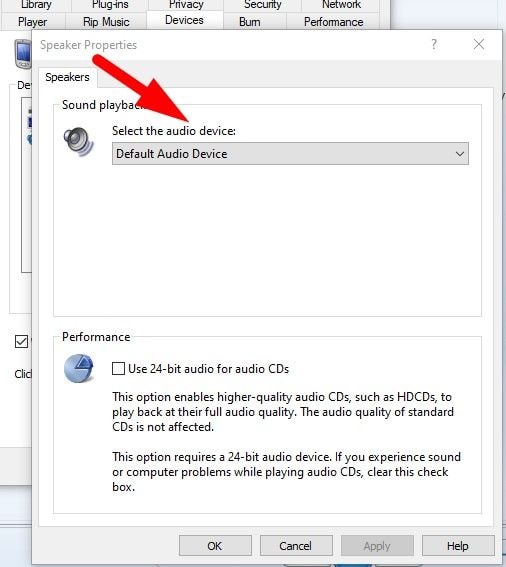
Sometimes, the "Windows Media Player not working" error may occur if you have accidentally chosen the wrong audio device. However, you do not have to panic as you can fix this issue by simply changing the device settings. Here is how you can do that:
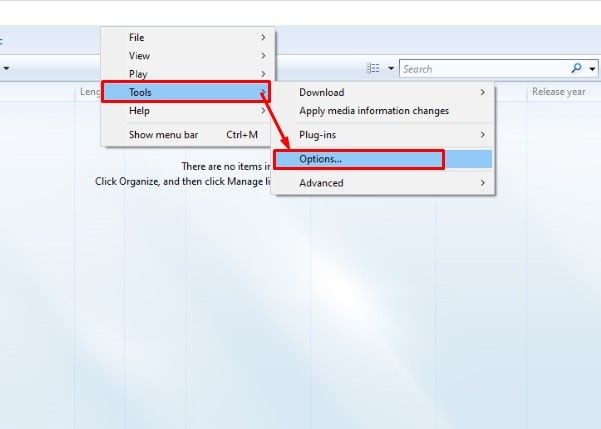
Step 1: To change device settings, right-click on the WMP screen. A few options will open up, click on "Tools" and then select "Options."
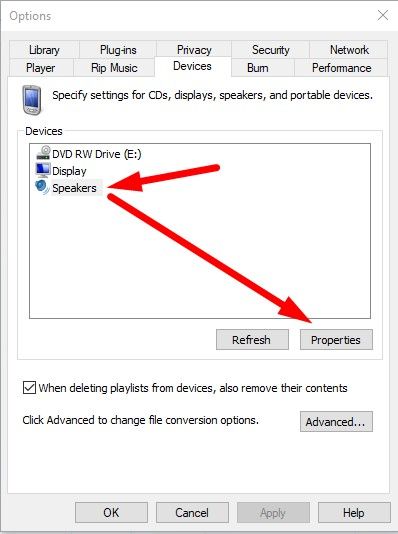
Step 2: Now, go to the "Devices" tab and select the "Speakers" option. Next, press the "Properties" button in the bottom right to apply settings.
Step 3: The final step is to choose the preferred audio device and see if the video issue is fixed or not.
Solution 3. Download Codecs to Fix Unsupported Video Files
If Windows Media Player does not support your media file, this means there might be a codec issue. In this situation, you need to download the codec that is required to play the Windows Media Player file types. The following steps will show how you can download codecs to fix "WMP not working" errors.
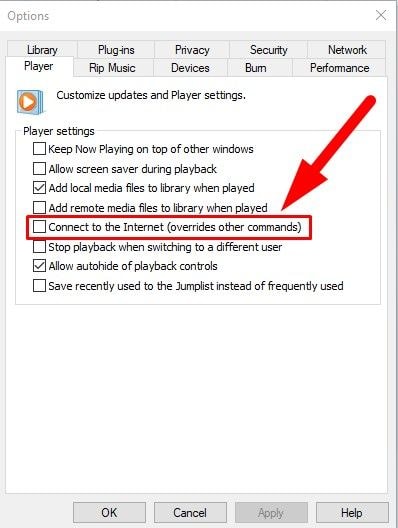
Step 1: First, you need to check the status of the codec. You can do that by going to the video file that is not working and right-clicking it. After that, choose "Properties." Under Properties, you will see Video codecs and Audio codecs status.
Step 2: Now, under the "Player" section, you download and install codecs by check-marking the "Connect to the Internet" option. This will enable you to download appropriate codecs required to play the video through Windows Media Player.
Solution 4. Switch to Another Media Player to Fix Black Screen Issue
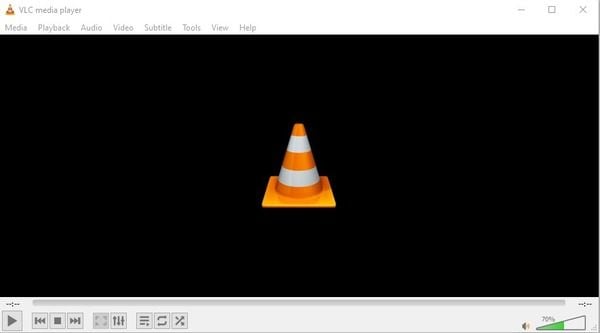
You should know that apart from Windows Media Player, there are other efficient players out there that you can use to play your videos. So, if you see a black screen or experience glitching while playing your video through WMP, you can use another media player. It is suggested that you use a VLC media player as it can play all types of media files with different Windows Media Player formats.
To use VLC, all you have to do is download it from its developer's website and install the setup on your operating system. After the installation process is complete, you are ready to enjoy the video watching experience. Remember, your Windows Media Player may have some serious issue, so it is always better to try another media player that is capable of playing every type of video file.
Part 3. Common Solutions to Fix Windows Media Player Not Working
Apart from the solutions mentioned above, other methods you can also refer to help you to fix Windows Media Player errors. Here are some possible fixes for different Media Player errors that you might experience. Let us check them out!
Solution 1. Run Windows Media Player Troubleshooter
Running Windows Media Player Troubleshooter is one of the easiest ways to fix "WMP not working" problems. Here are the steps you need to follow to open and run Windows Media Player on your computer:
Step 1: To open the run box, hold Windows+R keys together. After that, type "msdt.exe -id WindowsMediaPlayerConfigurationDiagnostic" in the box. Then, press "OK" and click on the "Next" button to run the WMP troubleshooter.
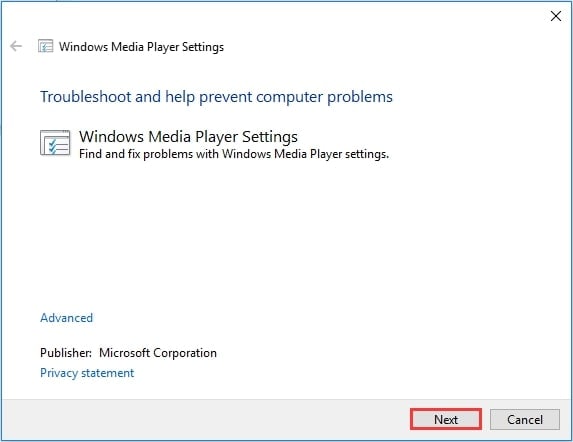
Step 2: Another window will open, select "Apply this fix" to reset WMP settings to default. You can close the window and check if your Windows Media Player is working or not.

Solution 2. Delete the Windows Media Player Library
If the above solution does not work, you can try another quick fix to resolve the "Windows Media Player not working" error by deleting the WMP library. Follow the steps below to remove the library:
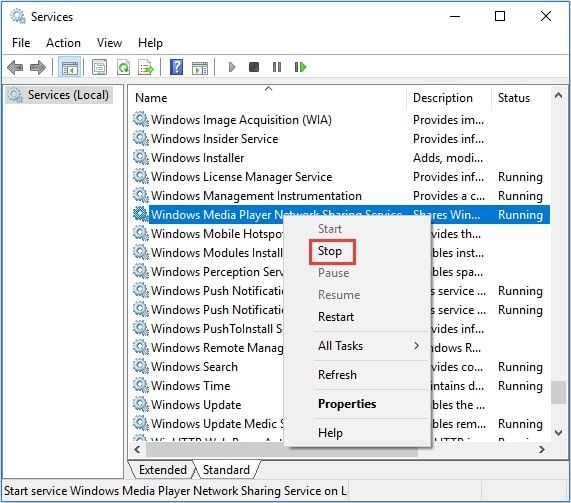
Step 1: Press the Windows + R keys together to open the run box. Once opened, type "services.msc" in the box and click "OK." This will open Services.
Step 2: You will see a list of services, look for "Windows Media Player Network Sharing Service," right-click it to stop the service.
Step 3: Now, hold the Windows+E keys together to open "File Explorer." After that, navigate to C:\Users\Default\AppData\Local\Microsoft. You will see a list of folders, double-click "Media Player." Then, delete all Windows Media Library files types (.wmdb) inside the folder.
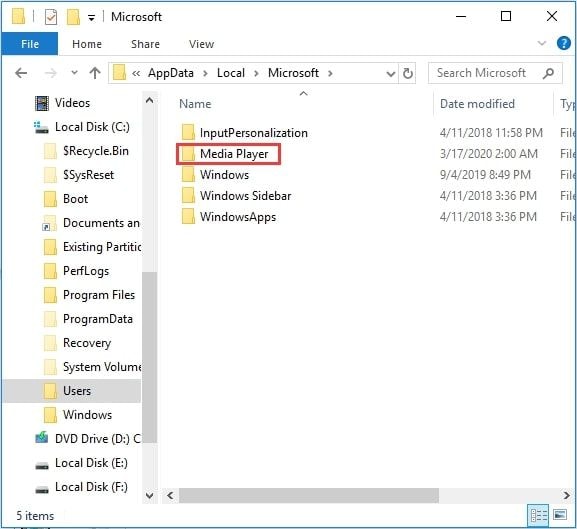
Now, close the window and try to open WMP — the "Windows Media Player not responding" error should be fixed.
Solution 3. Re-register Some DLL Files
If your Windows Media Player is running poorly and giving you errors, you can try re-registering some DLL files. Here is how you can do that:
Step 1: Open the search bar and then type "cmd." Now, right-click on "Command Prompt" to select Run as "administrator."
Step 2: The next step is to type the commands mentioned below one at a time and press Enter after typing each command.
- regsvr32 vbscript.dll
- regsvr32 jscript.dll
- regsvr32 wmp.dll

Step 3: Once done, exit Command Prompt and restart your system. You can see now if the "WMP not working" issue has been fixed or not.
Solution 4: Uninstall and Reinstall Windows Media Player
If nothing helps, you can try uninstalling and reinstalling Windows Media Player to get rid of the "Windows Media Player, not opening" error. This can fix the issue and help you run WMP again. Follow the instructions below to uninstall and reinstall Windows Media Player:
Step 1: Go to "Control Panel" and then select "Programs and Features." You will see the option "Turn Windows feature On or Off, click it.
Step 2: A list of options will open, scroll down to "Media Features" and expand it. Now, uncheck the box next to Windows Media Player. This will uninstall WMP from your system. After that, restart your computer.
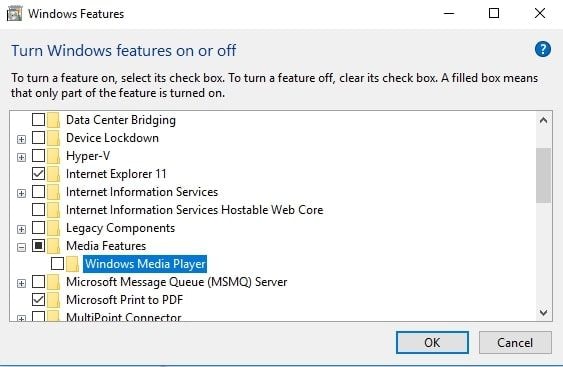
Step 3: Once your system is open, you can reinstall Windows Media Player by marking a check on the same box that you unchecked in the last step. Then, click "OK" and restart your computer again. You should be able to run Windows Media Player.
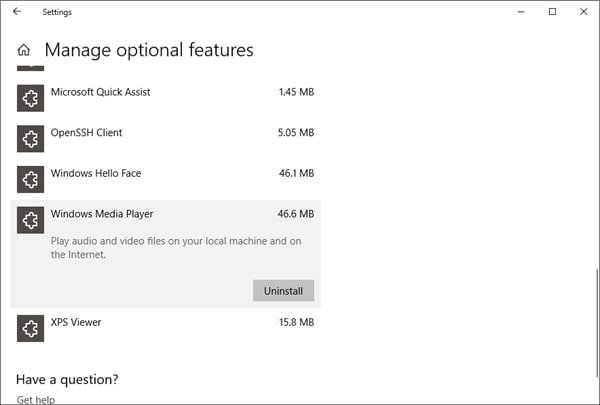
If you are using Windows 10, you can follow the same procedure by opening Settings, going to "Apps" and then selecting "Apps & Features." After that, you need to choose "Manage optional features" and then look for Windows Media Player and select "Uninstall." You can now restart your computer and install WMP again.
Part 4. Windows Media Player Guide to Avoid Crash
If you want to prevent Windows Media Player from crashing in the future, you must keep in mind the following things to avoid a crash and to run Windows Media Player smoothly on your computer:
- Use a secure and effective antivirus and run it regularly on your computer as well as on other storage devices. This will help your Windows Media Player file types from getting corrupted.
- Ensure that the sound drivers work fine and are properly installed.
- You should have the latest version of Windows installed on your computer.
- Make sure compatible codecs are downloaded on your operating system.
- Do not turn down or restart your system when the video is playing in the background.
- Do not convert the video from one format to the other unless necessary. It may cause a disturbance in the file pattern and result in damage.
- If you are downloading the videos from the internet, make sure they are downloaded from a reliable and secure site and are not downloaded with other malicious files or spam software.
- Always keep your Windows Media Player up-to-date.
- Try not to change vital video settings such as codec, output mode, or play with its header because it can damage the video file.
- Before playing the video, check whether Windows Media Player supports the video file or not.
- If you want to repair your video, make sure to use a reliable and professional video repair tool.
Closing Words
Windows Media Player supports all types of video files and is an efficient player for every user who wants to enjoy their video watching experience. So if the Windows Media Player stopped working or keeps crashing on your computer, you can always refer to the solutions and methods mentioned in this article.
If you still see "Windows Media Player not working" error on your computer, it is highly recommended to use Wondershare Video Repair Software that will fix all video-related issues instantly.


 ChatGPT
 Perplexity
 Google AI Mode
 Grok
Grok
