
 TL;DR:
⚡ Quick Fix: Remove Video Pixelation
Pixelation occurs when excessive file compression erases visual data or low-light shooting with high ISO distorts the footage. Fix grainy videos with these 3 steps:
● Run automated AI video repair: Use Wondershare Repairit Video Repair to upload pixelated MP4, MOV, or MKV files. Run Quick or Advanced Repair to automatically rebuild corrupted video layers.
● Apply After Effects grain removal: Import the pixelated footage into Adobe After Effects, drag the Remove Grain effect from the Presets panel onto your timeline, and adjust the Noise Reduction settings.
● Check for hardware and player codecs: High-resolution videos look pixelated if they exceed your device's processing limits or clash with player algorithms. Swap to an alternative media player to clear rendering bugs.
Ask AI for a summary
 ChatGPT
 Perplexity
 Gemini
 Claude
 Grok
Grok
If you have ever played a video that intermittently shows "polygon" like objects, that, my good friend, is what pixelation looks like. It frustratingly diminishes the quality of the video.
Nobody likes to watch a movie with polygons competing with actors for screen time-just a little joke. But seriously, whether you're trying to fix pixelated videos, enhance them, or unpixelate a video on Mac or online, the good news is: it's not rocket science. Stick around, and we’ll show you how to remove video pixelation with a few simple methods.
Part 1. What Leads to Video Pixelation Issue?
Pixelation usually happens when you compress the data in video files to make the video files smaller and reduce memory usage.
This excessive compression, however, could negatively affect video quality. Some of the data encoded in the video are permanently erased, thereby creating the "pixelation" effect on the video.
But what can cause the video pixelation? There are several factors.
In most cases, it’s possible to fix pixelated video or even enhance pixelated footage using the right tools. But if the quality loss is extreme, even the best software might not be able to bring it back completely.
It seems then that the only possible solution is to reduce the size of your playback window. This inadvertently reduces the grains and improves video clarity.
Part 2. 5 Methods to Fix Pixelated or Grainy Videos
Pixelated or Grainy videos are quite irritating as they make the video viewing experience less enjoyable. There are many reasons why your video footage may look grainy, but fortunately, there are several methods that allow you to rectify such errors.
So, sit back and relax as you are giving a guided tour on how to fix grainy videos.
Method 1. Use A Professional Video Repair Tool
Wondershare Repairit Video Repair is an advanced video repair tool that allows for the repair of corrupted videos caused by compression and many other issues. With a click of a button, it can quickly rectify grainy, frozen, blurry, or flickering videos.
It supports multiple video formats such as MOV, MP4, M2TS, MKV, MTS, 3GP, AVI, and FLV. This wide range of formats means that it's almost certain that Wondershare Repairit would be able to handle whatever you throw at it. Download it and have a try!

Wondershare Repairit - Video Repair
 Security Verified. Over 7,302,189 people have downloaded it.
-
Repair damaged videos with all levels of corruption, such as video not playing, video no sound, out-of-sync video or audio, playback errors, header corruption, flickering video, missing video codec, etc.
-
Repair videos of diverse formats, including MOV, MP4, M2TS, MKV, MTS, 3GP, AVI, FLV, MXF, KLV, INSV, M4V, WMV, MPEG, ASF, etc.
-
Repair damaged or corrupted videos caused by video compression, system crash, video format change, etc.
-
Repair critically damaged or corrupted videos available on SD cards, mobile phones, cameras, USB flash drives, etc.
-
Repairit has a quick and advanced scanning mode. You can use either depending upon the level of corruption the video file has undergone.
-
Support Windows 11/10/8/7/Vista, Windows Server 2003/2008/2012/2016/2019/2022, and macOS 10.10~macOS 14.
How to Fix Grainy Video Files in the Quick Repair Mode
Wondershare Repairit has two video repair modes, namely Quick Repair, and Advanced Repair.
The Quick Repair mode supports the repair of videos with simple errors. Follow the steps and repair your slightly damaged video files.
Step 1. Open Wondershare Repairit and add the video you want to repair by clicking the "+Add" button.

Step 2. Click on the "Repair" tab and wait until the process finishes.

Step 3. After the repair job completes, you can click the video to preview the video quality, then click the "Save" button to save the repaired file on your computer.

How to Fix Grainy Video Files in Advanced Repair Mode
Advanced Repair accordingly allows you to repair it by adding a Sample File to it. This mode is more suited to video files that get severely corrupted or you don't satisfied with the quick repair results.
A Sample File is a working file created from the same device and in the same format as the corrupted file. Wondershare Repairit consequently uses the information from the working sample files and repairs the corrupted files.
Step 1. Add some sample videos shot by the same device.

Step 2. After selecting the sample video, click on Repair > Save. Once the repair ends, a new window would open, indicating a successful repair. Finally, click the OK tab to save and preview the repaired video.

Attention:
Wondershare Repairit is a desktop software, so you need to repair the files on your Windows PC or MacBook. If you just want to repair videos on your phone and the damaged video is no more than 3GB, please try the online version of Wondershare Repairit - Online Video Repair. The online version of Repairit supports repairing your corrupted videos freely within seconds and also provides a nice video repair experience for you. Learn fix pixelated videos online for free.
Method 2. Recover from Original Video File
If it is the excessive levels of compression that result in pixelation, one way can help you. You could create a new video file provided that you have access to the original video file.
Simply discard the pixelated video and save the original video file with a lower level of compression. That should do the trick.
Method 3. Fix Pixelated Video with Adobe After Effects
Adobe has many advanced plugins like After Effects that help users remove pixels from videos and improve visual quality. Adobe After Effects is one of the most popular visual effects tools. With its built-in "Remove Grain" effect, you can effortlessly remove pixelation and grain from your videos. It removes grain caused by low light or high ISO during recording, and you can apply the effect to a specific area or the entire frame.
Here is a step-by-step guide on removing pixelation from videos using Adobe After Effects.
Step 1. Download and install After Effects from the official website of Adobe.
Step 2. Import the pixelated video you want to unpixelate and drag it to the timeline.
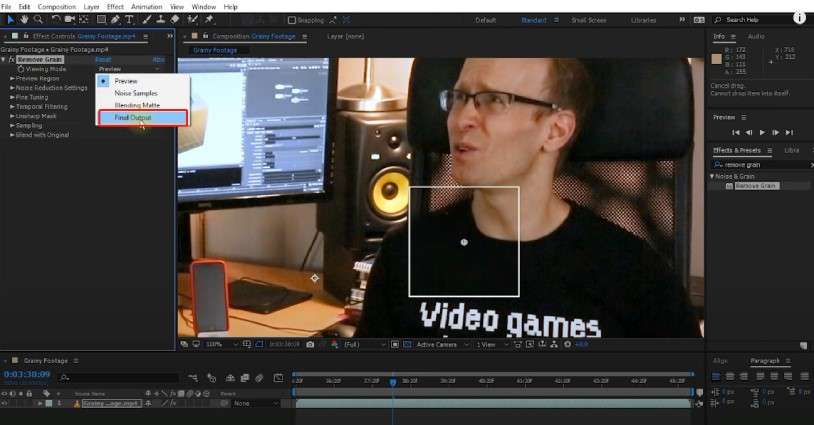
Step 3. Come to the Effects & Preset panel, search the "Remove Grain" effect, and drag the effect to the composition area, then you can see the preview result.

Step 4. Choose "Noise Reduction" settings and adjust the values of Noise Reduction to make the video more realistic.
Step 5. After that, you need to change "Preview" to "Final Output" to apply the effect to the whole area, then export the video that has been removed pixelation.
Method 4. Limited Hardware Processing Capacity
Sometimes, the problem is not necessarily with the video, but with the hardware processing the video. High-resolution videos consume significant computing resources. They will appear pixelated if the played videos exceed the processing capacity of the hardware being utilized.
In this instance, the videos are not the culprits. The only solution would be to utilize a system that can handle such videos.
Method 5. Incompatible Video Player
When you are sometimes faced with a pixelated video, it might be a problem with the video player's incompatibility, rather than a problem with the video.
In some instances, videos are encoded with unique algorithms that make certain video players unable to render them efficiently.
You could try using a different video player to confirm if it plays the video without issues.
Related Reading:
Fix pixelated videos on Android phone.
Part 3. Bonus Tips Against Pixelated or Grainy Video
We usually refer to a pixel as the smallest unitary component of a digital image. The more pixels used to represent an image, the higher the resolution and quality of a video or image file.
The image resolution is the information an image or video holds. A higher resolution means more info the digital file contains.
If you capture a video in a dark environment or with a camera that has low-resolution footage, pixelated videos can occur. If you compress it to tiny file size or a low video resolution, it can also happen.
All essentially mean is that not enough information is present in the video file for it to run perfectly. You can prevent the problems associated with video pixelation by doing the following:
1. Ideal Lighting Conditions
Well, shooting videos in the correct lighting conditions may seem a bit too obvious. However, having adequate lighting is vital if you want to avoid grainy videos.
When shooting videos outdoors, natural daylight is perfect enough. When shooting indoors or at night, you can enhance the natural lighting with adequate artificial lighting.
2. Using the Correct Camera Settings
Prevention, as it is said, is always better than cure. It is especially true when shooting videos, as avoiding the situations that may create pixelated videos in the first place can save you from a lot of problems afterward.
The use of correct and ideal camera settings is your best bet in avoiding pixelated videos.
3. Using Lower ISO Settings
ISO in a camera measures the sensitivity of the image sensor. When shooting videos, it is always advisable to use a lower ISO setting. It can avoid excessive light from distorting your videos.
But there is a particular case. When shooting in low light conditions, it may be necessary to increase ISO to compensate for the lower lighting level.
4. Wide Aperture
The camera aperture determines the extent of light that enters your camera. In low light conditions, set your camera to wide aperture settings and reduce any possible distortion to your video.
Conclusion
Those evil polygons turn up and flood your video screen with their unwanted appearances. It is certainly not the best experience when you play a video.
But it's not all gloom as the pixelation can be fixed in most cases. With the use of the right software, like Wondershare Repairit, pixelated video files can easily be repaired.
Note: Case: I fixed my grainy videos, but just found some other videos that were playing choppily. Fix The solutions to choppy, jerky, or skipping videos.
People Also Ask
-
How can I enhance a pixelated video?
You can enhance pixelated videos using editing software like Adobe After Effects or a repair tool like Repairit that restores clarity automatically. -
How do I remove pixelation from video on Mac?
Use video repair tools like Repairit for Mac to fix pixelation quickly, or apply grain-reduction effects in tools like Final Cut Pro. -
Can I unpixelate a video online?
Yes, you can remove pixelation from video online using browser-based tools like Repairit Online. For better quality repair, consider desktop solutions.