YouTube is arguably the most popular video streaming platform with millions of daily users. But as good as this platform is, it isn’t immune from unexpected glitches. Recently, many users have complained about YouTube stuttering, YouTube skipping, and choppy YouTube playback while playing videos. If your YouTube videos are taking too much time to load or hoppy YouTube videos are jumping, you're likely facing this issue.
If you've been wondering why is YouTube stuttering or experiencing the annoying YouTube 5-second delay, you're not alone. Luckily, troubleshooting YouTube video stuttering is as simple as it can get. We have listed several proven methods to eliminating this irritating problem without any hassles.
Table of Contents
Part 1: Fix "YouTube Video Stuttering" with 6 Common Ways
YouTube videos stuttering, YouTube skipping, or experiencing choppy YouTube playback can be caused by slow internet speeds, outdated software, or device performance issues. Check out the below 7 solutions to ensure your YouTube videos are running as smoothly as possible.
1. Check the network connection
The first thing you should do is check the speed of your internet. A slow internet connection is the leading cause of video stuttering. You have plenty of options to test your internet speed. But the most reliable one is to use a third-party application like Ookla for the internet speed test.
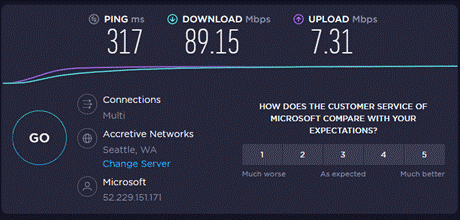
You may have to shut down extra web pages running on your browser or stop any torrent and downloading process.
2. Reload the Router
If your internet is not working at the optimum speed, try rerouting the router to fix YouTube stuttering. Turn off the Wi-Fi router, wait a few seconds, and turn it on again. That will address any temporary glitch in your router, and your internet will start running smoothly.

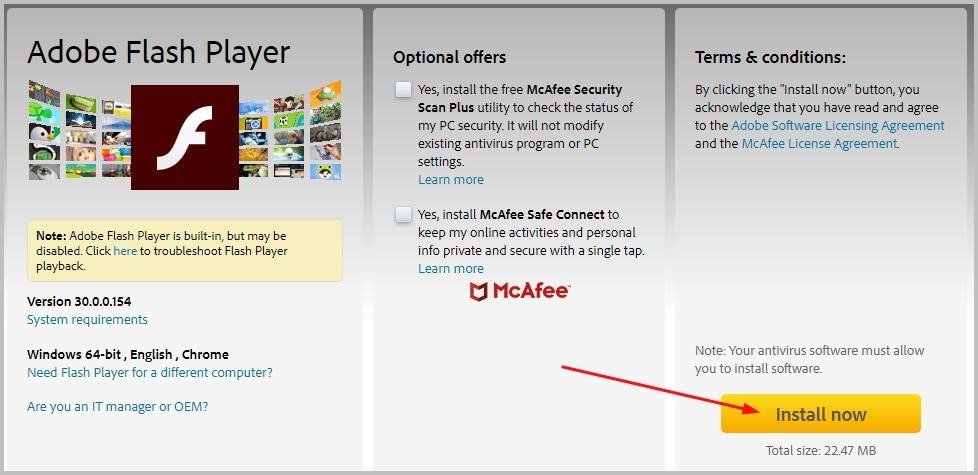
3. Install the latest Adobe Flash Player
Almost every popular video streaming site uses Adobe Flash Player to stream videos. However, if your Flash Player is outdated or corrupt, it can lead to the YouTube video stuttering problem. The quickest way forward is to install the latest Adobe Flash on your computer in such a scenario.
4. Update video driver
Video drivers are responsible for enabling communication between your PC and display. If any of the video drivers on your PC is not updated, it can also cause video stuttering.
All you need to do is check and update these drivers to eliminate this problem. Here's how to do that:
Step 1: Type Device Manager in the search tab and open it.
Step 2: Expand the drop-down arrow of Display adapters.
Step 3: Right-click your graphic card and select Update driver.
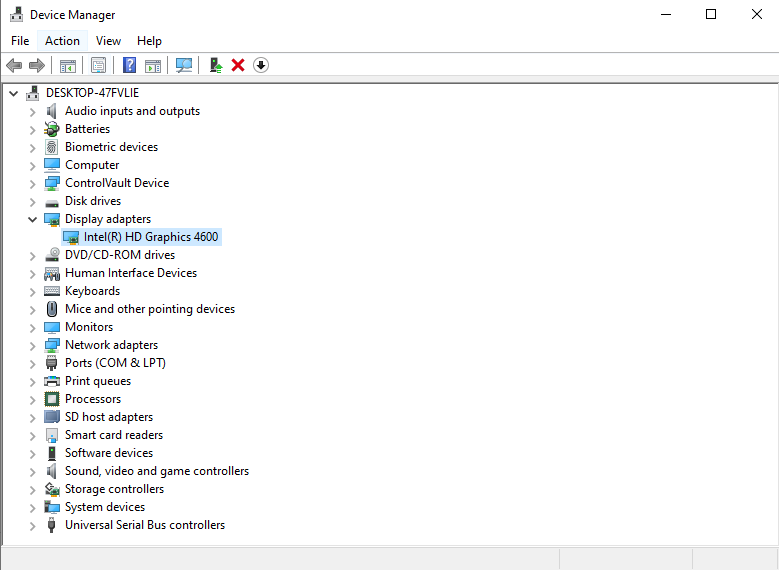
Step 4: On the next window, click on "Search automatically for updated driver software".
Then Windows will find and install drivers for your video device automatically.
5. Change the VPN
If you're using a VPN to browse and play YouTube videos, it is hindering the normal working of YouTube. Instead, try to change the VPN location to any other country or region and play the YouTube video again.
6. Disable hardware acceleration
One of the simplest ways to fix YouTube video stuttering is to disable hardware acceleration on the browse. This feature allows some applications to use the bulk of your computer’s hardware to perform more efficiently. And often, it limits the hardware usage of other programs.
So, disable hardware acceleration by following the below steps:
Step 1: Launch your browser, click on the three dots icon, and go to Settings.
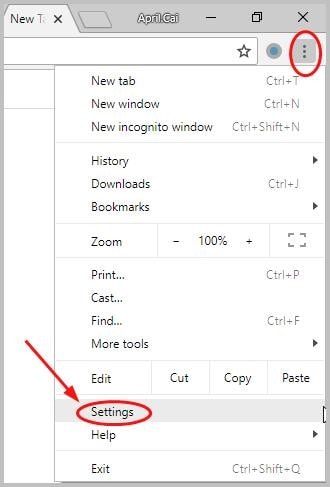
Step 2: Hit Advanced at the bottom of the screen to see more options.
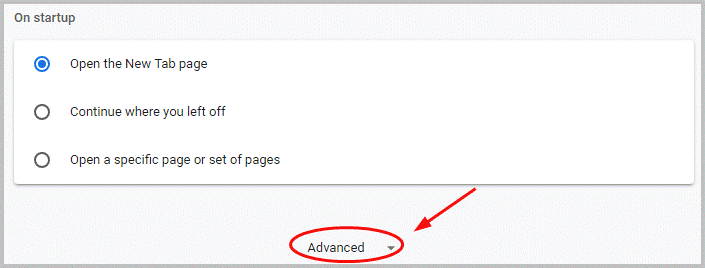
Step 3: Enable the "Use hardware acceleration when available" icon.

Step 4: Relaunch your browser and play YouTube videos again.
Part 2: How to Fix Downloaded YouTube Video Stuttering?
If you have downloaded YouTube videos on your PC, but they're still stuttering, you need professional video repairing software. Based on user feedback, Wondershare Repairit stands out as the most reliable tool for repairing stuttering videos.
It is a one-stop solution to fix any broken, damaged, or inaccessible video files with easy steps. With this tool, you can repair even the worst hurt videos instantly. More strikingly, it is compatible with popular app video formats and guarantees lossless video repairing. In addition, the program lets you preview the repaired video in real-time.

Wondershare Repairit - Video Repair

-
Repair damaged videos with all levels of corruption, such as video not playing, video no sound, out-of-sync video or audio, playback errors, header corruption, flickering video, missing video codec, etc.
-
Repair full HD, 4K, and 8K videos and support 20+ popular formats, including MOV, MP4, M2TS, MDT, RSV, WMV, MPEG, DAT, etc.
-
Repair damaged or corrupted videos caused by video compression, system crash, video format change, etc.
-
Repair critically damaged or corrupted RAW/Log/HDR videos from professional cameras such as Blackmagic Design, RED Digital, and ARRI, etc.
-
Repairit has a quick and advanced scanning mode. You can use either depending on the level of corruption the video file has undergone.
-
No limit to the number and size of the repairable videos.
-
Repaired videos are more compatible with professional editing software such as DaVinci, Composer, Final Cut Pro, and Premiere Pro.
-
Support Windows 11/10/8/7/Vista, Windows Server 2003/2008/2012/2016/2019/2022, and macOS 10.12~macOS 15.
Check out how easy it is to repair your stuttering videos:
Step 1: Add the stuttering Youtube video.
Launch Repairit on your computer and press the blue-colored “Add” button to upload the stuttering videos.

Step 2: Click the “Recover” button to start the repair process.
Once the videos are uploaded, you’ll get the relevant information of each video. Tap on the “Repair” button to initiate the repair process.

Step 3: Preview the repaired Youtube videos.
After the video repair process finishes, please click the “Preview” button to check whether or not the repaired video is running correctly. If you are satisfied with the result, click on the “Save” button and select a location to save it.

However, if you didn't get a satisfactory result, try the "Advanced Repair" feature present in Repairit to make a more professional repairing process. See a more detailed guide here.
Conclusion
And that's all you need to know about YouTube video stuttering and how to fix it. Make sure you carefully implement the steps mentioned above to get rid of video stuttering forever.
If your downloaded YouTube videos are stuttering, then use Repairit – Video Repair to repair your stuttering YouTube videos. This powerful tool lets you fix multiple videos in one go, irrespective of the level of damage.
People Also Ask
-
Why is my YouTube video stuttering or skipping?
YouTube videos stuttering or skipping are usually caused by a slow internet connection, outdated software, or device performance issues. Check your network speed, clear browser cache, and update video drivers to fix choppy YouTube playback. -
How can I fix YouTube video glitching or screen tearing?
To fix YouTube video glitching, try disabling hardware acceleration and updating your video drivers. This can resolve issues like hoppy YouTube videos or screen tearing. -
How can I fix Amazon video stuttering?
For Amazon video stuttering, check your internet connection, update your drivers, and disable hardware acceleration. If issues persist, use video repair software like Wondershare Repairit to fix corrupted Downloaded videos.


 ChatGPT
 Perplexity
 Google AI Mode
 Grok
Grok
