Ever encountered an error "cannot render file" while trying to use media player classic? Well, if you're new to all of this, and you plan to use the media player classic anytime soon, then read on and find out how to tackle the error.
This way, you will know exactly what to do upon encountering this error. Firstly, let us clearly understand what media player classic is and what its function is. Well, media player classic is a software by windows that helps users to run audio files on computer devices. In fact, this is one of the oldest music players in the computer world.
There are several other players such as the popular VLC player which supports a wider range of music file types in comparison with media player classic. Well, if you're going ahead and using windows media player classic then read on to resolve the error "media player classic cannot render the file".
Part 1: What Does Cannot Render the File Mean?
Firstly, let's break it down, to understand the meaning of the error, let us understand the meaning of the error statement. Render is a verb in the English language that describes the action of provision. Now, what does the error mean?
Why does the media player classic say "cannot render file". Well, the reason for this error to occur is that the file type you're trying to run is not supported by media player classic. Media player classic is an older software when compared to other similar players such as VLC media player. Newer generation softwares such as the VLC media player supports more number of extensions.
" Media player classic cannot render file" is one of the most common errors, it generally occurs when you try to play a media file whose file extension type is not supported by media player classic. Given below is the list of file formats supported by media player classic
-
Free Lossless Audio Codec (.flac)
-
CD Audio Track (.cda)
-
Windows audio file (.aac, .adt, .adts)
-
MP4 Audio file (.m4a)
-
MPEG-2 TS Video file (.m2ts)
-
MP4 Video file (.mp4, .m4v, .mp4v, .3g2, .3gp2, .3gp, .3gpp)
-
Indeo Video Technology (.ivf)
-
Musical Instrument Digital Interface (.mid, .midi, .rmi)
-
Audio Interchange File Format (.aif, .aifc, .aiff)
-
Sun Microsystems and NeXT (.au, .snd)
-
Windows Media Player Skins (.wmz, .wms)
-
Windows Media formats (.asf, .wma, .wmv, .wm)
-
Windows Media Metafiles (.asx, .wax, .wvx, .wmx, wpl)
-
Audio Visual Interleave (.avi)
-
Moving Pictures Experts Group (.mpg, .mpeg, .m1v, .mp2, .mp3, .mpa, .mpe, .m3u)
The error “media player classic cannot render file” happens either when when the file you're trying to play is corrupted or video codec is missing.
For instance, you can get errors such as cannot render the file MP4 or cannot render the file .mov. Such errors arise when the file is corrupted. Well, now let's find out how you can solve this error and play files using media player classic without encountering errors.
Part 2: Fix "Cannot Rend the File" Caused by Corrupted Video Files
Well, we now know what the possible cause of the error is. How do we solve it then? Firstly, we need to repair the corrupted files. Only after the files affected by virus are repaired, they can be run on the media player classic.
Here's where Repairit comes to your rescue, using Repairit, you can repair the corrupted files in no time. The premium tool helps to detect the damaged or corrupted files and further spots the problem and fixes it.
All you need to do is import the corrupted files onto the software and then use the software to resolve the error. The following are its mian features for corrupted video repair, have a look!

Wondershare Repairit - Video Repair

-
Repair damaged videos with all levels of corruption, such as video not playing, video no sound, out-of-sync video or audio, playback errors, header corruption, flickering video, missing video codec, etc.
-
Repair full HD, 4K, and 8K videos and support 20+ popular formats, including MOV, MP4, M2TS, MDT, RSV, WMV, MPEG, DAT, etc.
-
Repair damaged or corrupted videos caused by video compression, system crash, video format change, etc.
-
Repair critically damaged or corrupted RAW/Log/HDR videos from professional cameras such as Blackmagic Design, RED Digital, and ARRI, etc.
-
Repairit has a quick and advanced scanning mode. You can use either depending on the level of corruption the video file has undergone.
-
No limit to the number and size of the repairable videos.
-
Repaired videos are more compatible with professional editing software such as DaVinci, Composer, Final Cut Pro, and Premiere Pro.
-
Support Windows 11/10/8/7/Vista, Windows Server 2003/2008/2012/2016/2019/2022, and macOS 10.12~macOS 15.
Launch Wondershare Repairit on your device.
Double click on the "Wondershare Repairit" icon to launch the software on your system.
To repair videos on Windows
Skip to the next step if you're using a Mac OS device. On your Windows system, in the left-hand side panel, head to "Video Repair".
Step 1: Import the video
Then click on "Video Repair" > "Add" to import the video onto the software. The supported video types are MOV, MP4, M4V, M2TS, MKV, MTS, 3GP, AVI, FLV. Now you can see the details of the imported video such as path, details, date it was shot, etc.

Step 2: Repair the video
Now that you're done importing the video, click on "repair". Once the process is completed, click on "OK" to save and preview the video.

Step 3: Preview the video
Click on "Preview" to check whether the video is legitimate or not. If the video seems good enough, you can click on the "Save" button, by doing so the video will be saved to the location chosen by you.

Attention:
If you do not want to download software on your computer and your corrupted video is no more than 3GB, you can try the online version of Repairit Video Repair to get your video repaired online with ease.
Part 3: Reinstall K-Lite Mega Codec Pack
Apart from Repairit, you can use this method to fix the error. Here is how to fix “cannot render file” error using this second method.
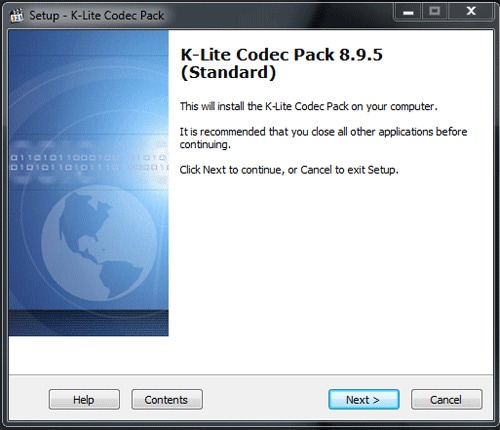
Step 1: Head to and download klite codec pack.
Step 2: Run the downloaded file and start the installation.

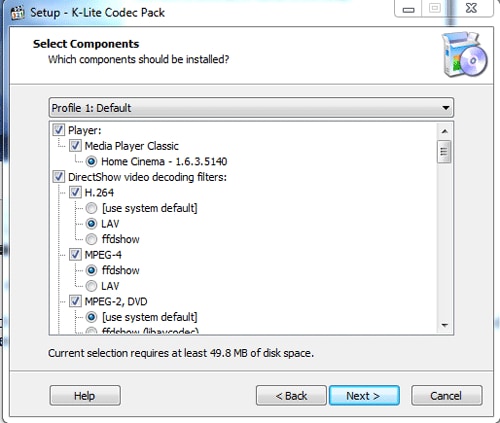
Step 3: Now leave all the settings on default and click on "next" to move ahead.

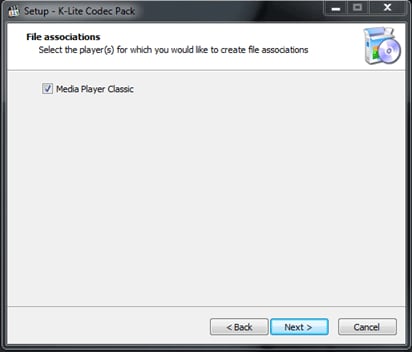
Step 4: Now on this window, select the checkbox and then click on next.

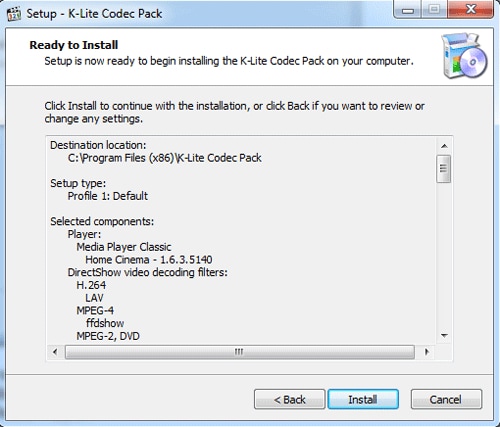
Step 5: Next, click on "install" and finally, the software will begin installing on your system

Part 4: You Might Also Want to Know
4.1 Why is rendering necessary?
Rendering is one of the most important steps in video processing. This ensures that your video plays seamlessly with all the applied effects and filters without any stutters in between. The playback in real-time becomes much smooth and seamless. Without the process of rendering, there will be a delay in the video and stutters will often be caused. This also ensures that the color filters added, additional background sound effects play along with the video without any delay.
4.2 Does rendering improve video quality?
Well, the rendering does improve the video quality by ensuring that the additional background effects that have been added to your video play seamlessly without any problems. When a video is incorrectly rendered, there is always a lag. Hence, we can say that without rendering, the video quality will differ and rendering does enhance the quality.
4.3 What is the difference between exporting and rendering?
Although both words are often used interchangeably, they have different technical meanings. When we say exporting, it essentially means that we save the final output video to our device. There are no technical enhancements that occur during the process of exporting. However, the rendering does have a change in picture quality. Rendering is the process where each frame is inspected and searched for any delays.
Closing Words
Well, we've looked at several different technical details pertaining to a video and mainly learned about the solution to the error "media player classic cannot render file". This happens generally when we install corrupted videos from malicious sources on the internet. Another reason why this error arises is that the video format is unsupported by windows media player classic. We also looked at the difference between the process of exporting and rendering. Finally, we also understood the technical solution to the error "cannot render file". Try out all these methods and solve this error in no time!
People Also Ask
-
Why does Media Player Classic say "Cannot render file"?
This happens when your file is corrupted or the right codec is missing. Try using a video repair tool or install K-Lite Codec Pack. -
How do I fix a corrupted video that won’t play?
Use Wondershare Repairit – a powerful tool to repair broken, unplayable, or damaged video files with just a few clicks. -
Does MPC support .MOV or 4K videos?
Not always. Older versions of Media Player Classic may not handle modern video codecs or high-resolution formats.


 ChatGPT
 Perplexity
 Google AI Mode
 Grok
Grok
