Choosing between Repairit Photo Eraser and HitPaw Watermark Remover comes down to how you like to erase objects from photos and delete watermarks. Repairit focuses on fast AI object removal with minimal effort, while HitPaw offers a practical way to clean up images and remove watermarks with more traditional controls. This guide compares their workflows, strengths, and limitations so you can pick the right photo eraser for your typical tasks.
Remove Unwanted Objects with Repairit Photo Eraser
 Security Verified. Over 7,302,189 people have downloaded it.
In this article
- Repairit Photo Eraser vs HitPaw Watermark Remover: Quick Verdict
- Repairit Photo Eraser vs HitPaw Watermark Remover: Key Differences
- Repairit Photo Eraser vs HitPaw Watermark Remover: Comparison Table
- What Repairit Photo Eraser and HitPaw Watermark Remover Are Best For
- Repairit Photo Eraser vs HitPaw Watermark Remover: Object Removal Capabilities
- Repairit Photo Eraser vs HitPaw Watermark Remover: Background Fill and Realism
- Repairit Photo Eraser vs HitPaw Watermark Remover: Workflow and Ease of Use
- Repairit Photo Eraser vs HitPaw Watermark Remover: Pricing and Trial Options
- Who Should Choose Repairit Photo Eraser
- Who Should Choose HitPaw Watermark Remover
- Pros and Cons of Repairit Photo Eraser and HitPaw Watermark Remover
- How to Remove Unwanted Objects After Choosing the Right Tool
Introduction
Both Repairit Photo Eraser and HitPaw Watermark Remover are designed to help you remove unwanted objects, erase text, and clean watermarks from photos. The main difference is how much automation you want. Repairit leans on AI to detect and fill areas for you, while HitPaw keeps you closer to manual selection and adjustment. Understanding this divide will help you pick the tool that matches your editing style and the types of images you usually clean up.
Repairit Photo Eraser vs HitPaw Watermark Remover: Quick Verdict
If you want an AI photo eraser that handles most of the heavy lifting, Repairit Photo Eraser is likely to feel more efficient for everyday object removal and background distraction cleanup. It emphasizes quick selection and automatic background fill, which can save time when you have multiple images or complex scenes.
HitPaw Watermark Remover may be a better fit when your main focus is straightforward watermark, logo, or small text removal and you prefer to manually mark exactly what should disappear. In those scenarios, its practical, area based workflow can provide the control you expect, especially if you typically work on only a few photos at a time.
Repairit Photo Eraser vs HitPaw Watermark Remover: Key Differences
The core differences between these tools revolve around automation, control, and how you achieve natural looking background fill after erasing something from a photo.
Workflow and removal logic
Repairit Photo Eraser is built around an AI driven workflow. You import an image, roughly select the object, person, text, or watermark, and let the AI interpret the scene, remove the selection, and fill in the gap with surrounding pixels. This approach tries to understand the background so that the removal looks natural with minimal manual retouching.
HitPaw Watermark Remover uses more traditional area based removal. You choose a removal mode and manually mark the exact region containing a watermark or object. The tool then processes that region, typically using blending, smearing, or basic content filling methods. The emphasis is on your manual selection precision rather than on automatic understanding of the entire scene.
Manual control vs automation
Repairit Photo Eraser leans toward automation. You give the AI a clear hint about what should be removed, and it tries to do the rest. This can be especially helpful when dealing with complex backgrounds or multiple distractions in similar positions across several images.
HitPaw Watermark Remover leans toward manual control. You are expected to carefully outline the area you want to erase. For users who like to fine tune each cleanup and do not mind spending extra time on selection, this approach can feel more predictable, particularly for simple watermarks.
Ease of getting natural looking results
With Repairit, the AI is designed to analyze the context around the removed object and rebuild missing areas. In many common scenes, this can produce cleaner, more natural looking fills with fewer visible smudges or repeating patterns. Depending on the image, you may only need one pass.
With HitPaw, realism depends more on your selection and the removal mode you choose. It can work well for flat or uniform areas, like solid color backgrounds or simple corners of a frame. More complex scenes, such as textured walls, patterned floors, or overlapping subjects, may require additional passes and some tolerance for small artifacts.
Repairit Photo Eraser vs HitPaw Watermark Remover: Comparison Table
| Criteria | Repairit Photo Eraser | HitPaw Watermark Remover |
|---|---|---|
| Best for | Users who want an AI photo eraser to remove unwanted objects and distractions with minimal manual work | Users focused on deleting watermarks or specific items with straightforward, area-based tools |
| Ease of use | Very simple, guided interface with AI doing most of the work | Beginner friendly, but may require more manual tweaking per object |
| Object removal | Strong at automatic object detection and filling surrounding areas quickly | Good for targeted object and watermark removal when you carefully select the area |
| Workflow | Import image, highlight object, let AI erase, then export in a few clicks | Import, choose a removal mode, manually mark watermarks or objects, then export |
| Strengths | AI automatic removal, simple interface, batch-style cleanup for similar images | Reliable watermark deletion options and hands-on control for each selected area |
| Weaknesses | Less precise control for very complex or edge-touching objects | More manual work and potentially slower when cleaning many photos in one session |
What Repairit Photo Eraser and HitPaw Watermark Remover Are Best For
Both tools focus on helping you remove unwanted objects and delete watermarks, but they are tuned for slightly different priorities.
Where Repairit Photo Eraser fits best
- Quickly erasing people or objects that distract from the main subject of a photo.
- Cleaning up product photos by removing logos, text overlays, or small props.
- Removing watermarks while keeping the background looking natural in typical scenes.
- Handling many similar photos, such as event shots or product catalog images, where you need fast, repeatable cleanup.
Where HitPaw Watermark Remover fits best
- Deleting obvious, localized watermarks from screenshots or simple photos.
- Erasing simple objects or stickers when you are comfortable painting over the exact area.
- Working on one or a few photos where you can spend more time on manual selection.
- Situations where you want the predictability of straightforward removal modes over heavier AI processing.
Repairit Photo Eraser vs HitPaw Watermark Remover: Object Removal Capabilities
Range of objects and distractions
Repairit Photo Eraser is designed to handle a broad range of targets: people in the background, unwanted objects, text, logos, and common types of watermarks. Because it relies on AI to understand the scene, it can often handle more complex placements, such as objects partially overlapping detailed backgrounds.
HitPaw Watermark Remover is well suited for clear, bounded areas like watermarks or logos in corners, simple text across the bottom of an image, or small items on relatively plain backgrounds. It can also be used for people or objects, but the more complex the surroundings, the more careful your selection usually needs to be.
Watermark and text cleanup
For watermark and text removal, both tools can be effective. Repairit attempts to reconstruct what would be behind the watermark so the result blends better into the background, which is useful when the watermark sits on top of textures, gradients, or photo details.
HitPaw typically works best when the watermark or text lies on a flat or lightly textured region. When conditions are right, its area based cleanup can remove the text without obvious artifacts, though tougher backgrounds may show slight smearing or softness.
Handling people and complex scenes
When you remove people from a crowded scene, such as a street or a beach, Repairit Photo Eraser often has an advantage because its AI analyzes surrounding details to approximate what the background should look like. Results can vary depending on how much of the background is visible, but the intent is to minimize manual touchups.
With HitPaw Watermark Remover, removing people from busy scenes typically requires more trial and error and sometimes multiple removal passes. It can still work, yet you may see more visible traces where the person was, especially when there are repeating patterns, strong shadows, or overlapping elements.
Repairit Photo Eraser vs HitPaw Watermark Remover: Background Fill and Realism
Natural looking background fill
Repairit Photo Eraser uses AI powered background fill to blend surrounding areas after object removal. In many real world photos, this means the tool tries to continue lines, textures, and lighting across the erased area so the edit looks less noticeable. For example, a fence line or a tiled floor may be extended more plausibly than with basic smudge based tools, although results can still vary by image complexity.
HitPaw Watermark Remover typically relies on simpler filling strategies. On flat backgrounds, this can look clean. However, when the removed area cuts across multiple textures or gradients, there is a higher chance that slight blur, distortion, or repeating patterns will be visible, especially at larger sizes.
Artifacts and cleanup
With Repairit, you may occasionally see minor artifacts if the background is extremely detailed or the removed object touches the very edge of the frame. In those cases, you can usually run another pass or refine the selection area to improve the result.
With HitPaw, artifacts are more closely tied to how precisely you select the area and which mode you use. You might need to try different modes or re select smaller segments to reduce smearing, particularly around fine edges like hair, branches, or text outlines.
When manual touchups are still useful
For both tools, manual cleanup can still be helpful on challenging images. If an erased area still looks slightly off, you may choose to redo the removal in smaller sections, crop the frame slightly, or blend edges using another editing tool. The main distinction is that Repairit aims to reduce how often you need extra steps, whereas HitPaw assumes you are comfortable working more manually from the start.
Repairit Photo Eraser vs HitPaw Watermark Remover: Workflow and Ease of Use
Repairit Photo Eraser follows a clear, AI first workflow: import a photo, select an area, let the AI remove the object, then export. This linear approach makes it easier for beginners to understand what to do next and how to repeat the process on multiple images.
HitPaw Watermark Remover offers a similarly straightforward sequence but places more emphasis on your choice of removal mode and the precision of your brush strokes. You import the image, pick a mode, carefully brush over or mark the target area, and then apply the removal. For some users, this level of control feels reassuring, but it can also lead to more time spent on each edit.
Brush selection and control
In Repairit, the selection tools are mainly there to tell the AI what needs to disappear. You usually do not need pixel perfect selections; approximate coverage is often enough for the AI to understand the target.
In HitPaw, your brush size and coverage matter more, because the tool processes exactly what you mark. Wider strokes can accidentally affect nearby details, while overly narrow strokes may leave fragments of the watermark or object behind.
Editing effort per photo
For users handling many photos, Repairit Photo Eraser generally reduces per photo effort thanks to its AI and quick passes. HitPaw Watermark Remover can be efficient for simple screenshots or a few photos but may feel slower if you have to repeat careful brushing across dozens of images.
Repairit Photo Eraser vs HitPaw Watermark Remover: Pricing and Trial Options
Both Repairit Photo Eraser and HitPaw Watermark Remover are typically offered as paid tools. In many cases, you can expect some form of free trial, limited mode, or evaluation version so you can test how well object removal and watermark cleanup work on your own images before purchasing.
Because pricing, plans, and discounts can change, it is best to check each product website directly for current details. Look for information about license type, supported platforms, and any differences between trial and full versions, such as export limits or watermarked outputs. This way you can evaluate not only how effective the removal is, but also whether the cost matches how often you plan to use the tool.
Who Should Choose Repairit Photo Eraser
- Users who want an AI photo eraser to quickly remove unwanted objects and distractions.
- Beginners who prefer a guided, minimal click workflow for cleaning up images.
- People handling many similar photos who benefit from faster, semi batch cleanup.
- Anyone who values automatic background fill that blends removed areas with surrounding pixels.
Who Should Choose HitPaw Watermark Remover
- Users focused mainly on deleting watermarks from photos and screenshots.
- People who prefer manual selection and hands on control over each erased area.
- Those who usually edit only a few photos at a time and can spend more time per image.
- Anyone who wants a straightforward watermark remover without relying heavily on AI.
Pros and Cons of Repairit Photo Eraser and HitPaw Watermark Remover
Repairit Photo Eraser Pros and Cons
HitPaw Watermark Remover Pros and Cons
How to Remove Unwanted Objects After Choosing the Right Tool
Once you have decided whether an AI focused approach or a manual watermark remover suits you better, the next step is to put that choice into practice. If you want to streamline everyday object and text removal with AI assisted background fill, Repairit Photo Eraser provides a focused workflow for that purpose.
Key Features
- AI driven object detection and removal with automatic background fill.
- Beginner friendly interface focused on quick photo cleanup tasks.
- Efficient handling of similar images where the same type of distraction appears.
- Support for common image formats such as JPG and PNG on mainstream desktop platforms.
- Multiple removal passes so you can refine tricky areas or leftover artifacts when needed.
Step-by-step guide
Here is a practical example of how a typical AI object removal workflow looks when you use Repairit Photo Eraser.
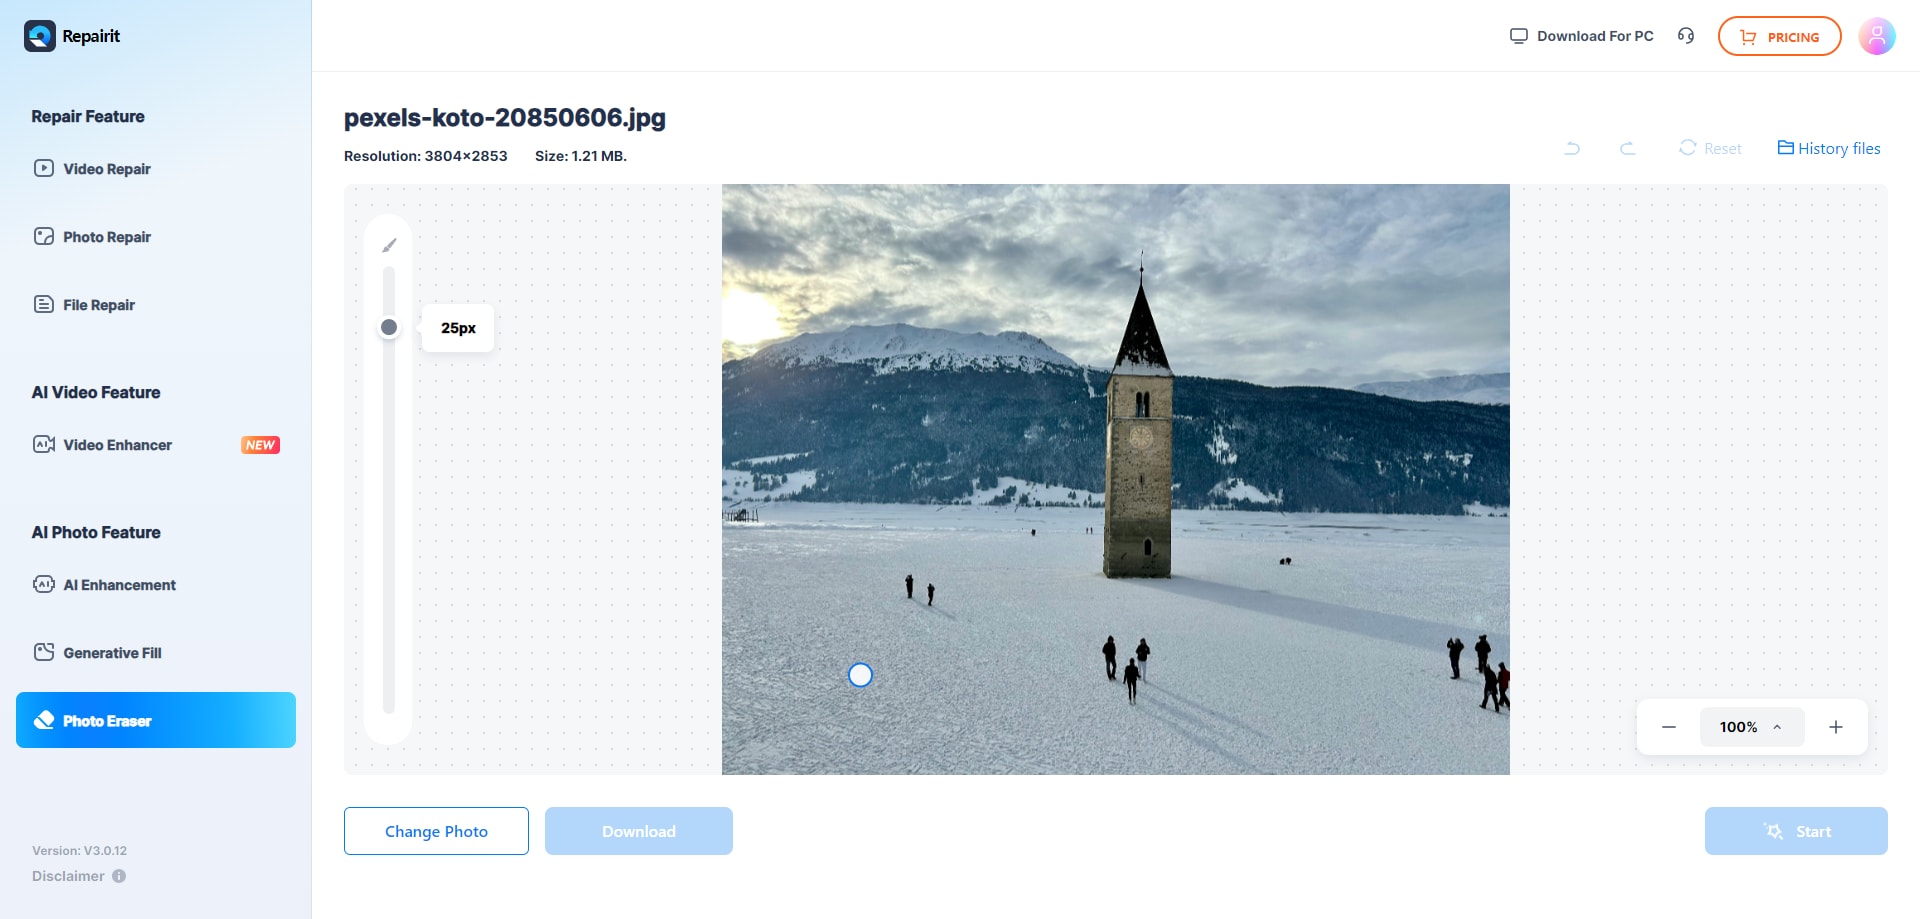
Step 1. Upload the photo you want to edit and start the object removal process.

Step 2. Adjust the brush size and select the object or area you want to remove from the image.
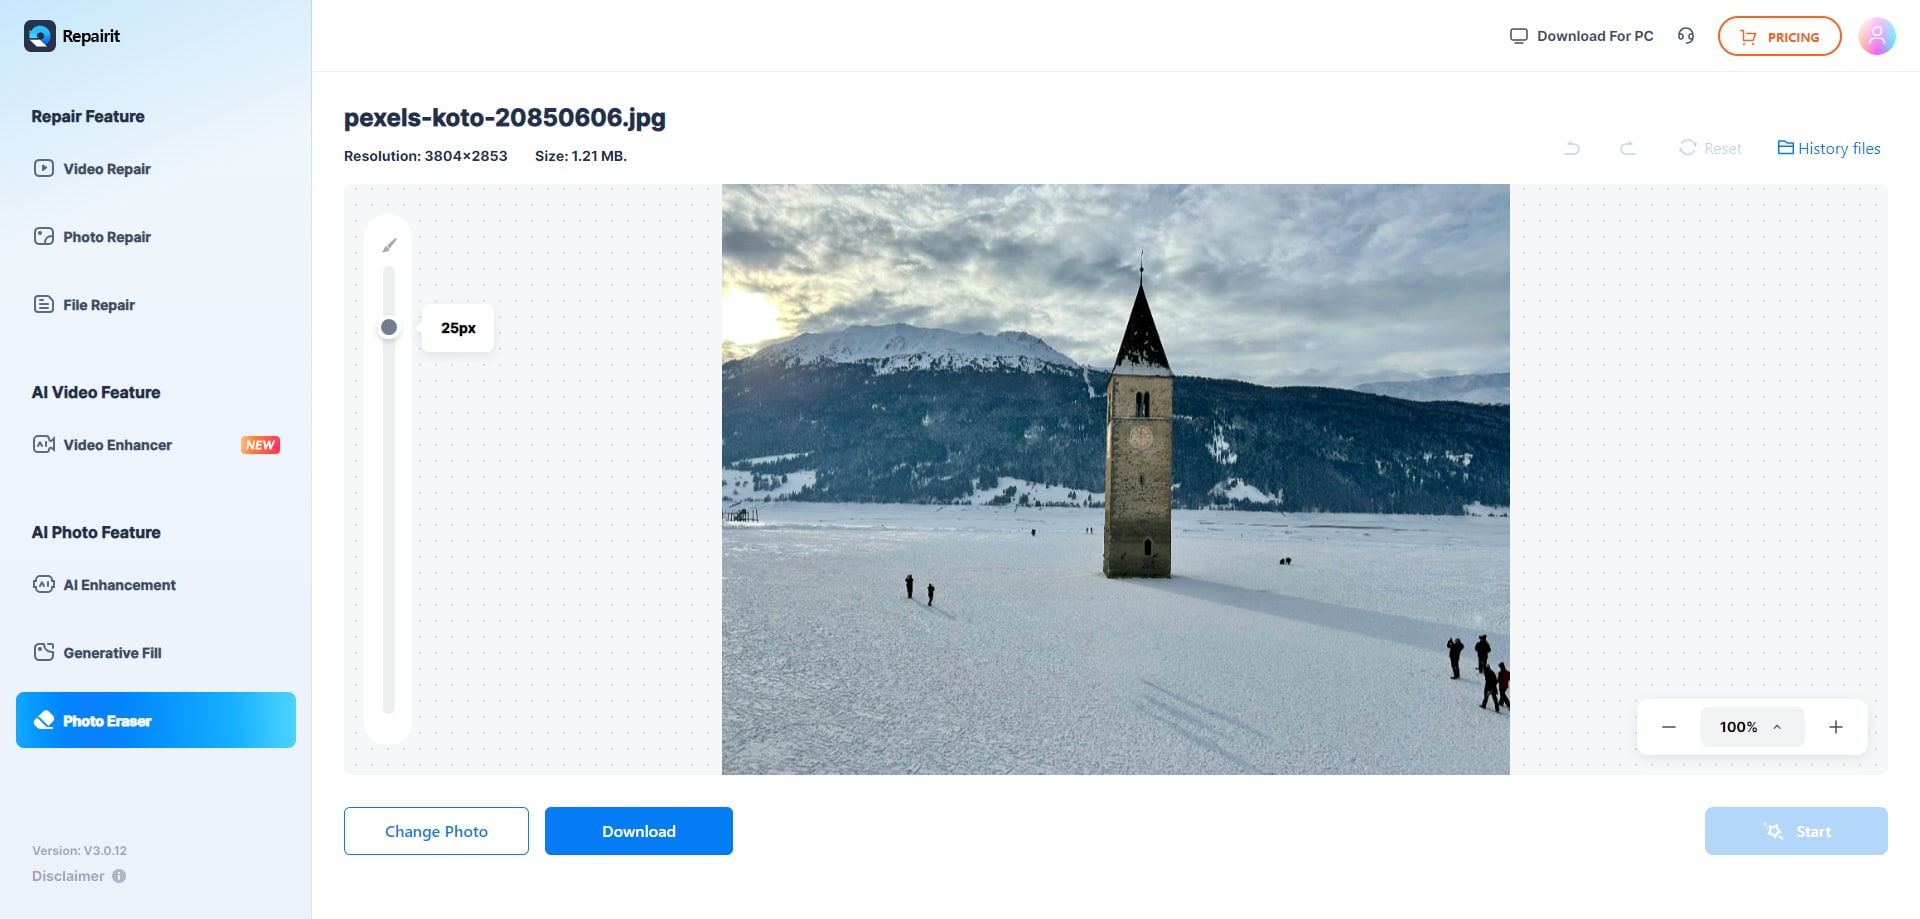
Step 3. Let the AI process the image and download the cleaned photo after the object is removed.
Final Verdict
Repairit Photo Eraser and HitPaw Watermark Remover both focus on removing unwanted content from photos, but they emphasize different strengths. Repairit leans on AI to erase objects quickly and rebuild backgrounds in a way that aims to look natural for common photo scenarios. This makes it a strong option when you handle many images, want minimal manual work, or care about realistic background fill after removing distractions.
HitPaw Watermark Remover remains a reasonable choice if your priority is targeted watermark or logo deletion and you are comfortable manually marking each area. Its practical, area based controls can be effective for simpler images, especially when you mainly work with screenshots or a small number of photos.
In many everyday use cases, Repairit will likely feel faster and more automated, while HitPaw suits users who value manual control and do not mind spending more time on each edit. The right choice depends on whether you prefer AI assisted speed or hands on precision for your object and watermark removal tasks.
Next: Repairit Photo Eraser vs Avclabs Photopro Ai
FAQ
-
1. Is Repairit Photo Eraser better than HitPaw Watermark Remover for erasing objects from photos
For many users, Repairit Photo Eraser is more convenient for erasing objects quickly because its AI can detect and fill areas with minimal effort. HitPaw Watermark Remover can still work well when you want manual control and primarily need to delete watermarks. -
2. Which tool is easier for beginners, Repairit Photo Eraser or HitPaw Watermark Remover
Beginners will usually find Repairit Photo Eraser easier because the workflow is streamlined: import, select, and let AI remove the object. HitPaw Watermark Remover is also approachable, but it may require more manual selection and retries to get a similar result. -
3. Can both tools remove background distractions as well as watermarks
Yes, both tools can be used to remove background distractions in addition to watermarks, as long as you can select the unwanted area clearly. Repairit uses AI to fill the background automatically, while HitPaw Watermark Remover relies more on your manual selections and chosen removal mode. -
4. How should I choose between Repairit Photo Eraser and HitPaw Watermark Remover
Choose Repairit Photo Eraser if you want an AI photo eraser that cleans up images quickly with automatic background fill. Choose HitPaw Watermark Remover if your priority is deleting watermarks and you are comfortable manually marking each area to control the removal more closely.
 ChatGPT
 Perplexity
 Google AI Mode
 Grok
Grok