Choosing between Repairit Photo Eraser and Affinity Photo often comes down to how you remove unwanted objects. Repairit focuses on fast, AI-driven cleanup, while Affinity Photo offers detailed manual control within a full professional photo editor. This comparison looks specifically at object removal, background fill, and everyday workflows so you can decide which approach matches how you like to work.
Remove Unwanted Objects with Repairit Photo Eraser
 Security Verified. Over 7,302,189 people have downloaded it.
In this article
- Repairit Photo Eraser vs Affinity Photo: Quick Verdict
- Repairit Photo Eraser vs Affinity Photo: Key Differences
- Repairit Photo Eraser vs Affinity Photo: Comparison Table
- What Repairit Photo Eraser and Affinity Photo Are Best For
- Repairit Photo Eraser vs Affinity Photo: Object Removal Capabilities
- Repairit Photo Eraser vs Affinity Photo: Background Fill and Realism
- Repairit Photo Eraser vs Affinity Photo: Workflow and Ease of Use
- Repairit Photo Eraser vs Affinity Photo: Pricing and Trial Options
- Who Should Choose Repairit Photo Eraser
- Who Should Choose Affinity Photo
- Pros and Cons of Repairit Photo Eraser and Affinity Photo
- How to Remove Unwanted Objects After Choosing the Right Tool
Repairit Photo Eraser vs Affinity Photo: Quick Verdict
In most cases, the choice depends on whether you value speed or control for object removal.
Repairit Photo Eraser focuses on fast, AI-powered cleanup. It is better suited to users who mainly want to remove unwanted objects, erase simple watermarks, or clear background distractions with minimal setup and very little manual editing.
Affinity Photo is a full professional editor with manual inpainting and selection tools. It may be a better fit when you already work with layers and masks, need precise control over every pixel, or want to combine object removal with broader retouching and design tasks.
Repairit Photo Eraser vs Affinity Photo: Key Differences
Both tools can erase objects from photos, but they take very different approaches.
Workflow focus. Repairit Photo Eraser is built around a short pipeline: upload, mark, let AI erase, then export. Affinity Photo follows a full editor workflow where object removal is just one of many tools in a dense interface.
Removal logic. Repairit relies on AI-assisted object detection and background prediction to fill in removed areas automatically. Affinity Photo uses manual tools such as inpainting brushes, clone tools, and selections, so users guide the cleanup more directly.
Manual control. Repairit offers simple controls for selecting the unwanted area and letting AI handle the rest, which is efficient for common distractions and logos. Affinity Photo provides layer-based editing, masking, and brush adjustments that support complex, multi-step cleanup when you need to refine edges or reconstruct detailed backgrounds.
Natural-looking results. With typical social photos, product shots, or simple backgrounds, Repairits AI can often produce acceptable, natural fills in a single pass. For scenes with repeating patterns, overlapping objects, or very close-up details, Affinity Photos manual tools may help you fine-tune the result until it blends more convincingly into the surrounding pixels.
Repairit Photo Eraser vs Affinity Photo: Comparison Table
| Criteria | Repairit Photo Eraser | Affinity Photo |
|---|---|---|
| Best for | Users who want a quick AI eraser to remove unwanted objects with minimal setup | Designers needing advanced editing control and detailed manual cleanup |
| Ease of use | Very simple, guided workflow focused on object removal only | Steeper learning curve due to full professional editing toolkit |
| Object removal | AI-driven eraser for fast cleanup of distractions and watermarks | Manual inpainting and selection tools for precise, layer-based edits |
| Workflow | Upload photo, mark object, let AI erase, then download | Import image, use inpainting tool, refine with brushes and layers, export |
| Strengths | Speed, simplicity, automatic background fill with minimal tweaking | Powerful editing tools, strong manual control, one-time purchase model |
| Weaknesses | Less suited to full retouching projects or complex compositing | Requires more practice, not centered on AI object removal automation |
What Repairit Photo Eraser and Affinity Photo Are Best For
Both tools can remove unwanted objects and clean up images, but Repairit Photo Eraser emphasizes automated AI erasing, whereas Affinity Photo uses manual inpainting and selection tools within a full editor.
Repairit Photo Eraser is generally best for:
- Quickly removing people or small objects from everyday photos without learning a complex interface.
- Cleaning up simple logos, text overlays, and watermarks where a fast AI fill is often enough.
- Batch-style cleanup sessions where you repeatedly erase distractions from multiple images.
- Users who want a focused object removal tool rather than an all-in-one photo editor.
Affinity Photo is generally best for:
- Photographers and designers who already work with layers, masks, and advanced retouching tools.
- Complex object removal where you need to rebuild backgrounds with multiple brush passes.
- Scenes that must be integrated into a broader design or composite project.
- Users who prefer a single, full-featured editor for both object removal and other image adjustments.
Repairit Photo Eraser vs Affinity Photo: Object Removal Capabilities
When you look only at object removal, a few practical differences stand out.
Range of removable objects. Both tools can address common tasks such as removing passersby, clutter, or distracting signs from photos. Repairit Photo Eraser leans on AI to identify and fill these areas automatically, which is helpful for quick social content, product photos, or travel images. Affinity Photo lets you tackle the same tasks but often expects you to guide the process more precisely with brushes and selections.
Watermark and logo cleanup. For straightforward watermarks, logos, or timestamps placed over relatively simple backgrounds, Repairits AI-based workflow can often remove them in a single run. You select the text or logo, let the tool process it, and check whether artifacts remain. In Affinity Photo, you typically paint over the watermark with an inpainting brush or clone from nearby areas. This takes more manual work but can be refined repeatedly until you are satisfied.
People and subject removal. When removing people or large subjects, results depend heavily on the background. Repairit performs best when the background is not overly complex or when nearby textures are easy to predict. Affinity Photo is more suitable when you need to rebuild detailed areas behind the subject manually, such as railings, tiled floors, or overlapping architecture, because you can switch between tools and layers to refine difficult sections.
Text removal. Both tools handle text overlays. Repairit focuses on fast erasing for banners, captions, or small labels, particularly when the underlying background is smooth. Affinity Photo may be more practical for stylized or large text that spans different textures, because users can zoom in, clone specific details, and fine-tune the edges around the removed text.
Scene complexity. For simple backgrounds such as skies, walls, shallow depth of field scenes, or uniform surfaces, Repairits AI-powered eraser is usually the more efficient option. As scenes become more complex, Affinity Photos manual control becomes increasingly important, especially for professional output where minor artifacts are not acceptable.
Repairit Photo Eraser vs Affinity Photo: Background Fill and Realism
Natural-looking background fill is a key factor when you remove objects, especially if the final image will be shared or printed at larger sizes.
Automatic fill behavior. Repairit Photo Eraser uses AI to infer what should appear behind the removed object, then fills that region automatically. In many everyday scenes, this leads to natural-looking results with minimal input. For example, removing a trash can from a sidewalk or a power line from the sky often requires only a quick selection.
Artifacts and blending. Depending on the image, AI-based removal can leave mild artifacts such as repeated patterns, soft edges, or subtle smudging where the object used to be. These are frequently acceptable for web or social use but may stand out under close inspection. Affinity Photos inpainting tools can also leave artifacts, but because they are part of a manual workflow, you can immediately refine them with additional brush strokes, cloning, or layer masks.
When manual cleanup helps. In scenes with strong geometric lines, repeating patterns, or sharp textures (for example, brick walls, fence rails, or checkerboard floors), manual correction often improves realism. With Affinity Photo, you can zoom in, align patterns carefully, and work on separate layers to hide seams. Repairit can still be useful here as a first pass; if the AI fill is close but not perfect, you may choose to re-run the eraser with a refined selection or lightly retouch the result in another tool.
Balancing speed and realism. If your main goal is to tidy up photos for quick publishing, Repairits automatic fills may provide a good balance of quality and speed. When you need pixel-level accuracy or print-ready composites, Affinity Photos manual approach gives you more room to iterate until the fill looks natural even at high resolution.
Repairit Photo Eraser vs Affinity Photo: Workflow and Ease of Use
Workflow and ease of use play a large role in how often you will actually perform object removal on real projects.
Repairit Photo Eraser workflow. Repairit Photo Eraser is designed for a short, focused workflow: upload, mark what you want gone, and let AI clean up the image. The interface centers on the eraser itself, with simple controls for brush size and region selection. This minimizes decisions and makes it approachable for users who rarely edit photos.
Affinity Photo workflow. Affinity Photo follows a more traditional professional editor flow: import the image, choose an inpainting or clone tool, often create a new layer for non-destructive editing, refine selections, then export. The number of panels, tools, and options gives power users more flexibility, but also means new users may need time to become efficient.
Brush and selection simplicity. In Repairit, brush and selection controls focus on marking the unwanted object clearly so the AI can interpret it. You typically do not manage multiple layers, separate masks, or advanced blend modes. Affinity Photo, by contrast, includes detailed brush dynamics, selection tools, and masking options, which are valuable for complex edits but add extra steps for simple removals.
Editing effort over time. If you regularly perform small object removals on many images, a streamlined AI workflow can significantly reduce the time spent per photo. For projects where a single image needs meticulous, portfolio-level cleanup, Affinity Photos extra effort may pay off in more consistent edges, better reconstruction, and fine-grained pixel control.
Repairit Photo Eraser vs Affinity Photo: Pricing and Trial Options
Pricing structure can also influence which tool makes more sense in your workflow.
Repairit Photo Eraser access. Repairit Photo Eraser is generally offered as part of an accessible toolkit, often with options to try core features before committing. This can be practical if you mainly need object removal and do not want to invest in a full professional editor. You can evaluate whether the AI-based workflow meets your needs without a large upfront cost.
Affinity Photo licensing. Affinity Photo typically follows a one-time purchase model rather than a subscription and may provide limited trial periods. This suits users who prefer paying once for a broad set of capabilities and using the editor for many tasks beyond object removal.
Decision impact. For users deciding between them, the key difference is that Repairit centers on a narrow, AI-driven workflow, while Affinity Photo provides a broad editing environment under a single license. If object removal is a frequent but straightforward task, a focused tool may feel more cost-effective. If you want advanced retouching, compositing, and design in addition to erasing objects, Affinity Photo can serve as a long-term hub.
Who Should Choose Repairit Photo Eraser
The following scenarios align well with Repairits AI-focused workflow:
- Users who mainly want to remove unwanted objects quickly without learning a full editor.
- Beginners who prefer a guided, AI-based eraser instead of complex manual tools.
- People who need to clean up images in batches with minimal setup time.
- Non-designers who occasionally delete watermarks or background distractions for social posts, listings, or documents.
If your priority is to get from photo to cleaned-up result in as few steps as possible, Repairit Photo Eraser is likely to feel more straightforward than a multi-purpose editor.
Who Should Choose Affinity Photo
Affinity Photos strengths make it a better match for users who want deeper control:
- Designers needing advanced editing control beyond simple object removal.
- Photographers who already work with layers, masks, and precise selections.
- Users who prefer a one-time purchase professional editor over multiple specialized tools.
- People comfortable refining inpainting results manually for alignment, perspective, and texture consistency.
If you frequently refine complex images where object removal is just one step in a larger creative process, Affinity Photo can integrate that cleanup into a comprehensive editing workflow.
Pros and Cons of Repairit Photo Eraser and Affinity Photo
Repairit Photo Eraser Pros and Cons
Affinity Photo Pros and Cons
How to Remove Unwanted Objects After Choosing the Right Tool
Once you decide whether a fast AI eraser or a manual editor fits your workflow, the next step is to put that choice into practice on real photos. For users who prioritize speed and simplicity, Repairit offers a direct way to test AI-powered object removal on typical images.
Key Features
- AI-driven eraser to remove unwanted objects and background distractions.
- Automatic background fill that aims to blend removed areas naturally.
- Streamlined interface for fast cleanup and export.
These capabilities align closely with routine object removal tasks, allowing you to focus more on choosing what to erase rather than managing multiple retouching tools.
Step-by-step guide
The basic workflow for removing objects in Repairit is designed to stay consistent from image to image.
Step 1. Upload the photo you want to edit and start the object removal process.

Step 2. Adjust the brush size and select the object or area you want to remove from the image.
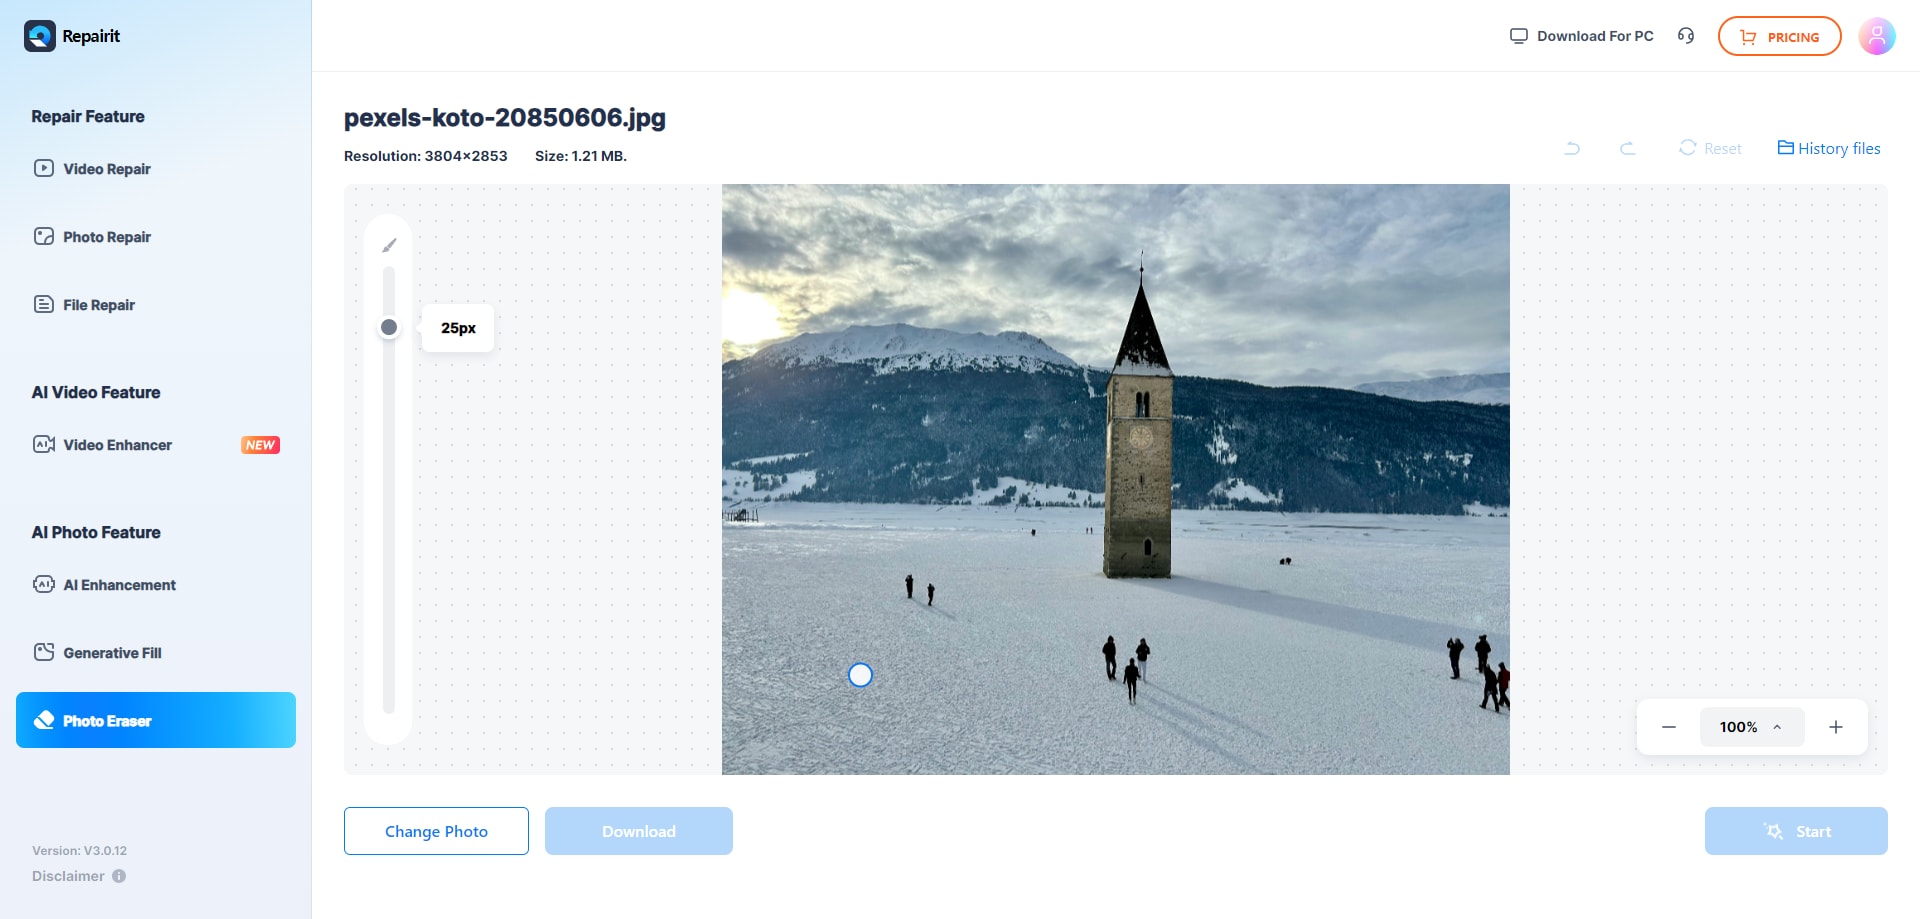
Step 3. Let the AI process the image and download the cleaned photo after the object is removed.
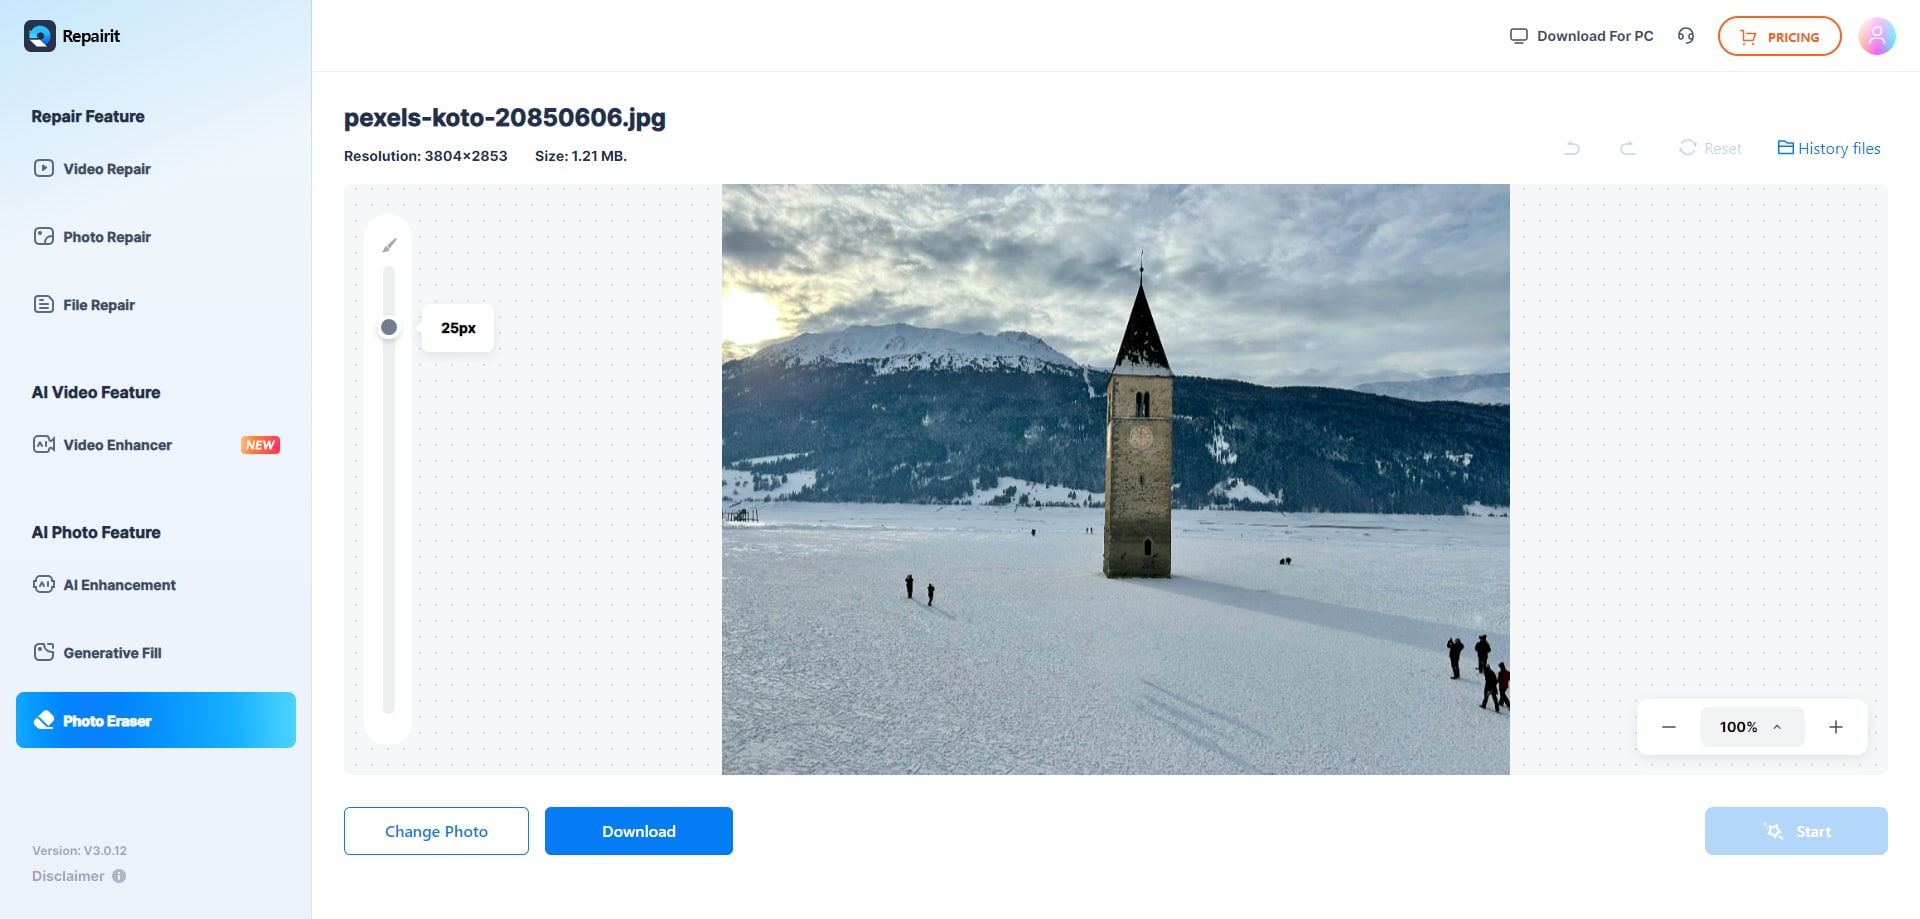
After downloading the result, it is a good idea to zoom in and verify that edges, textures, and lines look acceptable for your planned use. If needed, you can refine the selection area and run the process again.
Final Verdict
Repairit Photo Eraser and Affinity Photo both help you remove unwanted objects, texts, and distractions, but they serve different working styles.
Repairit leans into an AI-first, guided workflow that is well suited to users who want quick cleanup with minimal learning curve. It fits everyday photo sharing, simple watermark or logo removal, and background decluttering where a fast, automated fill is usually good enough.
Affinity Photo operates as a comprehensive editor with powerful manual tools. It is more appropriate when you already work with layers and masks, need detailed inpainting on complex scenes, or want object removal to be just one step in a broader editing pipeline.
Instead of viewing them as direct replacements, it can help to think about which tasks dominate your workflow. If fast object removal is your primary need, starting with Repairit is reasonable. If you also require advanced retouching and design features, Affinity Photo remains a strong option.
Next: Repairit Photo Eraser vs Gimp
FAQ
-
1. Is Repairit Photo Eraser easier to use than Affinity Photo for object removal?
In most cases, yes. Repairit Photo Eraser is built around a simple AI workflow: upload, mark, and erase. Affinity Photo offers more control but requires learning professional tools and interface conventions. -
2. Can Affinity Photo fully replace Repairit Photo Eraser for removing unwanted objects?
Affinity Photo can remove objects using inpainting and selection tools, but it is more manual. If you need fast, automated cleanup with minimal configuration, Repairit Photo Eraser may still be more convenient alongside Affinity Photo. -
3. Which is better for deleting watermarks and logos from images?
Repairit Photo Eraser is generally faster for straightforward watermark or logo removal, while Affinity Photo is useful if you want to refine results on layers or combine object removal with broader design work. -
4. Do I need professional editing skills to use Affinity Photo for object removal?
You do not need to be a professional, but some familiarity with layers, brushes, and tools like inpainting helps. Users who prefer not to learn a full editor may find Repairit Photo Eraser more comfortable for routine cleanup tasks.