
You will often hear the term hyperfocal distance in landscape photography tutorials, manual-focus lens guides, or cinematography breakdowns on YouTube. It is a simple but powerful idea that helps keep both foreground and background sharp in wide shots. Understanding it is essential when you want crisp video or photos for big screens, online streaming, or prints without soft, mushy details at the edges of the frame.
Repair Corrupted Files To Save Your Data
 Security Verified. Over 7,302,189 people have downloaded it.
In this article
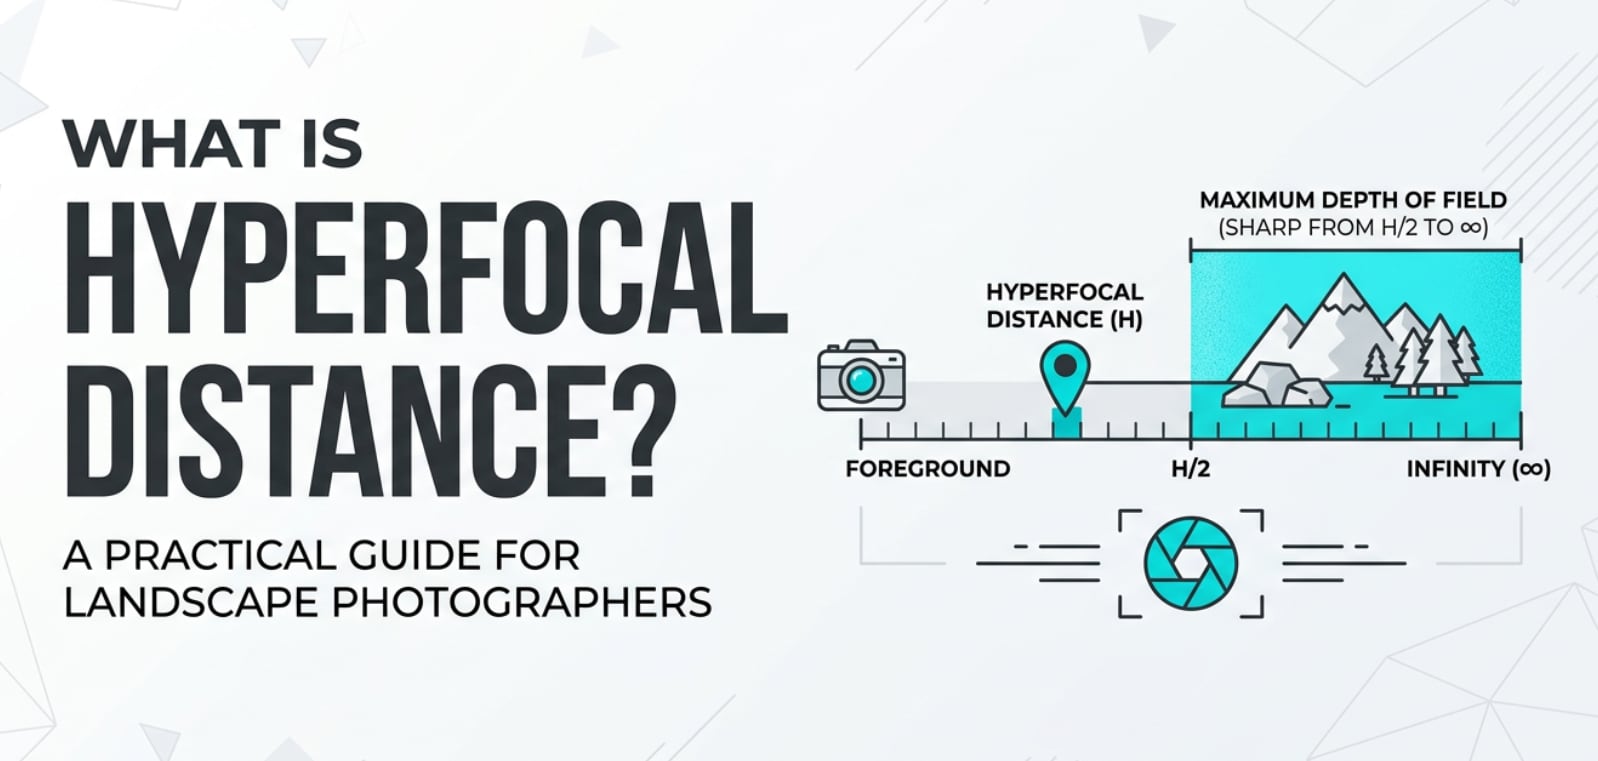
What Is Hyperfocal Distance?
Hyperfocal distance is the focus distance that gives you the maximum depth of field for a chosen focal length and aperture. When you focus the lens at this point, everything from roughly half that distance all the way to infinity appears acceptably sharp in your photo or video frame.
Technically, it is a focus and depth-of-field concept used in photography and cinematography. It links three critical variables: aperture, focal length, and the acceptable level of blur (circle of confusion) for your camera sensor or film format.
In practical shooting, setting focus to the hyperfocal distance lets you stop worrying about a single subject and instead keep a whole environment sharp. That is why it is popular with landscape photographers, street shooters, documentary filmmakers, and anyone recording wide establishing shots for streaming platforms, broadcast, or social media.
How Does Hyperfocal Distance Affect Your Image or Footage?
Depth of field, sharpness, and composition
The main impact of hyperfocal distance is on depth of field and perceived sharpness:
- Maximized depth of field: Focused at the hyperfocal point, your lens keeps near foreground elements and distant backgrounds simultaneously sharp. This is ideal when you want textures in rocks, grass, and mountains all crisp in one frame.
- Sharper edges and corners: Instead of focusing too close or too far, using the hyperfocal distance moves the sharpest region into a more useful zone of the frame, which often improves corner sharpness in wide-angle shots.
- Predictable focus for motion: In video, placing subjects within the hyperfocal range reduces the need for constant refocusing. People can move toward or away from the camera within that zone and remain acceptably sharp.
- Creative composition freedom: When you know everything from a certain near point to infinity will be in focus, you can confidently put important subjects at the frame edges, use strong foreground elements, or design layered compositions for large prints or 4K/8K playback.
Impact on editing, delivery, and platform compatibility
Hyperfocal distance also influences what you can do later in post-production and how your content looks across displays and platforms:
- Better for heavy cropping or reframing: Footage or photos captured with generous depth of field stay sharp even if you crop for vertical formats, punch in for a tighter shot, or stabilize in editing software.
- Consistent sharpness across formats: When exporting to 4K, 8K, or high-resolution prints, scenes captured at the hyperfocal distance hold up better because background detail remains clear instead of turning soft and noisy after sharpening.
- Less artificial sharpening needed: A naturally sharp frame means you do not have to push digital sharpening or texture sliders in post, which can introduce halos, artifacts, or noise that become obvious on HDR TVs and projectors.
- Reliable quality for streaming and playback: Compression on platforms like YouTube, Vimeo, and social apps tends to blur fine detail. Starting with a sharp, hyperfocal-based capture helps keep textures readable even at lower bitrates.
How Does Hyperfocal Distance Work in Real Shooting?
In real-world workflows, photographers and filmmakers use hyperfocal distance through a mix of planning tools and on-camera controls.
Where you control it on cameras and lenses
- Lens focus ring and distance scale: Many manual-focus and cinema lenses have a distance scale and depth-of-field markings. You simply rotate the focus ring until your chosen aperture aligns with infinity, then read the focus distance at the mid-point. That is your hyperfocal distance.
- Camera settings (aperture and focal length): Hyperfocal distance changes with aperture and focal length. Wider lenses and smaller apertures (like f/8, f/11) bring the hyperfocal point closer to you. Zoom or open the aperture and the hyperfocal distance moves farther away.
- Live view and focus peaking: In mirrorless cameras, focus peaking and magnified view let you visually confirm that both near and far elements appear sharp when focused around the predicted hyperfocal distance.
- Smartphone and tablet apps: Many shooters rely on hyperfocal calculator apps. You select your camera sensor, focal length, and aperture, and the app outputs a specific distance (for example, 2.1 m). You then manually set focus to that distance on your lens.
Practical shooting examples
- Landscape photography for large prints: You are shooting a 24 mm lens at f/11 on a full-frame camera. The hyperfocal chart says 1.2 m. You focus at about 1.2 m (sometimes by focusing slightly past a rock in front of you), and now everything from about 0.6 m to infinity is sharp, perfect for large gallery prints without soft foregrounds.
- Street and travel photography: Using a 28 mm lens at f/8, you set focus to the hyperfocal distance, then walk and shoot quickly without refocusing. People, buildings, and signs from a certain distance to infinity stay sharp, ideal for candid shooting or photojournalism where there is no time to fiddle with focus.
- Documentary and run-and-gun video: For wide shots of an interview environment or a city street, you dial in an aperture like f/5.6 or f/8, set focus to the hyperfocal distance, and record. As long as your subjects stay within that zone, they remain sharp during tracking, gimbal work, or handheld moves.
- Drone and action-cam work: Many drones and action cameras have fixed or limited focus. Understanding the idea of hyperfocal distance helps you choose apertures or ND filters that keep the whole scene sharp while avoiding diffraction, ensuring your 4K or 5K footage looks good on any device.
Best Uses, Common Mistakes, and Quick Tips
When hyperfocal distance matters most
- Landscape and nature photography: When foreground detail (flowers, rocks, water) is as important as distant mountains or clouds.
- Cityscapes and architecture: To keep streets, buildings, and skylines all crisp for prints, timelapses, or high-res exports.
- Establishing shots in film and video: Wide shots that introduce a location benefit from maximum depth, so viewers can explore the frame on big screens.
- Street, documentary, and event coverage: Hyperfocal setups let you zone-focus and react quickly without relying on continuous autofocus.
Common mistakes with hyperfocal distance
- Focusing at infinity instead of hyperfocal: Many beginners simply focus at infinity, which wastes depth of field in the far distance instead of using it to sharpen the near foreground.
- Using the smallest possible aperture: Stopping down to f/22 or f/32 may increase depth-of-field theoretically but can cause diffraction, making the image softer overall, especially for high-resolution sensors.
- Ignoring sensor size: Hyperfocal values differ for full-frame, APS-C, Micro Four Thirds, and smartphone sensors. Using the wrong chart or app settings leads to incorrect focus distances.
- Standing too close to the foreground: If your foreground object is closer than half the hyperfocal distance, it will still be soft. Photographers often overlook this and think the method failed.
Quick tips for using hyperfocal distance
- Use a hyperfocal calculator app and save presets for your common lenses and apertures.
- On lenses without distance scales, focus using live view: zoom in on a near object at half the hyperfocal distance, then slightly refine to balance near and far sharpness.
- Favor mid-range apertures like f/8–f/11 on full-frame (or f/5.6–f/8 on smaller sensors) to balance depth of field and diffraction.
- If you are unsure, slightly refocus and bracket focus distances for critical scenes you cannot reshoot.
- Always review critical shots at 100% zoom on the LCD or external monitor to confirm both foreground and background sharpness before leaving the location.
The takeaway: when you understand and use hyperfocal distance, you can reliably capture scenes that stay sharp from front to back, giving you more flexibility in editing, cropping, and delivering your work across any platform.
How to Use Repairit to Fix a Corrupted Photo File
What is Repairit?
Even when you nail focus and depth of field using hyperfocal distance, a corrupted memory card, failed transfer, or sudden power loss can damage your photo files. Repairit official website provides a dedicated, user-friendly solution for repairing broken photos and videos so you do not lose carefully planned hyperfocal shots or important visual assets.
Key features of Repairit
- Repairs a wide range of photo and video formats in a streamlined, guided process.
- Includes advanced repair modes to handle severely damaged media while preserving as much quality as possible.
- Lets you preview repaired files before saving, so you only keep successful results.
Step-by-step: Repair corrupted photos
- Add corrupted photo files
Open Repairit and choose the Photo Repair mode. Drag your damaged images into the window or click the Add button to browse your computer or storage device. You can load multiple corrupted photos from a camera, drone, or phone in one batch for repair.

- Repair photo files
Click the Repair button to let Repairit analyze and fix common structural errors automatically. If some photos are badly corrupted or crucial for a client project, switch to Advanced Repair, add a clear sample photo from the same device or camera, and let Repairit rebuild missing or damaged data more deeply.

- Save the repaired photo files
When the repair finishes, use the preview pane to inspect each recovered image at full resolution and confirm that sharpness, colors, and details look right. Select the files you want to keep, click Save, and choose a safe destination folder on your computer or external drive, separate from the original corrupted card.

Conclusion
Hyperfocal distance is one of the most practical tools for controlling depth of field in both photography and video. By understanding how aperture, focal length, and focus distance interact, you can set focus in a way that keeps more of your scene sharp, from near foreground to distant background.
Once you start applying hyperfocal techniques in landscapes, street scenes, or wide cinematic shots, you gain reliable, repeatable sharpness that survives cropping, editing, and high-resolution export. Combine that shooting discipline with safe backups and repair tools like Repairit so that technical issues with storage or transfers never steal your best, carefully focused images.
Next: Focus Breathing
FAQ
-
1. What is hyperfocal distance in simple terms?
Hyperfocal distance is the focus distance that gives you the largest possible depth of field for a specific focal length and aperture. When you focus there, everything from about half that distance to infinity looks acceptably sharp in your final photo or video frame. -
2. How do I calculate hyperfocal distance in practice?
You can use the mathematical formula, but most people rely on smartphone apps or printed charts. Choose your camera sensor, input your focal length and aperture, and the app gives you a distance (for example, 1.5 m). You then manually set your lens to that focus distance. -
3. When should I use hyperfocal distance instead of autofocus?
Use hyperfocal distance for landscapes, cityscapes, street scenes, travel, and wide establishing shots where you want both the foreground and background sharp. Autofocus is great for a single subject, but hyperfocal focusing is better when the whole scene matters. -
4. Does hyperfocal distance matter for video as much as for photos?
Yes. In video, hyperfocal focusing keeps a broad zone in focus so you can move the camera, track subjects, or record wide scenes without constant focus pulls. It is especially useful for documentaries, events, gimbal shots, and aerial footage. -
5. Can I fix a soft or out-of-focus image in post?
You can slightly improve apparent sharpness with sharpening, clarity, or AI enhancement tools, but you cannot fully recover detail that was never captured in focus. That is why understanding and using hyperfocal distance in-camera is crucial, and why tools like Repairit are aimed at file corruption issues rather than focus mistakes.
