
The exposure triangle is a core idea you will meet whenever you move beyond auto mode on a camera, whether you shoot photos, record videos, live stream, or edit footage for social platforms. It explains how aperture, shutter speed, and ISO work together to control brightness and image quality, so understanding it helps you avoid dark, blurry, or noisy results and get consistent exposure across cameras, formats, and devices.
Repair Corrupted Files To Save Your Data
 Security Verified. Over 7,302,189 people have downloaded it.
In this article
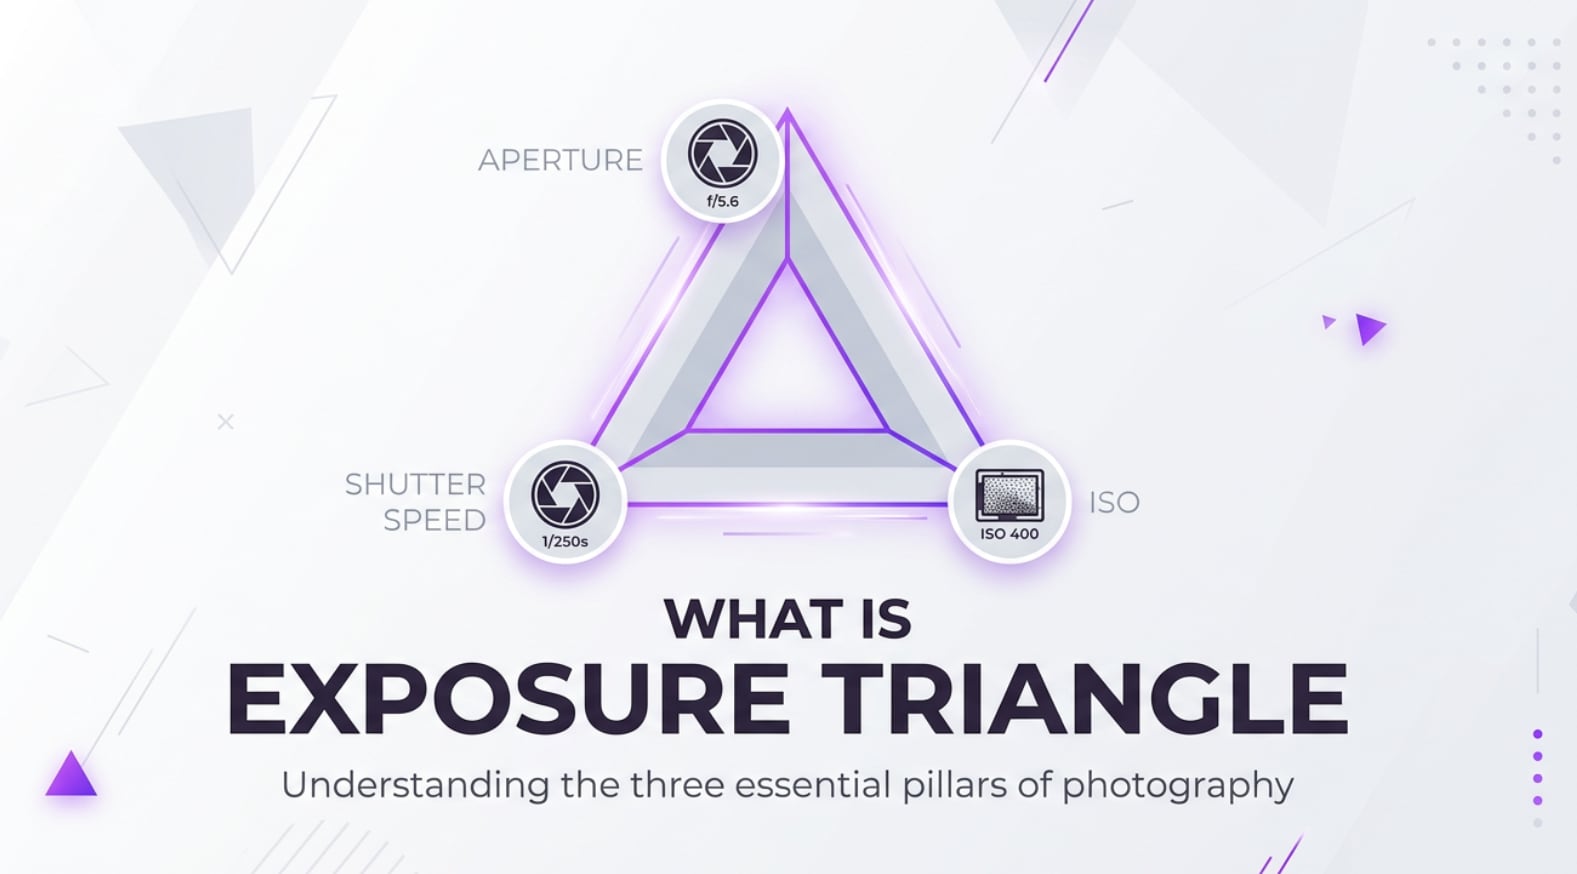
What Is Exposure Triangle?
The exposure triangle is a simple way to describe how three core camera settings work together: aperture, shutter speed, and ISO. It is a foundational photography and videography concept that applies to DSLRs, mirrorless cameras, cinema cameras, smartphones, and even many webcam and streaming tools.
Each corner of the triangle controls how light reaches the sensor:
- Aperture is the opening in the lens that controls how much light enters and how much background blur you get.
- Shutter speed is how long the sensor is exposed to light, which affects motion blur and sharpness.
- ISO is the sensor's sensitivity to light, which influences brightness and image noise or grain.
In practical shooting, the exposure triangle's role is to help you combine these three settings so your photos and videos are bright enough, sharp enough, and clean enough for your intended use, whether you are shooting RAW photos for editing, recording 4K video for YouTube, or exporting clips for social media.
How Does Exposure Triangle Affect Your Image or Footage?
The exposure triangle directly shapes how your images and footage look and feel. Changing one side of the triangle changes the others if you want to keep the same overall brightness. That is why understanding it is essential for controlling exposure, style, and technical quality from capture to playback.
Brightness and overall exposure
At the most basic level, the exposure triangle decides whether your frame is properly exposed, too dark (underexposed), or too bright (overexposed).
- Aperture and brightness: A wider aperture (like f/1.8) lets in more light and brightens the image; a narrower aperture (like f/11) darkens it.
- Shutter speed and brightness: A slower shutter (1/30s) exposes the sensor longer, giving more brightness; a faster shutter (1/1000s) reduces brightness.
- ISO and brightness: A higher ISO (3200) makes the sensor more sensitive, brightening the image; a lower ISO (100) keeps it darker but cleaner.
When you export photos or videos, correct exposure means better detail in both shadows and highlights, fewer artifacts after compression, and more flexibility for color grading and editing.
Sharpness, blur, and image noise
Beyond brightness, the exposure triangle shapes more subtle qualities that viewers notice, especially on large screens and high-resolution displays.
- Depth of field (aperture): A wide aperture creates a shallow depth of field, isolating a subject with a blurred background (common in portraits and cinematic video). A narrow aperture keeps more of the scene in focus, useful for landscapes, group shots, and product photography.
- Motion blur and sharpness (shutter speed): Fast shutter speeds freeze action (sports, wildlife, fast-moving subjects). Slow shutter speeds introduce motion blur, which can either ruin sharpness or be used creatively for light trails, smooth water, or panning shots.
- Noise and detail (ISO): Higher ISO adds visible noise or grain, which can reduce detail and cause banding, especially in low-light scenes. This noise often becomes more obvious after editing, encoding, and streaming on compressed platforms.
Mastering the exposure triangle helps you record cleaner files that hold up better when you edit, export to different codecs, upload to video platforms, or view on various devices from phones to TVs.
How Does Exposure Triangle Work in Real Shooting?
In real-world shooting, you interact with the exposure triangle almost every time you touch a camera's exposure controls, even if you are using semi-automatic modes like Aperture Priority or Shutter Priority.
Where you control aperture, shutter speed, and ISO
You can usually access exposure triangle controls in several places:
- On-camera dials and menus: Dedicated dials or wheels adjust aperture and shutter speed in Manual, Aperture Priority, or Shutter Priority modes. ISO often has a dedicated button or menu item.
- Touchscreen controls: On many mirrorless cameras and smartphones, sliders or virtual wheels let you adjust these settings directly while seeing live feedback in the preview.
- Monitoring tools: Exposure meters, histograms, and zebras on monitors or camera screens show how your exposure triangle choices affect real-time brightness and highlight clipping.
- Recording and streaming apps: Apps for webcams, live streaming, or mobile filming often expose manual control over shutter speed, ISO, and sometimes virtual aperture or ND filters to simulate exposure triangle behavior.
Even in auto exposure, your camera is constantly juggling these three values based on the metering mode, scene, and frame content.
Real-world shooting examples
Here are a few common scenarios that show how the exposure triangle works in practice.
- Portrait with blurred background: You might choose a wide aperture (f/1.8) for strong background blur, then set a shutter speed fast enough to avoid camera shake (for example 1/200s) and adjust ISO until the exposure meter is centered. If the scene is too bright, you may need to raise shutter speed or use an ND filter while keeping the same aperture.
- Sports or action: You start by setting a fast shutter speed (1/1000s) to freeze motion. Then you open the aperture as much as your lens allows and raise ISO as needed to maintain proper exposure without crushing shadows.
- Landscape or cityscape: You pick a narrow aperture (f/8–f/11) for maximum sharpness throughout the frame. That reduces light, so you may need a slower shutter speed and a tripod to avoid blur, keeping ISO low for the cleanest file.
- Video recording with fixed shutter: For 25 fps or 30 fps video, you typically keep shutter around 1/50s or 1/60s to maintain natural motion. That locks one side of the triangle, so you mainly balance aperture and ISO (and sometimes ND filters) when lighting changes or when switching locations.
By thinking in terms of the exposure triangle, you know which setting to adjust first based on your priority: blur, motion, or noise.
Best Uses, Common Mistakes, and Quick Tips
The exposure triangle matters most whenever light is difficult, subjects move fast, or you need consistent quality across a shoot that will be edited and delivered in multiple formats.
Common situations where it is crucial:
- Low-light events, concerts, and indoor scenes where you must balance motion blur against high ISO noise.
- Run-and-gun video shooting, vlogging, and documentary work where lighting conditions change quickly.
- High-contrast scenes (backlit subjects, sunsets) where you want to protect highlights while keeping detail in faces.
- Multi-camera shoots where matched exposure is vital for smooth editing and color grading.
Frequent mistakes:
- Using very slow shutter speeds handheld, causing unintentional blur even if the exposure looks correct.
- Pushing ISO too high instead of opening the aperture or adding more light, resulting in noisy footage that breaks apart with compression.
- Choosing aperture only for brightness and forgetting its impact on depth of field and lens sharpness.
- Letting auto ISO run wild in video, causing visible noise and flickering exposure changes mid-clip.
Quick tips to use the exposure triangle correctly:
- Decide your priority first: background blur (aperture), motion control (shutter speed), or noise level (ISO).
- Keep ISO as low as reasonably possible, especially for footage that will be heavily graded or compressed.
- Use the reciprocal rule for stills: keep shutter speed at least 1/focal length (e.g., 1/100s or faster for a 100mm lens) to avoid camera shake.
- In video, lock shutter to roughly double your frame rate and control exposure with aperture, ISO, and ND filters.
- Check histograms and zebras instead of relying only on how the monitor looks, especially outdoors or in very dark rooms.
The takeaway: treat the exposure triangle as a creative toolkit, not a formula. Start from your visual goal, then set aperture, shutter speed, and ISO to support that vision while keeping technical quality in check.
How to Use Repairit to Fix a Corrupted Photo File
Repairit introduction
No matter how carefully you control the exposure triangle, your best photos can still be lost to storage errors, power failures, or damaged memory cards. Wondershare Repairit is designed to rescue such images when they become unreadable or corrupted. With a clean interface and guided workflow, it lets you repair broken photos from cameras, phones, or drives without needing technical skills. You can learn more and download the tool from the Repairit official website.
Key features of Repairit Photo Repair
- Repairs corrupted or unreadable photo files from various cameras and devices with a guided, click-through workflow.
- Supports batch repair so you can fix multiple damaged images from a shoot in one pass, saving time on large projects.
- Provides a clear preview of repaired photos before saving, helping you verify quality and select only the results you want to keep.
Step-by-step: repair corrupted photo files
- Add corrupted photo files

Launch Repairit and open the Photo Repair module. Click the "Add" button and navigate to the folder containing your corrupted or unreadable photos. Select one or multiple image files from your camera card, hard drive, or external storage, then confirm to load them into the repair list.
- Repair photo files

Once the damaged photos appear in the list, click the "Repair" button to begin processing. Repairit will automatically analyze each file, attempt to fix structure and data issues, and display a progress indicator for every item. You can wait while the software works in the background without interrupting other tasks.
- Save the repaired photo files

After the repair finishes, preview your photos to confirm that they open correctly and look as expected. Select the images you want to keep, click "Save," and choose a safe destination folder on your computer or external drive. It is best to store the repaired files on a different device than the one that was corrupted.
Conclusion
Understanding the exposure triangle gives you control over how your images and footage look from the moment you press the shutter or start recording. By knowing how aperture, shutter speed, and ISO interact, you can choose settings that match your creative intent while avoiding underexposed, blurry, or noisy results.
Combine this technical knowledge with good backup habits and reliable repair tools, and you will protect both the quality and safety of your visual work. When exposure decisions become second nature, you are free to focus more on composition, storytelling, and delivering polished media that looks great on any platform or screen.
Next: White Balance
FAQ
-
1. What is the exposure triangle in simple terms?
The exposure triangle is the relationship between aperture, shutter speed, and ISO. Together, these three settings control how bright or dark your photo or video is, and they influence depth of field, motion blur, and noise. Changing one usually means adjusting at least one of the others to keep the same overall exposure. -
2. How do I balance aperture, shutter speed, and ISO in practice?
Start by deciding your priority. For background blur, set aperture first. For freezing or blurring motion, set shutter speed first. Then adjust the remaining setting plus ISO until your exposure meter or histogram shows a balanced result. Aim to keep ISO as low as possible while still achieving the brightness and motion look you want. -
3. Does the exposure triangle work the same way for video?
Yes, the same three controls apply to video, but shutter speed is usually tied to your frame rate (for example 1/50s for 25 fps). That means you mostly balance exposure using aperture, ISO, and neutral density filters. Managing these well gives you consistent footage that is easier to grade and compress for streaming or social platforms. -
4. What is the best exposure triangle setup for low light?
In low light, open the aperture as wide as possible, use the slowest shutter speed you can handle without unwanted blur, and then raise ISO only as much as necessary. If the scene is still too dark or noisy, consider adding light, using a tripod, or accepting a bit more motion blur instead of pushing ISO extremely high. -
5. Why should I learn the exposure triangle if I usually shoot in auto mode?
Knowing the exposure triangle lets you understand why your camera chooses certain settings and how to correct issues quickly. You can use modes like Aperture Priority, Shutter Priority, or exposure compensation more intelligently, and you will be better prepared when auto mode fails in tricky lighting or fast-moving situations.
