
Depth of field is everywhere once you start noticing it: in blurry portrait backgrounds, sharp travel landscapes, and cinematic close-ups in movies or YouTube videos. You will encounter the term in camera menus, lens reviews, smartphone camera apps, and editing tutorials. Understanding how it works helps you decide exactly what should look sharp, what should fade into blur, and how your photos and videos feel to viewers.
Repair Corrupted Files To Save Your Data
 Security Verified. Over 7,302,189 people have downloaded it.
In this article
Introduction
When you press the shutter or hit record, you are not only capturing light, you are also choosing how much of the scene appears sharp. Depth of field is the piece of the puzzle that controls this, whether you shoot on a DSLR, mirrorless camera, smartphone, or cinema rig. Knowing how to manage it turns random snapshots into intentional, story-driven photos and videos.
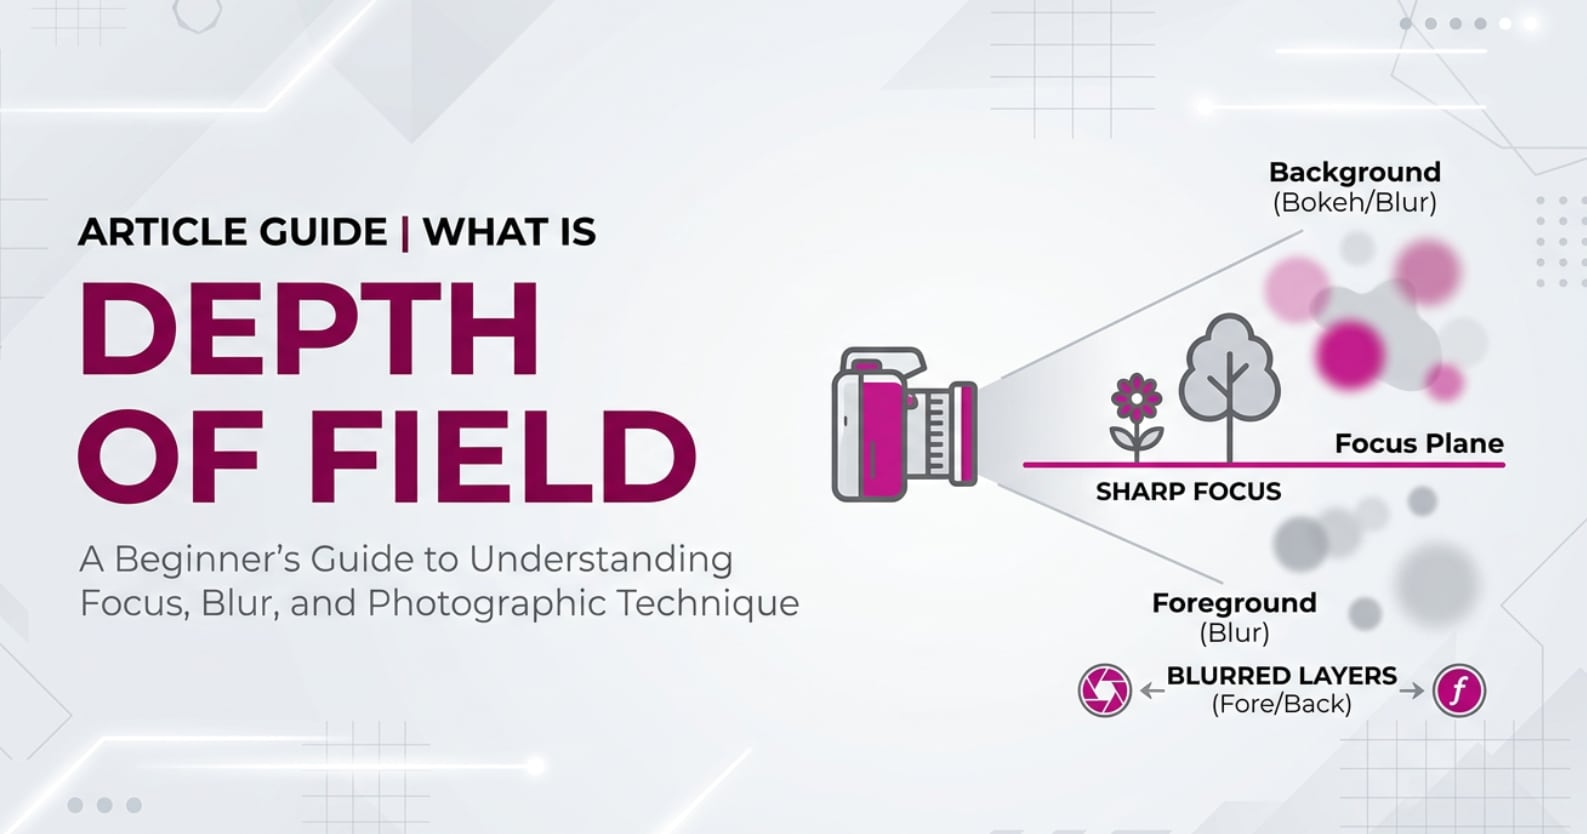
What Is Depth of Field?
What is depth of field in photography and video? It is the distance range in front of your camera where objects appear acceptably sharp. Anything inside this zone looks in focus, while areas closer or farther away gradually become blurred.
Technically, depth of field is a focus and sharpness concept. It belongs to photography basics, just like shutter speed and ISO, and it affects both still images and moving footage. Portraits with a creamy background use a shallow depth of field; landscapes that are sharp from foreground rocks to distant mountains use deep depth of field.
During shooting, depth of field is controlled mainly by three factors:
- Aperture (f-number)
- Subject distance (how close you are to the subject)
- Focal length (how wide or telephoto your lens is)
Sensor size and viewing size also play a role. Because of this, aperture and depth of field are often discussed together in camera tutorials, lens reviews, and editing guides.
How Does Depth of Field Affect Your Image or Footage?
Shallow vs deep depth of field in practice
Depth of field directly changes how your photo or video feels to the viewer.
- Shallow depth of field: Only a thin slice of the scene is sharp, usually the subject’s eyes or a small object. The background and sometimes the foreground blur strongly, creating a smooth background blur. This is common in portraits, product shots, and cinematic close-ups.
- Deep depth of field: A large portion of the scene, from near to far, stays sharp. This works well for landscapes, architecture, group shots, and documentary scenes where context matters.
This impacts several practical aspects of your results:
- Sharpness distribution: It does not change the total sharpness of your camera; it redistributes where sharpness lives in the frame.
- Subject separation: Shallow depth of field isolates a subject from busy backgrounds, guiding the viewer’s eye instantly.
- Perceived detail: Deep depth of field makes a scene look information-rich, useful for travel, event, and real-estate images.
- Cinematic look: In video, controlled shallow depth of field is part of what many people call the "cinematic look," especially at wider apertures and longer focal lengths.
| Shallow depth of field | Deep depth of field |
|---|---|
| Small in-focus area, strong blur | Large in-focus area, minimal blur |
| Great for portraits, products, detail shots | Great for landscapes, groups, documentary |
| Precise focusing required | More forgiving focus, easier for beginners |
How depth of field shows up in video and editing
In video work, video depth of field is not just about a single frame; it affects focus pulls, motion, and how shots cut together.
- Recording: During capture, depth of field determines how much wiggle room you have for small focus errors or subject movement. Shallow depth of field can cause focus breathing or slightly soft faces if your focus puller misses.
- Playback and streaming: Strong blur tends to compress better in streaming codecs (like H.264 or HEVC) because there is less fine detail. Deep depth of field, with lots of small textures, can show more encoding artifacts at low bitrates.
- Editing and grading: Editors often cut between shots with different depth of field to shape mood and attention. For example, an establishing shot with deep depth of field followed by a close-up with shallow depth of field. Artificial blur effects can enhance or simulate shallow depth of field, but they rarely match carefully captured optics.
- Exporting and platform compatibility: High-resolution files with deep depth of field may reveal more noise and compression issues when exported for social platforms. Shallow depth of field can hide some background noise and low-detail areas, resulting in cleaner-looking clips on phones and laptops.
How Does Depth of Field Work in Real Shooting?
In real-world shooting, depth of field is controlled mainly through your camera and lens settings, sometimes with help from on-screen tools or mobile apps.
- Aperture control: On interchangeable-lens cameras, you change aperture with a dial or in the touchscreen menu. On smartphones, portrait mode simulates aperture, letting you adjust background blur after the shot in many apps.
- Focus distance: Stepping closer to your subject reduces depth of field; stepping back increases it. In practice, this means moving your feet, not just zooming with your fingers.
- Focal length choice: Wide lenses (like 16–24 mm) give more depth of field; telephoto lenses (like 85–200 mm) give less, at the same aperture and subject framing.
- Sensor size: Full-frame cameras usually show less depth of field than APS-C or Micro Four Thirds at equivalent framing and aperture, which is why larger sensors are popular for a cinematic look.
Examples of depth of field decisions in different workflows:
- Portrait sessions: You might pick an 85 mm lens at f/1.8, focus on the eyes, and keep enough distance to avoid overly thin depth of field. The result is soft, clean backgrounds and sharp eyes.
- Wedding coverage: In fast-moving situations, sticking to f/2.8–f/4 gives you a balance: some background blur, but enough depth of field to keep faces sharp even when people move.
- Landscape trips: You may use f/8–f/11 on a wide lens, focus slightly in front of the center of the scene (hyperfocal technique), and get foreground, midground, and background sharp.
- Talking-head videos: You place the subject a few feet in front of the background, set around f/2–f/2.8, and use a monitor or focus peaking to confirm that the eyes stay crisp throughout the recording.
Best Uses, Common Mistakes, and Quick Tips
Understanding when and how to adjust depth of field helps you avoid common problems.
Best uses of depth of field
- Portraits and interviews: Use shallow depth of field to separate subjects from distracting backgrounds.
- Storytelling details: Focus tightly on hands, tools, or products to guide attention.
- Documentary, travel, and events: Choose deeper depth of field when you want to keep moving subjects and environments readable.
- Landscape and cityscape: Use deep depth of field to show the full scene with maximum clarity.
Common mistakes with depth of field
- Using the widest aperture all the time: Shooting wide open (for example, f/1.4) can produce razor-thin focus. It looks impressive, but important facial features or moving subjects may go soft.
- Standing too close: When you move very close to a face with a fast lens, depth of field can become so thin that one eye is sharp and the other is blurry.
- Ignoring background distance: Even at modest apertures, placing your subject far away from the background will increase background blur. Many beginners forget to use this powerful trick.
- Relying only on software blur: Fake blur in editing can look unnatural, especially around hair and edges. It is far better to capture pleasing aperture and depth of field in-camera.
Quick tips to control depth of field
- Open the aperture (low f-number) for shallower depth of field; close it (high f-number) for deeper depth of field.
- Move closer to your subject for more blur; step back for more of the scene in focus.
- Use longer focal lengths to compress the background and enhance blur.
- Increase distance between subject and background to maximize smooth blur, even at moderate apertures.
- On smartphones, use portrait mode but review edges carefully; adjust simulated aperture if available.
- Use your camera’s depth-of-field preview button or focus peaking (if available) to judge sharpness before recording.
Takeaway: Treat depth of field as a storytelling tool, not just a technical setting. Decide what must be sharp and let everything else support that decision.
How to Use Repairit to Fix a Corrupted Photo File
Repairit introduction and key features
When you experiment with different depth of field settings, you often shoot many versions of a scene, sometimes in RAW or high-resolution formats. If these carefully captured files become corrupted due to card errors, interrupted transfers, or storage issues, you risk losing your best takes. Wondershare Repairit, available from the Repairit official website, is designed to repair damaged photos and videos through a guided, non-technical workflow so you can recover important shots quickly.
Key features of Repairit for photo repair
- Repairs a wide range of photo formats with automatic analysis and recovery.
- Supports batch repair so you can fix multiple corrupted images in one session.
- Lets you preview repaired photos before saving the final versions.
Step-by-step: repair corrupted photo files
- Add corrupted photo files
Install and open Wondershare Repairit on your computer, then switch to the Photo Repair module. Click the add button and navigate to the folder where your corrupted photos are stored. Select all damaged files you want to restore and confirm to import them into the interface.

- Repair photo files
After importing, check the file list to be sure all photos you need are included. Click the Repair button to start processing. Repairit automatically scans each image, identifies typical corruption issues, and rebuilds a viewable version in the background without requiring advanced settings from you.

- Save the repaired photo files
When the repair finishes, use the preview window to check each recovered image. If the results look correct, choose a safe output folder that is different from the original problem location and click Save to export the repaired files. You can now organize, edit, and back up these photos alongside your other depth of field test shots.

Conclusion
Depth of field is one of the most powerful creative controls in photography and videography. By understanding how aperture, subject distance, focal length, and sensor size interact, you can predict how much of your scene will appear sharp, how strongly backgrounds will blur, and how your viewer’s eye will travel through the frame.
Mastering depth of field does not require exotic gear. It comes from intentional choices, careful focusing, and practice across real-world situations, from portraits and product shoots to landscapes and cinematic video. Combine that creative control with a solid workflow for protecting and repairing your files, and your images and footage can stay both visually compelling and technically reliable for years.
Next: Bokeh
FAQ
-
1. What is depth of field in simple terms?
Depth of field is the distance range in a photo or video that looks acceptably sharp. Anything within this zone appears in focus, while areas closer or farther away appear more blurred. -
2. What creates shallow versus deep depth of field?
A wide aperture (low f-number like f/1.8), moving closer to your subject, and using a longer focal length lens all create shallow depth of field. A narrow aperture (high f-number like f/8), stepping back, and using a wider lens increase depth of field so more of the scene looks sharp. -
3. Does sensor size affect depth of field?
Yes. With the same framing and aperture, larger sensors (like full-frame) produce shallower depth of field than smaller sensors. Smaller sensors, such as those in many smartphones or Micro Four Thirds cameras, naturally show more of the scene in focus. -
4. How can I get more background blur in portraits?
Use a wide aperture (for example, f/1.8 or f/2.8), move closer to your subject, increase the distance between your subject and the background, and if possible choose a longer focal length lens. On smartphones, use portrait mode and position your subject well away from the background. -
5. Can I fix depth of field problems in editing?
You can simulate or increase blur in post-processing with tools in apps like Photoshop, Lightroom, or video editors, but it is hard to perfectly replicate natural optical depth of field. It is best to set aperture, distance, and focus correctly when shooting, then fine-tune the look in editing.
