Clear sound matters when you’re listening to music, streaming movies, or playing games on your Windows 11 PC. But if you hear constant crackling from your speakers or headphones, it can quickly ruin the moment. Fortunately, this guide will help you find the cause and fix Windows 11 audio crackling issues quickly.
Table of Contents
-
- Fix #1: Switch to a Different Audio Format
- Fix #2: Turn Off Audio Enhancements
- Fix #3: Use the Windows Audio Troubleshooter
- Fix #4: Update or Reinstall Audio Drivers
- Fix #5: Enable Spatial Sound
- Fix #6: Turn Off ATI HDMI Audio
- Fix #7: Lower the Minimum Processor State
- Fix #8: Turn Off Fast Startup
- Fix #9: Check System DPC Latency
- Fix #10: Disable Audio Exclusive Mode (Windows 10)
Part 1. Common Windows 11 Audio Popping Causes
Audio popping and crackling in Windows 11 usually happen for simple reasons. The most common causes are:
- Outdated or highly damaged audio drivers - Drivers let Windows associate with your sound hardware. If they’re old or damaged, audio may pop, crackle, or cut out.
- Audio enhancements and exclusive mode conflicts - Windows may add sound effects to improve audio, but these can clash with certain speakers or headphones. Exclusive mode, which lets apps take full control of audio, can also cause popping.
- Power management limiting audio hardware - Windows may lower power to save battery, causing audio stutter issues.
- Incorrect sample rate or format settings - If your audio format (like 16-bit or 24-bit at 44.1kHz or 48kHz) doesn’t match your device, sound can distort or click.
- Background apps using audio - Too many apps using audio at the same time can cause glitches or interruptions.
- Hardware or connection issues - Loose cables, broken headphones, faulty speakers, or weak Bluetooth connections can also create popping. Sometimes the problem is the device, not Windows.
Part 2. Quick Self-Check: Identify Your Audio Crackling Scenario
Before you start fixing Windows 11 audio crackling, ask yourself the following questions to understand when and where the problem happens.
- Does the crackling happen in all apps, or just certain audio files? If it’s only in one app or file, the issue might be with that app or the file itself. If it happens everywhere, it’s likely a system-wide problem.
- Are you using wired headphones or Bluetooth devices? Sometimes, wired and wireless devices behave differently. Knowing which one has issues can help narrow down the cause.
- Does it happen only after your PC wakes from sleep or right after startup? If yes, the problem might be related to drivers not initializing correctly when Windows starts.
- Does the crackling stop when you switch to a different output device, like speakers or another set of headphones? If switching devices fixes it, the problem could be with the original device or its connection.
Part 3. Top 10 Fixes for Windows 11 Sound Crackling Issues (Step-by-Step)
If your laptop speakers are crackling on Windows, don’t worry. Here are 10 easy ways to fix the problem.
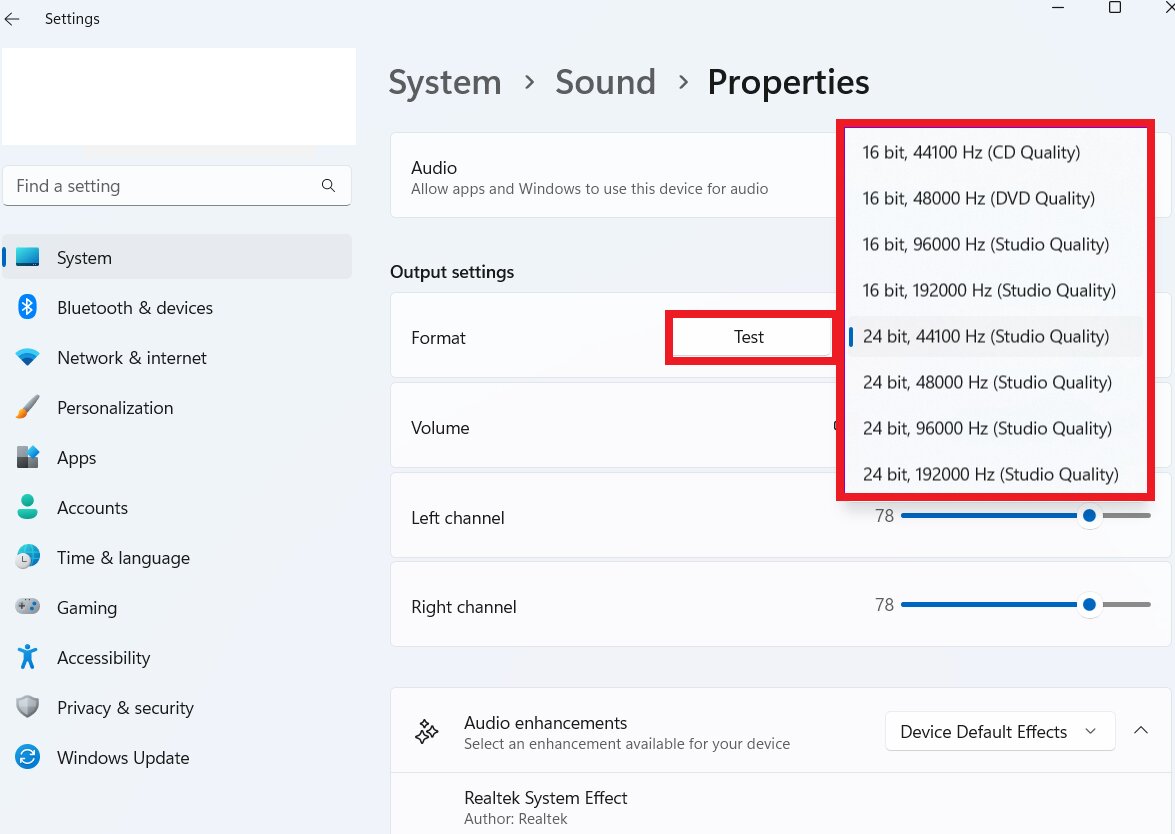
Fix #1: Switch to a Different Audio Format
Audio devices use specific formats, like 16-bit or 24-bit at 44.1kHz or 48kHz. Sometimes your system and device don’t match perfectly, causing crackling or distortion. By switching to a different audio format in Windows Sound Settings, you force the system and device to sync properly. This simple change can eliminate small pops and static sounds, giving you smoother audio.
You can fix some audio problems by adjusting your speaker settings.
Step 1: Click System and Sound in your settings.
Step 2: Select your audio device to open Properties.
Step 3: Under Output, use the Format drop-down to pick a higher sample rate and bit depth.
Step 4: Click Test to listen and check the sound.
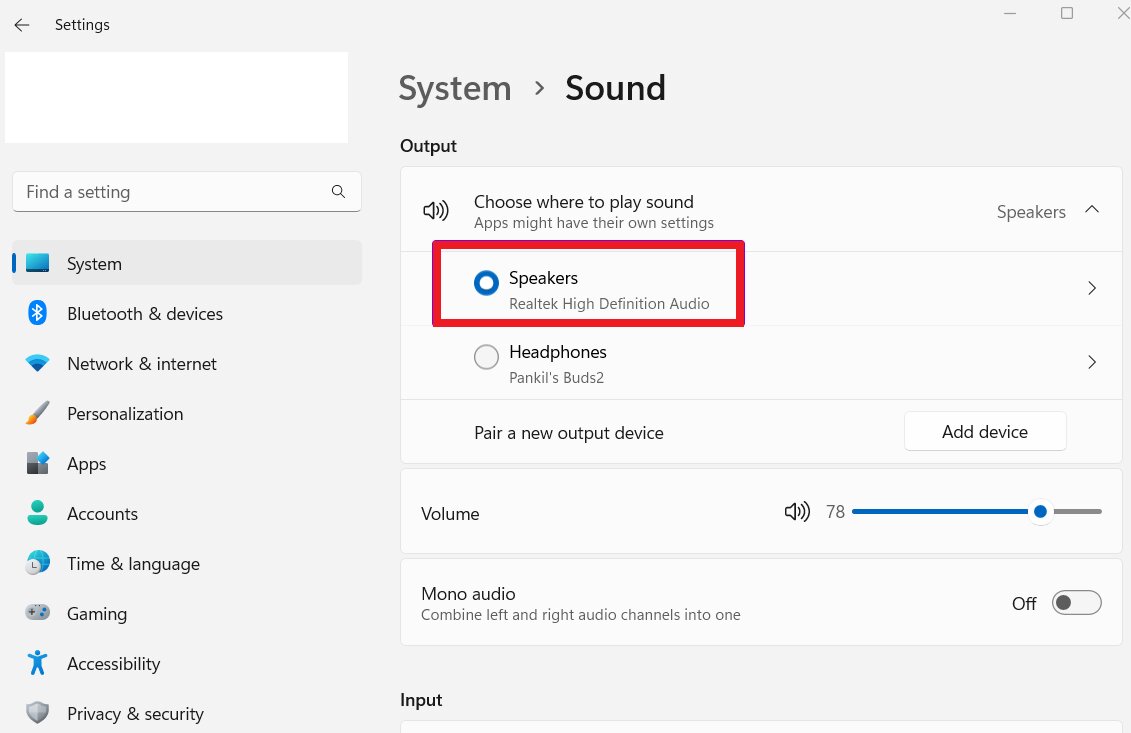
Fix #2: Turn Off Audio Enhancements
Audio Enhancements on Windows 11 improve your speaker sound. You can boost bass, create virtual surround sound, adjust for your room, and even equalize loudness to prevent sudden volume spikes.
However, these enhancements can conflict with your hardware or apps. Turning off enhancements removes these conflicts, making audio cleaner and more stable. Here are the steps:
Step 1: Open Settings, System, Sound, and All sound devices.
Step 2: Select your Speakers.
Step 3: Turn Audio Enhancements Off. Once applied, your Windows 11 audio will adjust according to your chosen settings.

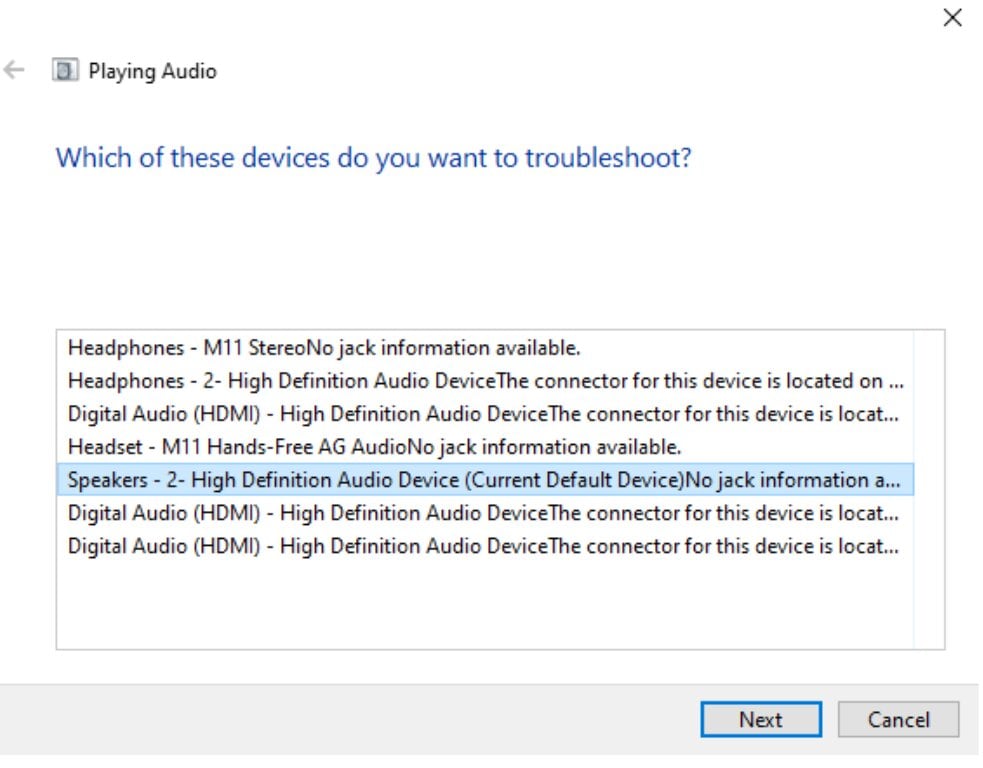
Fix #3: Use the Windows Audio Troubleshooter
Windows has a troubleshooter designed to detect and fix audio issues automatically. It checks drivers, settings, and connected devices, then suggests or applies fixes. Running this tool is an easy step to resolve crackling without needing complex changes.
Here’s how:
Step 1: Right-click the speaker icon on the Taskbar and select Troubleshoot sound problems.
Step 2: Choose the device that’s having issues and click Next.
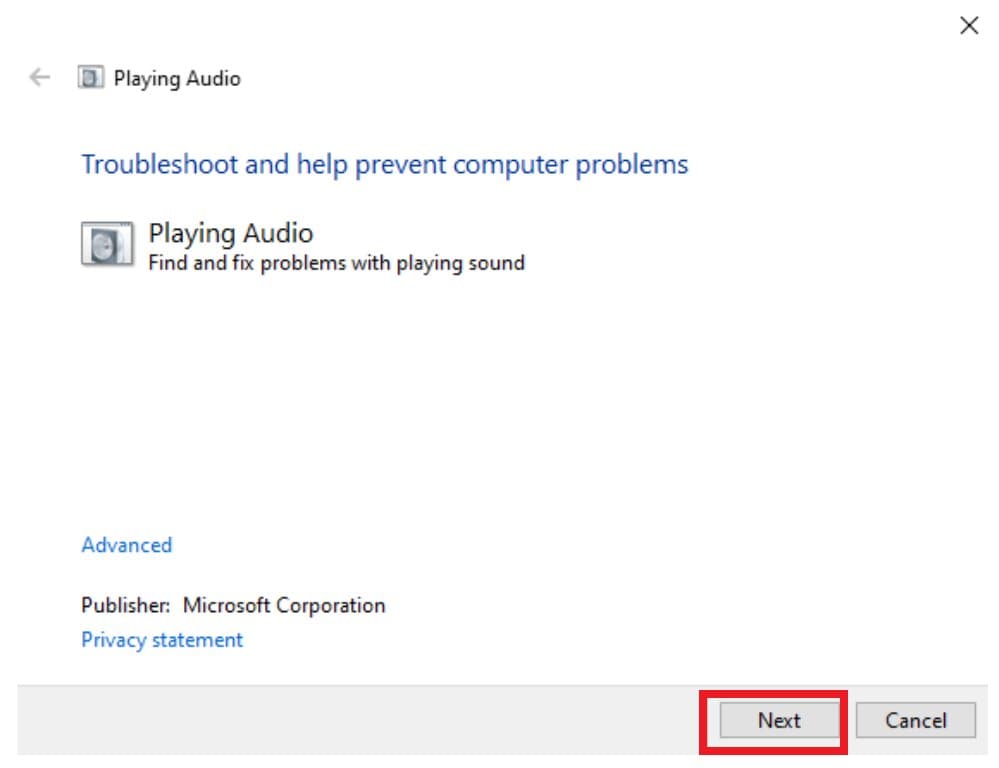
Step 3: The troubleshooter will check the device and offer solutions, like turning off audio enhancements.
Fix #4: Update or Reinstall Audio Drivers
Audio drivers act as a bridge between Windows and your sound hardware. Crackling audio can happen if your sound driver is missing, outdated, or corrupted. Updating or reinstalling it often fixes the issue. It ensures the system communicates correctly with your hardware, eliminating crackling entirely.
To update your audio driver:
Step 1: Press Windows + R, type devmgmt.msc, and press OK.
Step 2: In Device Manager, show the content of Sound, video and game controllers.
Step 3: Right-click your chosen audio device and tick Update driver.

Step 4: Click Search automatically for drivers to install the latest version.
To reinstall your audio driver:
Step 1: Right-click your audio device under Sound, video, and game controllers and tick Uninstall device.
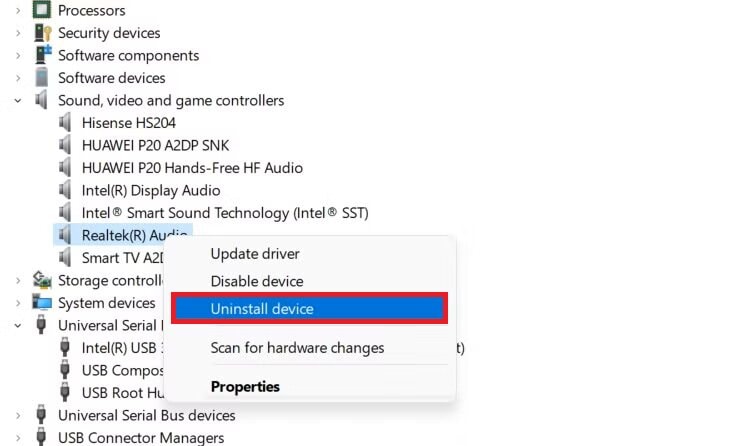
Step 2: Restart your PC. Windows will automatically reinstall the driver.
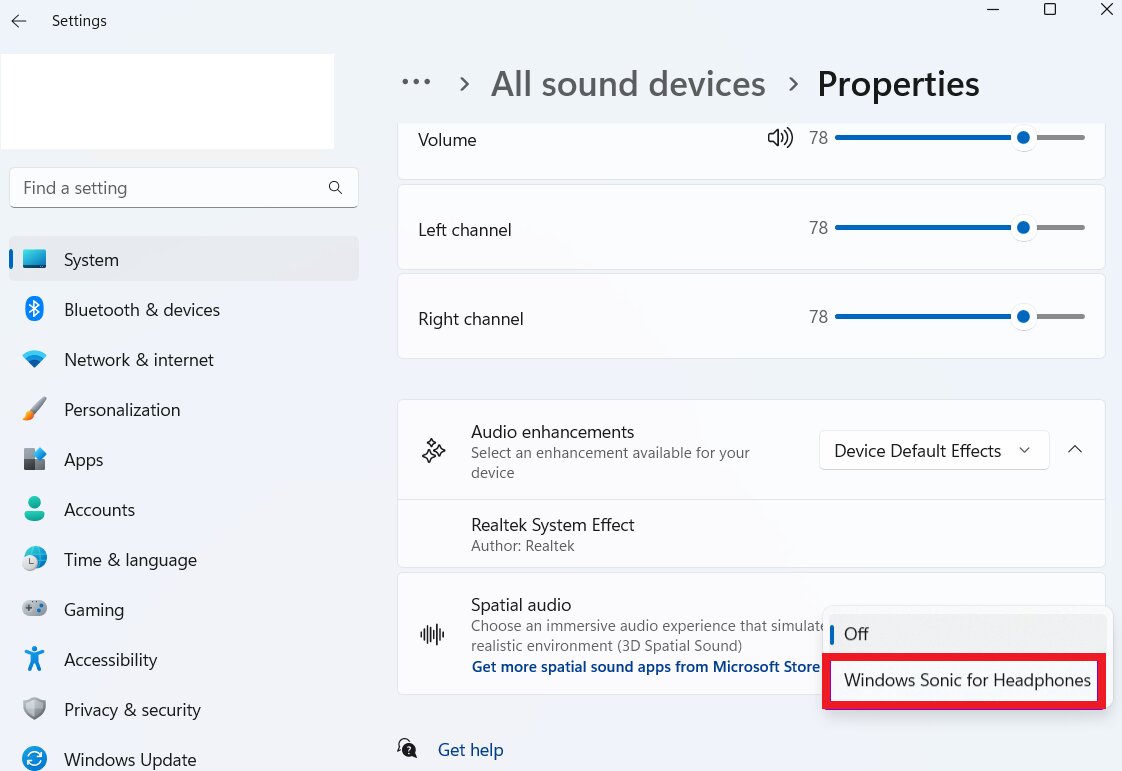
Fix #5: Enable Spatial Sound
Spatial sound creates a surround-sound effect, making audio feel like it’s coming from all around you. This is great for movies and games. Also, this can enhance audio and avoid stuttering:
Step 1: Access your Sound system settings.
Step 2: Select your audio device.
Step 3: Under Spatial audio, choose Windows Sonic for Headphones.
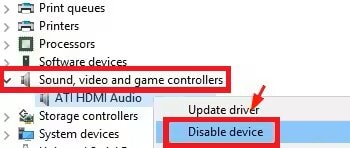
Fix #6: Turn Off ATI HDMI Audio
If you use ATI/AMD graphics cards with HDMI, the HDMI audio driver may interfere with normal sound output. Disabling ATI HDMI audio prevents driver conflicts that can lead to crackling, especially when multiple audio devices are in use.
Here are the steps to turn off your ATI HDMI Audio:
Step 1: Find your Device Manager.
Step 2: Access Sound, video, and game controllers.
Step 3: Right-click ATI HDMI Audio (if listed) and select Disable device.
Fix #7: Lower the Minimum Processor State
High CPU power or aggressive performance settings can sometimes make audio drivers unstable. Lower the minimum processor state in the power plan to reduce CPU stress and allow audio streams to process more smoothly without interruptions or pops.
Here are the steps to adjust the minimum processor state in Windows 11:
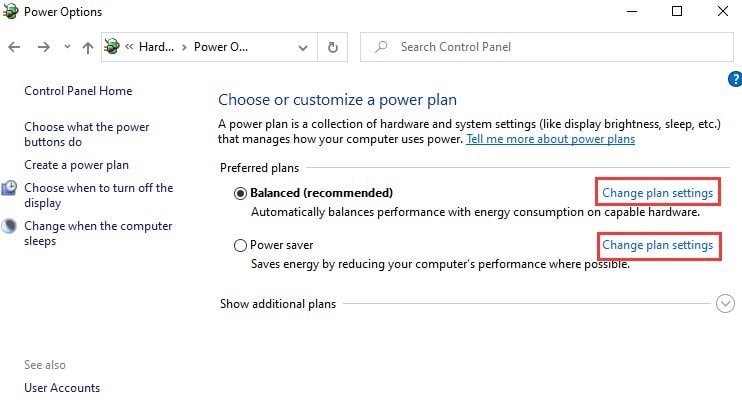
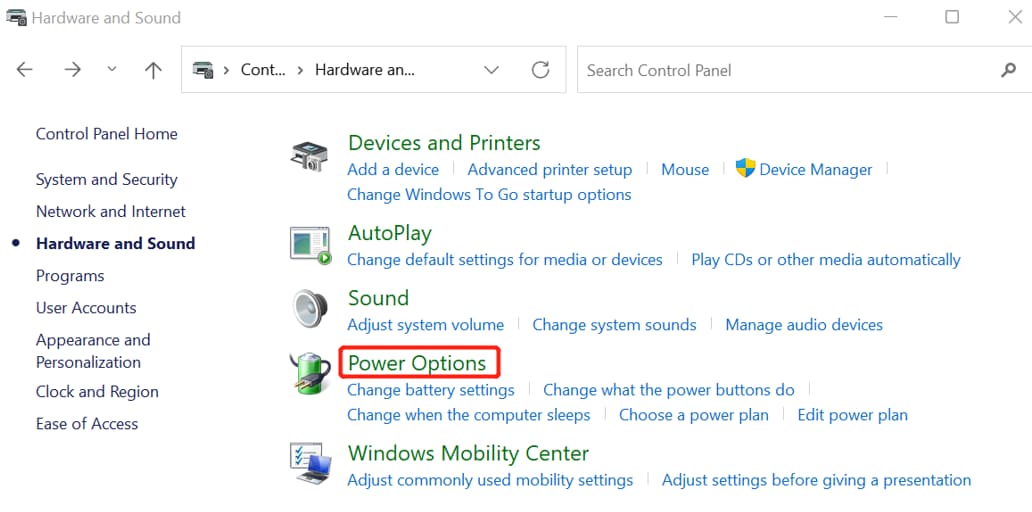
Step 1: Open Hardware and Sound and Power Options.
Step 2: Select Change plan settings next to your active power plan.
Step 3: Choose Change advanced power settings.
Step 4: Expand Processor Power Management and Minimum processor state.
Step 5: Change the percentage from the default 5% to your desired number.
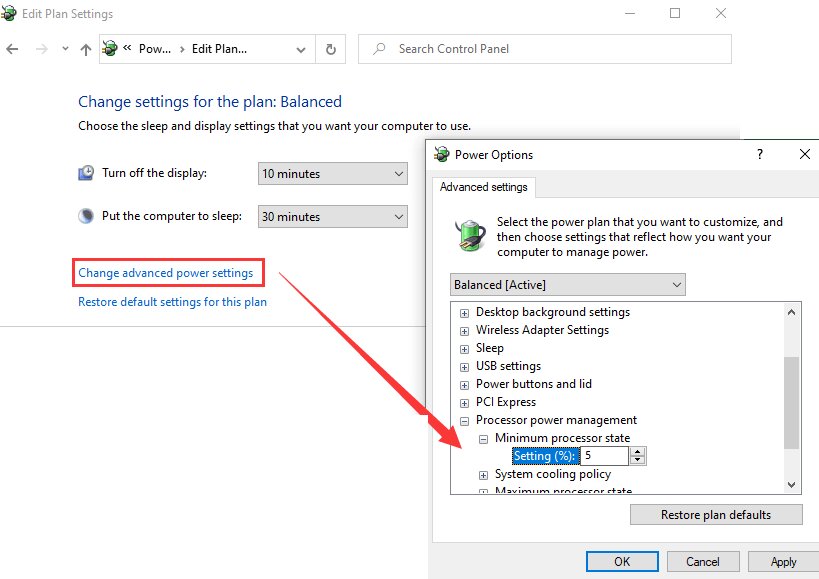
Step 6: Hit Apply, then OK to save.
Fix #8: Turn Off Fast Startup
Fast Startup in Windows 11 speeds up boot time by keeping certain system states in memory. However, it can leave audio drivers in a partially loaded or unstable state, causing crackling right after startup. Disable Fast Startup to ensure all drivers load fresh to resolve early startup audio issues.
Here’s how:
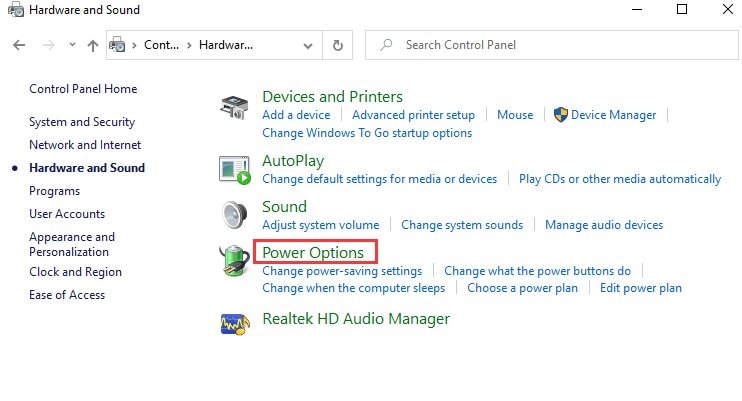
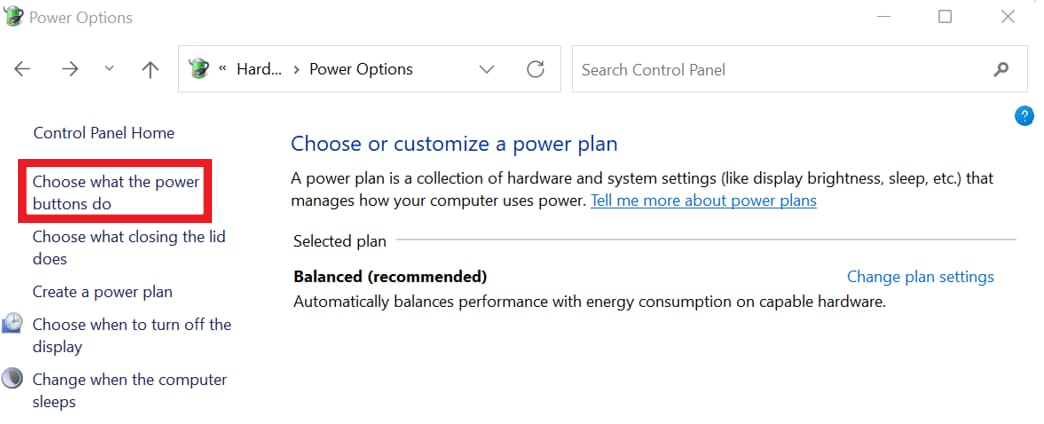
Step 1: Open the Control Panel, find Hardware and Sound, and click Power Options.
Step 2: Pick Choose what the power buttons do on the left.
Step 3: In Shutdown settings, untick the Turn on fast startup (recommended) box.
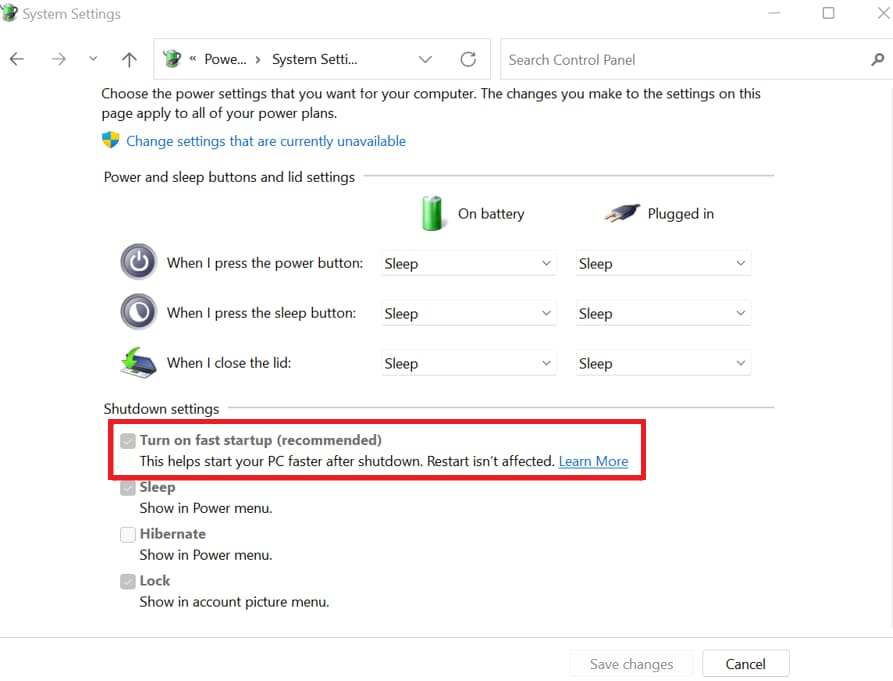
Step 4: If it’s grayed out, click Change settings that are currently unavailable and confirm with Yes.
Step 5: Click Save changes and exit. Shut down your PC and power it back on to see the effect.
Fix #9: Check System DPC Latency
DPC (Deferred Procedure Call) latency measures how quickly your system handles hardware requests. However, high latency can cause clicks, pops, or dropouts in audio if a driver takes too long to respond. By checking and fixing latency issues, you will have uninterrupted audio playback.
Step 1: Download and run LatencyMon.
Step 2: Press Start and let it run in the background.
Step 3: It will monitor your drivers and suggest which ones may be causing issues. You can try updating, disabling, or removing the problem device.
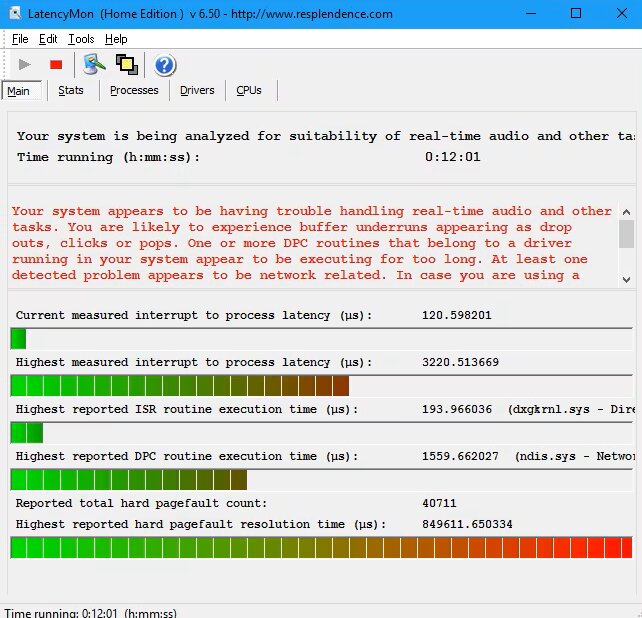
Note: For most users just watching movies, gaming, or listening to music, small latency issues usually won’t affect audio.
Fix #10: Disable Audio Exclusive Mode (Windows 10)
Exclusive mode lets one application take full control of your sound device. While some apps need it, it can create conflicts with other software, producing crackling or stuttering. Disabling this mode allows multiple apps to share your audio device, which reduces pops and makes sound more reliable.
Here’s how:
Step 1: Open Start, search for Sound Settings, and select it.
Step 2: Scroll down and look for More Sound Settings.
Step 3: In the Playback tab, double-click your headset.
Step 4: See the Advanced section and uncheck Allow applications to take exclusive control of this device.
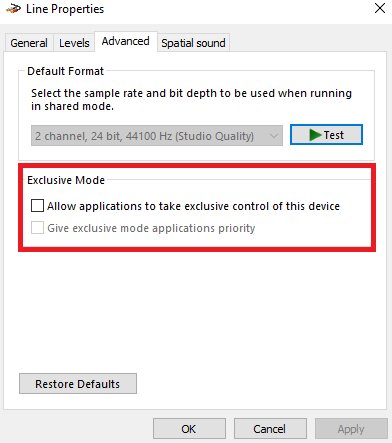
Step 5: Hit Apply to keep the changes.
Part 4. How to Fix a Corrupted Audio File Due to Popping and Crackling Issues
Have you tried the methods above but still didn’t fix the issue? In this case, the popping or crackling isn’t caused by your Windows 11 system or drivers; it’s the audio file itself.
But how to tell it’s a file issue, not a system issue? The answer is within a specific file. If the crackling only happens with a specific song, recording, or video, but other files play fine, it’s likely a corrupted file. You might notice that the same file behaves the same way on another device, confirming the problem is with the file and not your PC.
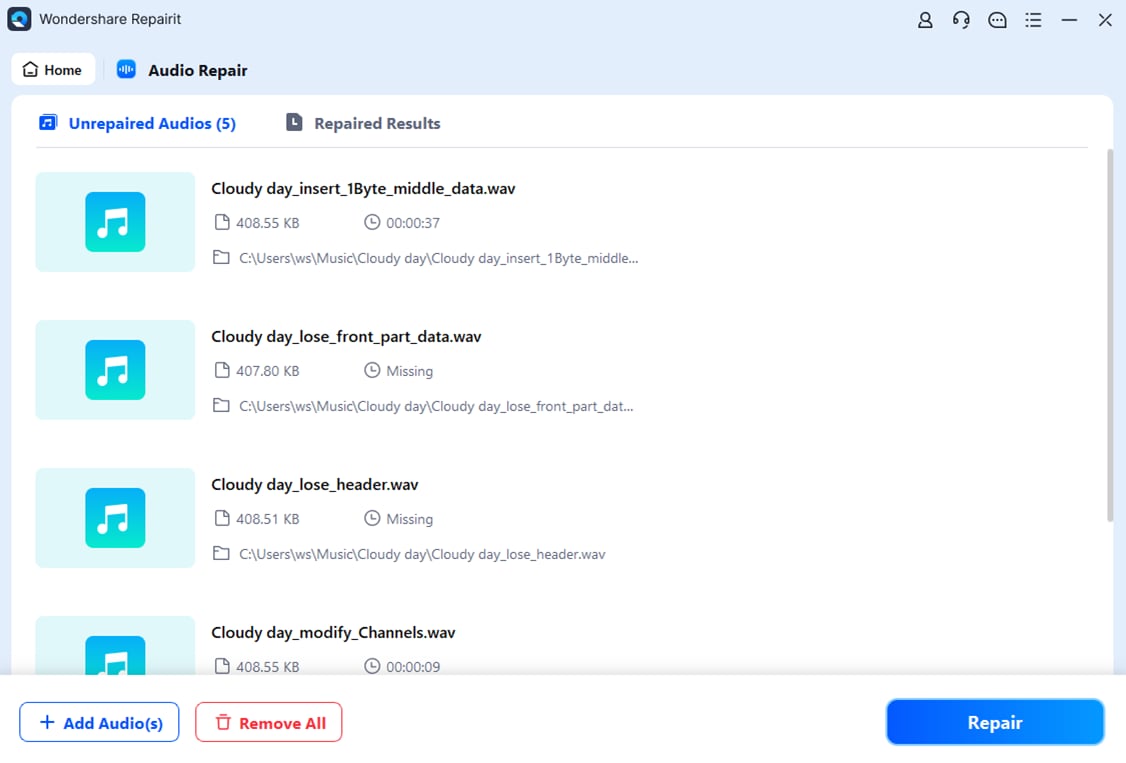
This time, you can utilize the best audio repair tool. For the most dependable outcomes, you can try Repairit Audio Repair. It’s designed to fix corrupted files caused by popping, crackling, or other distortions, while keeping your original audio quality intact. However, it can’t restore completely missing or heavily damaged audio. Also, it doesn’t unlock live streams or bypass copyright protection.
Key Features:
- Repairit Audio Repair can fix corrupted audio files with popping, crackling, static, clipping, humming, and other issues.
- It works with many formats, including MP3, M4A, WAV, AAC, FLAC, WMA, AIF, and AIFF.
- You can restore audio from voice recorders, cameras, editing software, online downloads, and screen recordings.
- You can repair multiple files at once quickly, and the original files are kept safe.
- It works on both Windows and Mac and restores clarity, depth, and missing details in your audio.
Step-by-Step Guide:
Step 1: Open Repairit, find More Types Repair and select Audio Repair. Click Add to upload your corrupted audio file due to popping and crackling issues.

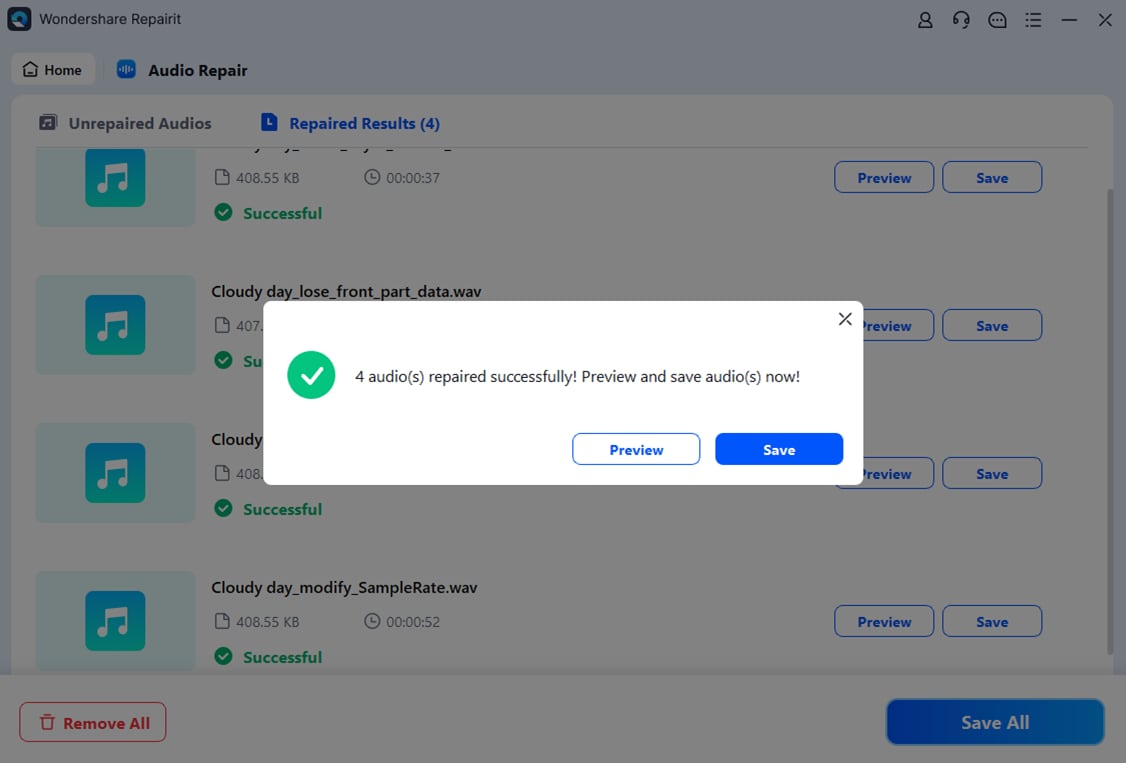
Step 2: Hit Repair. You may be asked to upload a sample audio file in the same format as the corrupted one. This helps improve the repair quality.
Step 3: Click Preview to check the repaired audio. If you’re satisfied, click Save and choose where to store the fixed files on your PC. Your repaired audio files are now ready to use without stuttering or playback issues.
Part 5. Tips to Prevent Audio Popping and Crackling Issues
Once you’ve fixed the crackling or popping in Windows 11, it’s smart to take steps to prevent it from happening again. Here are some:
- Keep Windows and audio drivers updated. Updates fix bugs and improve performance, reducing pops and clicks.
- Turn off extra audio enhancements. System attributes like bass boost or virtual surround can cause conflicts; disabling them keeps sound stable.
- Use good and stable audio devices. Low-quality headphones, loose cables, or unreliable Bluetooth can cause crackling.
- Check audio settings regularly. Make sure your settings match your device’s recommended format.
- Limit background apps using audio to prevent conflicts that can affect sound.
- Avoid sudden power changes or sleep mode interruptions. It helps maintain smooth audio on laptops.
- Keep your system clean. Remove malware or unnecessary programs that might interfere with audio.
Conclusion
Fixing audio crackling and popping in Windows 11 is easier than it seems. By updating drivers, adjusting sound settings, disabling conflicting enhancements, and using stable audio devices, you can enjoy clear, uninterrupted sound. For complex issues caused by corrupted files, tools like Repairit Audio Repair can fix your audio file while keeping the original quality.
FAQs
-
Why does audio crackle only sometimes?
Audio may crackle occasionally, depending on what your PC is doing. High CPU use, background apps, certain audio formats, or waking from sleep can cause brief pops. -
Does Bluetooth cause crackling more often?
Yes, Bluetooth is more likely to crackle than wired connections. Weak signals, interference, or distance from the source can cause static or dropouts. Keeping devices close and using a strong signal helps. -
Can Windows updates cause popping and crackling?
Sometimes. Updates can change drivers or settings and may temporarily cause pops. Updating your audio drivers or adjusting sound settings usually fixes it.