“Hi! I'm having an issue with my audio on Windows 11. This seems to be a problem with 11, because I recently upgraded from 10, and my PC never had a problem with audio stuttering before.” - Reddit user
There’s nothing more annoying than settling in for a game, an important video call, or your favorite music, only for your audio to start stuttering, dropping out, or crackling. This isn’t new — many Windows 10 and 11 users face audio stutter problems.
The good news? Most audio stuttering issues on Windows can be fixed. This guide walks you through simple checks and advanced fixes, covering both software and hardware causes. By the end, you’ll know how to restore clear and uninterrupted sound.
Table of Contents
-
- 1. Turn Off Audio Enhancements
- 2. Change the Default Audio Format
- 3. Restart Audio Services and Devices
- 4. Run the Windows Audio Troubleshooter
- 5. Reinstall or Update the Audio Driver
- 6. Disable Exclusive Mode for Audio Devices
- 7. Turn Off Windows Spatial Sound
- 8. Resolve Network Driver Conflicts
- 9. Disable Fast Startup on Windows 10 and 11
Part 1. What Is Audio Stutter in Windows?
Audio stutter occurs when your computer sound doesn’t play smoothly. You may notice skipping, repeating fragments, crackling, or uneven playback.
There are two main types of audio stuttering:
- System-level stutter: Caused by hardware or software conflicts — outdated drivers, incorrect audio settings, CPU overload, or driver latency spikes.
- File-based audio issues: The problem lies in the media file itself. Corrupted or poorly encoded files may stutter regardless of system settings.
Understanding which category applies helps you choose the right fix faster.
Part 2. Quick Self-Check: Identify Your Audio Stuttering Scenario
Before applying fixes, ask yourself:
- Does stuttering happen in all apps or only certain files?
- Does it only occur with Bluetooth devices?
- Did it start after a Windows update?
- Does it happen after waking from sleep?
- Do CPU or disk usage spike during playback?
Quick Match: Your Symptom → Try This Fix First
| What you notice | Most likely cause | Try first |
| Stutter happens in all apps (music, games, calls) | Driver/settings/system conflict | Fix #1, #2, #5, #6 |
| Only Bluetooth headphones stutter | Wireless interference / BT driver / power saving | Fix #3, #5, #8 (BT/Wi-Fi checks) |
| Stutter starts after sleep or startup | Fast Startup / services not initializing | Fix #3, #9 |
| Only during calls (Zoom/Teams/Discord) | Exclusive mode / enhancements / sample-rate mismatch | Fix #1, #2, #6 |
| Only specific files stutter | File corruption / bad encoding | Jump to Part 5 |
Part 3. Common Causes of Audio Stuttering in Windows 10/11

Some common causes of audio stuttering on Windows include:
- Outdated or corrupted drivers: Drivers let your computer communicate with your audio devices. Old or damaged drivers can cause skips or lag.
- Incompatible audio settings: Wrong settings, like bit rate or sample rate, can make sound uneven.
- System resources and running background apps: Heavy CPU or disk usage, or too many working background apps, can cause audio stutters.
- Bluetooth & wireless interference: Wireless headphones or speakers impact signal interference, which causes drops or skips.
Part 4. Top 9 Fixes for Stuttering Audio Windows Issue (Step-by-Step)
Below, we’ll go through 9 step-by-step solutions to help you have uninterrupted sound on your Windows 10 or 11 PC.
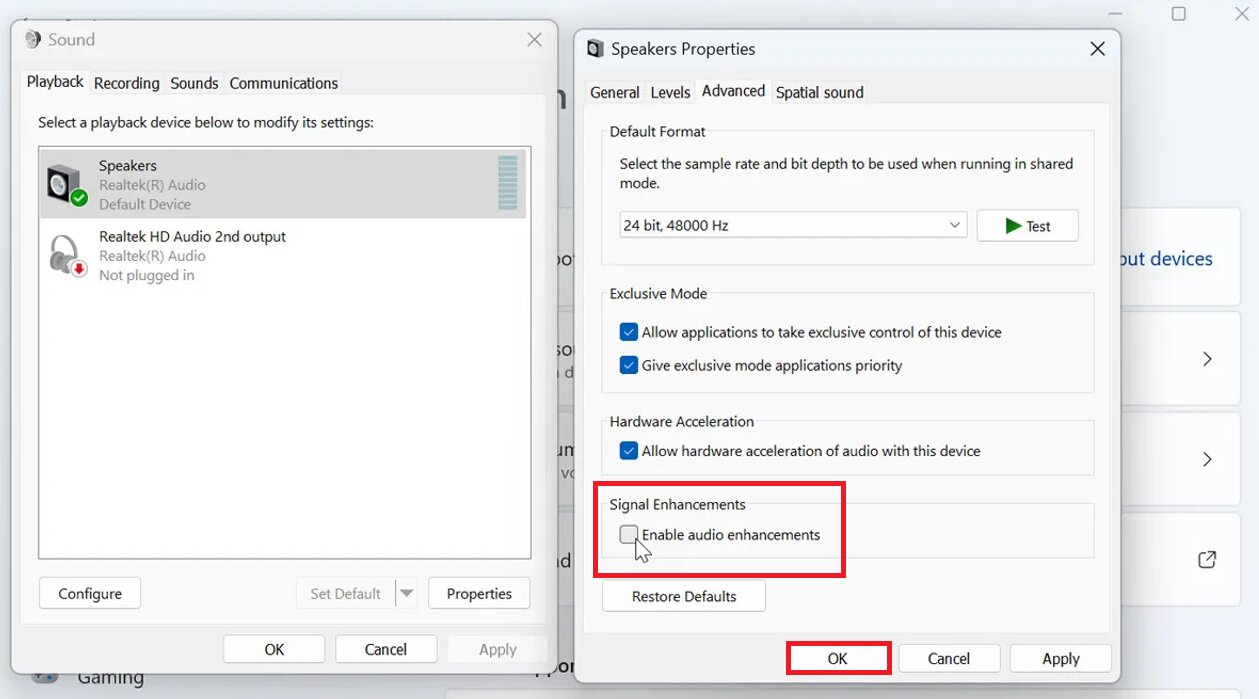
1. Turn Off Audio Enhancements
Best for: Crackling or stutter after updates or when using built-in effects.
Windows with built-in audio enhancements can sometimes conflict with your audio hardware, which causes stuttering or crackling. Turning off these enhancements gives your system a clean audio system.
Step 1: Go to Start, Settings, System and Sound.
Step 2: Select your audio device (under Input for microphones or Output for speakers/headphones). Press Speakers Properties.
Step 3: On the Advanced tab, uncheck Enable audio enhancements.
Step 4: Click Apply and OK.
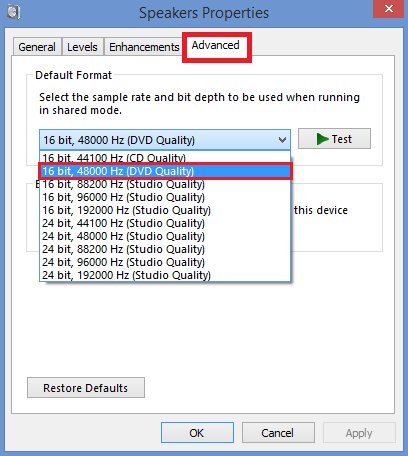
2. Change the Default Audio Format
Best for: Buzzing or stutter in specific apps.
Start with a widely compatible setting such as 16-bit, 48,000 Hz (or 24-bit, 48,000 Hz if available). Higher sample rates (like 96 kHz or 192 kHz) aren’t automatically more stable and can sometimes introduce issues on certain drivers.
Note: Avoid jumping straight to 192kHz unless your hardware explicitly supports it.
Here are the steps:
Step 1: Press Windows + R and enter mmsys.cpl.
Step 2: Right-click your default playback device (with the green tick) and select Properties.
Step 3: Go to the Advanced tab. Choose 16-bit, 48000 Hz (DVD Quality).
Step 4: Hit Apply and OK. Test your audio. If it still stutters, try other formats until it works.
3. Reset Sound Devices & App Volumes (Quick Refresh)
Best for: Random stutter after sleep or system glitch.
Restarting your audio services refreshes the system’s audio processes, while reconnecting your devices clears temporary glitches. This simple step is surprisingly effective for fixing random or intermittent stuttering.
Step 1: Access your Windows Settings.
Step 2: Go to System and Sound.
Step 3: Scroll down and click Volume Mixer.
Step 4: Click Reset next to “Reset sound devices and volumes for all apps to the recommended defaults.”
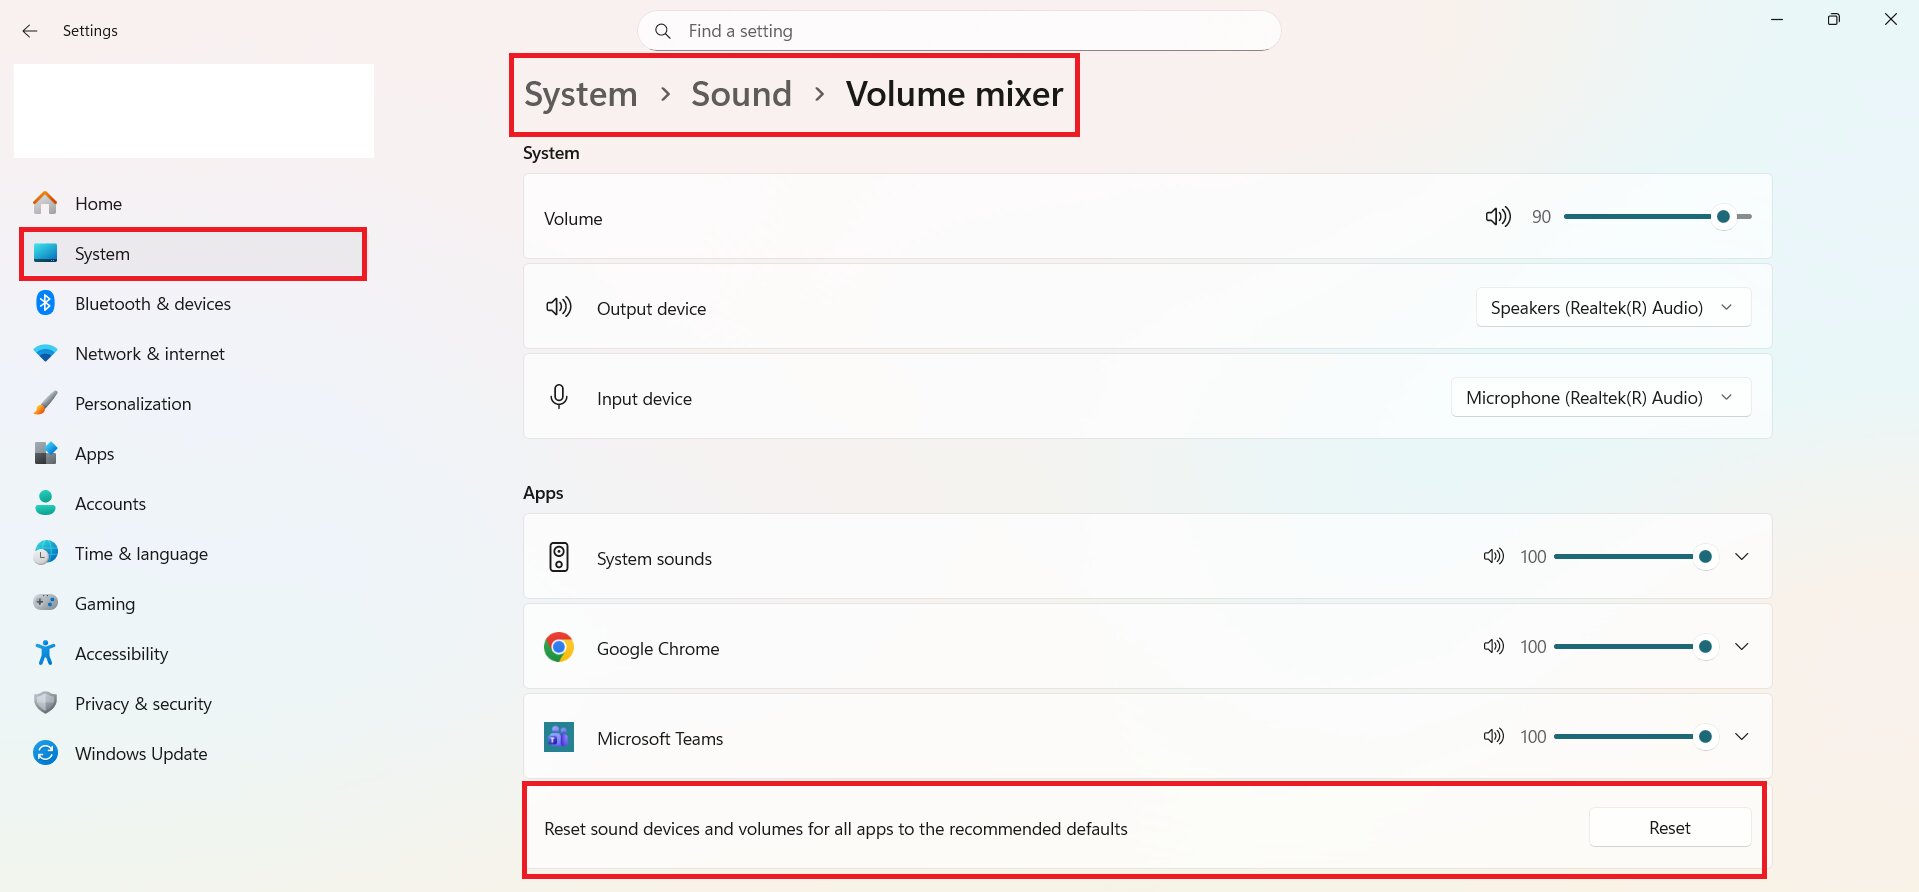
Note: This will reveal any hidden audio devices. You may need to disable them again after the reset.
4. Run the Windows Audio Troubleshooter
Your Windows system has a troubleshooter that can automatically locate and troubleshoot audio errors. This tool checks for issues like misconfigured settings, driver problems, or device conflicts. Running the troubleshooter is a quick way to see the cause of stuttering without digging into complicated system settings.
Step 1: Press Update & Security shortly on your Windows settings.
Step 2: Select Troubleshoot and hit Additional troubleshooters.
Step 3: Choose Playing Audio and click Run the troubleshooter.
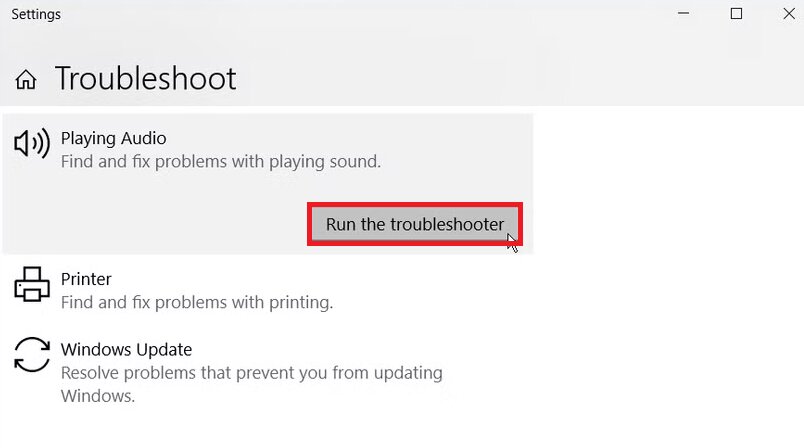
Step 4: Follow the on-screen instructions. When it finishes, check the results to see what fixes were applied.
5. Reinstall or Update the Audio Driver
Best for: Stutter after driver or Windows update.
Updating or reinstalling your audio driver ensures your PC can communicate properly with your sound hardware. This step solves both wired and Bluetooth audio issues and is essential if other fixes haven’t worked.
Follow these steps below:
Step 1: Press Windows + X and tick Device Manager.
Step 2: From the Audio inputs and outputs section, right-click your audio device (e.g., Realtek, Intel, or NVIDIA) and select Update driver.
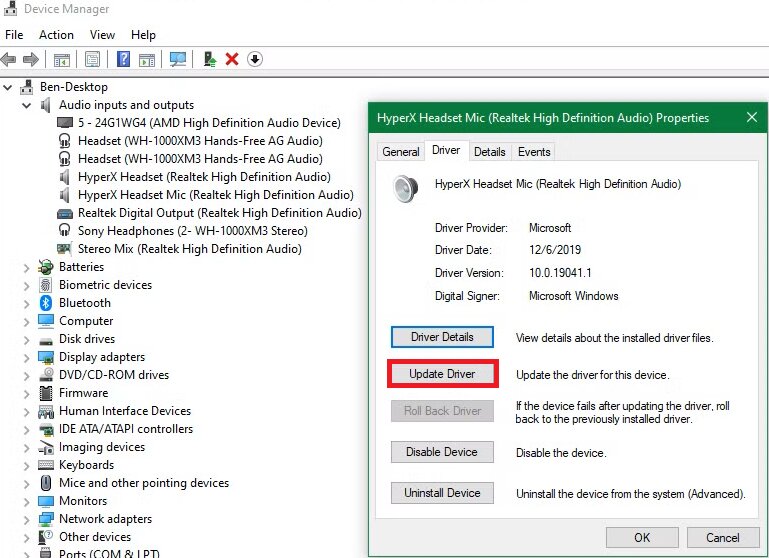
Step 3: Choose Search automatically for drivers.
Step 4: Windows will look for the latest driver and install it if available.
Step 5: Once done, restart your computer to apply the changes.
Note: If Windows doesn’t find a new driver, you can visit your audio device manufacturer’s website to download the latest driver manually.
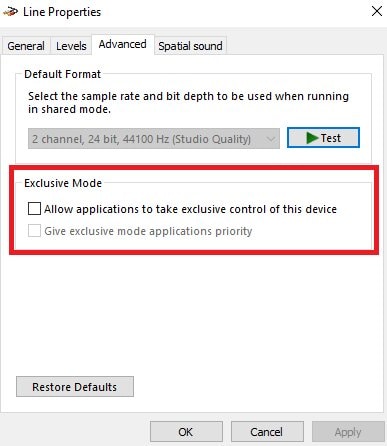
6. Disable Exclusive Mode for Audio Devices
Best for: Call apps or media apps interfering with each other.
Disabling exclusive mode allows multiple applications to share the audio device, which reduces interruptions. Here’s how to disable exclusive mode:
Step 1: Right-click the tiny speaker icon in the taskbar and select Open Sound settings.
Step 2: Under Choose your output device, click Device properties, then Additional device properties.
Step 3: On the Advanced tab, uncheck Allow applications to take exclusive control of this device.
Step 4: Tick Apply and OK.
Step 5: Repeat these steps for your input device (microphone).
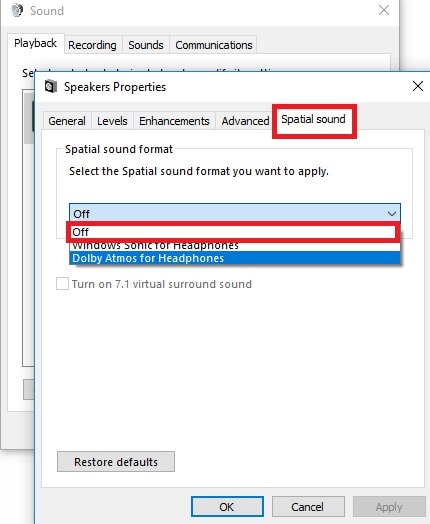
7. Turn Off Windows Spatial Sound
Turning off spatial sound can help your PC focus on smooth audio playback, especially if your speakers or headphones don’t fully support it. Here’s how to turn off Windows spatial sound:
Step 1: Access your Windows Sound settings.
Step 2: Under Output, select your audio device (speakers or headphones).
Step 3: Click Speakers properties.
Step 4: Scroll down to Spatial sound.
Step 5: In the dropdown menu, select Off.
Step 6: Hit OK and close the settings, and test your audio.
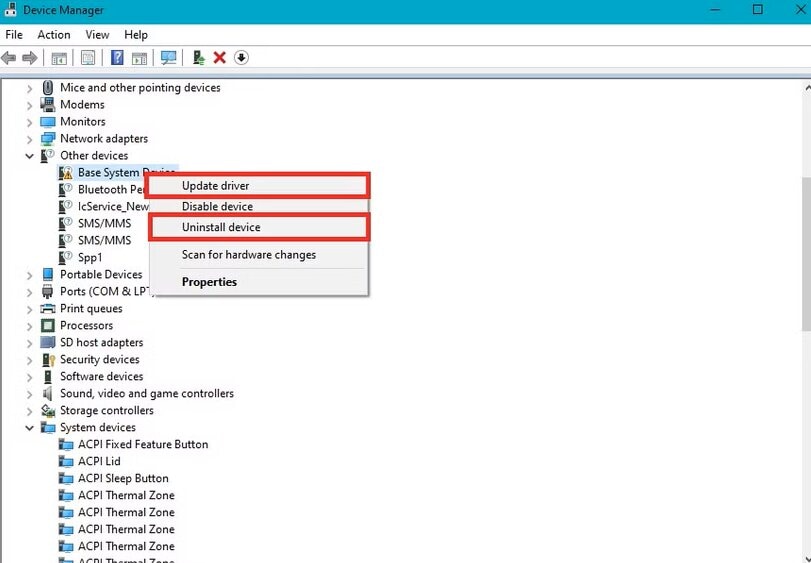
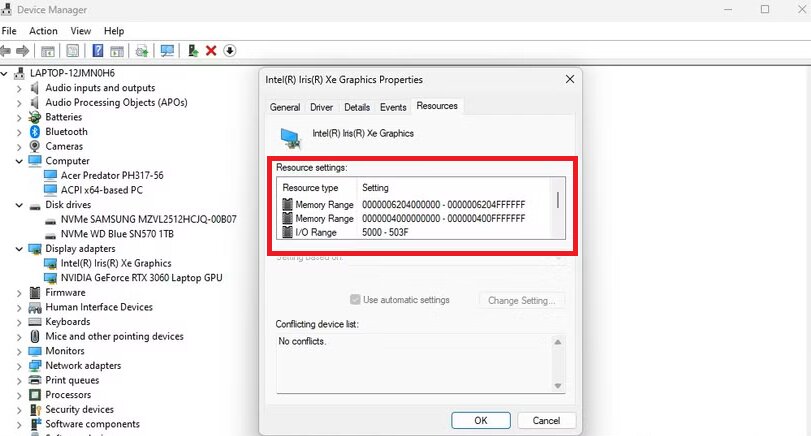
8. Resolve Network Driver Conflicts
Best for: Bluetooth or streaming-related stutter.
If audio stutters mainly with Bluetooth devices, during streaming, or while gaming online, network and Bluetooth drivers can contribute to latency spikes that interrupt audio. Here’s how to resolve device conflicts using Windows Device Manager:
Step 1: Open Device Manager and right-click the conflicting device.
Step 2: Select Update driver to let Windows install the latest driver. Or select Uninstall device to reinstall the driver automatically after a restart.
Step 3: To adjust resource settings, go to the Resources tab. You can either manually assign resources or enable Use automatic settings so Windows manages it.
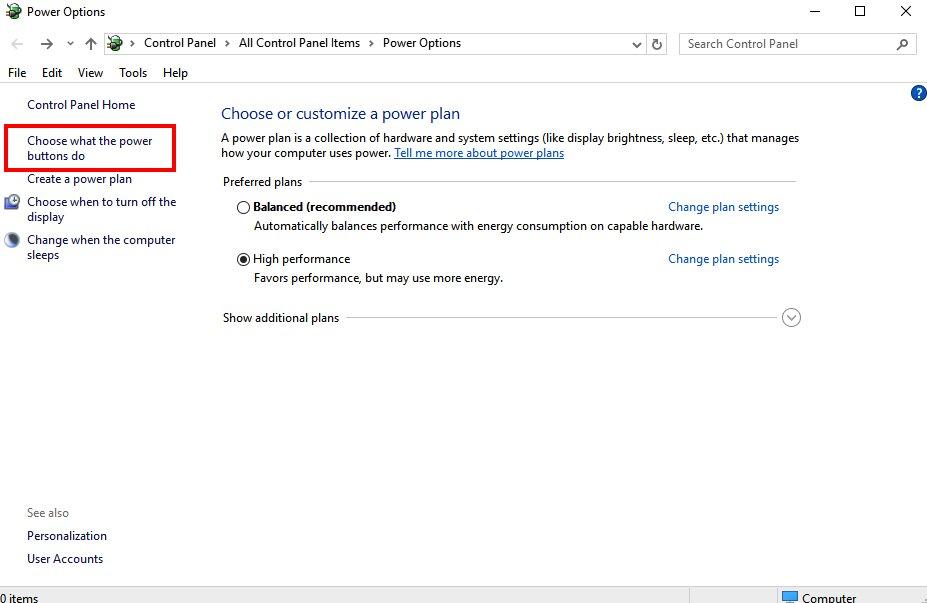
9. Disable Fast Startup on Windows 10 and 11
Best for: Stutter after boot.
Disabling Fast Startup allows Windows to fully initialize audio components, which eliminates startup-related stutter problems. Adhere to the following steps to disable fast startup:
Step 1: Enter powercfg.cpl in the Run dialog
Step 2: In the Power Options section, hit on Choose what the power buttons do.
Step 3: Scroll down to Shutdown settings and uncheck Turn on fast startup.
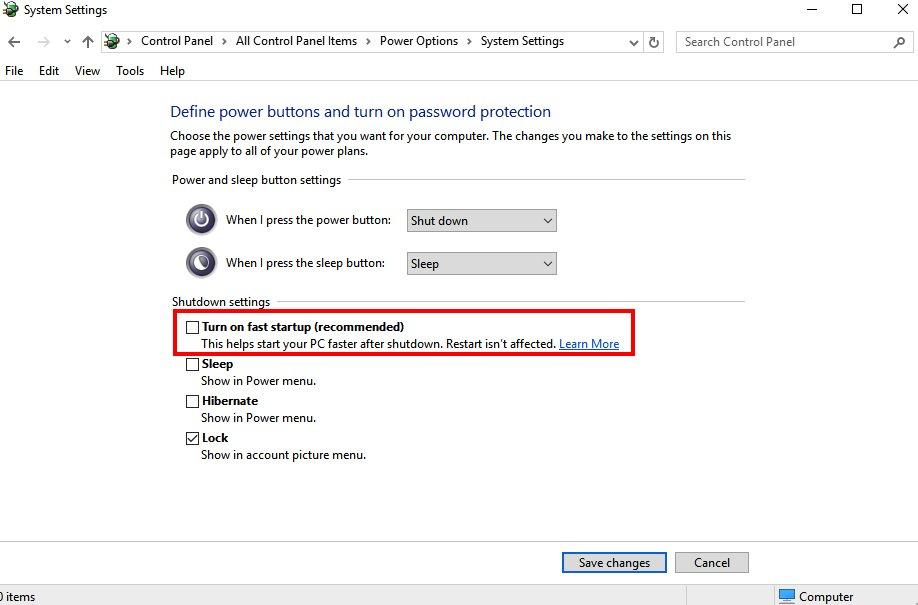
Step 4: If the option is greyed out, press Change settings that are currently unavailable first.
Step 5: Hit Save changes. After disabling Fast Startup, restart your computer and check if the issue is fixed.
Part 5. When Audio Stuttering Is Caused by Corrupted Audio Files
If only certain audio or video files stutter (while everything else plays normally), the issue is usually file-level corruption—such as an incomplete download, interrupted transfer, or damaged encoding. In this case, Windows sound settings and drivers may not fix the problem.
How to confirm it’s a file issue (not a system issue)
- The same file stutters in multiple players (e.g., VLC and Movies & TV).
- The file also stutters on another computer.
- Other files play smoothly on your PC.
What a file repair tool can and can’t do
- Can help: repair damaged local audio/video files so they can play smoothly again.
- Can’t help: system-wide stutter across all apps, live streams, or platform buffering issues.
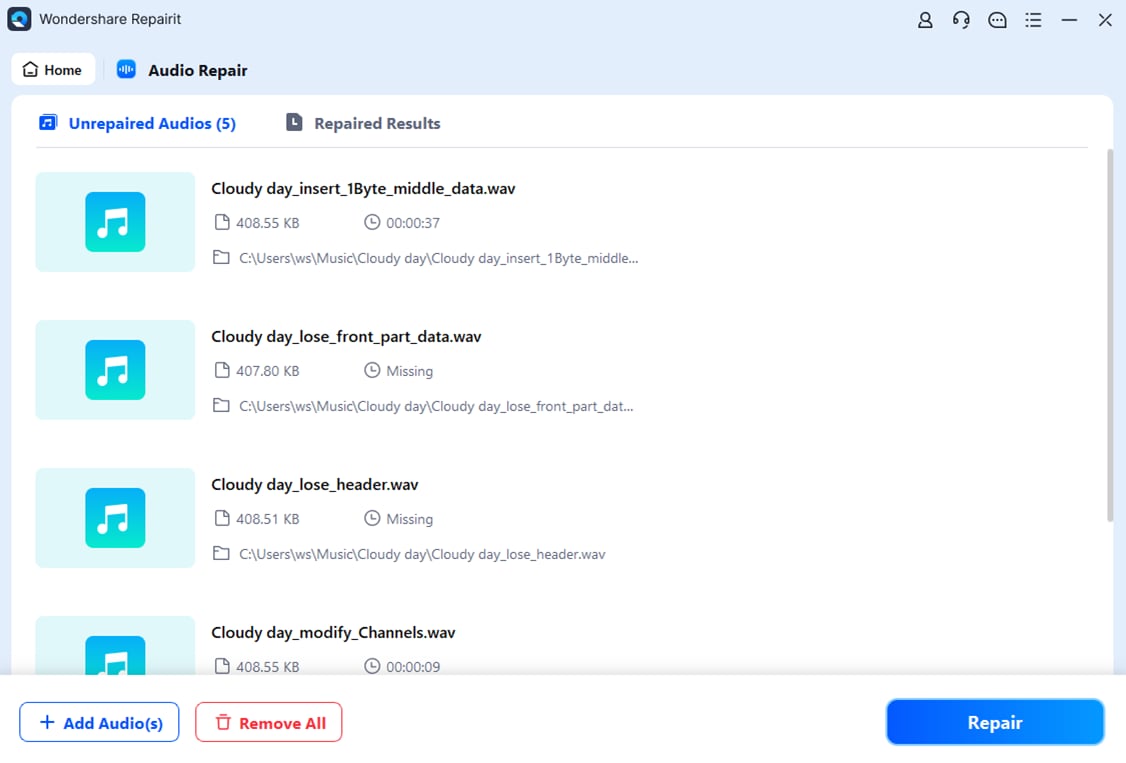
If you’ve confirmed the issue is limited to specific corrupted files, a file repair tool like Repairit Audio Repair can help repair those files.
Step-by-Step Guide:
Step 1: Open Repairit, find More Types Repair and select Audio Repair. Click Add to upload your damaged audio files (MP3, M4A, FLAC, WAV, etc.).

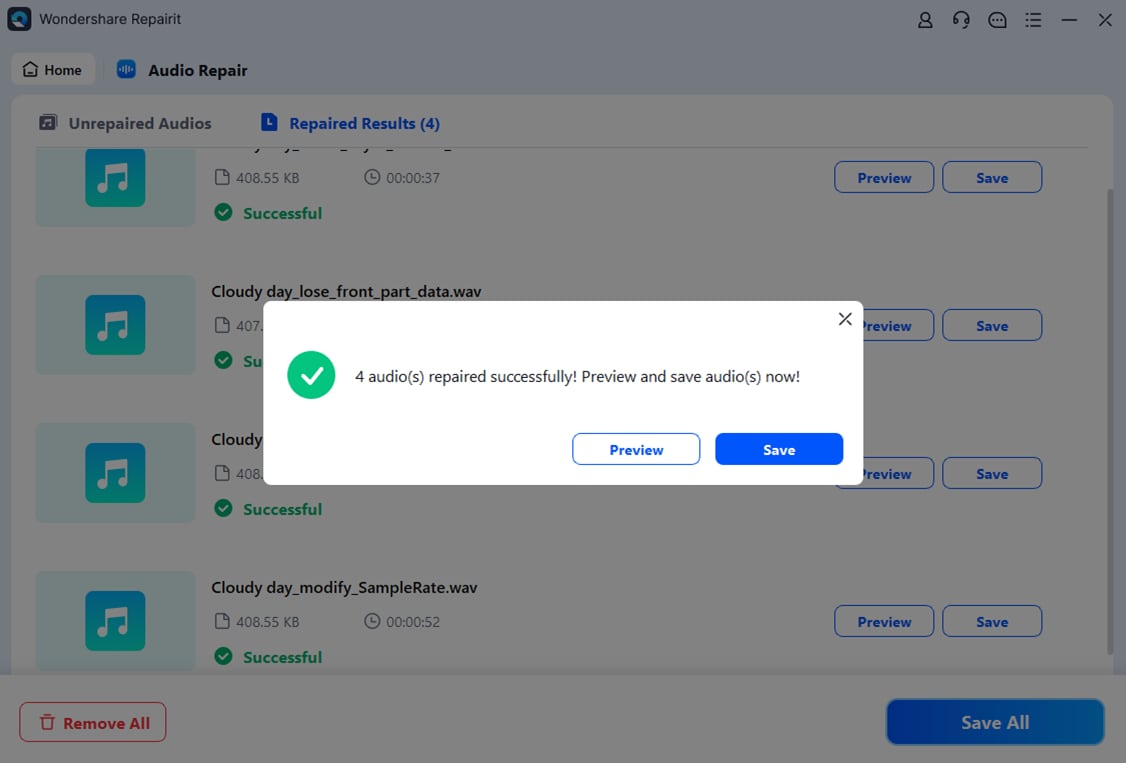
Step 2: Hit Repair. You may be asked to upload a sample audio file in the same format as the corrupted one. This helps improve the repair quality.
Step 3: Click Preview to check the repaired audio. If you’re satisfied, click Save and choose where to store the fixed files on your PC. Your repaired audio files are now ready to use without stuttering or playback issues.
Part 6. Important Tips to Prevent Audio Stuttering on Windows 10/11
Preventing audio stuttering is easier than constantly fixing it. Minimize the chances of audio stutter and enjoy uninterrupted sound on Windows 10 and 11 with the following tips:
- Keep Windows and audio drivers updated. Updates have improved bug fixes and performance upgrades that prevent stuttering.
- Avoid unnecessary enhancements and spatial effects. Features like bass boost or Dolby Atmos can sometimes overload your system, causing glitches. Stick to simpler settings for smoother playback.
- Use stable, high-quality audio devices. Cheap or faulty headphones, speakers, or Bluetooth adapters are more likely to cause drops or crackling.
- Match sample rates across apps and devices. When your audio files, apps, and devices use different settings, it can create playback issues. Keeping them aligned reduces stuttering.
- Safely download and transfer audio files. Corrupted downloads or interrupted transfers can make files unplayable. Always ensure your audio files are complete and error-free.
If stuttering persists:
- Perform a Clean Boot to rule out third-party conflicts.
- Uninstall recent Windows updates if problem started afterward.
- Test another output device (USB headset/DAC).
- Check driver latency using tools like LatencyMon.
- Install audio drivers directly from your PC manufacturer.
- If hardware defects are suspected, consider contacting your device manufacturer.
Conclusion
Audio stuttering in Windows 10 and 11 can be frustrating — but it’s usually fixable. Whether caused by drivers, settings conflicts, wireless interference, or file corruption, the structured troubleshooting steps above help isolate and resolve the issue safely.
Start with the simplest fixes first, and move gradually toward advanced steps only if needed. Clear, uninterrupted sound is usually just a few adjustments away.
FAQs
-
Why does audio stutter after Windows updates?
Sometimes, Windows updates change system settings or install new drivers that aren’t fully compatible with your audio hardware. This can cause sound to skip, crackle, or lag. Updating your audio drivers or checking your sound settings usually fixes the problem. -
Can Bluetooth audio stutter even if system audio is fine?
Yes. Bluetooth stuttering is often caused by wireless interference, a low battery, or connection issues. Even if your system audio works perfectly with wired devices, Bluetooth can still have skips or dropouts. Reconnecting the device or moving closer to your PC often helps. -
Will hardware upgrades stop audio stutter?
Sometimes. Upgrading your sound card, RAM, or CPU can improve performance and reduce stuttering caused by heavy workloads or outdated hardware. However, if the stutter comes from settings, drivers, or corrupted files, hardware alone won’t fully solve it.