
PST files, or Personal Storage Table, are the files utilized for storing contents from your Outlook email. Microsoft Outlook introduced these file types under the narrative of protecting and keeping your mail record. However, in cases where you are switching from one version of the Outlook to another or changing your Windows device, you will need to use the PST file to successfully interchange content between devices or platforms.
This article is all about the process to import PST file in Outlook and different software. We will be covering multiple methods according to variating scenarios. For instance, if users wish to transfer their contacts from Outlook to Apple Contacts, we have covered them. For other cases where users are looking to transfer their email data from Windows to Mac or from Outlook to Gmail, this article effectively provides a detailed guide to all users. Let's get started!
In this article
Step-by-Step Guide on How to Import PST Files into Apple Contacts
Contacts are a very important element in your everyday life. As they provide an identity to the person you communicate with, you may find it necessary to import contacts across your new iPhone. This part shall introduce you to a guide that will help you import PST files into Apple Contacts. For this part, you will be considering iTunes as your first option for the successful execution of the procedure.
While you consider using this method to import PST file into Apple Contacts, you need to ensure that iCloud is not activated across your device. Before starting the process, you can set the items to be synchronized in this one-time process. Whenever the iOS device is connected to the computer, the content across it will be updated accordingly. Once done, make sure to follow the steps shown below:
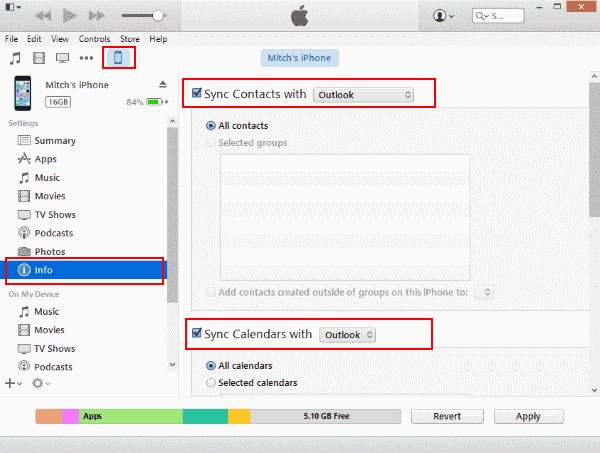
Step 1: You need to ensure that the latest version of iTunes is installed across your computer. Launch the tool and connect your iOS device to the computer. iTunes will successfully detect your iOS device automatically.
Step 2: Once you are in the interface of iTunes, access the left panel of the platform and click on the ‘Device’ icon. A drop-down menu appears on the screen. Select "Info" from the available options and proceed.
Step 3: You will find a new set of options on the right side of the screen. Check the option of "Sync Contacts With" and choose "Outlook" from the options on the menu. Click on "Apply" to successfully execute the process.
Import PST to Gmail – Easy Process
This method can be quite useful if you shift your Outlook email to Gmail. Considering you are in such a situation, you may need to follow a certain series of steps that would help you in transferring your email contents into Gmail without any difficulty. To execute this manual procedure successfully, follow the step-by-step procedure below:
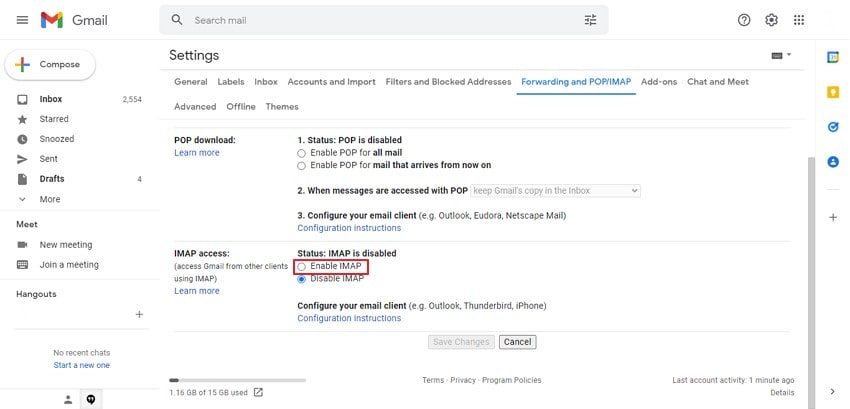
Step 1: Log into your Gmail account successfully and click on the "Gear" icon on the top-right section of the screen. Select the option of "See all Settings" from the drop-down menu to proceed into the next window.

Step 2: On the "Settings" screen, you will find the tab "Forwarding and POP/IMAP."

Step 3: Access the "IMAP Access" section on the next screen, click on the option of "Enable IMAP," and save the changes made in the settings of your email account.
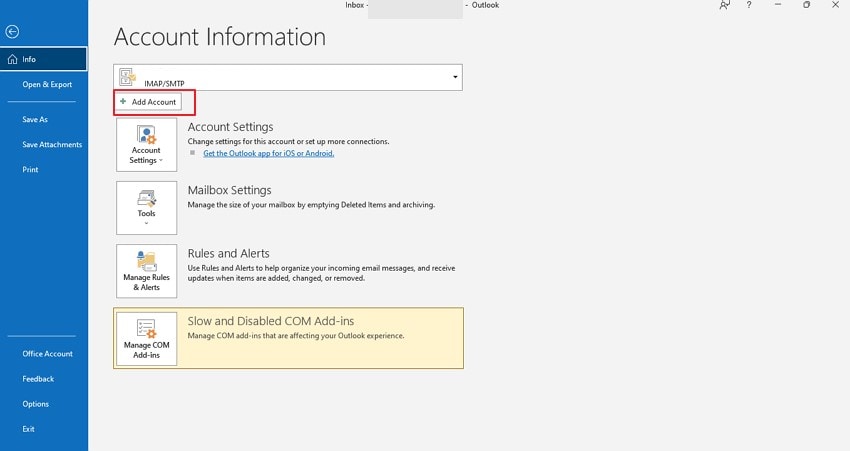
Step 4: Launch Outlook on your computer and click on the "File" tab at the top of the interface. Following this, click on "Add Account" and enter your Gmail ID. Once added, click on "Connect" and proceed to enter the password to add the account successfully.
Step 5: Once your Gmail account is added successfully, you will be notified. Tap on "Done" to import PST file to Gmail. If you are a Windows user, please check out Part 3 for importing PST to Outlook successfully. Check out Part 4 to import PST to Outlook if you own a Mac.

Import PST File into Microsoft Outlook – Windows Solution
In other cases, if you are looking forward to import PST file in Outlook across your Windows device, the process is quite simple and definite to execute. We will be taking the latest Outlook versions and providing step-by-step instructions to the readers to successfully import a PST file into Outlook. Follow the steps as shown below for successful results:
Step 1: Launch your latest version of Outlook on the Windows device and tap on "File" to lead to a new menu. Click on "Open & Export" and tap on "Import/Export" for importing your PST file into the Outlook account.
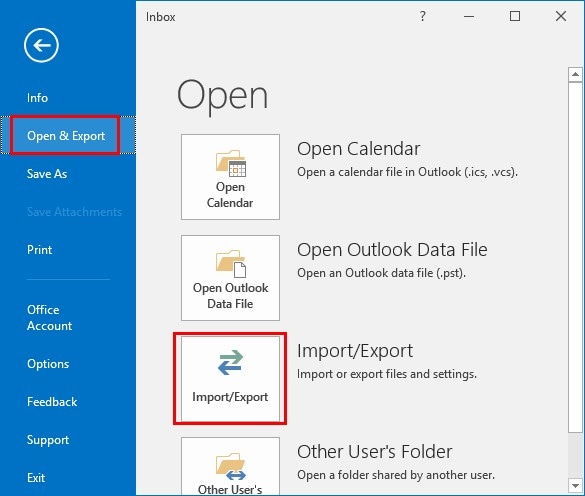
Step 2: The "Import and Export Wizard" initiates on a new screen. On the window, you need to select the option of "Import from another program or file" and click "Next" to proceed.

Step 3: A new dialog box of "Import a File" opens up. Select the option of "Outlook Data File (.pst)" and proceed to click "Next."

Step 4: In the next window, you need to click on "Browse" to locate the file to be imported into your Outlook account. Select an appropriate option about duplicating items and tap on "Next."
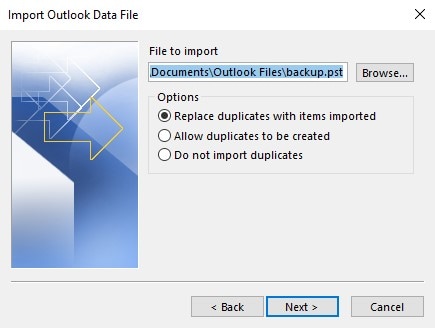
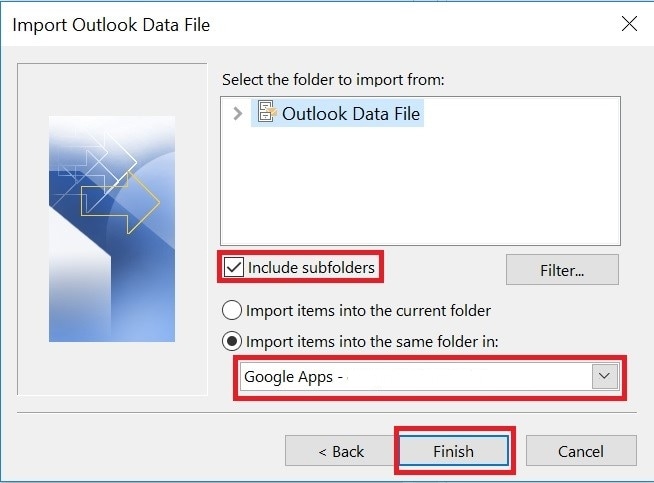
Step 5: A new dialog box of "Import Outlook Data File" opens on the screen. Select all the folders and sub-folders that you need to import. Check the option of "Include subfolders" and select the option of "Import items into the same folder in:" across the same dialog box. Select the profile across this option and tap on "Finish" to conclude the process.
Import PST File into Microsoft Outlook – Mac Solution
This part would be useful for users transferring their Windows device into a Mac. Under such cases, you may need to transfer your content from the mail under professional needs. For such cases, you can consider to import PST file to Outlook Mac. You need to make sure that the PST is UNICODE-supported for effective results in the method. Follow the steps shown below to import your PST file into Outlook for Mac:
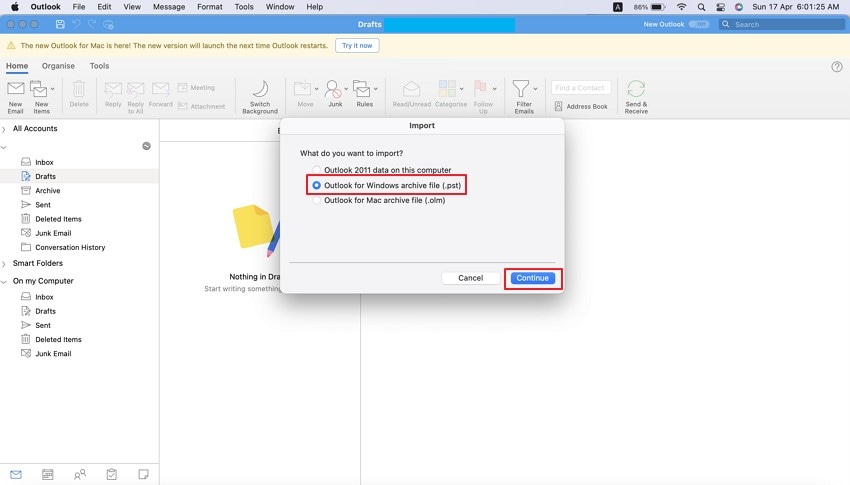
Step 1: You need to have the PST file across your Mac. Ensure to transfer it on your Mac. Once done, launch your Outlook application on Mac and access the "File" tab from the menu. You need to select the option of "Import" across the drop-down menu.

Step 2: On the next screen, you need to select the "Outlook for Windows Archive File (.pst)" option and click on "Continue" to move forward with the process. Locate the folder where the file has been saved and select "Import" for adding it to your platform.
Step 3: Once added, click on "Done" and find the imported files across the "On my Computer" navigation pane.

How to Repair Corrupted PST File with Wondershare Repairit for Email?
While looking into these methods, there might be a case where you may get your file corrupted. To get the file repaired and your content retained, you will definitely need a proper tool. Wondershare Repairit for Email has got you covered, where you can repair your corrupted PST file in no time. The tool is quite efficient and effective in such cases, as it recovers mailboxes from large PST.

-
Repair damaged PST & OST Files in Outlook in all Email corruption scenarios, such as hard disk crashes & bad sectors, virus attacks & tojan horse, outlook corruption & malfunctions, improper shutdown procedure, etc.
-
Restore Outlook Emails deleted for a long time and extract the Email messages, folders, calendars, etc. within seconds.
-
Repair corrupted Emails and restore deleted Emails with a very high success rate.
-
Repair Emails in bathes without size limits and support to preview all of them before saving.
-
Compatible with Windows 7/8/8.1/10/11, Windows Server 2012/2016/2019, and MacOS X 10.11~ MacOS 12 (Monterey).
Look across these steps for successfully repairing corrupted PST files with ease.
Step 1: Launching the tool
Launch Repairit for Email on your device. Click "+Select File" to upload your corrupted PST files.

Step 2: Repair corrupt files
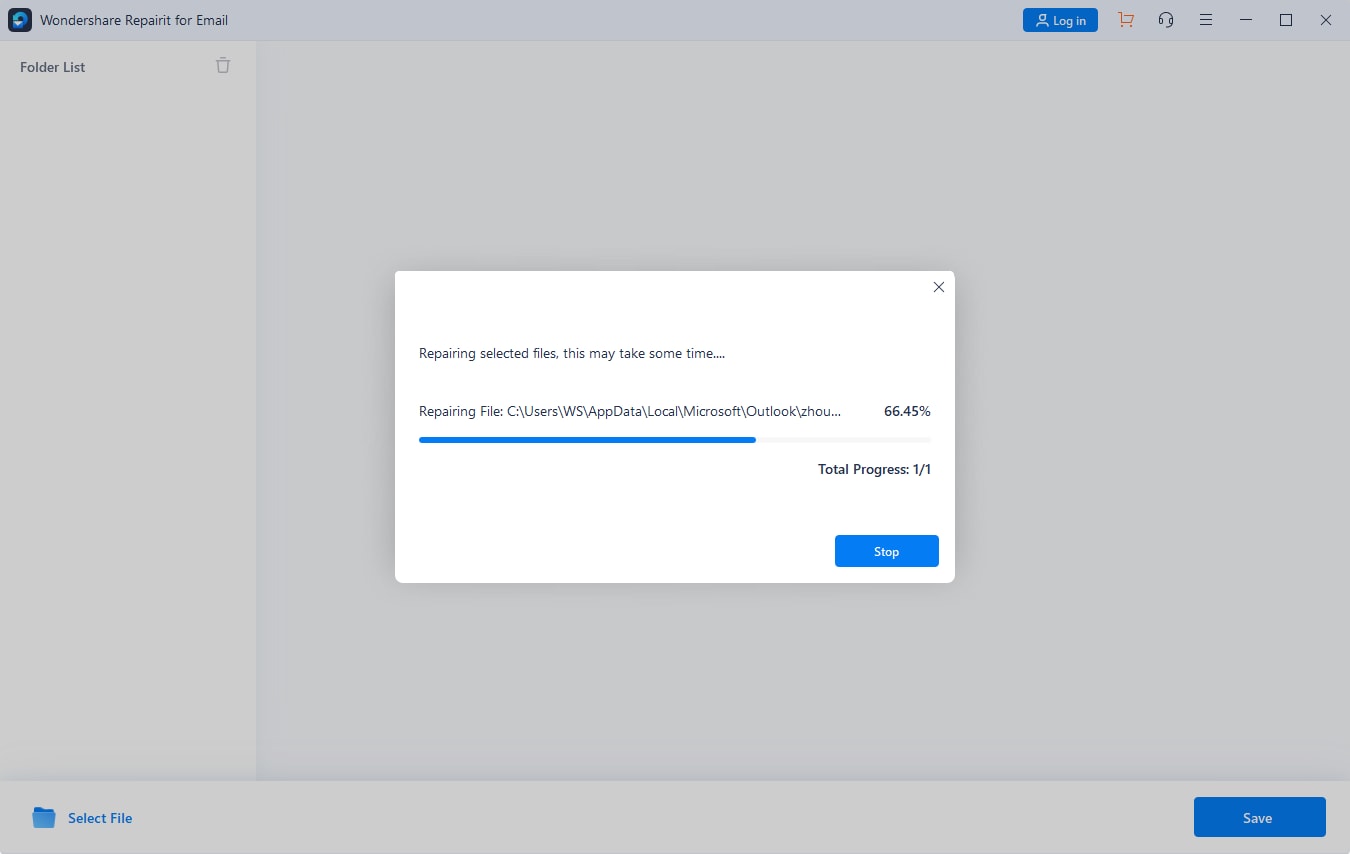
After uploading the corrupted files, select all of them or any one of the files from the list to be repaired and click on "Repair" to execute.
Step 3: Preview and save the repaired files
Repairit concludes the repairing process in a short time. Once done, a message would display, which would continue into displaying all the PST files that can be recovered in the process. On selecting the items that you have to repair, click on "Save" to choose a location for the selected items.

Closing Words
This article has been vocal about providing users with effective methods to import a PST file into Outlook and other software. If you are looking forward to covering such a process, you need to go through this article for proficient results. We hope that you will be able to recover all your data while trying these methods.
 ChatGPT
 Perplexity
 Google AI Mode
 Grok
Grok
