Quite a lot of Outlook users are getting the 0x80040119 error code. The problem most times occurs with e-mail accounts in IMAP and Concerned users report that the error stops them from sending or getting any mail from that actual e-mail address. The problem is not limited to a particular Windows version since it's established to happen on Windows 8.1 Windows 10, and Windows 7.
If you are facing error 0x80040119 in Microsoft Outlook after the e-mails you are sending fails or while setting up an account, there is no need to worry. This article will guide you on how to fix the Outlook error 0x80040119. It will show you some possible fixes to solve this issue.
In this article
What's causing the Outlook Error 0x80040119?
Several different situations are responsible for the error message. Here are the possible causes that might be prompting the outlook error code 0x80040119:
Corrupted PST file – The most known cause that triggers this error code is a discrepancy with the (.PST) file of Outlook. The most effective fix is to fix the corrupted file with the Inbox Repair Tool.
Corrupted Office Installation – Another likely cause that can trigger this problem is an incomplete or corrupted Office installation. Some concerned users with this situation have confirmed that they were able to resolve the problem by repairing the Office installation through the Programs and Features menu.
Glitches on e-mail account – If you e-mail is powered by a 3rd party provider like Gmail or Yahoo, chances are an irregularity made the e-mail trapped in limbo mode, where it cannot receive or send e-mails. You can fix the problem by restoring the account through Account Settings Outlook.
Method 1: Try the Inbox Repair Tool
The most likely issue that will trigger the outlook unknown error 0x80040119 is an inconsistent Outlook (.PST) file. If this file is corrupted, you might not be able to use the server to send and receive e-mails.
Users with this problem have been able to fix the bug by repairing the.PST file with the aid of the Inbox Repair Tool. This tool is in all versions of Outlook.
Note: This solution works only for Microsoft Outlook 2013 and later versions. If you are using an older version of Outlook, the guide below will NOT work. Move down straight to Method two.
Here's a swift guide on how to repair the Outlook (.PST) file with Inbox Repair Tool:
- Ensure that Outlook and all connected apps are fully closed.
- Download the Inbox Repair tool on the Microsoft website and wait for the download to complete.
- Double-click the utility launcher. On the first screen, click the Advanced link, now tick the box labeled Apply repairs automatically. Then, press Next to go to the next screen.
- Allow the scan to complete to know the problems with your Outlook.PST file. If any bugs are found, it will immediately recommend feasible repair strategies.
- When you are on the Microsoft Outlook Inbox Repair window, select browse, now move to the folder where the.PST file is located.
Note: If you are not sure where the PST file is, remember that the usual location is C:\Users\ \AppData\Local\MicrosoftOutlook. Except you moved it into another location, you will be able to find it

- After completing this process, restart Outlook once more and check if the issue has been solved
- If the 0x80040119 error is still showing when you want to accomplish a task with your e-mail, go straight to the technique below.
Method 2: Repairing the entire Office installation
If you've established that the problem is not being triggered by a damaged PST file, you are most likely battling with some sort of corrupted data in your Office installation that is hampering your outlooks functionality.
Some users that with a similar situation have been able to get the problem fixed by repairing the whole Office installation using the in-built functionality. If you lately saw signs that your Office installation could have been changed (some start-up fault associated with Office or an isolated item) you should confirm that your Office installation is not damaged by restoring it through the Programs and Features menu.
Here's our tutorial on fixing Error 0x80040119 the Office installation to make your Outlook work properly
- Click Windows key + R to start the Run dialog box. Now, input "appwiz.cpl" into the text box and click Enter to start Programs and Features.

- When you into the Programs and Features window, roll down through the applications list to find your Office installation. When you get it, right-click on the app and select Change from the context menu that recently appeared.
Note: If the UAC (User Account Control) prompts you, after clicking on Change, choose Yes to allows administrative privileges.
When you land in the repair menu, go to Quick Repair and then click Continue
Note: Remember that contingent on your Office installation, this menu can look differently on your monitor.
When the process is finished, close your PC and restart it to see if the problem is fixed when you open your outlook app.
If you are still facing the 0x80040119, move to the method below.
Method 3: Repair the Account through Account Settings
If you are using an e-mail through third parties like Gmail or Hotmail, you may face error 0x80040119 in Outlook.
Repair the account through the account settings window to resolve the issue.
Step 1: Start Outlook app, then click on the top file
Step 2: On the left side, go to Account Settings. Click on the button with "account Settings".

Step 3: In the window for Account Settings, click the tab with "E-mail", then choose the e-mail account that's triggering the problem and select the button labeled "button".
Step 4: Observe the prompts on the monitor to complete the repairing, now start your computer and your Outlook again and see if error 0x80040119 is still there.
If you're again facing the Outlook error 0x80040119, move straight to the solution below.
Method 4: Uninstall the Third-Party Programs
Sometimes third third-party programs with extra protection can also cause this problem. Kaspersky and McAfee are some of the most pointed 3rd party security applications.
To resolve this problem, you need to uninstall the third-party security app and wipe all remaining files that can affect your e-mail client.
Uninstall the Software
Step 1: Click Windows + R tabs to start the Run interactive box. Now enter appwiz.cpl in the box and click enter to start the programs and features menu.
Step 2: Locate the security program you know is triggering the issue, now right-click it, and select Uninstall.
Step 3: Observe the uninstallation prompts to uninstall the suite.
Step 4: After the uninstalling the program, restart your PC
Method 5: Remove All Residue Files
Step 1: Go here to locate the removal program for the security suite you want to remove from your PC.
Step 2: Click the link above to download the removal software and now start it.
Step 3: Observe the prompts on the monitor and remove every remnant file of the uninstalled suite using the removal tool.
Restart your computer and open your Outlook program. Now repeat the process that led to the osx80040119 error and check if it has been resolved.
Method 6: Use Professional Outlook Repair Tool
If the above-mentioned solutions does not work well, please try Wondershare Repairit for Email. It will help you to repair any Outlook errors and corrupted Outlook PST or OST files with high accuracy quickly. Here are the main advantages of Repairit for Email.

-
Repair damaged PST & OST Files in Outlook in all Email corruption scenarios, such as hard disk crashes & bad sectors, virus attacks & tojan horse, outlook corruption & malfunctions, improper shutdown procedure, etc.
-
Restore Outlook Emails deleted for a long time and extract the Email messages, folders, calendars, etc. within seconds.
-
Repair corrupted Emails and restore deleted Emails with a very high success rate.
-
Repair Emails in bathes without size limits and support to preview all of them before saving.
-
Compatible with Windows 7/8/8.1/10/11, Windows Server 2012/2016/2019, and MacOS X 10.11~ MacOS 12 (Monterey).
Steps to Repair Outlook Data File (.pst) by using Wondershare Repairit for Email.
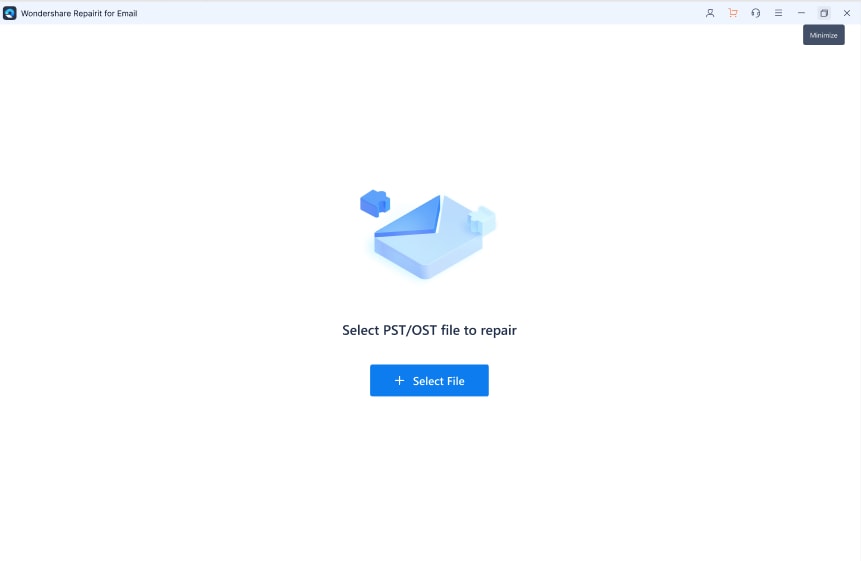
Step 1: Add PST File
Download and install Wondershare Repairit for Email on your device. Repairit window will ask you to click the "+Select File" button.

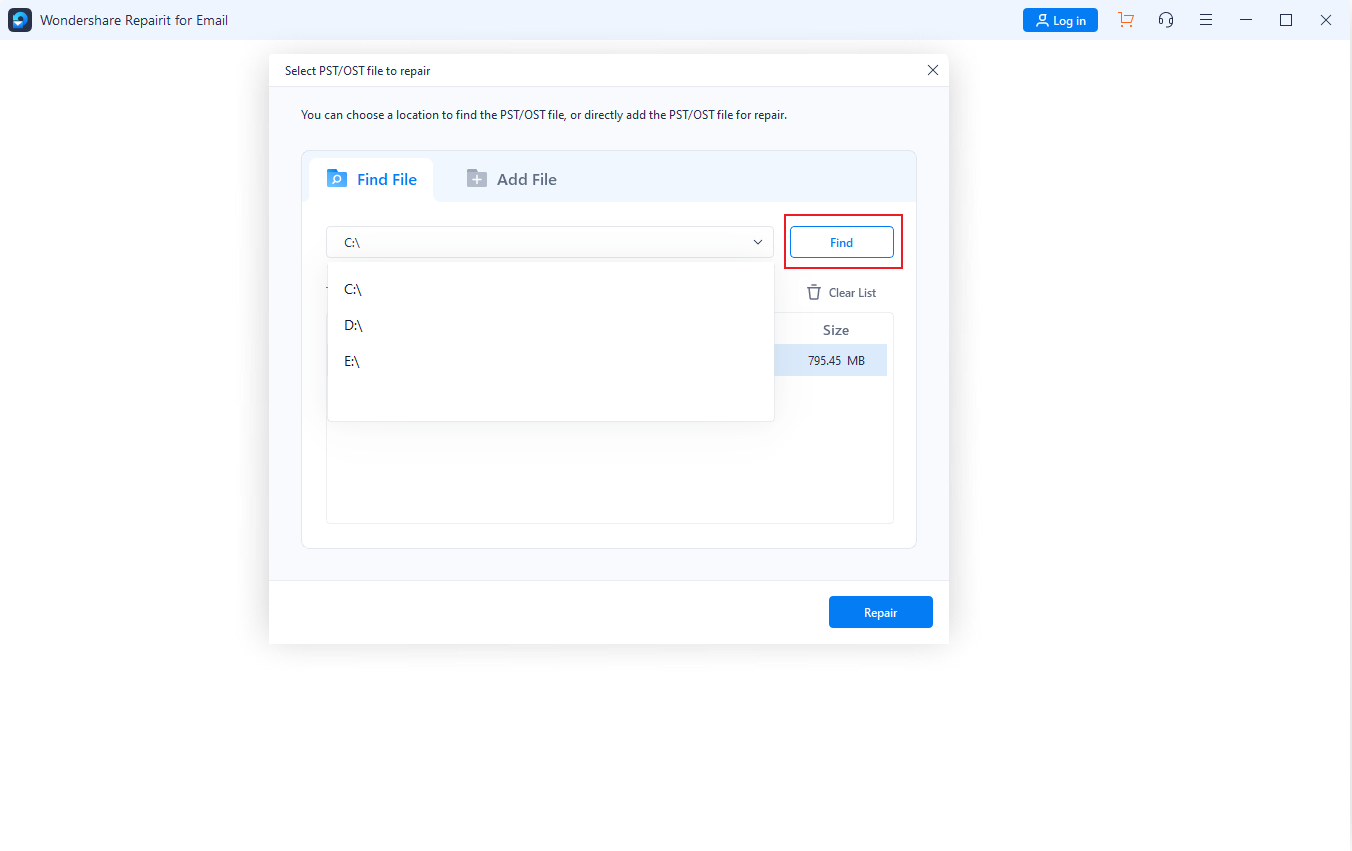
You need to select files from the desired location by clicking the "Find" button, and click the "Repair" button to start the file repair process.

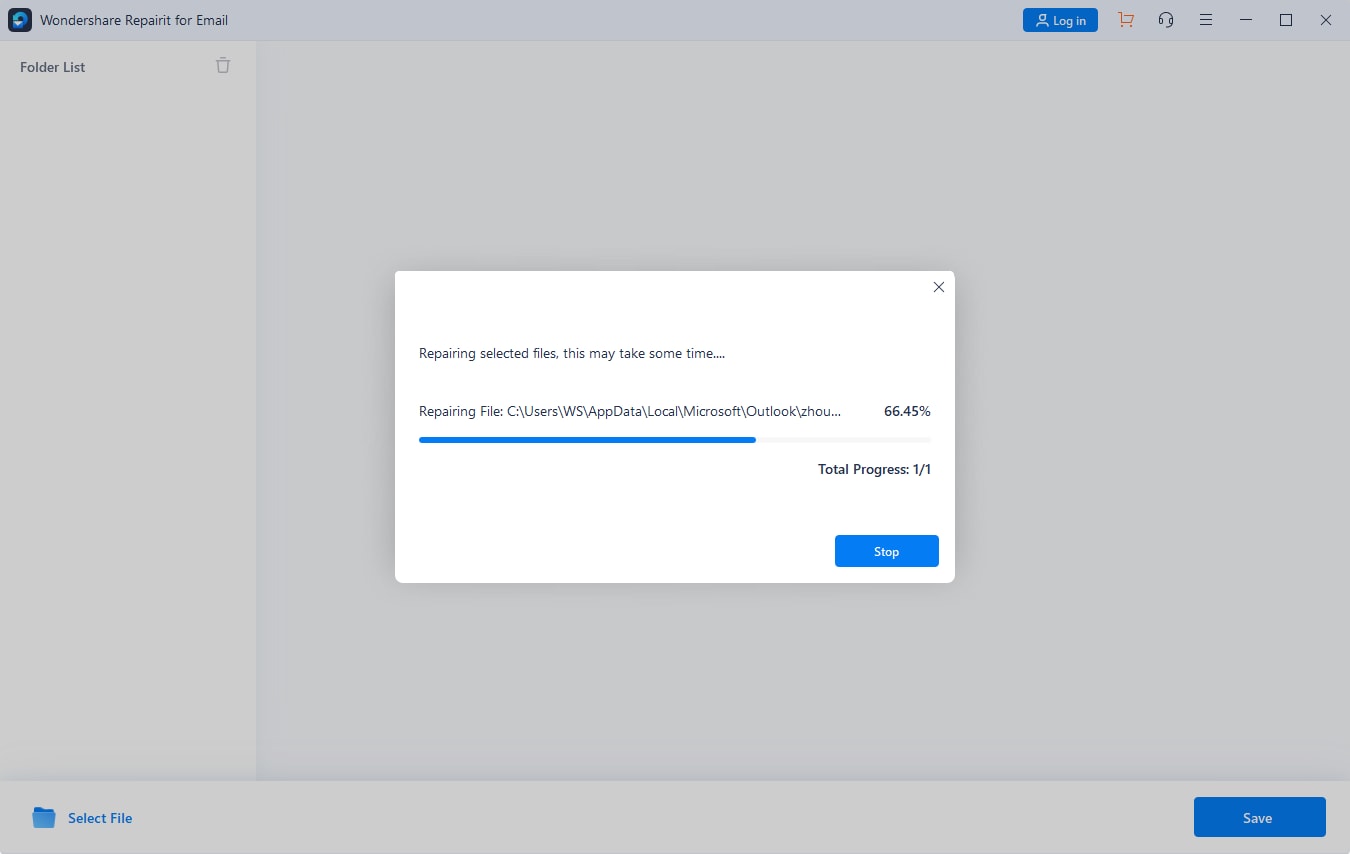
Step 2: Repair the PST File
After clicking the "Repair" button, Repairit will start to fix the corrupted file.

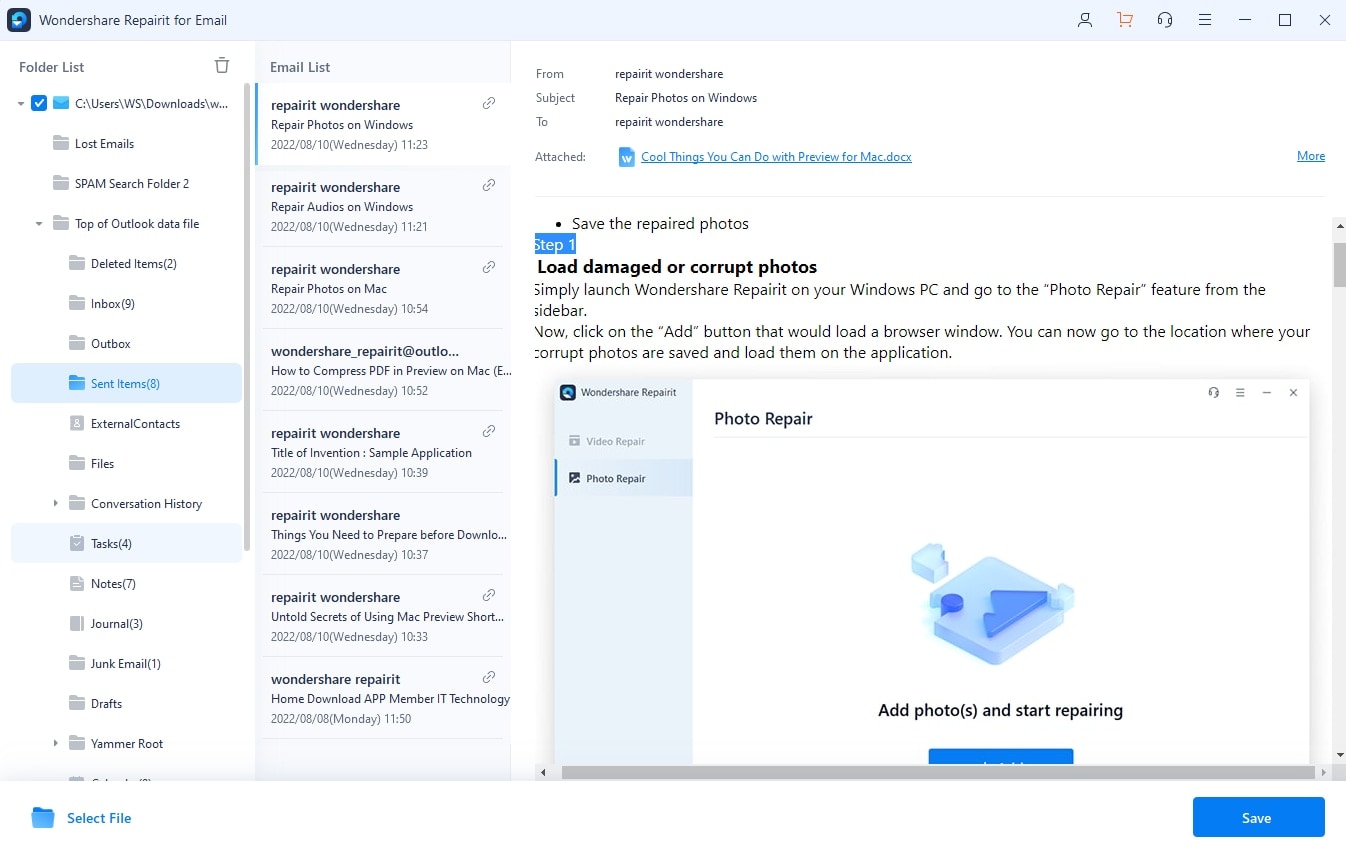
Step 3: Preview and Save
After the file repair process finishes, Repairit allows you to preview the file before saving it. If you're satisfied with the result, please click the "Save" button to save the fixed file.

Conclusion
After using Repairit for Email, I can confirm that the suite repairs corrupt Outlook.PST files perfectly regardless of the severity of damage or size of the file.
Apart from recovering all deleted e-mails, it also successfully recovered the whole mailbox data.
Repairit for Email is available in Technician and Professional editions. Both work perfectly in repairing Outlook PST files that have been corrupted.
If you are facing issues of corruption.PST files in Microsoft Outlook, Repairit for Email is your easiest way out. The software can also fix many other Outlook files and data related issues.


 ChatGPT
 Perplexity
 Google AI Mode
 Grok
Grok
