

 TL;DR:
⚡ Quick Fix: Fix Outlook Sent Folder Missing
Enable Sent Item Saving: Go to Outlook Mail settings and make sure "Save copies of messages in the Sent Items folder" is turned on.
Disable Cached Exchange Mode: Open Account Settings, select your Exchange account, disable Cached Exchange Mode, and restart Outlook to refresh folder access.
Repair Outlook Data Files: Use Scanpst.exe or an email repair tool to fix corrupted PST/OST files that may cause the Sent folder to disappear.
Recreate or Redirect the Profile: Create a new Outlook profile or choose an alternative folder for sent emails if the default Sent Items folder remains missing.
Ask AI for a summary
 ChatGPT
 Perplexity
 Gemini
 Claude
 Grok
Grok
Having access to all your mails on Outlook is meant to be normal as it helps you to locate important information. However, it becomes frustrating when the "Sent" folder of your Outlook gets missing or inaccessible.
In this article, you will learn four major tips you can employ in fixing this problem of sent folders missing in Outlook. They are practical measures that you can rely on, even if you are not a tech expert. So, get on with it!
What to Do When Outlook Sent Folder Gets Missing
So you open your Outlook and your sent folder is missing! What do you do? First, you need to calm down, then try the tips discussed below and you can be certain that one of them will successfully fix the problem at hand.
Tip 1: Enable Saving Sent Items
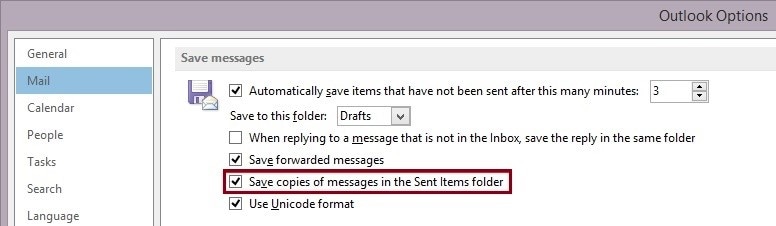
The first tip is to ensure that you tick the "checkbox" for saved copies of "Sent Items" folder messages. This means that you have to enable the option to always save a copy of any message you send, in the folder for sent items.
To enable this checkbox, follow the steps below:
Step 1. Click on "File" > "Options"
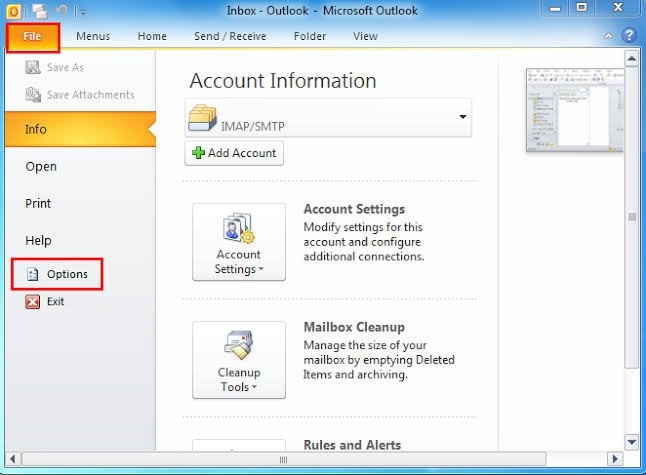
Step 2. Choose "Mail"
Step 3. Go down to the section marked "Save messages". Ensure you check the checkbox near "Save copies of messages in the Sent Items Folder"
Step 4. Click "OK" to finish.
Tip 2: Disabling Cached Exchange Mode
The Cached Exchange Mode is one of two modes through which you can connect Outlook to your Exchange account, the other being Online Mode. The Cached Exchange Mode enables you to access emails and make changes even when you are not online since they are locally saved on your hard drive as OST files. As great as it sounds, the Cached Exchange Mode may need to be disabled if you are to gain access to your sent folder. This is because it requires a larger disk space when compared to the Online Mode. More importantly, the reason you cannot perform a search in your emails is because of the Cached Exchange Mode.
Thus, follow the steps below to disable cached exchange mode and use the online mode to see if you can find your missing sent folder:
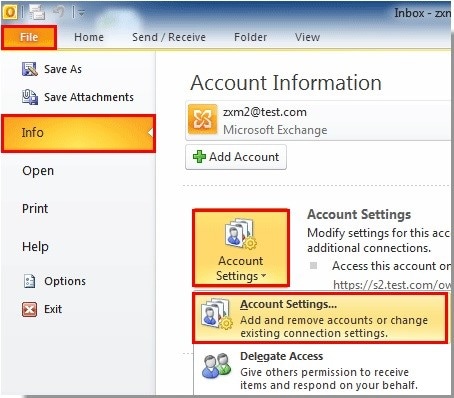
Step 1. Go to the dialog box for "Account Settings". To access this,
For Outlook 2010 and 2013, follow the path: "File" > "Info" > "Account Settings" > "Account Settings".
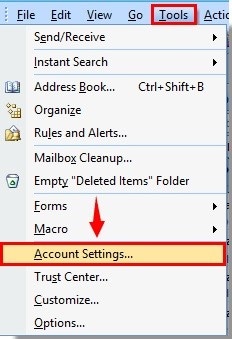
However, if you are using Outlook 2007, go to "Tools" > "Account Settings"
Step 2. Now that you are in the dialog box of "Account Settings", you can choose the exchange account whose Cached Exchange Mode you want to disable. Once you do this, go under the "Email" tab and select "Change".
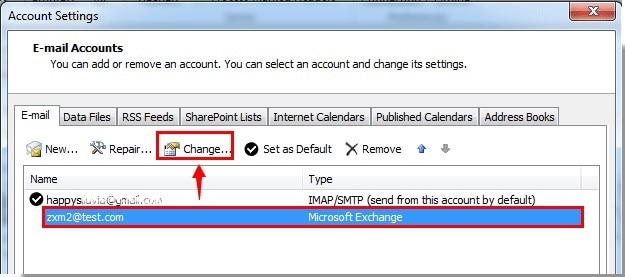
Step 3. A dialog box for "Change Account" will appear. Go to the box named "Use Cached Exchange Mode" and click to remove the "check" sign.
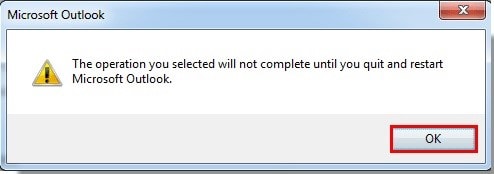
Step 4. Click the "Next" option.

Step 5. You will see a pop-up "Microsoft Outlook" dialog box again, choose "OK".
Step 6. Start Outlook again so that all your changes will be applied.
Tip 3: Repairing the Outlook Profile
You may need to perform a repair of your Outlook profile to retrieve the missing sent folders. To achieve this, you can either use Outlook's inbox repair tool or use a professional repair tool such as Wondershare Repairit for Email. The use of both options will be discussed below:
1. Scanpst Tool
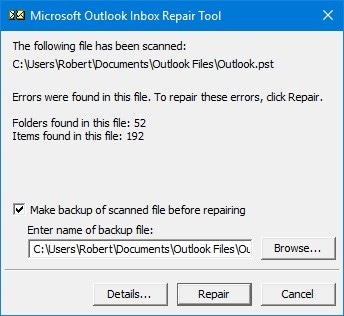
This is also called Outlook's Inbox Repair Tool. It is important for manual repair of any issues facing your Outlook profile. Once there is corruption involving this .pst, then Outlook generates errors, one of which is the missing sent folder. Scanpst is an already-installed part of your Outlook, hence, all you need to do is to locate it on your Outlook version, follow the steps below, and repair your corrupt Outlook file:
Locate the .pst file you need to scan for repair. For Outlook 2007 and earlier versions, the default PST location is:
C:\Users\%username%\AppData\Local\Microsoft\Outlook\
For Outlook 2019, 2016, 2013, 2010, and Office 365, follow this path:
C:\Users\%username%\Documetns\Outlook Files\
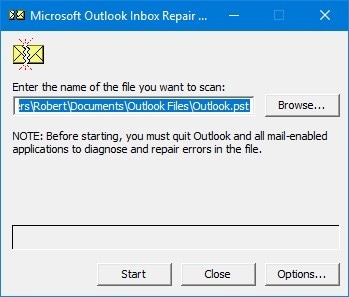
Now, click the "Start" button to enable the repair tool to scan the location. The length of time Scanpst will take to do this analysis depends on how large the folder size is
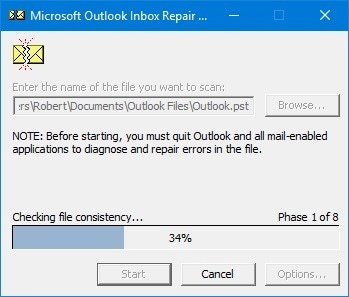
You will be presented with a report on the nature of the error and the extent of corruption responsible for your sent folder being inaccessible. You can click on "Details" if you wish to get more information on this.
Move on to repair. However, ensure you back up all your important PST files before clicking on "Repair".
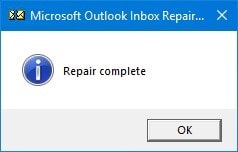
>Once the repair is completed, select "OK", then close Outlook and restart it.
2. Wondershare Repairit for Email
Scanpst is limited in certain ways, which makes it necessary for you to employ the use of third-party repair software to fix your corrupt Outlook PST files. Wondershare Repairit for Emailis such a software that can exceed the limitations of Scanpst as it repairs severely corrupted PST files, it recovers items that have been deleted or are missing and the repair process is easy and straightforward. Meanwhile, with Scanpst, you may need to carry out the repair process several times to get your desired result, a process that can be lengthy.

-
Repair damaged PST/OST Files in Outlook in all Email corruption scenarios, such as hard disk crashes & bad sectors, virus attacks & tojan horse, outlook corruption & malfunctions, improper shutdown procedure, etc.
-
Restore Outlook Emails deleted for a long time with a very high success rate.
-
Repair emails in bathes without size limits and support to preview all of them before saving.
-
Compatible with Windows 7/8/8.1/10/11, Windows Server 2012/2016/2019, and MacOS X 10.11~ MacOS 12 (Monterey).
Download Wondershare Repairit for Email and follow the below steps to repair your corrupted Outlook PST files:
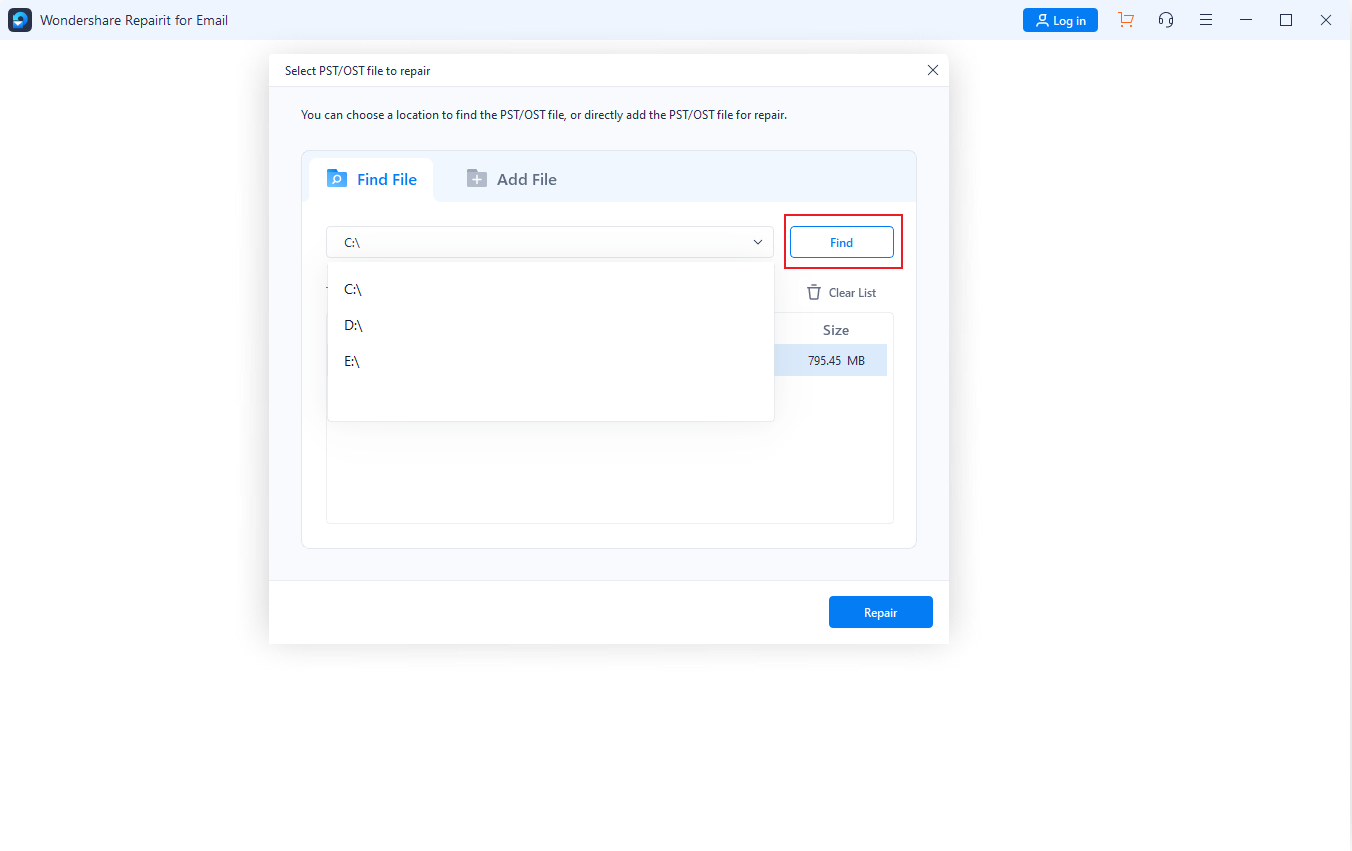
Step 1: Upload your corrupted Outlook PST files.
After running Wondershare Repairit for Email, please click "Select File" to add your corrupted PST files.

Select the desired files from the desired location by clicking the "Find" button, then click the "Repair" button.
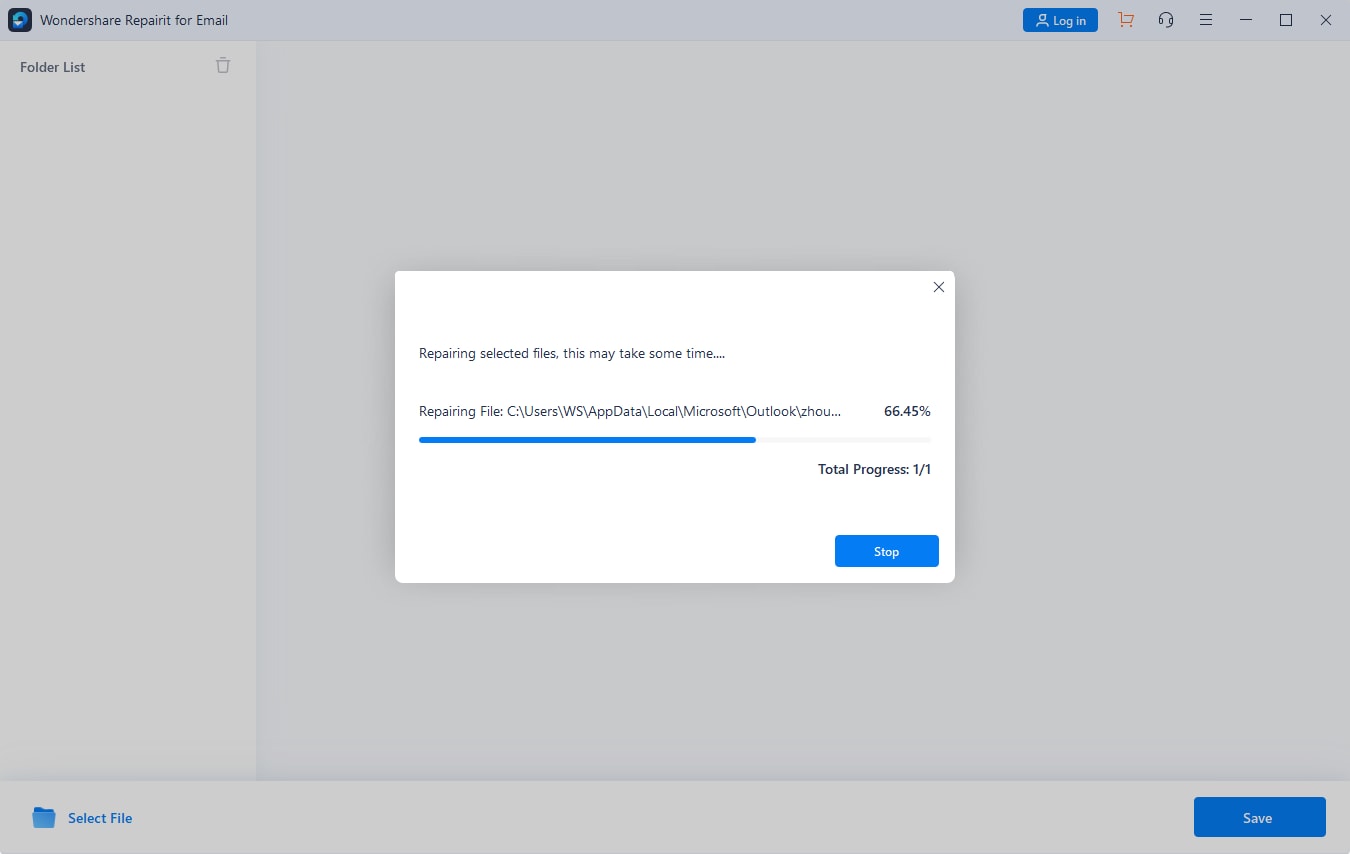
Step 2: Repair the uploaded PST files.
Repairit for Email will automatically repair your corrupt Outlook PST files in seconds and you can see the repair process.
Step 3: Preview and save the fixed emails.
After the email repair process finishes, you can preview the restored Outlook mailbox data, then select what you want to save and hit the "Save" button to save the fixed PST files.

Tip 4: Recreating the Outlook Profile
The final tip is to create a new profile for Outlook, completely starting afresh. To do this, follow the steps below:
Step 1. Close Outlook. Next, launch "Control Panel" and from the list under "View by:", choose "Large icons"
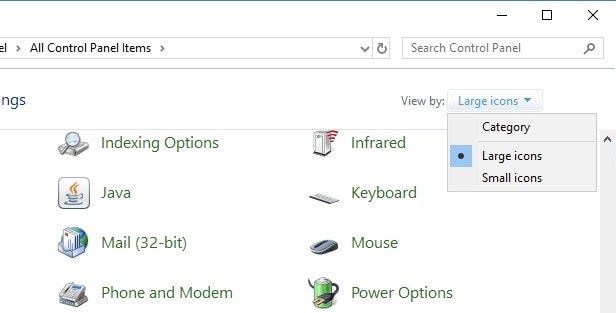
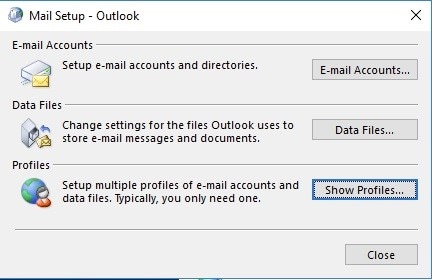
Step 2. Choose the icon representing "Mail (32-bit) and from here, select "Show Profiles…"
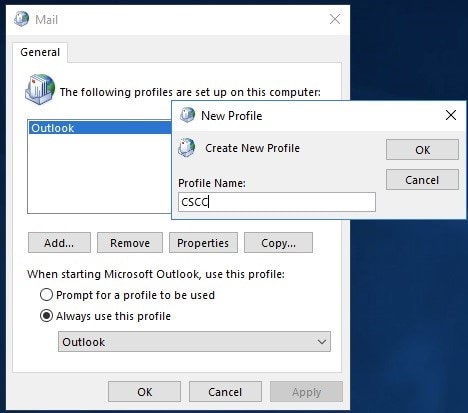
Step 3. Choose to "Add…" a new profile, then give your new profile a name of your choice. Set it up by following the prompts that appear.
Step 4. Go to "Always use this profile" and under this tab, choose your new profile from the list, as the default.
Step 5. Re-open Outlook. Note that restarting may take a while on the Desktop Client because of the fresh downloads that are done as a necessity for your newly created profile.
Tip 5: Select Alternative Folder for Sent Emails
The last option is to choose alternative folder to save the sent items. When you send an email to someone, the email is saved in Outlook's Sent Items folder. There you can easily find your emails. Follow the steps below to select an alternative folder.
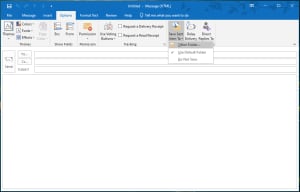
Step 1. Run the Outlook and click "New Email", select "Save Sent Items to" in "Options", then click "Other Folder".
Step 2. A new window will appear on your screen, click "New", then a new window "Create a New Folder" will appear.
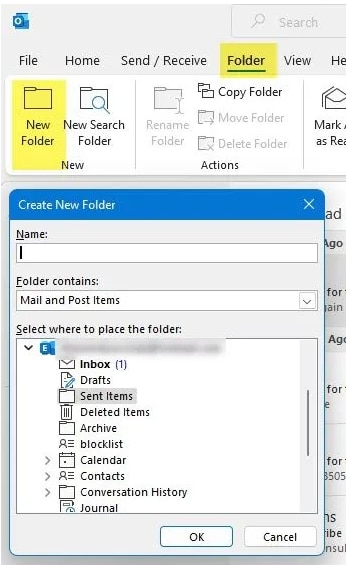
Step 3. Type in "Name" and select your mails in "Folder Contains", then select a location to save the new folder and click "OK".
Further Reading:
Here are the useful articles to help you.
1. Outlook Mailbox Is Full Can’t Send Messages Error.
2. Fix Outlook an Unexpected Error Has Occurred Issue.
3. Solutions to Outlook Error 0x800ccc13 Cannot Connect to Network.
The Bottom Line
With the tips explained above, you should be able to fix the problem of your Outlook Sent Folder Missing. If one solution does not work for your peculiar case, another will. So, don't give up until you have tried it all.