

 TL;DR:
⚡ Quick Fix: Fix Sound Keeps Cutting Out on Windows 10
Update Audio Drivers: Open Device Manager, update your sound driver, or reinstall it if the driver is corrupted, incompatible, or causing unstable playback.
Repair Corrupted Audio Files: If only one audio or video file has sound cut-outs, repair the damaged audio file to restore smooth playback and original sound quality.
Adjust Sound Settings: Disable sound enhancements, check speaker configuration, and make sure Windows is not changing audio behavior during communications.
Run System Fixes: Update Windows and use the Playing Audio troubleshooter to detect driver, speaker, or system-level issues causing audio interruptions.
Ask AI for a summary
 ChatGPT
 Perplexity
 Gemini
 Claude
 Grok
Grok
During weekends, people like to spend their time watching their favorite movies. They watch shows on Netflix, HBO, Amazon Prime, and other platforms. Through this, people can get entertained without stepping out of their homes. Unfortunately, people sometimes report errors like sound keeps cutting out Windows 10. This can ruin their plans to watch movies and TV shows at home.
This article will help you tackle audio cut-out by providing effective solutions. Through this article, you can discover the causes and fixes to eradicate this issue.
Part 1: What Does "Sound Keeps Cutting Out Windows 10" Mean?
Sound keeps cutting out Windows 10 means that the audio from your computer is not normally playing. For example, if you are playing an audio or video file on your PC, the sound suddenly goes away without any reason, and after a few seconds, it plays normally. If the audio keeps cutting out on your computer, you won't be able to enjoy watching movies.
By further reading this article, you can learn about the actual reasons for this issue. Then, we will combine it with helpful solutions that you can easily implement.
Part 2: What's the Cause of this Error?
Do you want to know the causes of audio cutting out Windows 10? Explore the reasons mentioned below that can occur on your PC, resulting in this error:
1. Corrupted Audio File
Audio files saved on your PC can be corrupted or damaged for various reasons. Such as incomplete file transfer or interruption while downloading due to malware attacks. If the audio file gets corrupted due to any of these reasons. It can form an issue of the audio keeps cutting out Windows 10.
2. Unsuitable Sound Settings
If there is more than one user, there can be a change in sound settings without your knowledge. It may be possible that the default sound settings changed without your permission. In this case, the audio cut-out problem can occur.
3. Outdated Windows
The outdated operating system can not only result in audio cutting out Windows 10 issues. It can also impact the performance of your PC. If you are running your audio or video files on an outdated Windows. It can form glitches or bugs, generating audio-related problems on your PC.
4. Damaged Audio Drivers
You cannot hear sound from devices without proper audio drivers on a PC. If the audio is constantly cutting out, it can occur due to corrupted or damaged audio drivers. The corruption of audio drivers can generate due to multiple reasons. It can include issues like outdated drivers or the presence of a virus on your computer.
5. Problem with Speakers
Faulty built-in or external speakers can also form an issue of sound keeps cutting out Windows 10. Your speakers can get damaged due to many possible reasons. It includes dust, hardware issue, or any physical damage affecting their performance. If that's the case, the speakers' sound won't be consistent.
Note: Are you a music enthusiast but find it hard to create your own music? Then you shouldn't miss these blogs:
What is Audio Compression?
What is The Difference Between Mastering and Mixing?
How to Make Your Own Music?
Part 3: Troubleshoot the Audio Cutting Out Issues on Windows 10
Are you looking forward to the helpful solutions to fix the audio cut-out? This section provides you with complete assistance with a clear guide for solutions.
Fix 1: Update System Audio Drivers
System audio drivers are necessary for proper audio configuration. There is a possibility that they are not upgraded to the latest version. In other cases, they might be incompatible with your operating system. They will show technical errors like sound keeps cutting Windows 10. To resolve this problem, the simplest method is to update audio drivers manually:
Step 1: Click on the "Search" icon given on the taskbar.
Type "Device Manager" on the search bar. The results will be displayed automatically. From the search results, proceed with the "Device Manager" option.

Step 2: On the Device Manager window, expand the option "Sound, video, and game controllers."
To do so, double-click on this option. Now choose the audio driver from the given options and right-click on it. Opt for the "Update driver/device on the pop-up menu."

Step 3: The driver update window will appear on your screen with two options.
Now tap on "Search automatically for drivers." Your audio drivers will quickly update to the latest version by clicking on it.

Step 4: In other cases, a message displays, "The best drivers for your device are already installed."
If this is the case, tap "Close" to finish the process. Once done, restart your PC and check whether the audio cut-out issue was resolved.

Fix 2: Uninstall and Install System Audio Drivers
As we discussed earlier, audio drivers can get damaged, impacting the audio quality. If you are using corrupted audio drivers, the sound on your PC will not be consistent. This is essentially a mood killer for you. To tackle this problem smartly, you should reinstall the audio drivers for a fresh start.
Step 1: Navigate to "Device Manager" by searching it on the Search bar of the taskbar.
Double-click on "Sound, video and game controllers" to expand this option.

Step 2: From the displayed audio drivers, right-click on the audio driver that is damaged.
From the small pop-up menu, tap on "Uninstall device/driver." Confirm by clicking on "Uninstall" to continue with the process.

Step 3: Once you have uninstalled the audio drivers, head back to the Device Manager.
From the list, choose the "Device" name. From the Device name menu, select "Scan for hardware changes" to install the audio drivers. After completing the reinstall drivers process, restart your computer.

Fix 3: Repair your Corrupted Audio File
Sometimes the audio file you are running can be corrupted for several reasons. If you have downloaded the audio file from an unauthorized website. There is a chance that it can contain a virus that can damage your audio file. So, the problem may not be in your PC or audio drivers. Instead, you might be using a corrupted audio file. To manage corrupted or damaged audio files, Wondershare Repairit is most suitable. It not only repairs the corrupted audio file but also brings the original audio quality.

-
Repair damaged audios with all levels of corruption, such as audio not working, clipping audio, humming audio, rumbling audio, sibilant audio, out-of-sync audio, etc.
-
Repair audios of diverse formats, including MP3, M4A, FLAC, AAC, WAV, etc.
-
Repair damaged or corrupted audios from mutiple devices: portable voice recorder, recording software, shooting apparatus, SD cards, phones, hard drives, USB flash drives, etc.
-
Compatible with Windows PC, Mac OS, and supports PC to mobile transferring/sharing.
To use this tool for audio repair on Windows, check the following steps:
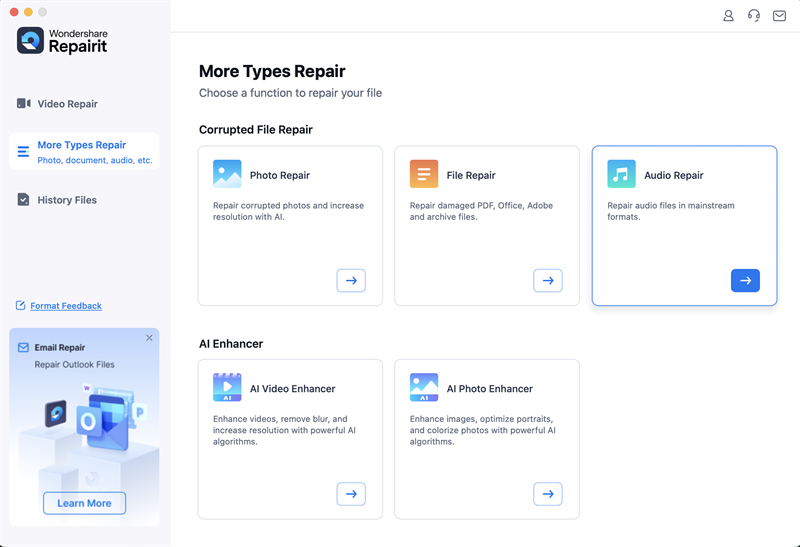
Step 1: Access Audio Repair Tool.
Download and install Wondershare Repairit on your Windows 10 and open its interface. On its homepage, tap on "More Types Repair" displayed in the left section, then "Audio Repair". Now click the "Add" button to upload the damaged audio file on this platform.
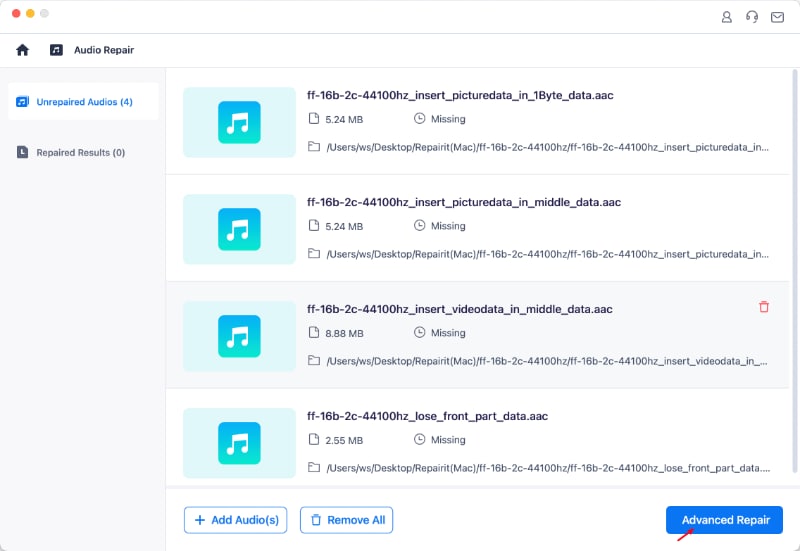
Step 2: Start Repairing Corrupted Audio.
When a user uploads an audio file on this tool, he can check all the related information. It includes details like file size, quality, and duration on the screen. Click on the "Advanced Repair" option to launch the repairing process. Add your sample audio file of the same format across the platform. Wait for some time until the repairing process gets completed.
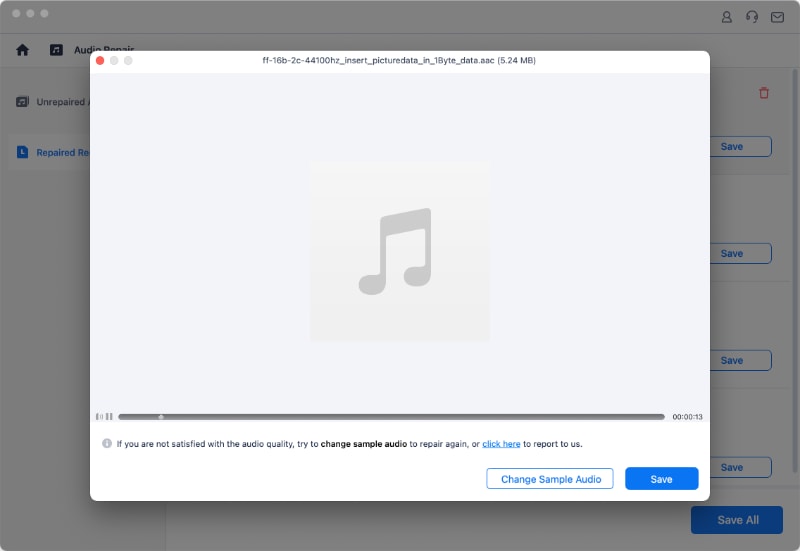
Step 3: Preview and Save Repaired Audio.
When you would be able to see the status of "Completed," you can check the results. For this, tap on the "Preview" button to see the repaired audio file. If you are satisfied with the results, hit on the "Save" button to store the file on your PC.
Fix 4: Disable Sound Enhancement Settings
Many people like to adjust sound enhancement settings to improve their sound quality. However, sometimes it can worsen the situation, producing audio cut-outs on your Windows. That's why it's best to disable all sound enhancement settings to resolve the audio issue.
Step 1: On the taskbar, right-click on the "Sound" icon given at the bottom right corner of the screen.
From the pop-up menu, select "Sounds."

Step 2: On the Sound window, click on the "Communication" tab.
From this tab, check the option called "Do nothing." Now click on the "Apply" button and then tap "OK" to save all the changes.

Step 3: Head back to the "Playback" tab on Sound's window and right-click on your preferred audio device.
From the small menu, tap on "Properties."

Step 4: The Properties window will open on your screen.
Now click on the "Enhancements" tab and check the box "Disable all enhancements." Click on the "Apply" and the "OK" buttons to save all the changes.

Fix 5: Change Speaker Settings
Sometimes, a user can make changes in speaker settings accidentally. It impacts the overall audio performance of the computer. If someone has made some improper speaker settings, it can also result in audio keeps cutting out. To get rid of this, change the speaker settings manually and then check if the problem got solved or not.
Step 1: Right-click on the "Sound" icon given on the right corner of your taskbar.
Now tap "Sounds" from the small menu, which will open a new window.

Step 2: Tap on the "Playback" tab and select the "Configure" option of your sound device.
Following this, click on the "Next" button to proceed.

Step 3: On the new window, uncheck the box called "Front left and right."
It is displayed under the heading "Full-range speakers." Now click on the "Finish" button to end the configuration process successfully.

Fix 6: Update your Windows
An outdated version of Windows is not only harmful to the system audio. It can also disturb the compu0ter's general performance. The system's speed will get slow and form issues like audio cut-outs. The only solution to this problem is upgrading the OS. Installing the latest OS version can optimize the system's performance.
Step 1: Press the shortcut of "Windows + I" to launch computer settings.
From the given setting options, opt for "Windows Update."

Step 2: A new window will open that will display the option "Check for updates."
Click on this option to see the pending updates of your OS. If you find the pending update, click "Download and Update" to install the latest OS version.

Fix 7: Try Windows Audio Troubleshooter
If you have tried all the solutions mentioned above and still can't fix audio cutting out Windows 10. It is best to try an audio troubleshooter to resolve the error. This will bring the audio problems and will also suggest solutions for the issue. You can pick and choose any suggested solution to fix the issue instantly.
Step 1: To open the settings, press "Windows + I" from your keyboard.
From the Windows 10 Settings, choose "Update and Security."

Step 2: From the left section, tap on the "Troubleshoot" option found across the screen.
Further, select the "Additional Troubleshooters" option. Here, you can see multiple troubleshooters for every task. From the given options, click on "Playing Audio." Once done, tap on "Run the troubleshooter."

Step 3: Wait for seconds as the troubleshooter will diagnose the audio problems.
It will also suggest the solutions on your screen. Click on any suitable solution and follow the instructions to fix the problem.

A video guide to show you how to fix sound or audio problems on Windows.
Conclusion
Now that you've known what the sounds that keep cutting out Windows 10 are and the best solutions to fix audio cut-outs in simple and easy steps, you can take action to fix this problem on your computer! If you found any corruption in your audio files, try Wondershare Repairit to fix them!
* Some of the above codec formats may need to be supported by system.