

 TL;DR:
To safely move your Outlook OST file to another drive, you must bypass default path restrictions by creating a ForceOSTPath Windows Registry key, linking a newly created Outlook profile to the relocated file, or changing the directory path while Cached Exchange Mode is temporarily disabled.
● Modifying the Windows Registry requires creating an Expandable String Value specifically named "ForceOSTPath", which must be placed in the precise directory path matching your Microsoft Outlook version (such as \Office\16.0\ for Outlook 2016 or \15.0\ for Outlook 2013).
● If using the Control Panel method instead of the registry, you must manually copy the OST file to the new drive first, create a new profile via the "Mail" dialog, point the "Outlook Data File Settings" to the relocated file, and set the new profile as the default.
● Moving OST files carries a risk of file corruption that can disable your active Outlook account; if the file becomes unreadable during the transfer, you will need a third-party recovery solution like Wondershare Repairit for Email to repair the damaged data.
Ask AI for a summary
 ChatGPT
 Perplexity
 Gemini
 Claude
 Grok
Grok
Outlook OST files are the most crucial element in an Outlook account. All the data related to the email is stored and synchronized across it. When it comes to shifting locations, there are many reasons and methods for it. But what is the best way to move OST File to another drive? This article gives you an answer to all these concerns about the details.
Part 1: Why Do You Move the Outlook OST Files?
The Outlook email client is an email service provider that connects with the computer. There are different elements to keep up with the computer linked to it. Outlook OST is the synchronized data files connected to the Exchange server. Any change in the Outlook account is recorded in the OST file. In addition, OST files enable offline editing, which is updated across the email on connection. This makes OST files a unique entity in the Outlook email system.
It covers a complete process if users consider moving their data from one location to another. However, this is accompanied by a set of reasons you must understand. Outlook OST files can be moved, but why? Let's find out:
- You might be shifting your professional work from one organization to the other. In light of this act, you may have to move your Outlook data across the profiles. As you cannot take up the complete profile to the other organization, this is the best way to shift your data.
- When you consider moving an OST file to another drive, it can involve storage issues. You might run out of space across a specific drive, so you must shift to another location.
- At times, the Exchange Servers crash and do not operate properly. This puts the OST file at threat of corruption. To avoid this, you shift your OST file to another location to prevent data loss.
- You should have other sources in situations where you do not have access to the email service. The OST files saved across a location can do the trick.
- It might be time for you to shift from a Windows device to a Mac. When this happens, you need to move your OST file.
Part 2: Guiding Methods to Move Outlook OST File With Ease
There are multiple techniques to employ in moving Outlook OST files. You can find the best solution when you seek to move OST to another drive. Let's find out how these methods can help you out in executing this move:
Solution #1: Specify ForcePSTPath Registry Key Entry
Windows Registry key can be a perfect technique to shift the location of Outlook data files. ForcePSTPath, a key dedicated to this purpose, allows Outlook users to perform this task. They can have their Outlook data shifted with ease by working on the following steps:
Step 1: Use the shortcut keys of "Windows + R" to launch the Run Program.
Look for the space and type "regedit" to launch the Windows Registry editor.

Step 2: Provide any of the respective key navigation paths, which are based on the Outlook version:
For Outlook Version 2016, the key is:
Computer\ HKEY_CURRENT_USER\Software\Microsoft\Office\16.0\Outlook
For Outlook version 2013, the key is:
Computer\HKEY_CURRENT_USER\Software\Microsoft\Office\15.0\Outlook
For Outlook Version 2010, the key is:
Computer\HKEY_CURRENT_USER\Software\Microsoft\Office\14.0\Outlook
For Outlook version 2007, the key is:
Computer\HKEY_CURRENT_USER\Software\Microsoft\Office\12.0\Outlook
Step 3: As you proceed across the respective location, find space across the right-hand section.
Select "New" and dedicate the registry key as an "Expandable String Value."

Step 4: When creating a new value, add the name "ForceOSTPath" to it.
Set the location of this key under the provided space. This would act as the new location for the OST file. You are then advised to restart your Microsoft Outlook to apply the changes.

Solution #2: Create New Outlook Profile and Move OST
Another solution that can be used to move OST to another drive is by creating a new profile. Once created, the old OST file would be configured across a new location. To perform this hefty task of moving the OST file to another drive, you have to work along the provided steps:
Step 1: Search for the existing OST file on your computer.
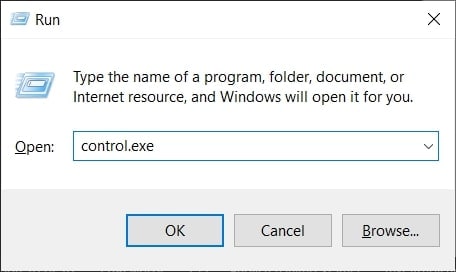
Next, copy and paste the OST file across a new location on your device. Following this, proceed to open the "Control Panel" from the "Search" bar on the taskbar.
Step 2: As you launch it on a new window, tap on the "Search" option provided at the top.
Search for "Mail" and open the respective option on the front.
Step 3: You will be led into the "Mail Setup" dialog box.
Initially, click the "Show Profiles" button and tap "Add." Provide a new profile name for the account and hit "OK."

Step 4: Provide the credentials of the email account to be linked with the new profile.
Click "Next" once specified. As the new email account is configured, check the "Change account settings" checkbox.

Step 5: You will find yourselves across a new window of "Server Settings."
Find the "More Settings" button to launch a new window across the interface. Direct yourselves into the "Advanced" tab and select the "Outlook Data File Settings."

Step 6: Browse the location on the next pop-up and provide the location where the OST has been moved.
As you've provided all the details, click "OK" to conclude the setup.

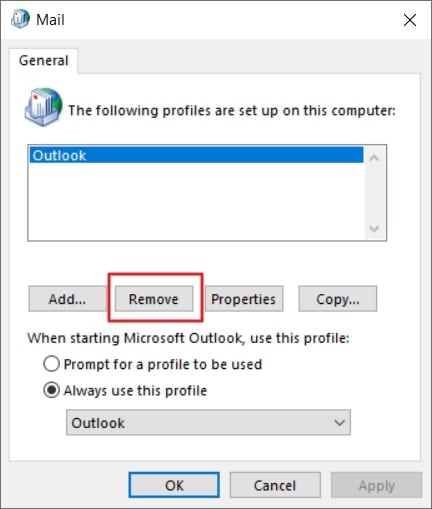
Step 7: You must revert to the "Mail Setup" dialog box from the Control Panel.
As you reaccess it, hover across the "Always use this profile" section. Change the settings to "New Profile" out of the available profiles.
Solution #3: Disabling Cached Exchange Mode
You can also deploy this technique to move Outlook OST files to another drive. Consider working with the following steps to implement this process:
Step 1: Launch your Microsoft Outlook version on the computer and direct to the "File" tab.
You must propagate to the "Info" section and find the "Account Settings" button. On selecting it, proceed to select "Account Settings" from the menu to access the new window.

Step 2: Navigate across the "Data Files" tab and select the account.
On selecting the account, lead into the "Settings" section. You can guide into the "Advanced" section when a new window pops up. Next, disable the "Use Cached Exchange Mode" option and save changes.

Step 3: Under the same pop-up, look for "Outlook Data File Settings" in the "Advanced" tab.
As you are directed to the next screen, tap on the "Disable Offline Use" button. Afterward, change the location of your OST file and then access the "Outlook Data File Settings" again. This time you have to browse and select the new location of your OST file. Next, hit the "OK" button to confirm the location.

Step 4: Repeat enabling the "Use Cached Exchange Mode" option on your computer.
Apply all changes to change the location of the OST file successfully.
Bonus Part: Using an Email Repair Tool to Repair Corrupted OST File
This article focuses on the discussion of moving the OST file to another drive. While executing this task, there is a chance that the file might corrupt for no reason. Having a corrupted OST file means no active Outlook account. Therefore, repairing the Outlook OST file is the only way to resolve the problem. You can make use of the email repair tool for this purpose.
Wondershare Repairit for Email features a perfect system to repair OST files. It can also be used for repairing PST files, with support for Windows and Mac users.

-
Repair damaged PST & OST Files in Outlook in all Email corruption scenarios, such as hard disk crashes & bad sectors, virus attacks & tojan horse, outlook corruption & malfunctions, improper shutdown procedure, etc.
-
Restore Outlook Emails deleted for a long time and extract the Email messages, folders, calendars, etc. within seconds.
-
Repair corrupted Emails and restore deleted Emails with a very high success rate.
-
Repair Emails in bathes without size limits and support to preview all of them before saving.
-
Compatible with Windows 7/8/8.1/10/11, Windows Server 2012/2016/2019, and MacOS X 10.11~ MacOS 12 (Monterey).
Following this, you can find the process to be essentially easy. To make the best use of Repairit for Email, you must:
Step 1: Open Repairit for Email and Add File.
Start your Wondershare Repairit for Email after installation. Proceed across the "Select File" button on the screen.

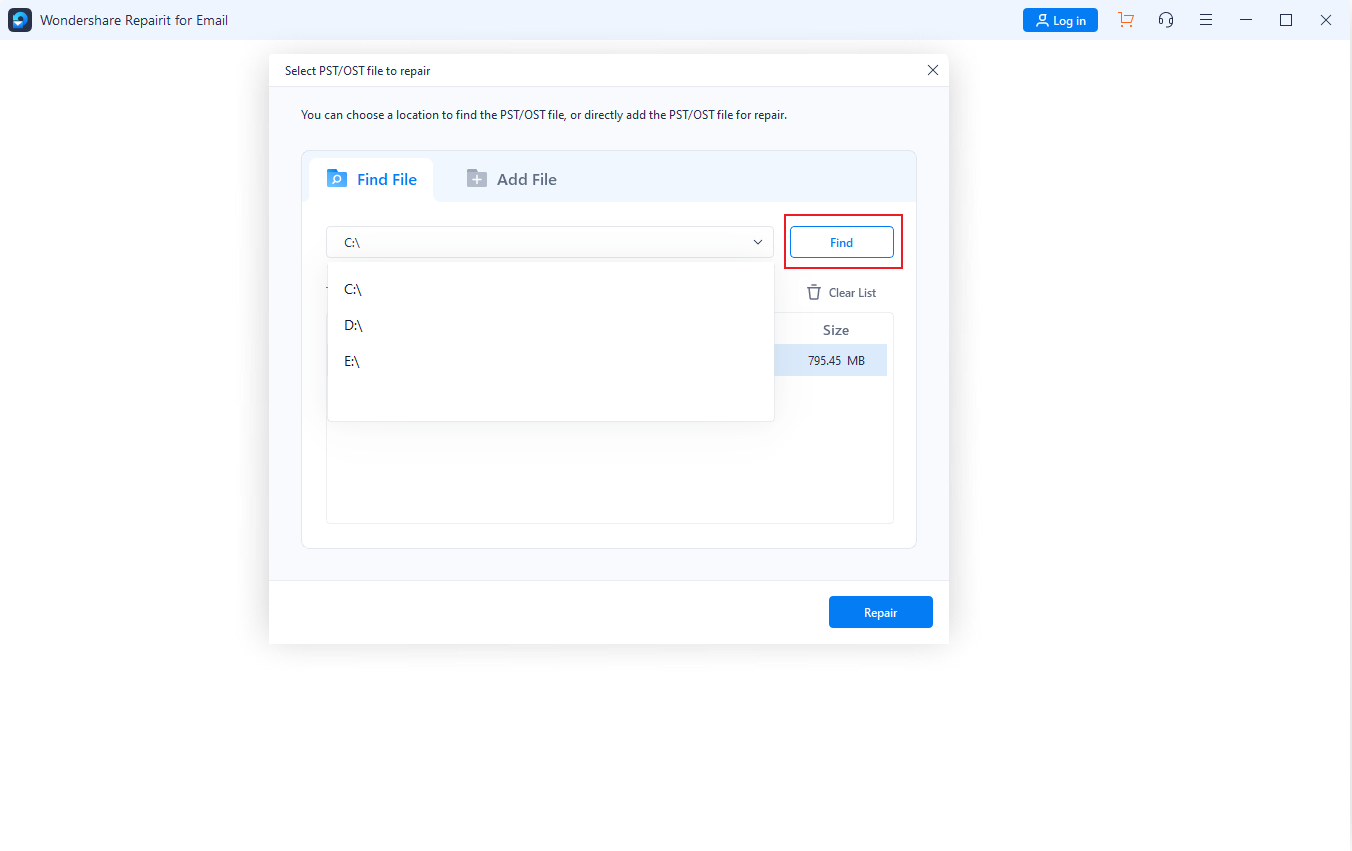
Step 2: Select a Mode to Add the Corrupted Data File.
Following this, you are provided with two options for adding the file. Search for the "Find File" tab to let the platform look for the corrupted data file. Next, work with the "Add File" tab for manually inserting the Outlook data file across the platform. Finally, click "Repair" to execute the task as the file is added.
Step 3: Repair the File and Save Results.
It will take a while to complete the repair process. You can preview all the repaired data across the preview window. Select the repaired data and hit "Save" to make all changes.

Wrapping Up
This article has helped you decipher how to move the Outlook OST file to another drive. You can efficiently perform this move on your device with the provided solutions. If the data file gets corrupted during the process, make the perfect use of Repairit for Email.