The Outlook error 0x800ccc90 is one of the most common errors users experience when trying to receive or send emails using the Microsoft Outlook program. Since this is the case, this article has been provided for you, as a user experiencing the error, to be able to fix it without having to stress about calling an expert. Thus, you will be shown the possible reasons why you encounter this error and more importantly, practical ways you can fix the error.
1. What are the Probable Reasons for Outlook Error 0x800ccc90?
To find out why you are experiencing the Microsoft Outlook error 0x800ccc90, read the following:
-
If the port number you have used for your Outgoing Server is changed to an incorrect one, you may experience the error 0x800ccc90. It is also possible that your port has been blocked by your Internet Service Provider (ISP).
-
A possible reason for this error is that you are using an incorrect username and password. If Outlook cannot match your username and password, you may experience this error.
-
If you have installed an external application such as an antivirus or firewall, your security detail is possibly blocking the smooth functioning of your email on Outlook.
2. How to Fix Outlook Error 0x800ccc90?
You came here because you want to know how to fix the error 0x800ccc90 right? Well, let's get to it!
1. Create New Send/Receive Groups
You can make the process of sending and receiving emails easier by dividing your POP3 account into smaller groups and connecting separately with these groups. To do this, follow the steps below:
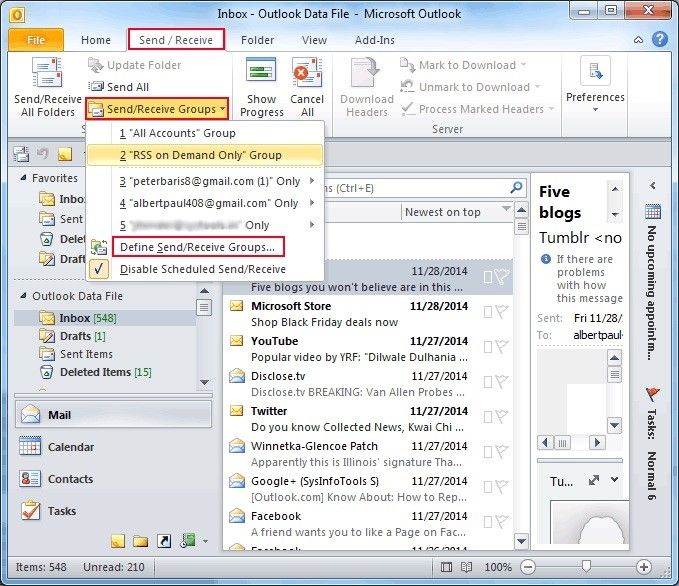
Step 1: Select "Send/Receive" and click "Send/Receive Groups" > "Define Send/Receive Groups".
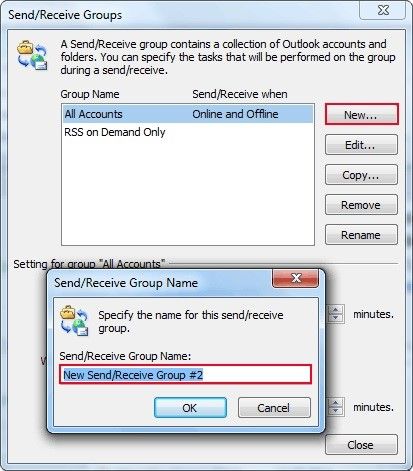
Step 2: Select the "New" tab. Next, input a new name to the group under the box labeled "Send/Receive Group Name".
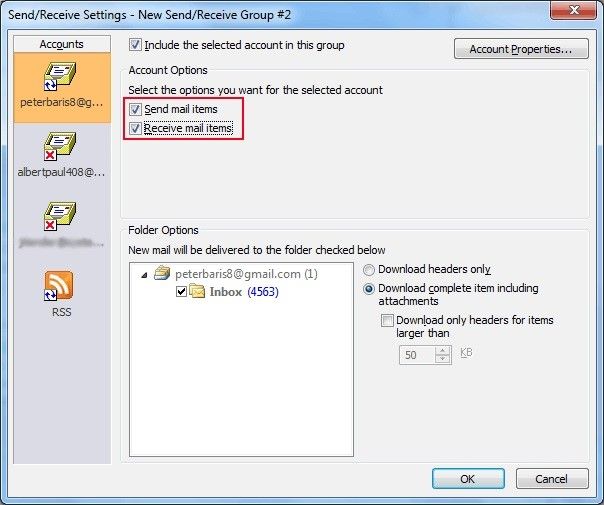
Step 3: Begin adding the accounts you want to add to this group you have created by ticking the checkbox "Include the selected account in this group".
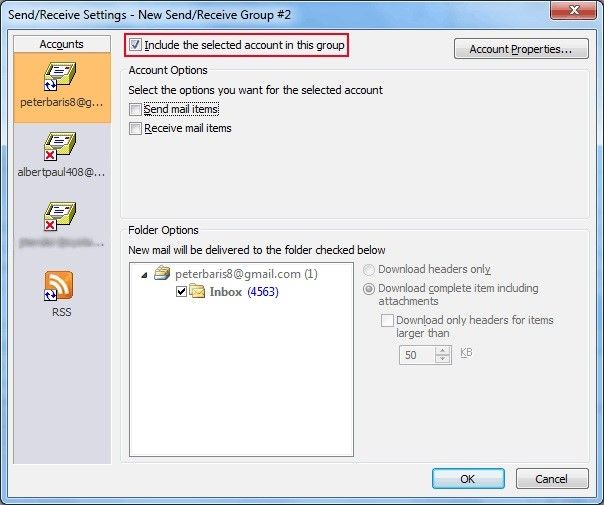
Step 4: Tick the boxes beside "Receive Mail Items", as well as "Send Mail Items".
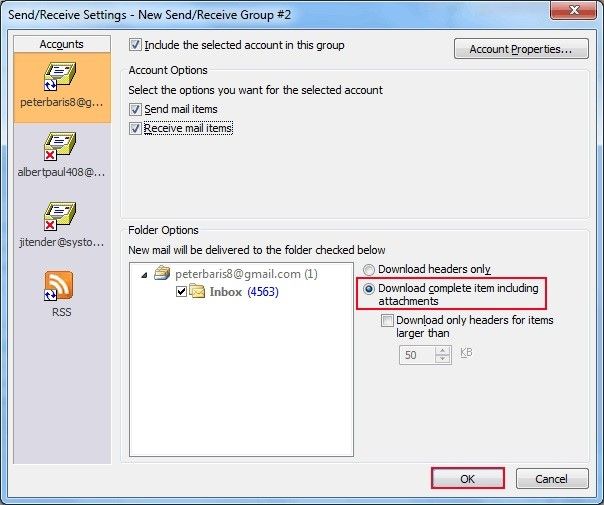
Step 5: Select the option "Download complete item including attachments". Next, choose "OK".
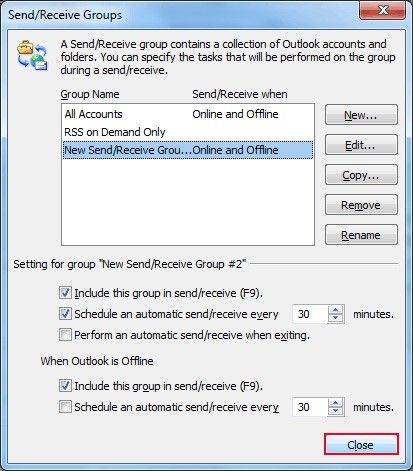
Step 6: Keep creating as many groups as you need. When you are done, select "Close".
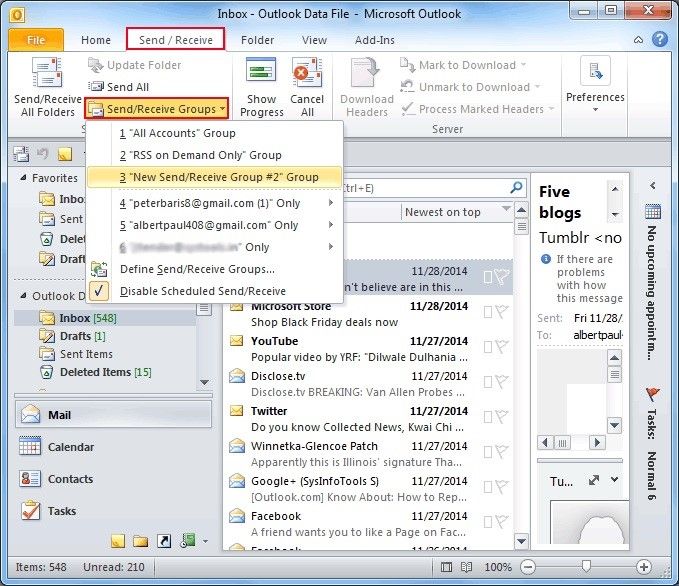
Step 7: If you want to receive or send a mail with any of the groups you have created, go to "Tools" option, select the "Send/Receive" tab and choose the group by name.
2. Changing the Server Port Numbers
You can also change the port numbers of your server by doing the following:
Step 1: Click on "File" and "Account Settings".
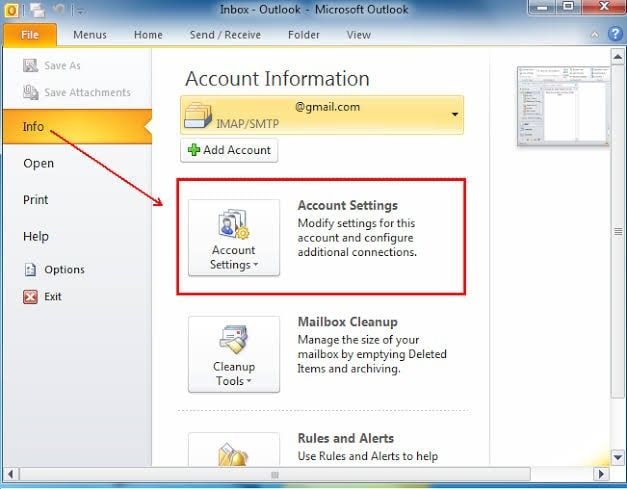
Step 2: Choose the "Email" account and click "Change".

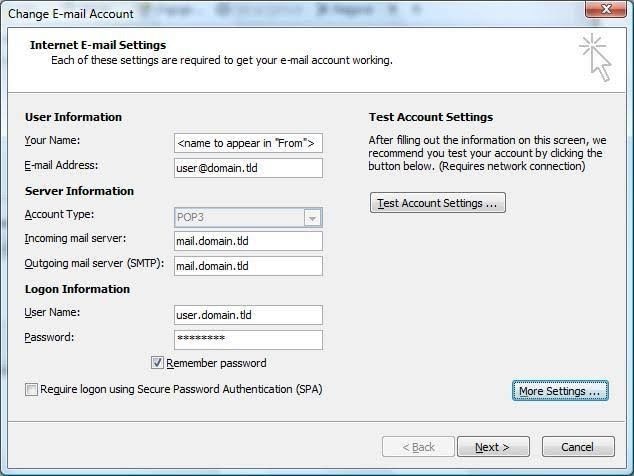
Step 3: In the "Change" window click on "More settings".
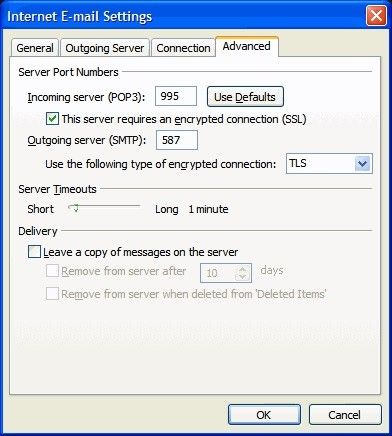
Step 4: Click on "Advanced tab" and input "995" in the box beside "Incoming Server (POP3), all under the "Internet Email Settings" window.
3. Using the Outlook Inbox Tool
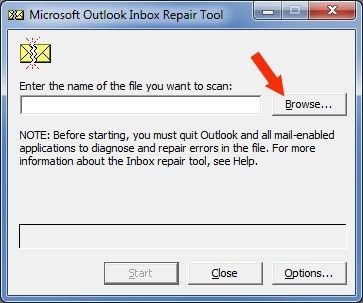
Outlook has an Inbox Repair Tool that scans for errors in Outlook PST files and fixes them. To use this tool, follow these steps:
-
Vacate Outlook and open the Inbox Repair Tool.
-
Input the path to find your PST file and its name in the toolbox or "Browse" for the file.
-
Click "Start" to begin scanning.
4. Try the Third-Party Outlook Repair Tool
The Inbox Repair Tool needs to be run several times to get all the errors in your Outlook. Moreover, there is no guarantee that all the errors will be eliminated. Why not save yourself the time and uncertainty by opting for an option that will guarantee you a complete repair of your Outlook once and for all? Wondershare Repairit for Email can fix the errors within your Outlook PST file and ensure that you do not experience the error 0x800ccc90 anymore.

-
Repair damaged PST & OST Files in Outlook in all Email corruption scenarios, such as hard disk crashes & bad sectors, virus attacks & tojan horse, outlook corruption & malfunctions, improper shutdown procedure, etc.
-
Restore Outlook Emails deleted for a long time and extract the Email messages, folders, calendars, etc. within seconds.
-
Repair corrupted Emails and restore deleted Emails with a very high success rate.
-
Repair Emails in bathes without size limits and support to preview all of them before saving.
-
Compatible with Windows 7/8/8.1/10/11, Windows Server 2012/2016/2019, and MacOS X 10.11~ MacOS 12 (Monterey).
So, let's get fixing!
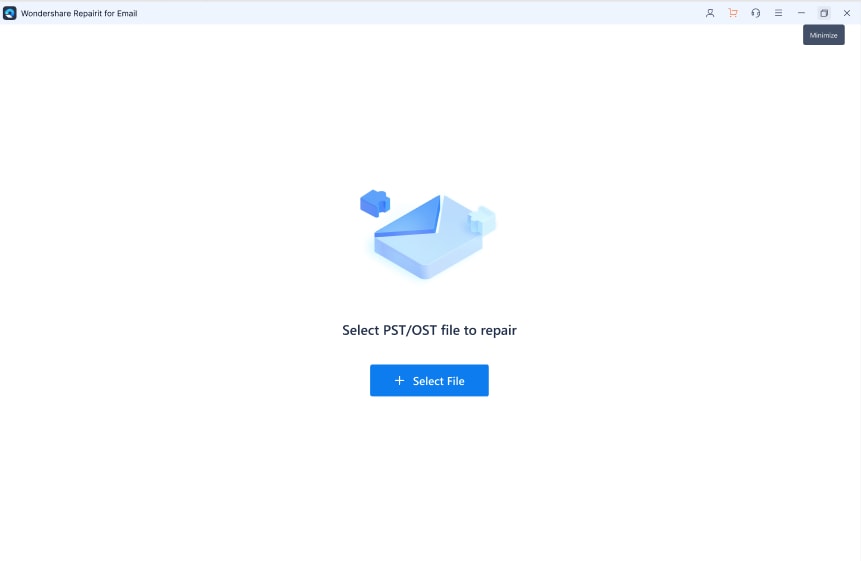
Step 1. Add Corrupt File
Click on "+Select File" to add the corrupt PST file for repair.
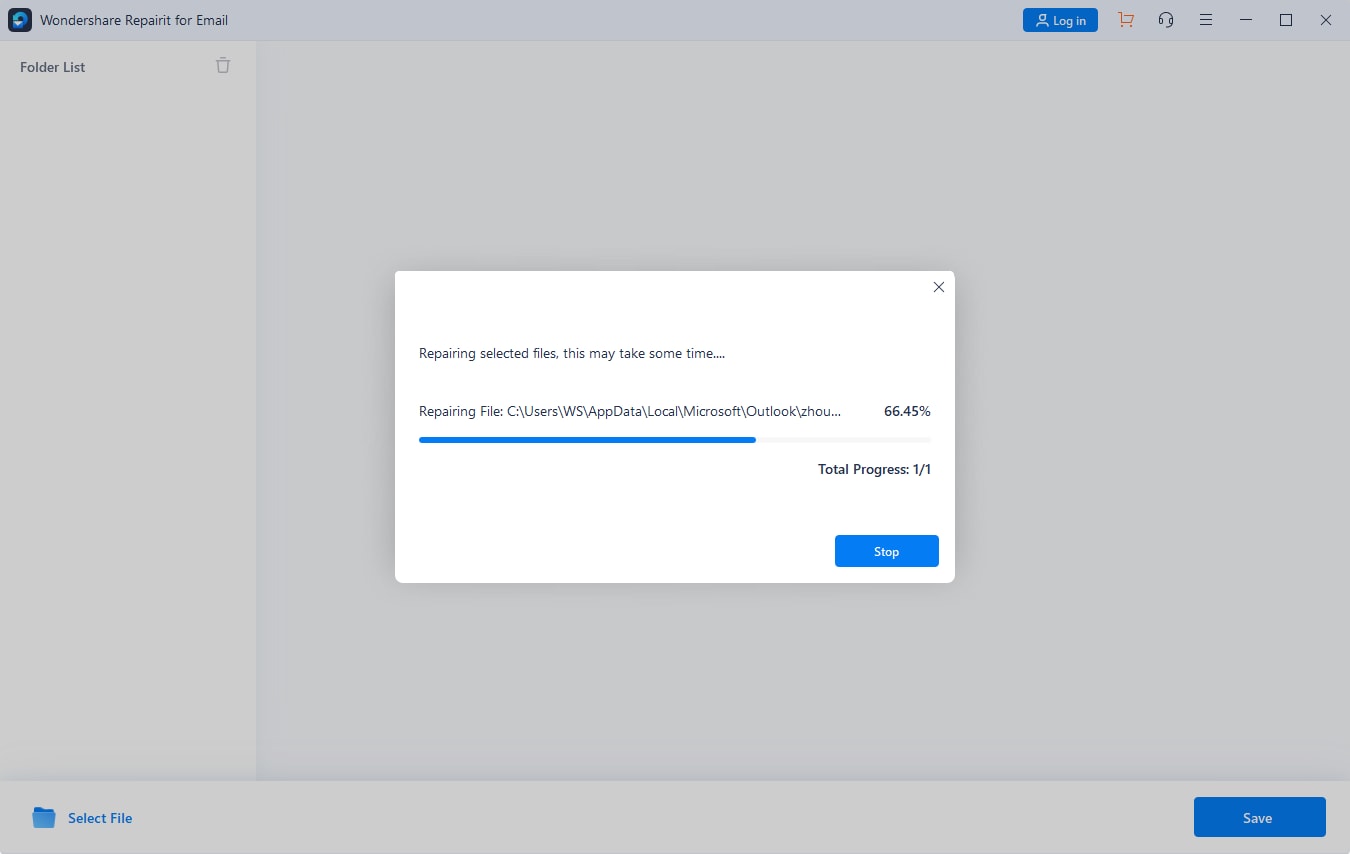
Step 2. Repair File
Select the blue button labeled "Repair"; the tool will scan for errors and fix them.
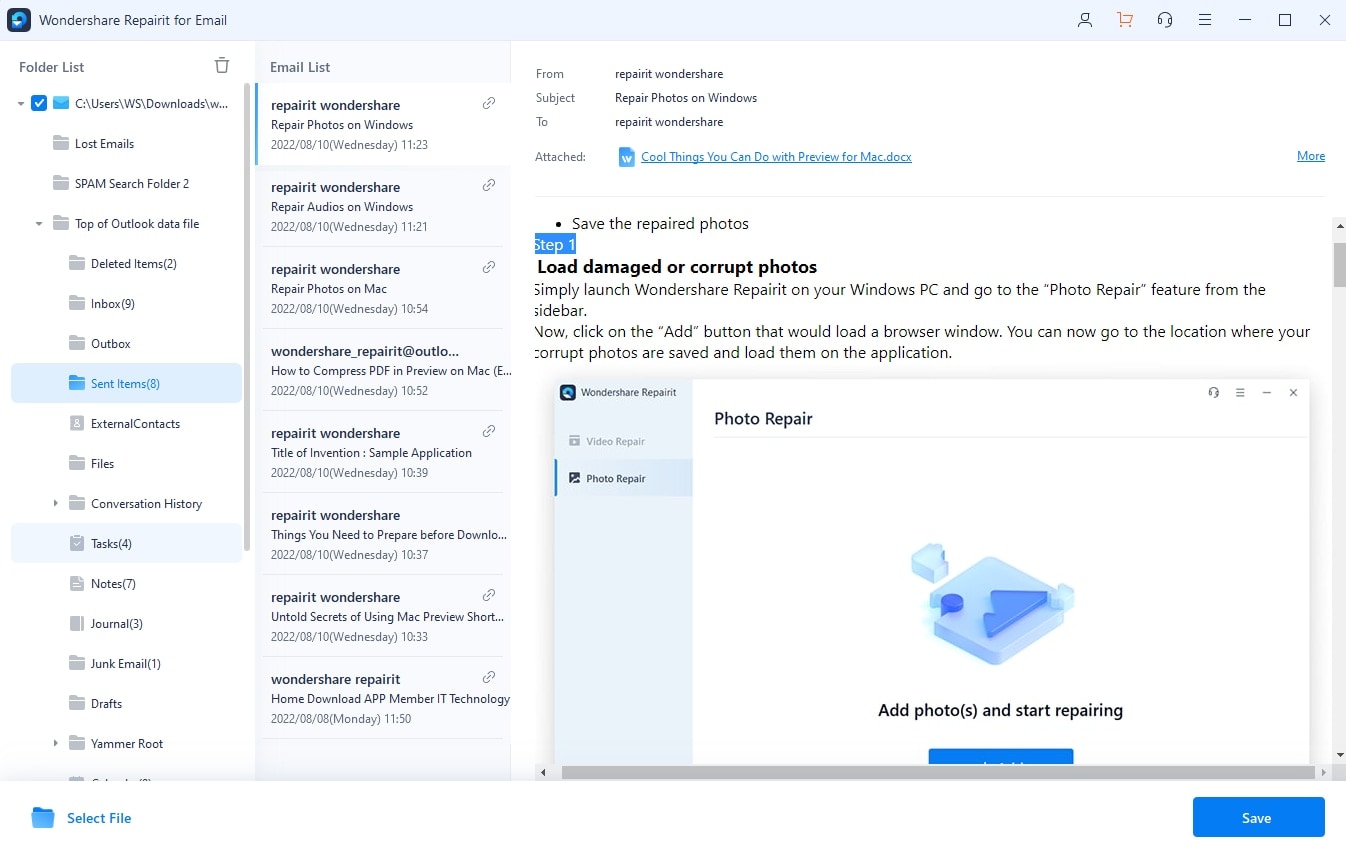
Step 3. Preview and save the Repaired Files.
Go through all the repaired files using the preview feature of Wondershare Repairit for Email. All that is left to do after previewing is to save the files. Do this by clicking the "Save" button.
Further Reading:
Here are the useful articles to help you.
1. Repair Unknown Error 0x80040600.
2. Solve Outlook Error 0x80048002.
3. Fix Outlook Error 0x800ccc0e.
The Bottom Line
You can now enjoy sending and receiving your emails: messages, journals, attachments, tasks, calendars, meeting schedules, lists, and many more. This has been made possible through this article and the solutions it brings, top of which is the use of Repairit for Email, a tool which you can trust even if all other options fail

 ChatGPT
 Perplexity
 Google AI Mode
 Grok
Grok
