

 TL;DR:
Fix an inactive Outlook spell check by enabling auto-proofing in the Mail options, unchecking automatic language detection to prevent vocabulary conflicts, or repairing corrupted PST and OST data files.
● For Outlook 2010, 2013, 2016, and 2019, enable "Always check spelling before sending" through the File menu, while Outlook 2007 requires accessing the Tools menu.
● Uncheck "Ignore original message text in reply or forward" in the Mail options so the application does not bypass your current text during automated outgoing checks.
● The Outlook.com web edition lacks native automatic spell checking, requiring users to rely on their browser or operating system's built-in spell checker.
Ask AI for a summary
 ChatGPT
 Perplexity
 Gemini
 Claude
 Grok
Grok
Have you ever faced an Outlook spell check not working issue with your Outlook application? If Outlook spell check is not working, you may be embarrassed by an unprofessional error. Outlook should immediately notify you of problems in the email messages if automatic spelling and grammar checking is on.

To avoid embarrassment, you can follow various solutions to fix the issue. This article describes numerous solutions to the problem of Outlook spelling and grammar checks not working. So, let's learn the most prevalent reasons for this problem and how to resolve it rapidly.
Part 1: Possible Causes of Spell Check Not Working Issue In Outlook
Outlook's inbuilt spell checker keeps you from making mistakes in your professional emails and reports. However, if the spell check in Outlook is not working, we may make some major errors that we ignore because of the automatic spelling checks. There could be several reasons for such problems in spell-checking.
- The spell check was turned off in Outlook.
- The language of your email is not supported by the grammar check.
- The Outlook version is out of date.
- Outlook is due for an upgrade.
- Any other third-party add-ins have rendered the grammar checker inoperable.
- Malware attacks are common.
After knowing the causes behind the issue of spell check not working in Outlook, let's check the solutions.
Part 2: Some Manual Methods to Solve Spelling Check Not Working
Here are manual ways to help you solve the issue of spelling and grammar checks not working. The methods below might help you with your system.
Method 1: Check Manually for Spelling and Grammar Before Sending
You can check for spelling by using the F7 shortcut key on your keyboard. You can also move to the Review tab in the menu bar and select Spelling & Grammar.

Another simple method for configuring spelling and grammar checks in Outlook is provided here:
For Outlook 2019, 2016, 2013, and 2010
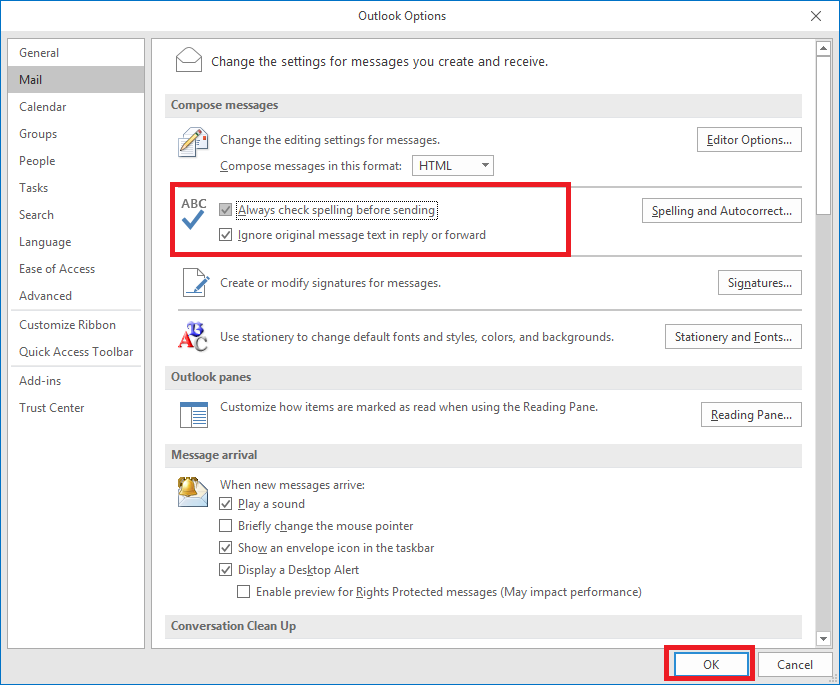
Step 1: Open the application and go to File.
Step 2: Go to Options and select Mail.
Step 3: Select Always check spelling before sending under Compose Message.
And then press the OK button.
For Outlook 2007
Step 1: Click Tools and then Options.
Step 2: Select Always Check Spelling Before Sending from the Spelling tab.
Method 2: Enable Proofreading at Template Level Using Language Options
Another manual method is to enable and disable spelling and grammar checking for each email message you send at the template level. To do so, follow the steps outlined below:
For Outlook 2019, 2016, 2013, and 2010
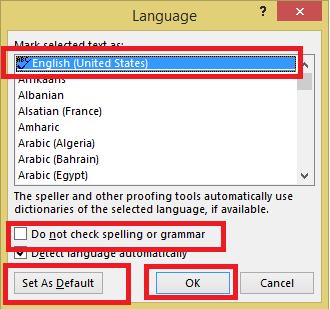
Step 1: Select New Email.
Step 2: Next, click Review and then Language.
Step 3: Select Proofing Language from the language menu.
Step 4: Uncheck "Do not check spelling or grammar." Now, click on Set as Default.
Step 5: Click the OK button to confirm the settings.
For Outlook 2007
Step 1: Select Mail Message from the New menu.
Step 2: Select Spelling from the Home tab of the Proofing group.
Step 3: Uncheck "Do not check spelling or grammar" in Set Language.
Step 4: Select the Default button.
By following the procedures above, you can disable and enable spelling and grammar checks for other languages as needed. The applications and adjustments will be made at the template level.
Part 3: Other Solutions for Resolving the Spell Check Not Working Problem
Solution 1: Restart Outlook
If you recently changed your Outlook settings, it is possible they do not take effect until you restart the program. Save all open documents and drafts before restarting.
Solution 2: Check if your spell checker is correctly activated
After you've restarted Outlook, go over the Outlook AutoCorrect settings. You can access the menu by following the steps below:
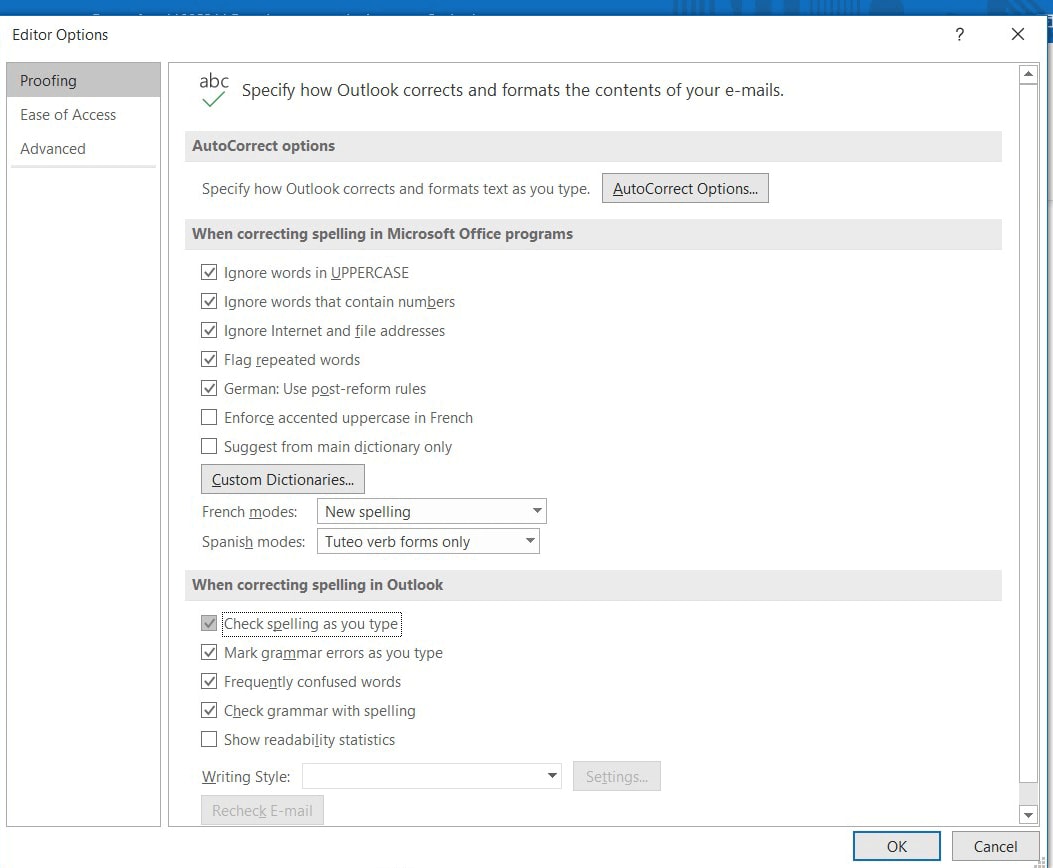
Step 1: Go to the "File" tab.
Step 2: Click "Options" on the left-hand menu.
Step 3: Change the tab to "Mail" in the pop-up window.
Step 4: Select "Spelling and AutoCorrect."
When correcting spelling in Outlook, tick the box after "Check spelling as you type" and "Mark grammar errors as you type." These are available under the "When correcting spelling in Outlook" options mentioned below.
Solution 3: Check that your automatic checking of outgoing emails is activated
If you choose to use the auto-check for outgoing emails instead of the spell and grammar checker, you can check the current settings for this function. To begin, navigate to the appropriate menu:
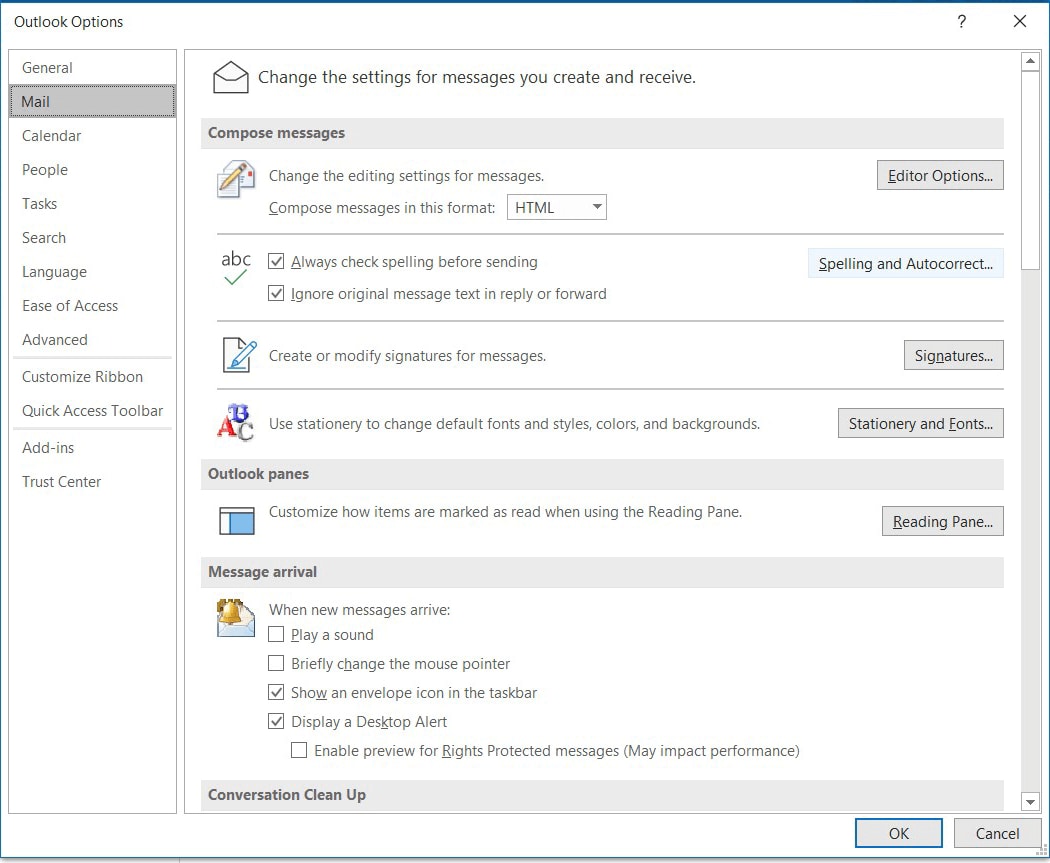
Step 1: Go to the "File" tab.
Step 2: Start the "Options" menu.
Step 3: Choose the "Mail" tab.
Check the box that represents "Always check spelling before sending" (just below "Compose messages"). If a checkmark is already there, you should remove the check from the "Ignore original message text in reply or forward" option.
Otherwise, the computer may ignore parts of your current message during the spell check, and Outlook may not perform as intended.
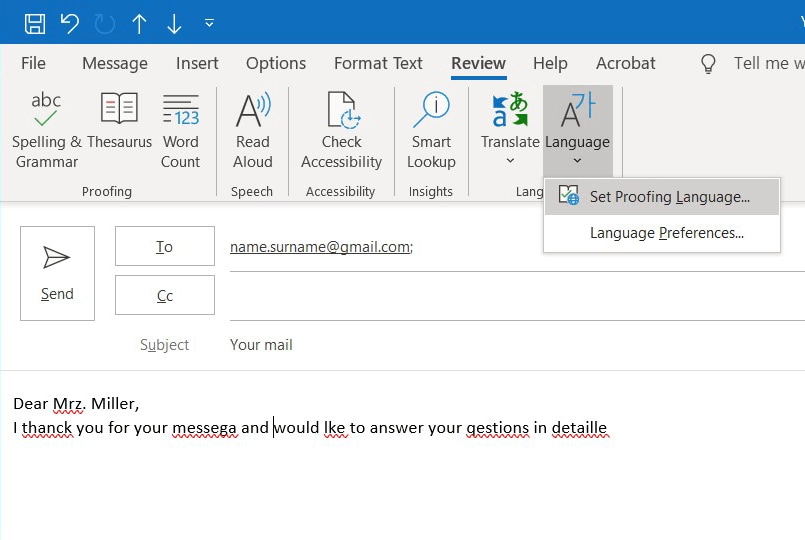
Solution 4: Change language for spell check
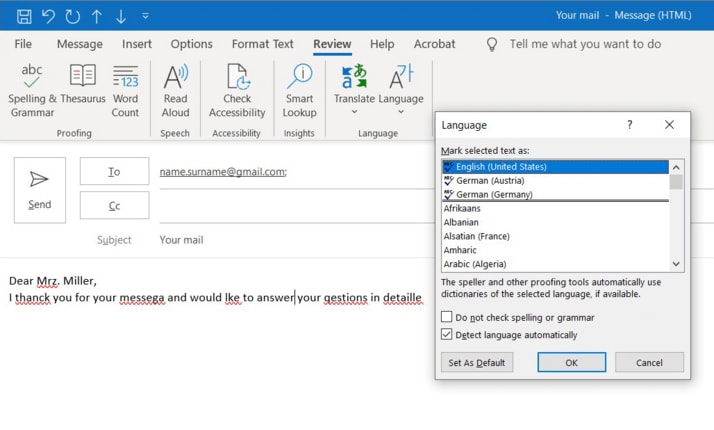
Start creating a new email as usual. Click the Language button in the Review tab. Choose Set Proofing Language to see the current language settings for spell and grammar checks.
After you've selected the language, manually test the spell check by clicking the Spelling & Grammar option in the Review tab. The spell checker displays a little dialogue window with the right language displayed.
Remove the tick next to Detect language automatically (if it exists), as it can cause problems, such as if you frequently use foreign words in your emails.
Solution 5: Check installation and update status
Is your operating system up to date, and have you installed the most recent updates? Is your Microsoft Office suite, including Outlook, properly installed and up to date? If you could not locate an Outlook error and solutions 1–4 did not resolve the issue, it might be necessary to reinstall Outlook.
Configure or fix Outlook.com spell check
Are you sending emails using Outlook's browser version? By default, the web edition of Outlook does not enable automatic checking of the spelling and grammar. You can use your browser's spell checker or enable your operating system's spell check for all applications.
Part 4: Try Using the Outlook Email Repair Tool
If none of the solutions work, your emails may be corrupted. You can use a professional tool called Wondershare Repairit for Email in this circumstance. Let us find out more about this software!
Repairit for Email is an exceptional software compatible with both Windows and Mac devices. It helps in the repair of OST/PST files creating issues. Before we get into how to use the tools, let's look at some of their distinguishing features.

-
Repair damaged PST & OST Files in Outlook in all Email corruption scenarios, such as hard disk crashes & bad sectors, virus attacks & tojan horse, outlook corruption & malfunctions, improper shutdown procedure, etc.
-
Restore Outlook Emails deleted for a long time and extract the Email messages, folders, calendars, etc. within seconds.
-
Repair corrupted Emails and restore deleted Emails with a very high success rate.
-
Repair Emails in bathes without size limits and support to preview all of them before saving.
-
Compatible with Windows 7/8/8.1/10/11, Windows Server 2012/2016/2019, and MacOS X 10.11~ MacOS 12 (Monterey).
Instructions for Using Repairit for Email for Email (Windows)
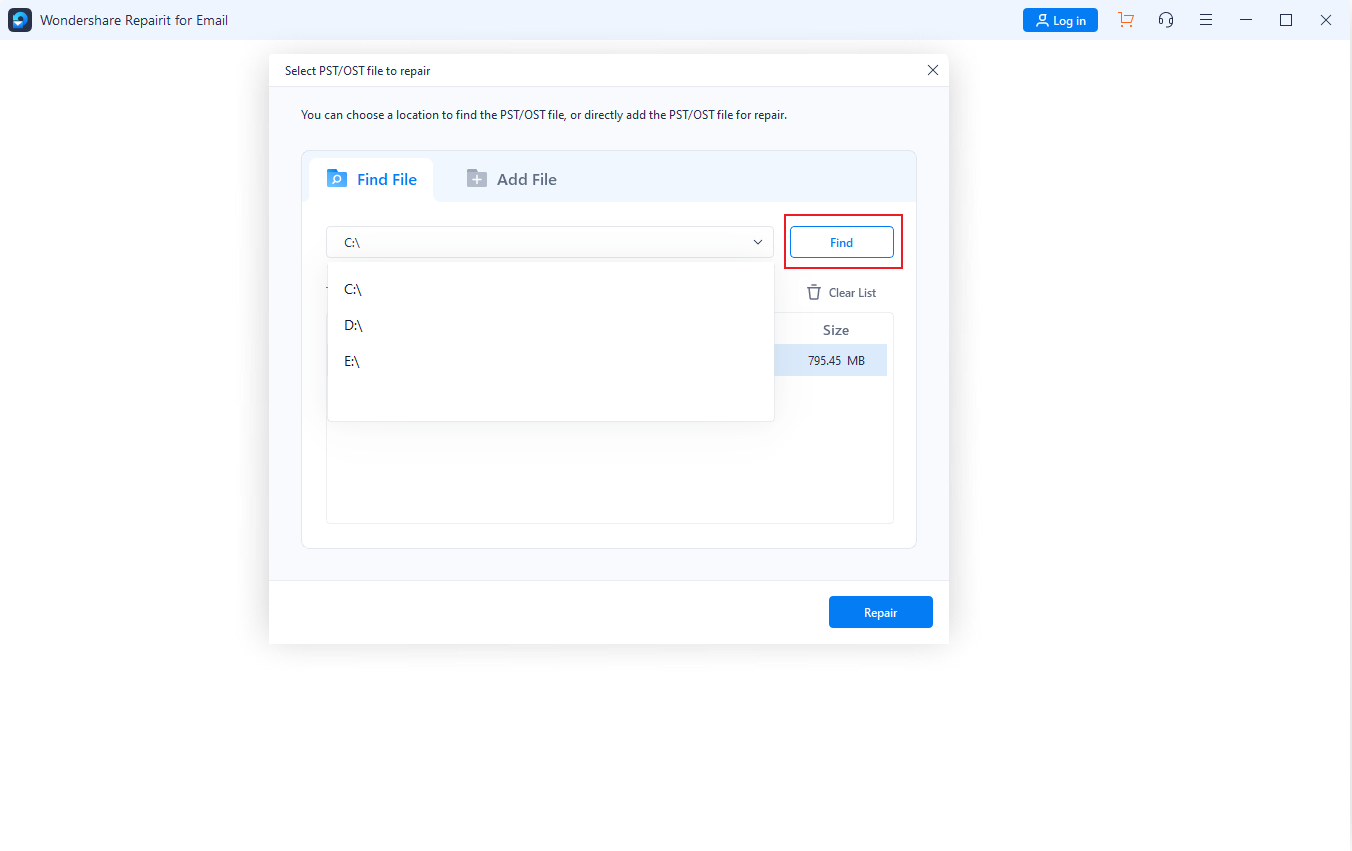
Step 1: Upload the corrupted email files
When you launch Repairit for Email, you can select between PST and OST files. Choose a damaged file to upload, then click Select File.

A window on the screen will allow you to select files from a certain place. By selecting Find, you can search for corrupt emails in a variety of locations. You can add them by selecting Add File if you already know where they are.
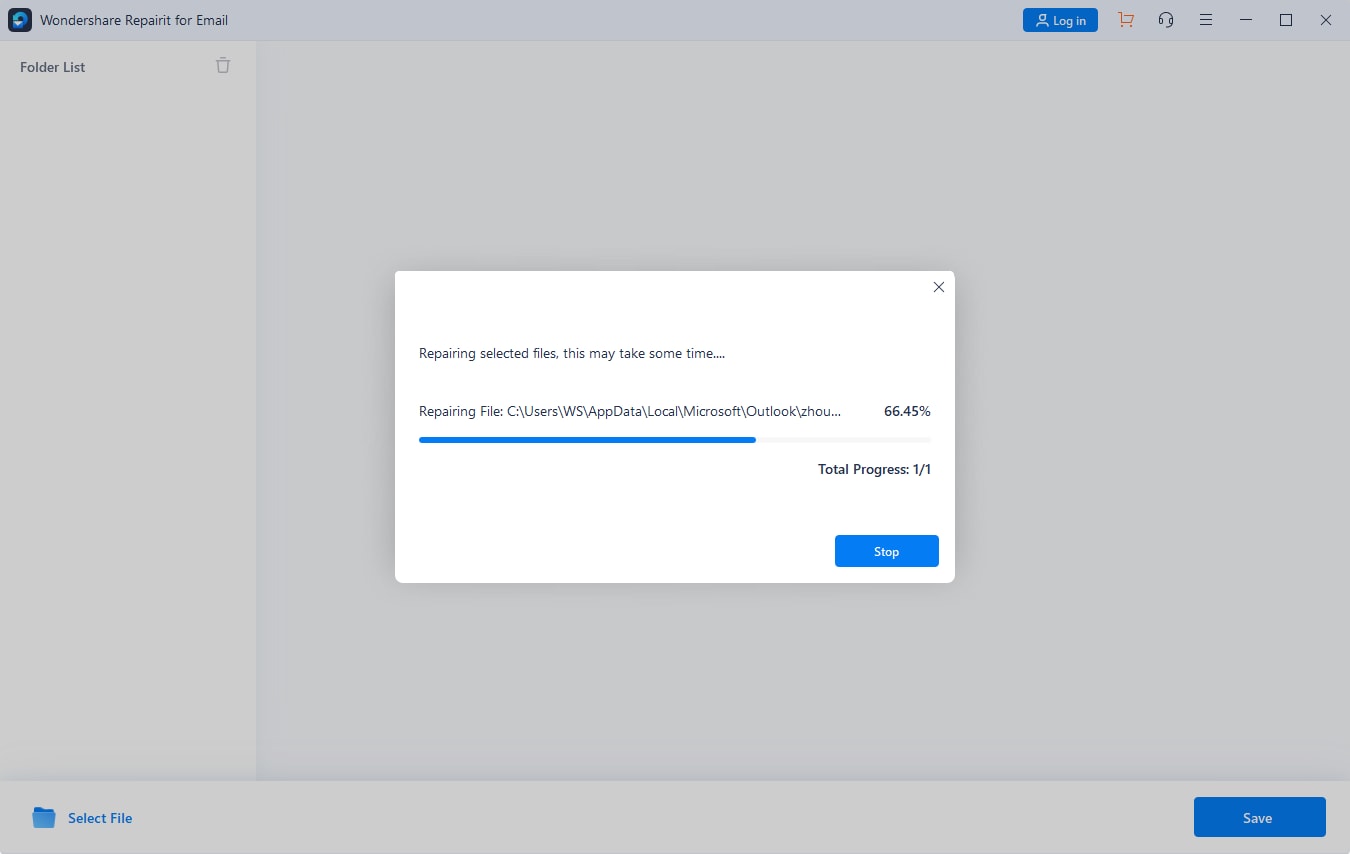
Step 2: Start the repair process for any uploaded email files
After adding the emails, please click the blue Repair button. "Repairit for Email" efficiently recovers corrupted emails.
Step 3: Save the repaired files after preview
Once the repair procedure is completed, all repaired emails will be displayed on the left panel. You can read the contents of an email file before storing it at a specific location.

Conclusion
In the end, let's summarise the article by hoping that the above solutions can help you. One of the fixes may save you from embarrassment as a result of Outlook's spelling and grammar check not working. However, manual methods do not always produce the intended results. Therefore, other effective solutions are also available.
However, sometimes the problem can be with your Email itself. In such a situation, repairing the email file is the right option. Hence, you can use the professional Repairit for Email for Email tool. It will help you in repairing your damaged email files. Hence, your problem can be solved quickly.