
 TL;DR:
To resolve the "We Could Not Create the Outlook Data File" error when adding an email account, you must disable the Simplified Account Creation feature, use alternative configuration paths, or repair your Microsoft Office installation.
● Disable the malfunctioning account wizard by opening the Registry Editor, navigating to Computer\HKEY_CURRENT_USER\SOFTWARE\Microsoft\Office\16.0\Outlook\Setup, and creating a new DWORD (32-bit) Value named DisableOffice365SimplifiedAccountCreation set to a value of 1.
● Bypass the standard interface to add your account manually by selecting Manage Profiles under the Outlook Account Settings menu, or by launching the Mail (Microsoft Outlook) applet directly from the Windows Control Panel.
● Execute a Quick Repair for Microsoft Office via Programs & Features if the application is bugged, or use Wondershare Repairit for Email to recover data if the failure is caused by an already corrupted PST or OST file.
Ask AI for a summary
 ChatGPT
 Perplexity
 Gemini
 Claude
 Grok
Grok
You might face problems when you try to create an Outlook account. For example, the email client may send you a message "We Could Not Create the Outlook Data File" when adding a new account across Outlook.
However, with this message, adding an account is surely impossible. Therefore, you need to resolve this email account problem to function across Outlook. This article provides a guide on how to fix this particular error.
Part 1: Potential Causes of "We Could Not Create the Outlook Data File"
First, let's find out why the "We Could Not Create the Outlook Data File" error occurs. This will help you assess the solutions that can be perfect to resolve the error. Discussing the causes will also help you determine how you can avoid this error in the future.

1. Bugs in your Outlook
The first significant reason is the bugs across Outlook. An improper installation or any other malfunction can be a cause of this. For example, with issues in Outlook, you cannot create a new account. Instead, you receive the error "We Could Not Create the Outlook Data File."
2. Problems with Google Account
If you try to add a Gmail account and fail to do so, you need to check the account details. There is a chance that you are adding the wrong password to the email or other issues. That is why this error is prominent across your computer.
3. Simplified Account Creation Wizard
Outlook provides a feature for creating accounts quickly across the platform. Although it is a simplified feature, it can create problems for your device. If the feature malfunctions, you won't be able to make the account on Outlook. This is why it is necessary to disable this feature from your computer.
4. Low Device Space
Is your computer space low due to data accumulation? With such a problem, you cannot create a new email account for your ease. You will continually receive the error "We Could Not Create the Outlook Data File." The only way to get rid of it is to delete the data to make some space on your device.
Part 2: Solutions to Resolve "We Could Not Create the Outlook Data File"
We shall now look into the solutions for this particular email account error. This will help you resolve the problem, and help you in creating an account across Outlook. While you keep the causes in mind, identify the problem and find a proper resolution.
Method 1: Uninstall Outlook From Your Computer
You can consider deleting and reinstalling Outlook on your computer. To perform this, you need to follow the steps shown below:
Step 1: Open your computer's "Search" bar with the "Windows + S" shortcut keys.
As it opens up, type "Apps & features" to open it on a new window.

Step 2: On the next window, find the "Microsoft Office" app in the list of applications.
As you find the respective app, select it. Next, click on the "Uninstall" button next to the application to start the process. Follow the on-screen instructions to uninstall Office from your computer.

Step 3: You need to open a browser and find your device's latest version of Office.
Install it successfully and re-launch Outlook to add an account across it.
Method 2: Try Repairing Your Outlook Application
Rather than uninstalling Outlook from the computer, you can repair the platform. Follow the steps as shown below for repairing your Outlook:
Step 1: You must first access the "Control Panel" on your computer.
Next, look for the "Search" icon on the taskbar to open it. Then, type the provided option and open it across a new window on your computer.

Step 2: Proceed to the "Programs" section in the available options.
Next, you must lead into the "Programs & Features" for locating the application.

Step 3: Scroll down the list of apps to find "Microsoft Office."
When selecting it, click the "Change" button on the top.

Step 4: This opens up the repairing wizard for Microsoft Office.
Select the "Quick Repair" option and click on "Repair." Doing this will repair your Outlook application and help you create a new account.

Method 3: Change Your Gmail Account Password
As you can open a Gmail account on your Outlook application, you might face issues processing it. One certain issue can occur due to entering the wrong password. To avoid the error "We Could Not Create the Outlook Data File," you need to change the password:
Step 1: Open your browser and access Gmail to log into the account.
With the sign-in window on your front, provide the email address and click "Next."

Step 2: Click the "Forgot password?" button to initiate the password recovery process on the next window.

Step 3: Select an appropriate way of recovering your password.
Follow the on-screen instructions to change your Gmail password. Once done, you can use it to add it across Outlook easily.

Method 4: Disable the Simplified Account Creation Feature
We have stated that the Simplified Account Creation feature can create issues. It can also be a major cause of the error "We Could Not Create the Outlook Data File." To resolve this, you need to have it disabled. Follow the steps ahead to figure out the remedy for this problem:
Step 1: Launch the Run Program with the "Windows + R" shortcut key.
Type "regedit" in the space for opening the Windows Registry window.

Step 2: Use the path navigation provided below across the Registry:
Computer\HKEY_CURRENT_USER\SOFTWARE\Microsoft\Office\16.0\Outlook\Setup

Step 3: Right-click on the blank space across the right panel.
Select "New" across the drop-down menu and hit on "DWORD (32-bit) Value."

Step 4: Rename the added file to “DisableOffice365SimplifiedAccountCreation.”
Double-click to open this new key and change the value to "1" across the "Value data:" section. Hit "OK" to change the settings and resolve the email account problem.

Method 5: Make Space in your Computer
As stated, disk space can also become a reason for this error on your Outlook. This can be resolved by freeing up space from the right locations. To free up space, you can remove unnecessary data across your "Local Disk (C:)." Try removing unnecessary apps from your computer to make space. If you have downloaded unwanted content, remove it from the "Downloads" folder.

Method 6: Add an Account Across Outlook by Other Techniques
You might be adding the Outlook account in the wrong way. Other techniques of adding an Outlook account can be used for this purpose. We will provide you with two different approaches to adding an Outlook account.
Way 1: From the Outlook Application
Step 1: Launch Microsoft Outlook on your computer and propagate to the "File" tab from the top.
Next, lead through the "Info" section from the left panel to open up options. Access the "Account Settings" button from the right side of the Info window. Choose "Manage Profiles" from the drop-down menu of "Account Settings."

Step 2: The "Mail Setup" pop-up opens on the screen.
Select the option of "Email Accounts" on the screen to open the account settings window.

Step 3: As you have opened the "Email" tab from the top, click on "New" to add an account.
Provide the necessary information to add the Outlook account.

Way 2: From the Control Panel
Step 1: You can also add an account through the Control Panel.
Launch the "Run Program" on your computer and type "control.exe." This will open up the Control Panel window on your computer.

Step 2: Type "Mail" across the search bar to open the option.
Next, select "Mail (Microsoft Outlook) to launch the Mail Setup. On the setup window, click on the first button of "Email Accounts."

Step 3: This will initialize the Account Settings window, where you must proceed to the "Email" tab.
Select the "New" button to add a new Outlook account. Add in the respective details for logging the account into Outlook.

Bonus Part: How to Repair Your Outlook Data File if It Corrupts?
There are many types of errors you can face with your Outlook data file. Apart from the "We Could Not Create the Outlook Data File" error, you can also corrupt your data file. When your data file corrupts, accessing Outlook gets impossible. It would help if you had it repaired with the help of the right tool. Wondershare Repairit for Email provides the option of repairing your Outlook data files.
The platform features a quick recovery system for your Outlook data file. It repairs the data file without requiring any user effort. While this tool can be accessed by Windows and Mac users, the results are absolute.

-
Repair damaged PST & OST Files in Outlook in all Email corruption scenarios, such as hard disk crashes & bad sectors, virus attacks & tojan horse, outlook corruption & malfunctions, improper shutdown procedure, etc.
-
Restore Outlook emails deleted for a long time and extract the email messages, folders, calendars, etc. within seconds.
-
Restore Outlook Emails deleted for a long time with a very high success rate.
-
Repair emails in bathes without size limits and support to preview all of them before saving.
-
Compatible with Windows Windows 7/8/8.1/10/11, Windows Server 2012/2016/2019, and MacOS X 10.11~ MacOS 12 (Monterey).
To understand how it helps, look into the featured steps below:
Step 1: Initiate the Email Repair Tool.
You need to access the separate application of Repairit for Email. As it launches, click the "Select File" button to add the corrupted data file.

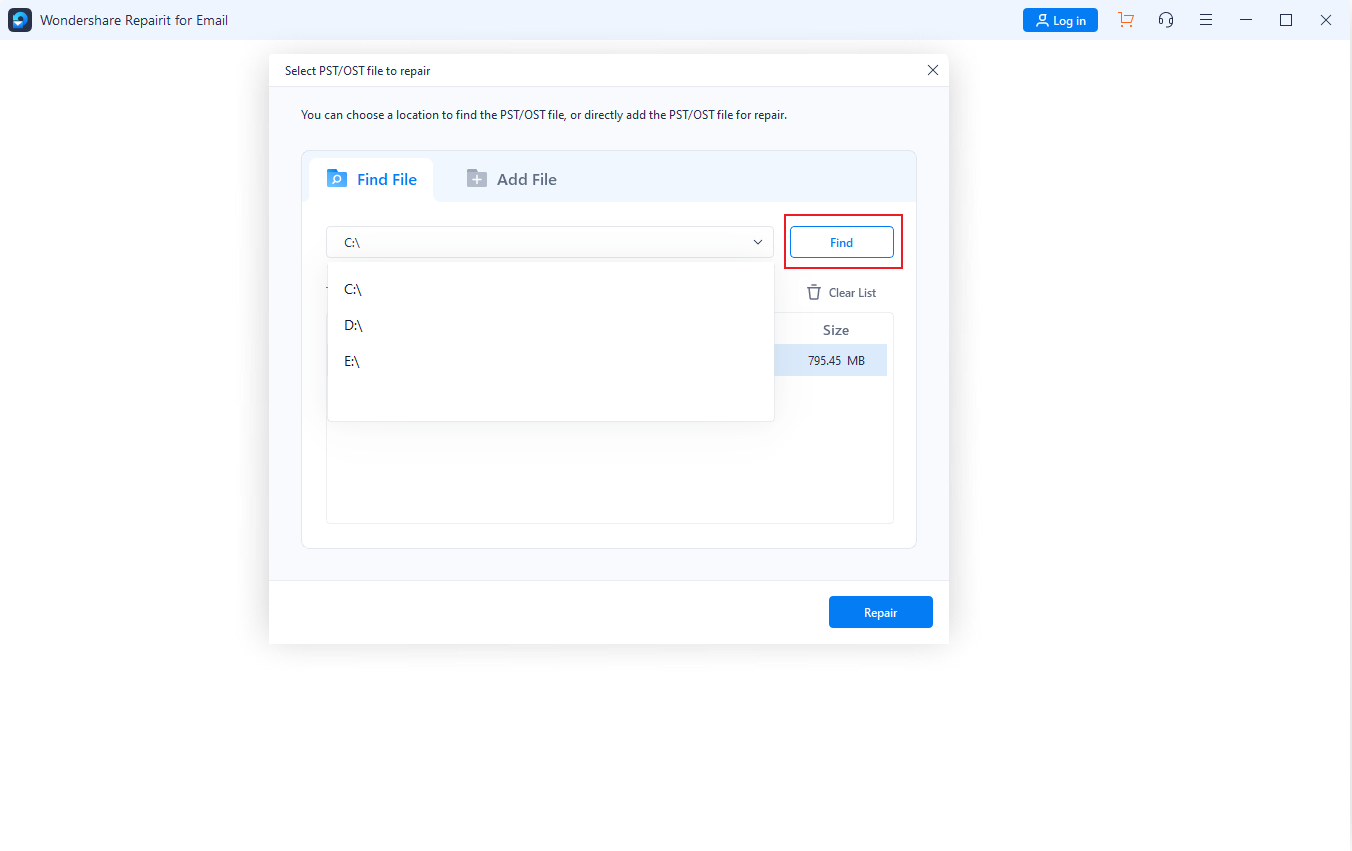
Step 2: Search or Add Corrupted File.
Repairit provides you with two different options to import the data file. You can click the "Find File" tab to search for the corrupted file. Hit the "Add File" tab if you know the location and can browse it.
Step 3: Repair, Preview, and Save Results.
Once imported, click the "Repair" button to start the process. The repaired files are displayed across the preview window, which can be reviewed. Next, select the email files, and click "Save" to recover the corrupted data.

Related Reading:
How to Create PST File in Outlook?
Concluding Words
This article has been helpful with resolving the adding account error on Outlook. The error "We Could Not Create the Outlook Data File" has been appropriately discussed. The causes and practical solutions also have been provided for ease. This article has also included great remedies if you face issues with corrupted data files. Wondershare Repairit for Email can accommodate all Outlook data file problems for you.