Emails have been a great communication source for over two decades. While they developed into better designs, different dimensions were put into effect. Out of all implementations, there were frequent issues reported for the email client. One such error was Error 550, which was in the headlines of Outlook users. Outlook Error 550 is one of the most common email errors.
If you have encountered this email issue, how are you looking forward to fixing it? This article provides you with a direction to fix Outlook Error 550. Look into the treatments and details to determine the best for your Outlook email client.
Part 1: What is Outlook Error 550?
Email clients are required and set up across multiple devices. As it is a professional demand, you must put your emails across phones and laptops. However, what if your Outlook mail does not log in perfectly? The failure to reach out to the mail recipient while setting up the device is Error 550.
This is commonly linked to SMTP problems (Simple Mail Transfer Protocol). The SMTP represents the set of standard rules for sending and receiving mail.
Thus, in the market, Outlook Error 550 is also referred to as SMTP Error 550. Such hustles across the email settings raise such concerning conditions. However, there are multiple causes for Outlook Error 550.
If you have been receiving this error lately, there is a chance that your email might be blocked. First, the recipient may have detected the email to be compromised, thus, blocking it. There might be a chance that the recipient is putting up the wrong email.
If there's no email under such a name, Outlook Error 550 is evident. In other cases, the hosting server or the email address may be temporarily unavailable for some reason.
Given such reasons and basics, it is clear what Outlook Error 550 is. It will show this error if you even tend to use a different IP address for your email client. Conversely, the mail server might have mistakenly identified the mail as spam. With such minor technicalities, you might get yourselves bound to this problem.
Part 2: What are Some Common Phrases Denoting Email Error 550?
We shall be reviewing some common phrases that will denote Outlook Error 550. Going through these phrases would help you realize the issue that you are facing. It will help you highlight the concern and will guide you to resolve it effectively and easily.
1. Email Error 550 5.1.1
On getting this message, it is evident that the recipient's email is invalid or does not exist. This happens because of email typos or misconfiguration of the recipient's server.
2. Email Error 550 5.4.1
The recipient's server won't accept emails from the domain in use. Having such an error message shows DNS misconfiguration.
3. Email Error 550 Relay Not Permitted
The recipient server has not permitted the server you are using for sending the email. This raises Error 550 across your device.
4. Email Error 550 5.7.1 Access Denied
The email has been rejected due to the security policies of the recipient server. Incorrect configuration across the recipient side may raise such problems.
5. Email Error 550 Host Unknown
This error is sent across by the SMTP server on having an unknown hostname across the email address.
6. Error 550 #5.1.0 Address Rejected
Such an error is recorded in cases where the recipient's server won't accept emails from the sender. This happens in situations where the addresses or Exchange Online emails are blocked.
7. Server Error 550 or 550 Blocked Error
This error pops up across the computer when the recipient hosting server blocks emails. The email is redirected back to the sender as per the instructions of the SMTP error code.
8. Error 550 in Outlook
Associated with a 550 Authentication error, this is required for the relay. Outlook users report such a problem when the email server requires authentication. As the server sends the SMTP authentication, it requires credentials from your side.
Part 3: How to Fix Outlook 550 Error?
We shall now focus on resolving the Outlook 550 error across your email client. Numerous fixes can be considered; however, you need to be sure of the right direction. Different solutions are required because Outlook Error 550 has many forms and formats. Since it initiates under various scenarios, it can be fixed by different methods. Let's see how you can fix Outlook Error 550 with ease:
1. Repair Outlook Data Files
We will look into how to repair Outlook emails for the first solution. The issues presiding across this specific error can be caused due to corrupt emails. Thus, you need to repair the Outlook data files with the perfect repair tool. Wondershare Repairit for Email provides the optimal opportunity to improve emails. While this platform features an easy-to-use system, it can be implemented perfectly.
Its ability to resolve OST and PST files likewise is another highlighting point. Following this, you can also consider opting for this tool if you are a Windows or a Mac user. Unlike other tools, you can repair email files across Windows or Mac. Following this, Repairit for Email promises the best results for you while repairing. Let's see how you can repair PST files with Repairit for Email with the steps:

-
Repair damaged PST & OST Files in Outlook in all Email corruption scenarios, such as hard disk crashes & bad sectors, virus attacks & tojan horse, outlook corruption & malfunctions, improper shutdown procedure, etc.
-
Restore Outlook emails deleted for a long time and extract the email messages, folders, calendars, etc. within seconds.
-
Restore Outlook Emails deleted for a long time with a very high success rate.
-
Repair emails in bathes without size limits and support to preview all of them before saving.
-
Compatible with Windows 7/8/8.1/10/11, Windows Server 2012/2016/2019, and MacOS X 10.11~ MacOS 12 (Monterey).
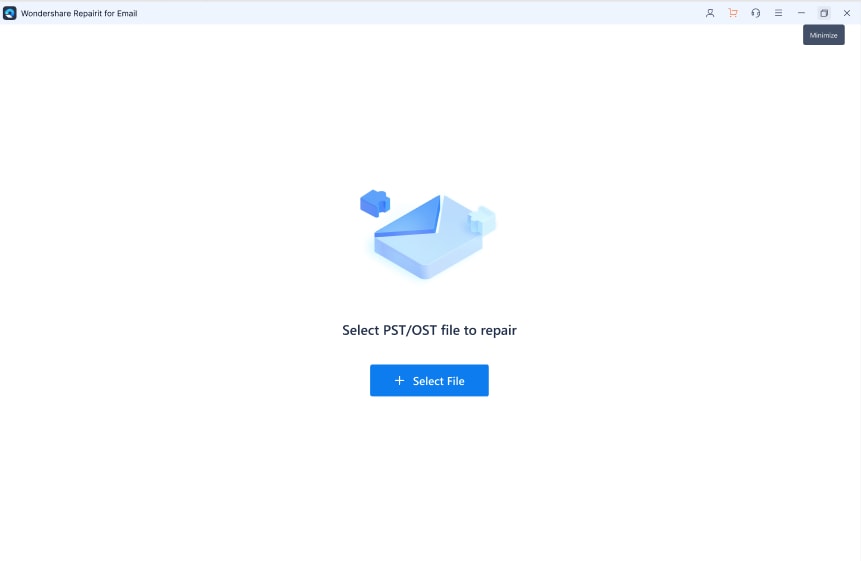
Step 1: Launch Repairit for Email.
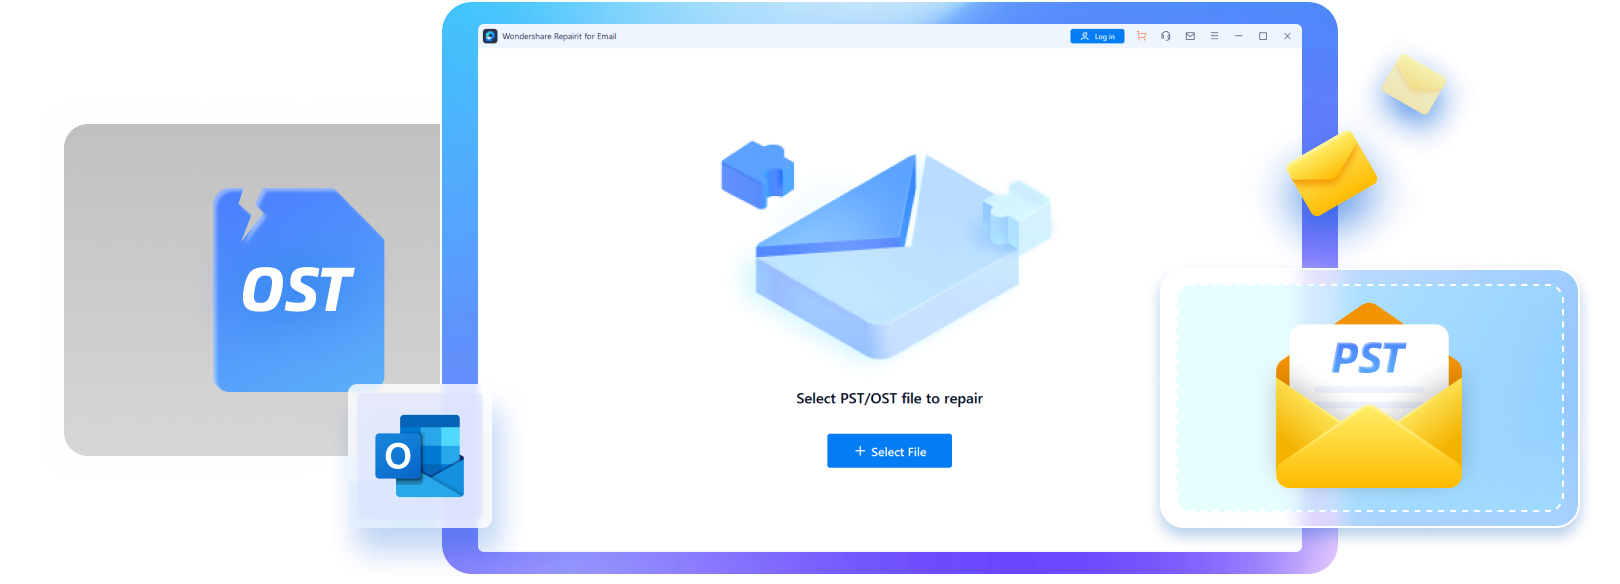
You need to download and launch Wondershare Repairit for Email on your Windows. As it opens up, click on the "Select File" option to open the respective PST or OST file.
Step 2: Import and Repair Data File.
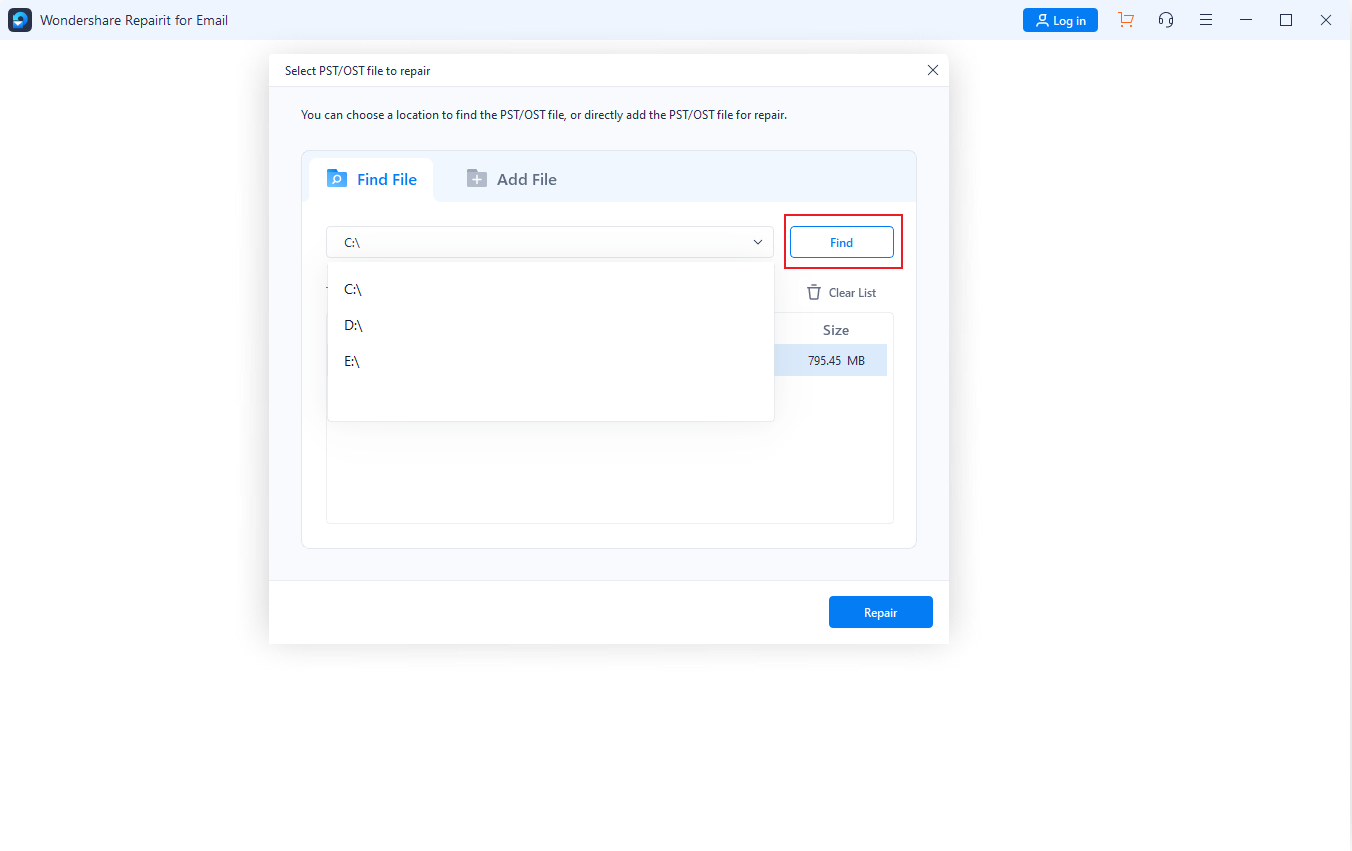
If you want to repair OST or PST files, you have two options to consider. Firstly, you can simply search for the files with no effort. Along with that, you can also import the data file directly if you have its location. Click "Repair" if you have successfully imported the PST or OST file.
Step 3: Preview and Export Results.
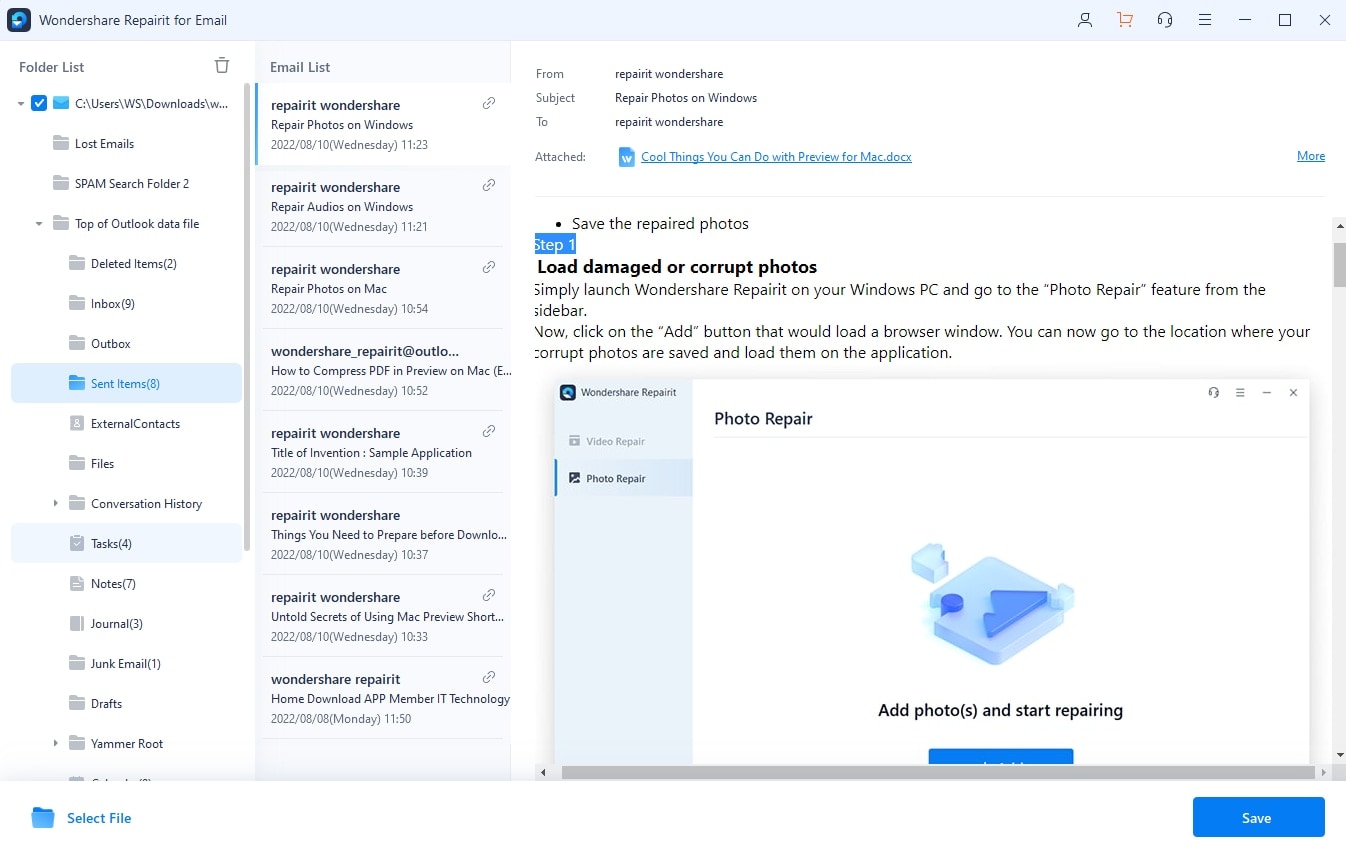
As the file automatically repairs, it will be displayed across the preview window. Go across the categories and click "Save" if satisfied with the results.
2. Check for Email Address Typos
Out of most reasons, typos can be the most considerate reason for Outlook Error 550. As the email address is incorrect, you need to ensure correctness in its structure. It might be the case that the recipient may have forwarded the wrong email address. Thus, it is best to confirm the email credentials beforehand. In another case, your email may be rejected for not having any content across it. Email servers usually have strict rules related to empty emails.
3. Try Sending the Email After Some Time
There is a chance that the recipient's server is down for some reason. In such a scenario, it is impossible to send them an email. While the server can be down for any reason, you must wait for it to resume. Wait for a few hours before you retry sending it again across the same email. If not, you can take an alternative email as a solution. It would do the trick for you to resolve this error.
4. Change the Outgoing Email Port
Another quick resolution to this problem can be changing the email port. The Outlook Error 550 can be resolved by changing the outgoing port. While you are using Microsoft Outlook for your emails, you need to follow the steps defined below:
Step 1: Launch Microsoft Outlook on your computer to start the process.
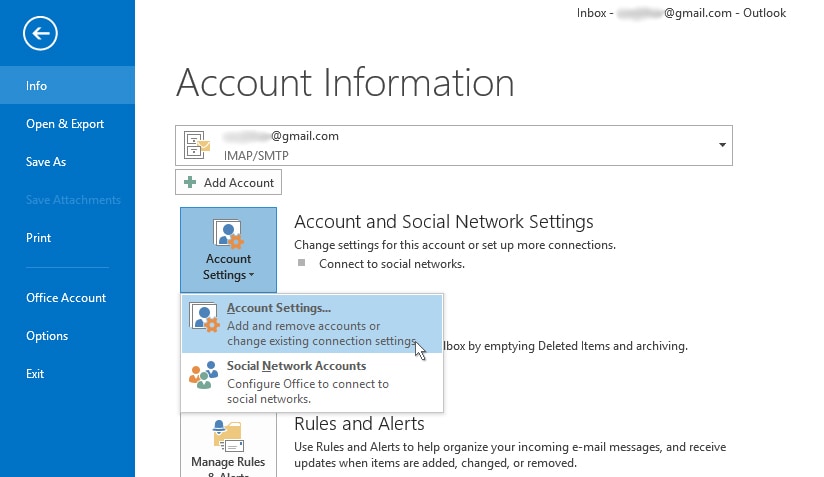
If you have Outlook 2007, you can find the option of "Account Settings" across the "Tools" tab on the top. If you are using Outlook 2010 or later, tap on "File" and lead to the "Info" section. There, choose the "Account Settings" option from the "Account Settings" sub-menu to open a new window.
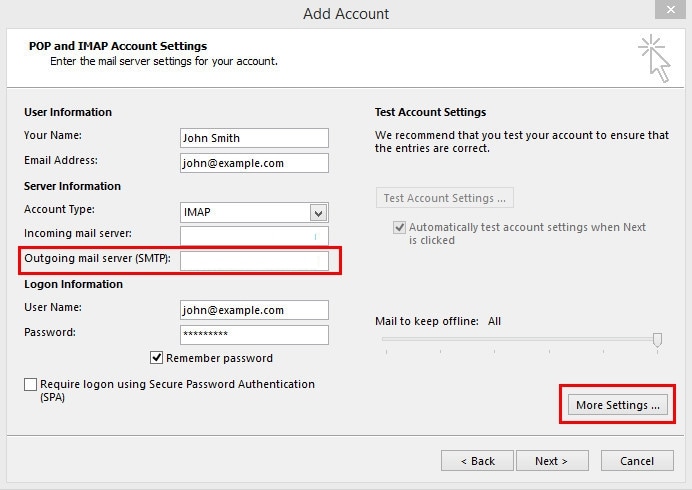
Step 2: Select your respective email address and click on "Change."
A new dialog box will open on the front providing Add Account Settings. As it shows the settings of the existing account, click on "More Settings" to proceed.
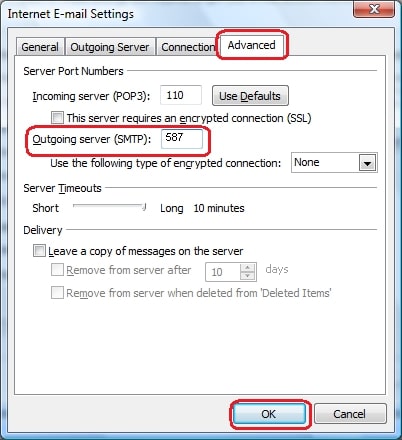
Step 3: Under the "Advanced" tab, find the option of "Outgoing server (SMTP)."
Change the port number from 25 to 587. Next, click on "OK" to save all changes.
5. Check If the Email IP is Blacklisted
Are you facing Outlook Error 550 while sending an email to the recipient with a specific email address? It is highly possible that the server or domain in use has been blocked by an anti-spam filter. Email clients have blacklisted some domains and IPs across their systems. This is why you may be facing the issue of sending emails. With Outlook Error 550 coming across every email, there is a need for verification. You need to look into the guide explaining how it is identified with the help of a tool named MX Lookup:
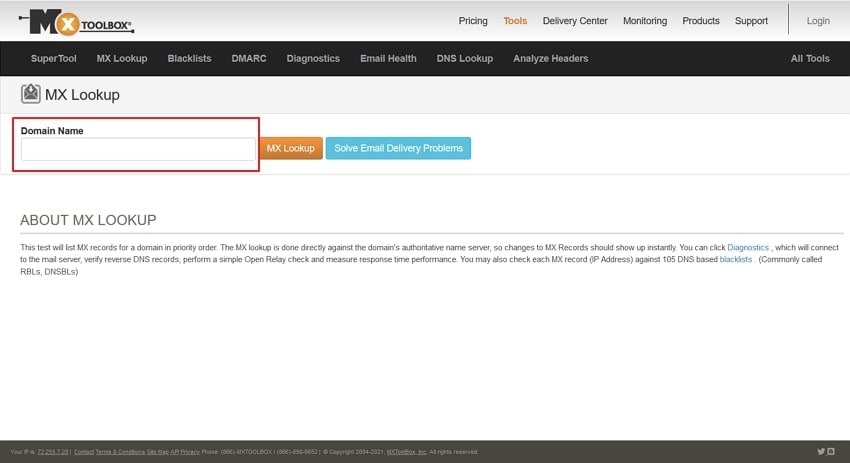
Step 1: You need to visit the official website of MX Lookup and type your email domain there.
Initiate a scan and discover the IP addresses of your email domain.
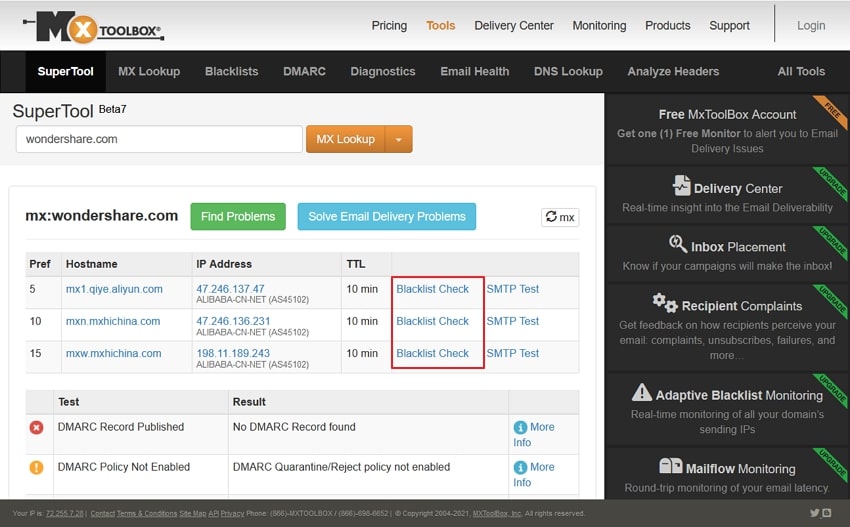
Step 2: Next, click on "Blacklist Check" for each of your IPs to check if it is blocked by someone or not.
If it is blocked by someone, then you will not be able to send the email through your Outlook.
6. Enable SMTP Authentication
Email applications automatically configure SMTP Authentication. If it is not configured for some reason, you have to get this done for ease. Let's look into the steps to see how you can enable SMTP Authentication:
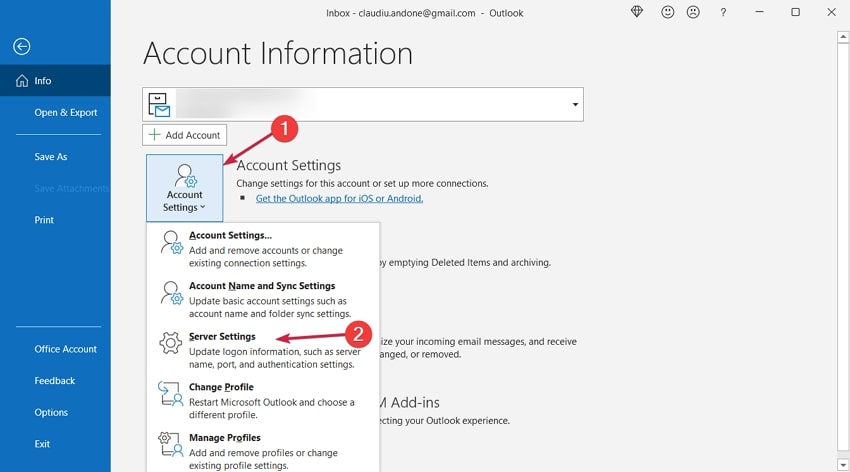
Step 1: Launch Outlook and proceed to the "File" tab.
There, move to the "Info" section and click on the "Account Settings" button. Next, you have to proceed with the "Server Settings" option from the drop-down menu.
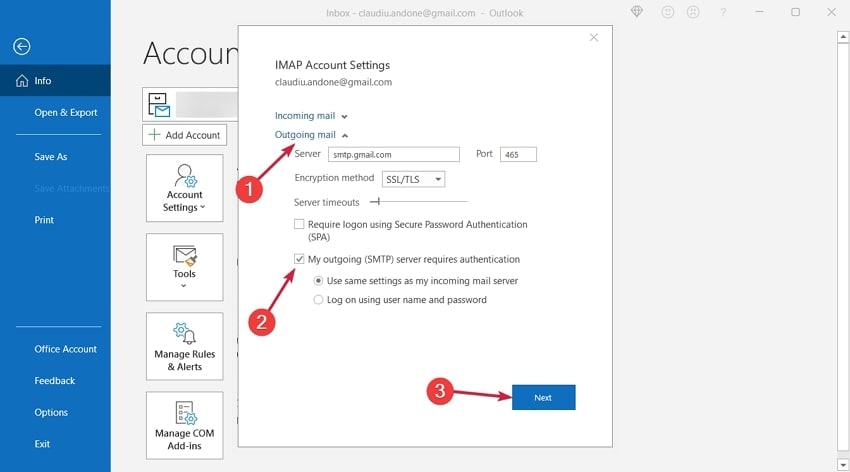
Step 2: On the next window that opens, you need to select the option of "Outgoing email."
Ensure the "My outgoing server (SMTP)…" checkbox is enabled. Also, ensure that the "Use same settings as my incoming mail server" is enabled. Now, click "Next" to proceed.
7. Contact the Internet Service Provider
You need to contact your ISP if none of the methods are absolute. The problem might not lie across the server but on the internet. Thus, you must ensure that the internet across your device is proper. This would indeed resolve any email issues caused by the internet.
Part 4: FAQs
-
Q1. What are the pricing plans offered across Wondershare Repairit for Email?
-
A1: You can find the following pricing plans for Repairit for Email. Make the perfect choice at your convenience:
Windows
Mac
Year License
$69.99
$69.99
Perpetual License
$79.99
$79.99
-
Q2. How can you prevent Outlook Error 550 in the first place?
-
A2: The ability to prevent this error across your email client is quite simple. You must scan all outgoing emails and look for malware within file uploads. Following this, you need to block direct outgoing connections to SMTP servers. Following this, use a web application firewall and limit your emails sent every hour. Also, keep changing the password of your email client.
-
Q3. How to change the port number across Apple Mail to avoid Error 550?
-
A3: If you seek to change the port number across your Apple Mail, launch it and select the "Mail" menu. There, click on "Preferences" to lead to the next screen. Find the "Accounts" tab and choose your email account. Next, locate the "Outgoing Mail Server" section and access the "Server Settings" option. You can change the port number from 25 to 587 to resolve this error.
Conclusion
This article has put up a coherent overview of Outlook Error 550. As one of the solutions to this problem is to repair Outlook emails, several other methods exist. For perfect results, you should consider solutions like Wondershare Repairit for Email. Find the best resolution for Outlook Error 550 with such a tool.

 ChatGPT
 Perplexity
 Google AI Mode
 Grok
Grok
