

 TL;DR:
⚡ Quick Fix: Fix Shared Mailbox Not Showing
Restore your missing Microsoft 365 shared mailbox instantly with these steps:
● Enable Shared Folders: Go to File > Account Settings > Account Settings. Double-click your account, select More Settings > Advanced tab, and check "Download Shared folders".● Add Folder Manually: In the same Advanced tab, click Add and type the shared mailbox email address to force it to map.
● Fix Sync Data Corruption: If folder sync remains broken due to profile corruption, download Wondershare Repairit for Email to scan and recover missing folders and emails from damaged OST/PST files.
Ask AI for a summary
 ChatGPT
 Perplexity
 Gemini
 Claude
 Grok
Grok
Ever had an issue where Outlook is not showing the shared mailbox? Today, businesses have increasingly moved from on-premises Exchange to a Microsoft 365 or cloud environment. There are many of them even migrating all of their data to the cloud.
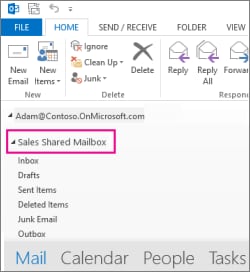
In most circumstances, the handoff goes off without a hitch, and there are no big stumbling blocks. Once post-migration procedures are done, data from Office 365 may be viewed in Microsoft Outlook. However, the user may be unable to view the information on their local copy of Outlook.
Part 1: Why is the Shared Mailbox not visible in Outlook?
Shared Mailboxes are an excellent approach to allowing people to access the same mailbox. However, Shared Mailboxes are not always accessible in Outlook. Several variables can contribute to this. One possible explanation is that the Shared Mailbox was not correctly set up. Another option is that the user needs more adequate access to the Shared Mailbox.
If you are experiencing trouble accessing a Shared Mailbox, check with your Administrator to ensure that it is correctly configured and that you have the appropriate rights. It would be best if you got your Shared Mailbox to appear in Outlook with a little tinkering.
Part 2: Various Solutions to solve the issue of shared mailbox not showing in Outlook
A shared mailbox, unlike user mailboxes, does not have a login or password. To access a shared mailbox, you must have the administrator's Send As, Send On behalf, or Full Access rights. Use the solutions and workarounds outlined in this article to resolve the issue if you have the necessary responsibilities and permissions to access a shared mailbox but cannot see it in your Outlook client.
Solution 1: Generate and Check Logs to Fix the Error
If your Outlook shared folder is not showing, follow these steps to generate logs and analyze them to check for the issue and fix them.
Step 1: Open Outlook and go to File > Options > Advanced.
Step 2: In the Advanced option, Check the Enable troubleshooting logging (requires restarting Outlook) option and then click OK.
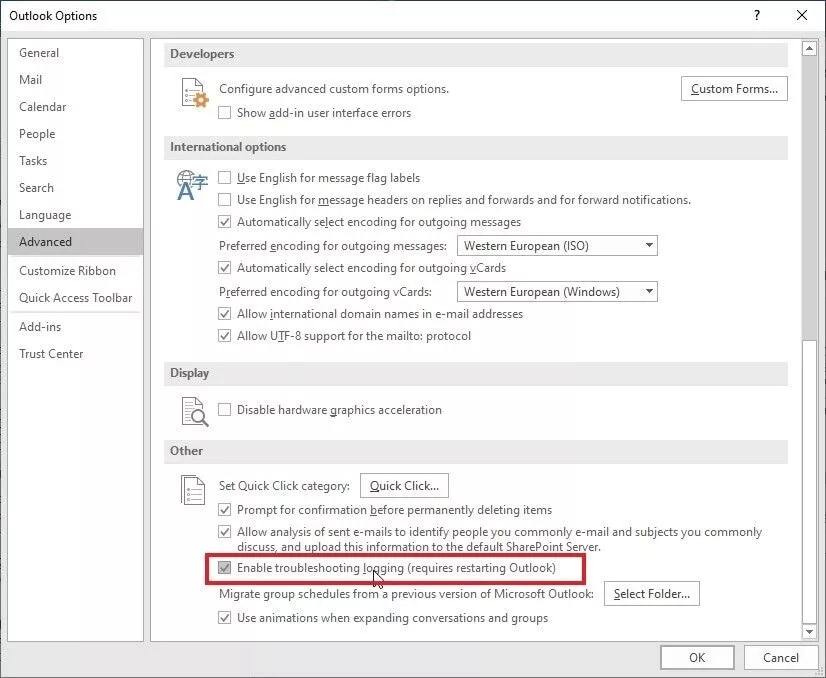
Step 3: Close Outlook and restart.
Step 4: The file logs are stored in the %localappdata%/Temp folder or C:/Users/UserName/AppData/Temp folder location.
Check the logs and resolve the issue to fix the problem and try to access the Shared Mailbox folders.
Solution 2: Disable Auto-Mapping
Autodiscover services in Office 365 or Microsoft 365 will auto-map the Shared Mailboxes to them if a user has full access or rights to see the mailboxes. When the user logs in to the web app or launches Outlook, the Shared Mailbox is instantly loaded.
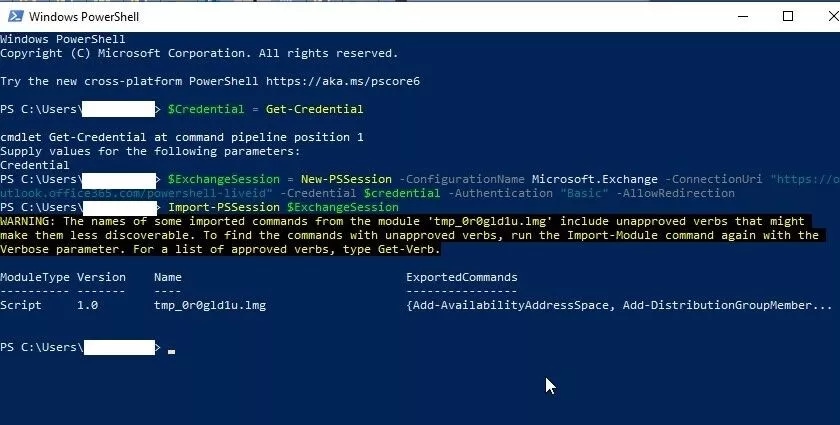
In certain circumstances, this may not work, and you may need to explicitly disable the auto-mapping option using the command-line interface for the user to regain access to the Shared Mailbox. Follow these steps if a shared mailbox is not showing emails in outlook:
Step 1: Open Powershell as administrator and run the following command to store user credentials.
Command: $Credential = Get-Credential
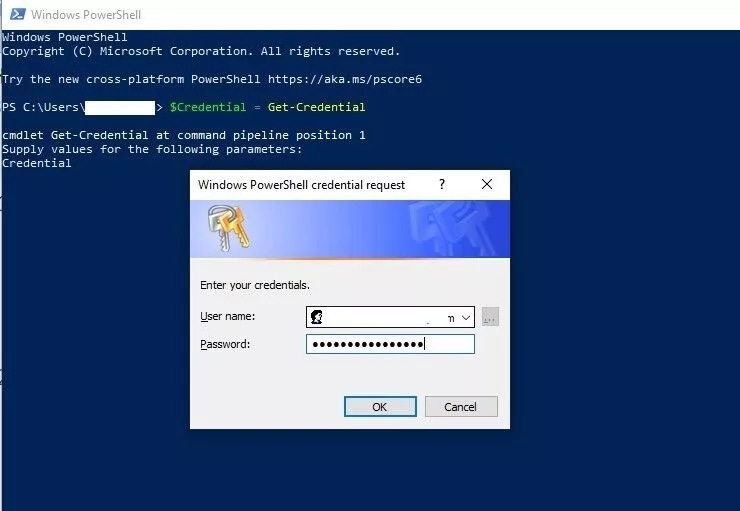
Step 2: Enter your Office 365 Credentials and then click OK.
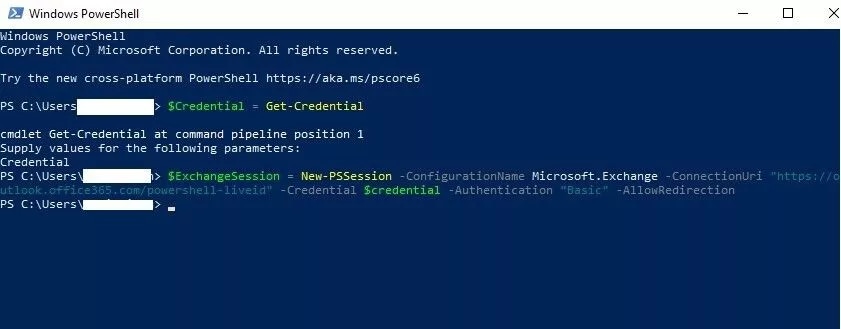
Step 3: Run the following command to make a connection and start a new Office 365 PowerShell session.
Command:
$ExchangeSession = New-PSSession -ConfigurationName Microsoft.Exchange -ConnectionUri “https://outlook.office365.com/powershell-liveid” -Credential $credential -Authentication “Basic” –AllowRedirection
Step 4: Now start the Exchange Online Session.
Command: Import-PSSession $ExchangeSession
Step 5: Once the connection is established and the session has started, remove the permissions to access the Shared Mailbox.
In the following example, you are revoking the permission of support@abc.com from the xyz@abc.com user.
Command:
Remove-MailboxPermission -Identity support@abc.com -User john@abc.com -AccessRights FullAccess
Step 6: Then assign the full access permission to the shared mailbox again using the following command and disable the auto-mapping.
Command:
Add-MailboxPermission -Identity support@abc.com -User xyz@abc.com -AccessRights FullAccess -AutoMapping:$false
Step 7: You may now add the Shared Mailbox manually to the Outlook account, which will recreate a new OST file.
The old one will become inaccessible.
Step 8: Repeat the above steps for every user to allow access to the Shared Mailbox.
Solution 3: Add Shared Mailbox Manually
To add a shared mailbox manually, follow these steps:
Step 1: Open Outlook, go to File > Account Settings > Account Settings.
Step 2: Under the Email tab, double-click on your mail to access the settings.
Step 3: Click More Settings.
Step 4: In the Advanced tab, enable the Download Shared folders options.
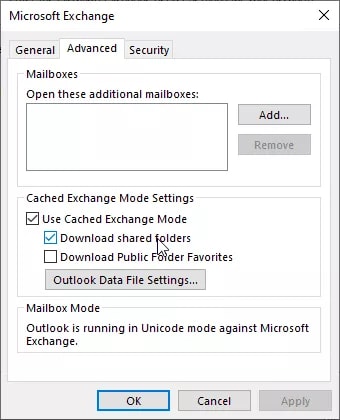
Step 5: Click on Add and type the Shared Mailbox name.
Step 6: Click OK > Apply > OK.
Solution 4: Recreate Profile
Your email profile may be corrupted or destroyed, prohibiting you from using the Shared Mailbox. In this scenario, you should establish a new profile and set up your email account. The Shared Mailbox may be mapped to your user account by the Autodiscover service. The procedure is as follows:
Step 1: Close Outlook and launch the Control Panel.
Step 2: Locate and choose the Mail option.
Step 3: Click Show Profiles, followed by Add.
Step 4: Click OK after entering the profile name.
The setup wizard will launch.
Step 5: To create your account with this new profile, enter your Microsoft 365 credentials.
Step 6: Close the Control Panel and launch Outlook when it has been created.
Step 7: Select your new profile name from the Profile Name selection and click OK.
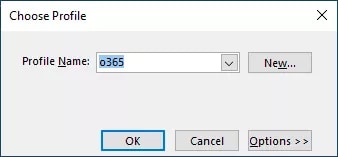
Step 8: This will launch Outlook with your newly created profile.
Step 9: Wait a few moments for the synchronisation to complete.
Step 10: Go through all your mail folders, including the Shared Mailbox. It should now be visible.
Contact the Administrator if this method also fails to add the Shared Mailbox to your user account in Outlook.
Part 3: Some Limitations of the Manual Methods
Simple manual solutions to the problem exist, but not everyone can implement them. Furthermore, these approaches have significant drawbacks. These constraints are explained below.
Limitation 1: Because of the inherent vulnerability of cloud storage, there is always a significant danger of data theft.
Limitation 2: They can resolve the issue of the Office 365 shared mailbox vanishing from Outlook. But, they can not prevent unwanted access to your critical data.
Limitation 3: There is no assurance that these procedures will always be effective. In certain circumstances, they may not function.
Limitation 4: They are not suitable for everyone. They are difficult for certain users.
You should be able to see your shared mailbox content in Outlook after utilizing all of these ways. Once you can see your shared mailbox in Outlook, you may send and receive messages from it.
However, if you do not see the shared mailbox, it is conceivable that the shared mailbox migration failed for some reason. Then you should utilize a professional migrator program that has no flaws and swiftly completes the migration operation.
Bonus: Restore The Lost Outlook Emails
Here I will recommend a solution in case your Outlook Emails are lost. Wondershare Repairit for Email is an excellent email repair software that works on both Windows and Mac. Before getting into how to use the tools, let's have a look at some of their outstanding features.

-
Repair damaged PST & OST Files in Outlook in all Email corruption scenarios, such as hard disk crashes & bad sectors, virus attacks & tojan horse, outlook corruption & malfunctions, improper shutdown procedure, etc.
-
Restore Outlook Emails deleted for a long time and extract the Email messages, folders, calendars, etc. within seconds.
-
Repair corrupted Emails and restore deleted Emails with a very high success rate.
-
Repair Emails in bathes without size limits and support to preview all of them before saving.
-
Compatible with Windows 7/8/8.1/10/11, Windows Server 2012/2016/2019, and MacOS X 10.11~ MacOS 12 (Monterey).
Steps to follow on how to use Wondershare Repairit for Email
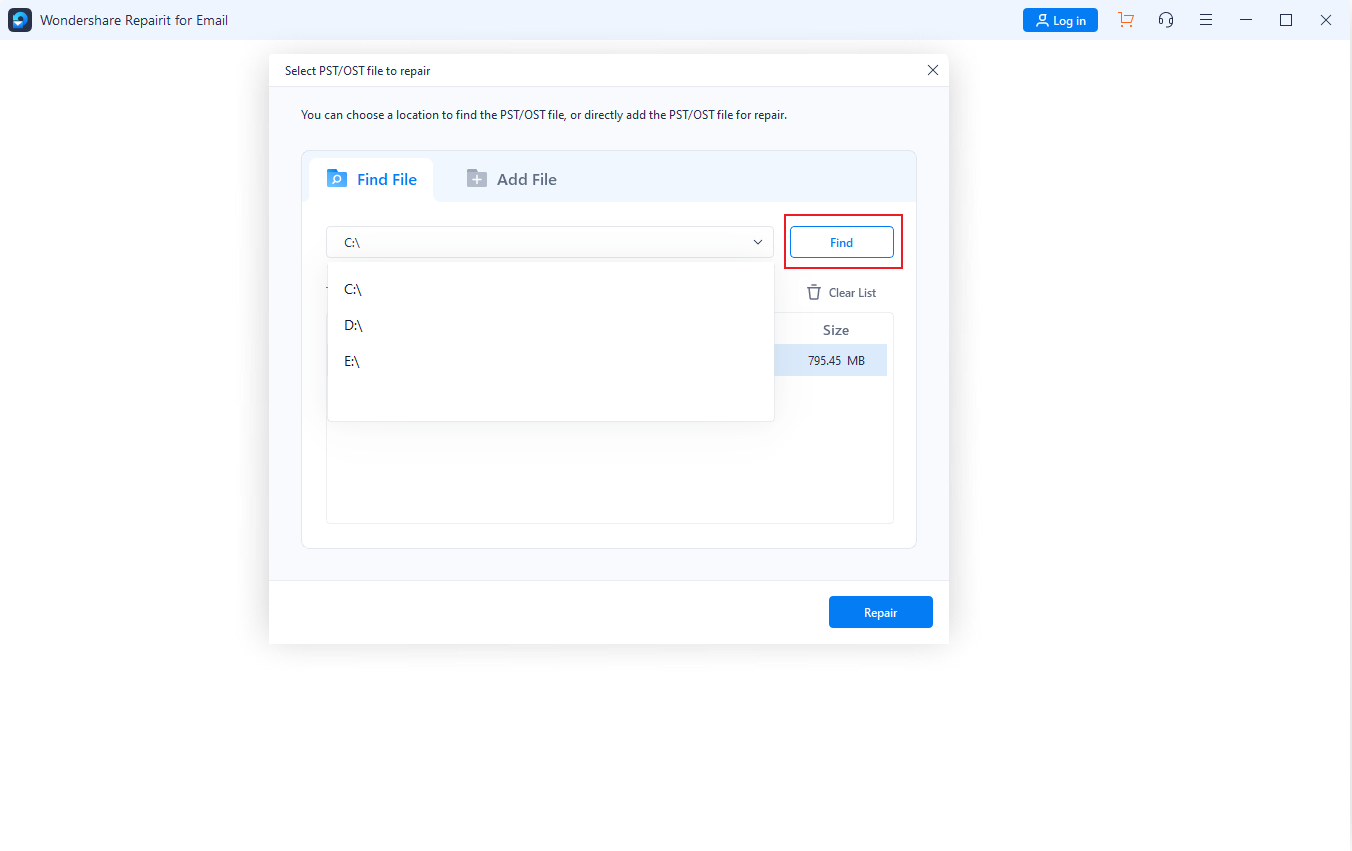
Step 1: Select and Upload the file
First open Wondershare Repairit for email. You will see an interface of Repairit for Email. Click on 'Select File' to upload the files.

Select the files from the source. After selecting the files, click on 'Add File'. You can add single or multiple files to repair the files.
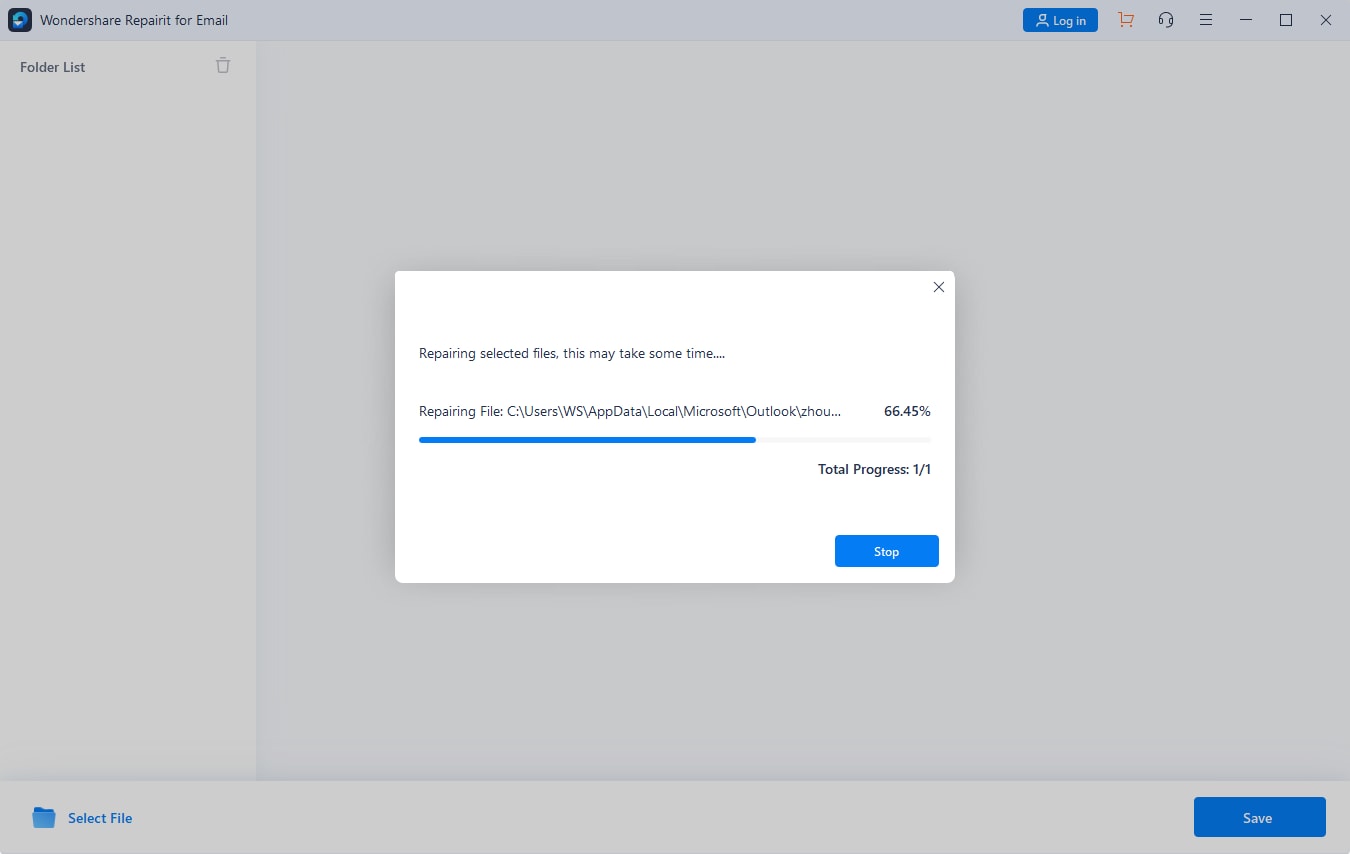
Step 2: Repair the Uploaded Files
Please click the blue "Repair" button after you have added the emails. Repairit for Email will recover your corrupt emails automatically in seconds.
Step 3: Preview and Save the Repaired Files
After completing the repair procedure, all fixed emails will be displayed on the left panel. Double-click an email file to preview its contents, and then select a location to store it.

Conclusion
Do you have trouble finding your Office 365 Shared Mailbox in Outlook? This is a regular problem for consumers who have switched to the new Microsoft 365 platform. Above are some troubleshooting methods in this post to assist you with locating and accessing your Shared Mailbox. Finally, if everything else fails, you can use Wondershare Repairit.