

 TL;DR:
⚡ Quick Fix: Fix Sound Problems on Windows 10
● Check Basic Sound Settings: Make sure the volume is not muted, the correct output device is selected, and your speakers or headphones are set as the default playback device.
● Run Windows Audio Fixes: Restart your PC after updates, run the Windows 10 audio troubleshooter, and check all audio cables or wireless connections.
● Repair Driver or Codec Issues: Roll back or reinstall audio drivers, update the IDT High Definition Audio CODEC if needed, and disable audio enhancements that may cause playback conflicts.
● Repair Unplayable Audio Files: If only certain audio files will not play, repair damaged MP3, M4A, FLAC, AAC, or WAV files before changing more system settings.
Ask AI for a summary
 ChatGPT
 Perplexity
 Gemini
 Claude
 Grok
Grok
"I have been trying to connect my headphones to the computer for listening to the video that I've prepared for my presentation. My computer is not giving out any sound across the headphones, and I am unable to figure out if the problem is across my headphone jack or other sources?"
Have you also had a similar experience with your Windows 10 computer? With an overview of the problem, it is clear that this article will bring clear fix sound problems Windows 10. As you adopt these solutions, this guide would bring up clear results for you that would effectively fix all sound problems in your device.
Table of Contents
Part 1: Some Common Types of Audio Issues on Windows 10
Before you come to know the clear remedies to fix audio in Windows 10, there is a need to figure out the types of issues that can occur across your Windows device due to certain settings. The following list features some reasons and types of errors that you may find on your device when your audio won't work:
- The respective audio output may be muted or will be at a low volume.
- The audio settings that you may be used across your Windows 10 not be set as the system's default audio settings.
- The recent update in your drivers may have led to some software glitches across the audio device of your Windows 10.
- There can be problems across your audio cables and connections that are used to run the audio of your Windows 10.
- The audio you are trying to run across your Windows 10 may be damaged.
Part 2: 10 Audio Troubleshooters to Fix Audio on Windows 10
After a proper understanding of the concerns that can be created through sound issues on Windows 10, we shall now shift our focus to the solutions to these audio issues in Windows 10. Go through the provided remedies in detail to figure out a comprehensive solution to the problem.
Fix 1: Check Volumes and Muted Outputs
Out of the multiple audio stuttering Windows 10 solutions for your device, the first essential thing to check is the volume and muted outputs across your computer's sound system. Usually, you may not hear the voice since the output voice of that specific application may be turned off or decreased to its minimum. To check volumes and the muted outputs across your Windows 10 computer, follow the steps as follows:
Step 1: Click on the "Speaker" icon present across the bottom-right of the system tray.
Check whether the volume slider is set at the value of 100 or not.

Step 2: Right-click on the "Speaker" icon to select the option of "Volume Mixer."

Step 3: You can check the device's volume across the next window.
If you are using any specific application, you will also find its output volume listed across these options. Ensure that all outputs are at maximum volume.

Fix 2: Verify That The Current Audio Device is the System Default
There might be certain issues with the settings of your speaker, which would lead to the need for an audio troubleshooter Windows 10. If you haven't managed your audio device's settings and put its playback settings as default for your computer, you may find it extremely damaging for your computer's audio settings. Check the system settings of your current audio device with the help of the following steps:
Step 1: You need to right-click on the "Speaker" icon and select the option of "Playback devices" from the displayed menu.
Check whether the volume slider is set at the value of 100 or not.

Step 2: On the next window, you'll find yourselves in the "Playback" tab, where you can see the default speakers detected.
If the green icon is across the computer's speakers, they are the default playback device on Windows 10.

Step 3: If the speakers won't be the default audio tool, click on the option across the window and select "Set Default."

Step 4: You can also check the settings of your current audio device by selecting and clicking on the "Properties" option.
Change the sample rate and bit depth in the "Default Format" section and hit "Test" after every change to verify which format perfectly works for your Windows 10.

Fix 3: Restart Your PC After an Update
A recent update on your PC usually comes with multiple hardware and software upgrades according to your device. Your device's sound may not work properly due to some uneven settings across your device. To restart all processes from scratch, it would be perfect if you restart your PC after an update. This can be done quickly with the help of the following steps:
Step 1: Click on the "Start" menu present across the bottom-left of the screen.
Click on the "Power" icon across the menu that protrudes.
Step 2: Select "Restart" from the available options to restart your PC.

Fix 4: Run the Windows 10 Audio Troubleshooter
Built-in troubleshooters are a great way to execute errors like audio stopped working in Windows 10. If the basic settings and changes across them are not bringing out the proper solution to this concern, you should consider running the audio troubleshooter in Windows 10 to resolve the problems across the device. For this, you need to process the following steps in detail:
Step 1: To access the right settings on your computer, you need to simply use the "Win + I" shortcut key to open the settings of your Windows 10.

Step 2: Redirect across the "Update & Security" section and find the "Troubleshoot" option in the available list.

Step 3: On clicking the option, you will find the "Additional Troubleshooters" option in the next window.
Select the "Playing Audio" option in the list appearing next and "Run the troubleshooter" to find the solution to this problem.

Fix 5: Try Audio Repair Tool to Fix Unplayable Audio
What if the audio that you are running on your device is unplayable? There is not much that you can do except repair the audio with the right tools. While searching for the right functionality for this remedy, you can come across Wondershare Repairit as the perfect option to fix the unplayable audio across your computer.
With an extensive ability to repair audios, this software features a system that returns you audio of a similar quality as its original version. To understand the process of using this tool, go through the provided steps in detail:

-
Support to repair damaged audios with all levels of corruption, such as clipping audio, humming audio, rumbling audio, sibilant audio, out-of-sync audio, etc.
-
Support to repair audios of diverse formats, such as MP3, M4A, FLAC, AAC, WAV, etc.
-
Repair damaged or corrupted audios from mutiple devices: portable voice recorder, recording software, shooting apparatus, SD cards, phones, USB flash drives, etc.
-
Support Windows 11/10/8/7/Vista, Windows Server 2003/2008/2012/2016/2019/2022, and macOS 10.10~macOS 14.
Step 1: Open and Import Audio.
Launch Wondershare Repairit after downloading it across your computer successfully. Proceed to the "More Types Repair" tab, then "Audio Repair" and import the unplayable audio on the platform.

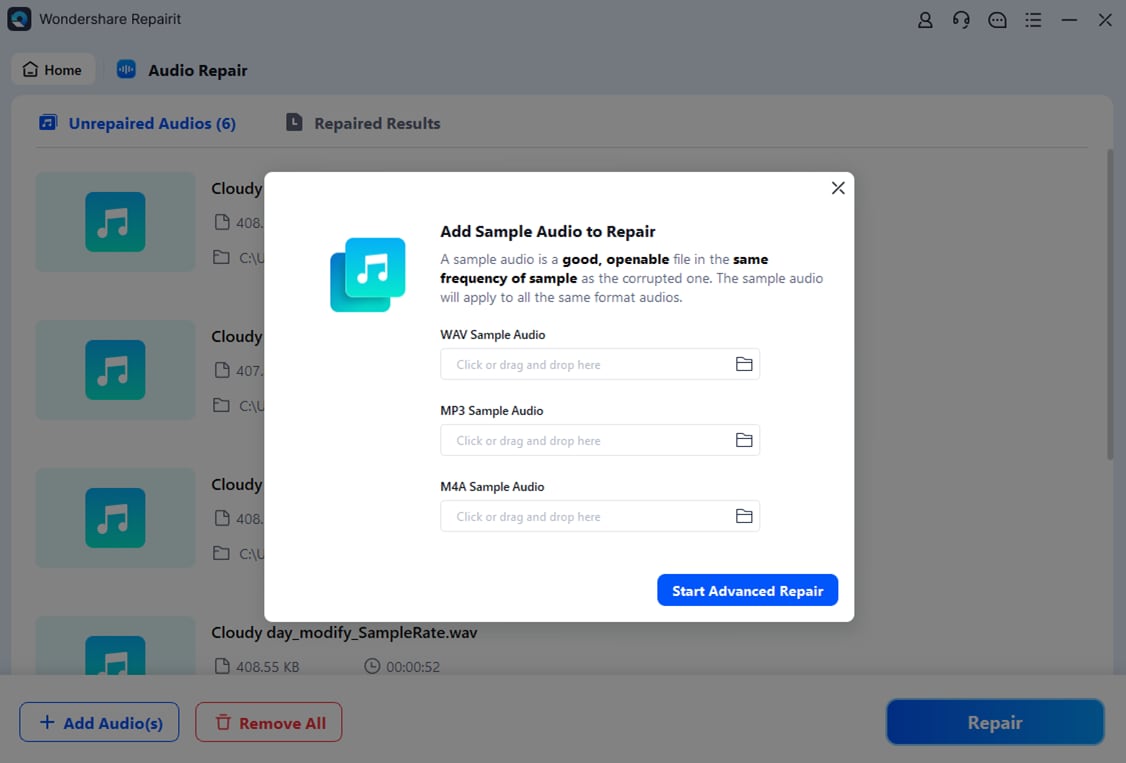
Step 2: Initiate Repair by Providing Sample.
Once imported, hit the "Repair" button and find a new screen on your front. It requires you to put in sample audio that is similar to the format of the unplayable one. As you put in the sample audio, the process resumes.
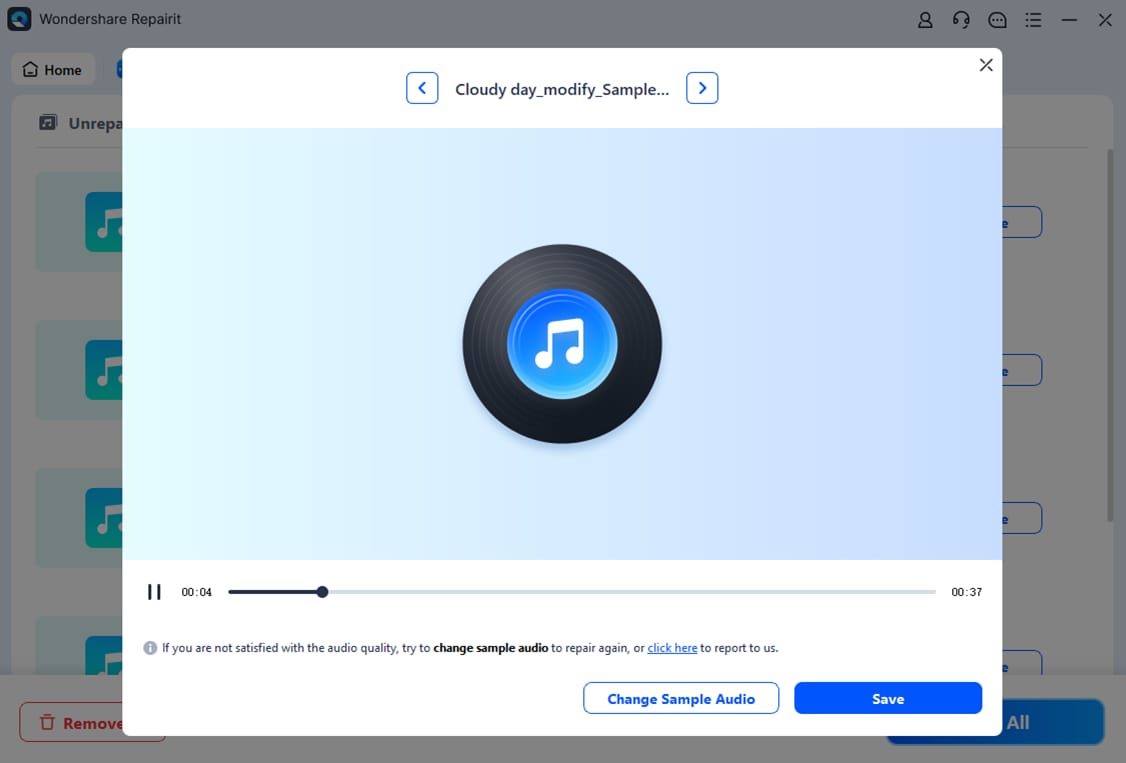
Step 3: Preview and Save Repaired Audios.
As the audio is repaired, it is previewed across the window of the platform. Click on "Preview" to check the results. If you are satisfied with it, click on "Save" to download it locally.
This video can help you fix your audio files with a step-by-step guide.
Fix 6: Make Sure You're Using the Right Audio Output
If you're using headphones or sourcing the device's sound across another peripheral device, the audio output settings are changed automatically according to the conditions. However, you need to check whether the right audio output is selected if you are facing a continuous problem of audio stuttering Windows 10. To check this out, try the following steps in detail:
Step 1: You need to access the "Speaker" icon and right-click on it to select the "Open Sound settings" option.

Step 2: On the next screen, you need to locate the option of "Choose your output device" for selecting the audio output of your choice.
Access its drop-down menu and find the appropriate audio output that you want to select from the list.

Fix 7: Check All Audio Cables and Wireless Connections
Before you lead to more solutions for resolving the audio problems on your Windows 10, there is another unorthodox method for resolving such issues on your devices. Usually, such concerns come up if there are some problems across the audio cables and wireless connections with the device. Keep a check across all connections and set them up properly as some hardware issues may lead to such a problem on your device.
Fix 8: Roll Back or Reinstall Audio Drivers
Another quick and effective technique to resolve audio issues in Windows 10 is to roll back or reinstall the audio drivers installed on your device. This option helps set up the connection between the device and the computer again, leaving out all glitches in the connection. To make sure this executes properly, follow the steps provided below:
Step 1: Click on the "Search" icon on the starting menu of your Windows and search for "Device Manager".

Step 2: As you lead to a new screen, go across "Sound, video and game controllers" and expand the menu.
Find the respective driver and right-click to select "Properties" from the menu.

Step 3: Go across the "Driver" section and click on the "Roll Back Driver" button to revert back to the previous update of the driver for its proper functionality.

Fix 9: Update the IDT High Definition Audio CODEC
If you have the IDT High Definition Audio CODEC installed on your Windows 10, you may need to check for its updates. If the codec is not updated on time, it may lead to issues related to Windows 10 audio not working. To make sure this doesn't happen, go across the steps provided as follows:
Step 1: Click on the "Search" button on the start menu and launch ‘Run.' Type in ‘devmgmt.msc' across the box to run the "Device Manager".

Step 2: Navigate to the "Sound, video and game controllers" section and find the "IDT High Definition Audio CODEC" in the available options. Right-click and select "Update Driver Software".

Step 3: As you lead to a new screen, select "Browse my computer for driver software" to search for the update of this codec.

Step 4: Following this, you need to select "Let me pick from a list of available drivers on my computer".
Find the "High Definition Audio Device" in the next window and proceed by clicking "Next".

Step 5: You will find a warning message where you need to click on "Yes" to proceed with the installation.
This will successfully update the IDT High Definition Audio CODEC driver.

Fix 10: Disable Windows Audio Enhancements
Certain audio settings may become a liability across your Windows 10 device. Under such circumstances, you need to check if audio enhancements are turned on for your computer's audio. If that is the case, it would be better to disable these settings to fix sound problems Windows 10. For this, you need to follow the respective step-by-step process:
Step 1: Find the "Sound" icon on the bottom-right of the system tray and right-click on it to select "Playback devices."

Step 2: Select your default speakers and open their "Properties".
You need to lead to the "Enhancements" tab in the next window. Check the option of "Disable all sound effects" and click "OK" to confirm the settings.

Further Reading:
Fix Laptop Sound Not Working
Google Chrome Has No Sound? Easy to Fix!
Conclusion
This article has provided a comprehensive overview of the issue related to audios on your Windows 10 computer. If you are facing the audio stopped working Windows 10 problem on your device, you need to try out the options available to fix audio Windows 10. Along with carrying out the solutions for the audio settings on your computer, there is a chance that the audio you are using may be unplayable.
To counter this problem, you can utilize Wondershare Repairit for quick and effective results. Repairit enables you to resolve this problem across the audio with the help of a few clicks. We hope that you'll be able to figure out the right solution to this problem on your computer.