

 TL;DR:
To resolve laptop sound issues on Windows 10/11, verify that your volume is unmuted and routed to the correct output device, run the built-in Audio Troubleshooter, and update or reinstall your audio drivers.
● If automatic driver updates fail, manually change the IDT High Definition Audio CODEC to the compatible High Definition Audio Device via Device Manager, or completely uninstall the audio driver and restart the PC to force a clean installation.
● For persistent playback failures, disable all audio enhancements in the default sound device properties or check the disable front panel jack detection setting within the Realtek HD Audio Manager.
● When system audio works but specific media remains silent, the file itself is likely corrupted or missing codecs, requiring a format change or a dedicated repair tool like Wondershare Repairit.
Ask AI for a summary
 ChatGPT
 Perplexity
 Gemini
 Claude
 Grok
Grok
Everything that you operate or play on your laptop has a particular sound that is played through a speaker. The sound played through a laptop is a complete process executed through hardware and software. This leads to the fact that there can be problems where you can have a laptop sound not working issue.
Have you ever opened your laptop to play a video, join an online meeting, or give an important presentation—only to realize there’s no sound? Sound issues can cause many problems for you. For this, the article has put the focus on discussing the reasons and solutions for sound not working on a laptop in Windows 10/11.
Part 1: Possible Reasons That Cause Laptop Sound Not Working
There can be multiple reasons for having no sound on the laptop. Not only does this poke you, but it gets complicated for you to manage the unavailability of sound. To ensure that you can resolve this problem across your laptop, it is important to be aware of the reasons that lead to such a state. We shall look ahead to some potential causes that will explain the problem of audio not working on laptop:
1. Problem with Hardware Devices
The speakers on your laptop or the ones attached to your laptop may malfunction for any reason. This leads you to have no sound across your laptop. The problem can be caused by problems in connectivity or issues with the operation of the hardware.
2. Audio File is Damaged
Rather than looking into hardware issues with the device, there is a chance that the audio files are the source of this problem. If you are not hearing any audio on your device, the audio file itself may be corrupted or damaged, which leads to such a situation.
3. Codecs are Missing
You might face such an issue on your laptop if the supported codecs for the audio file are missing. Under such circumstances, you need to look across other file format options or consider changes across your media player to avoid coding issues while operating sounds.
4. Issues with Audio Driver
There is a clear chance that the sound drivers installed across your computer may be potentially damaged or outdated, which is why they are to be looked over for functioning the audio across the laptop. Resolving audio drivers is important for the resumption of sound across the device.
Part 2: 10 Ways to Fix "Sound Not Working on Laptop" Error
Once you have gone through the details on why sound is not working on laptop Windows 10, we shall now look into some potential remedies that can be tried to troubleshoot the problem across your Windows device. We hope you'll be able to manage the sound issues within the laptop.
Fix 1: Check Your Cables and Volume
The first solution to any user's mind should be simple and effective rather than complex in operability. If you find no sound on laptop, there is a clear understanding that the problem might be as simple as muting your volume output. In other cases, if you've used any external audio device, check if it is firmly connected to the port.
Any unnecessary disconnection and the problem with the cables can directly lead to no volume on laptop, which is only resolvable through properly fitting the cables and wires used in the process. Once you've checked that the cables are connected properly, you should go across the volume settings to check if your volume is not muted. For this, we will advise the following methods as a solution:
Step 1: Find the "Speaker" icon on your desktop's taskbar and right-click on it to select the option of "Open Volume Mixer".

Step 2: With a new window in the display, check if the volume across the device and your application are turned on.
Unmute any sound source that you find across the mixer.

Fix 2: Make Sure You're Using the Right Audio Output
There is a possibility that multiple audio output devices are connected across your laptop. Under such circumstances, checking if you are using the right audio output for this purpose is necessary. For this, you need to click on the "Speaker" icon and tap on the name of the current device to open the menu of other available devices for audio output.
This can be a quick way to change the audio output; however, it does not display the complete list. To find out the complete list of available audio outputs, you need to proceed with the following steps:
Step 1: Right-click on the "Speaker" icon on the taskbar to open a drop-down menu.
Select "Open Sound Settings" in the available options to lead to the sound settings of your Windows 10/11 laptop.

Step 2: Lead into the next menu by clicking on "Manage sound devices".
Then you can find across the "Output" section. With the new window on your front, select any particular sound output to check if it is not unnecessarily disabled. If it is, select the audio output and click "Enable" to shift to the right audio output.

Fix 3: Restart Your PC After Upgrade
You might have recently upgraded your Windows 10/11 software, which may have led to issues with your device's sound. While you have it upgraded, you must restart your Windows device to properly install all updates so that it does not leave behind anything that damages processes, such as your device's sound.
If you want to resolve issues such as no sound on laptop, you should consider restarting your laptop as follows:
Step 1: Click on the "Start" menu on the left-most side of the taskbar to open a navigation pane.

Step 2: Select the "Power" icon across the bottom-left button and click on "Restart" to restart your PC after an upgrade.

Fix 4: Use Audio Repair Software
What if the problem lies across the audio file rather than the hardware or software of your laptop? If the audio file is corrupted itself, there is an apparent problem with the file that needs to be resolved through an audio repair program.
Wondershare Repairit provides its users with a progressive solution in the form of an audio repairing tool, which is quick and effective and provides users with high-quality results.

Wondershare Repairit - Audio Repair
 Security Verified. Over 7,302,189 people have downloaded it.
-
Repair damaged audios with all levels of corruption, such as audio not working, clipping audio, humming audio, rumbling audio, sibilant audio, out-of-sync audio, etc.
-
Repair audios of diverse formats, including MP3, M4A, FLAC, AAC, WAV, etc.
-
Repair damaged or corrupted audio from multiple devices: portable voice recorder, recording software, shooting apparatus, SD cards, phones, hard drives, USB flash drives, etc.
-
Support Windows 11/10/8/7/Vista, Windows Server 2003/2008/2012/2016/2019/2022, and MacOS 10.13~MacOS 15.
Go through the steps to know more about the process of repairing audios on Wondershare Repairit to get rid of the laptop audio not working problem:
Step 1: Import Corrupted Audio
Launch Wondershare Repairit on your Windows 10/11 laptop and access the "More Types Repair" feature from the left, then click Audio Repair. Next, click on "+Add" to import the corrupted audio file into the application.

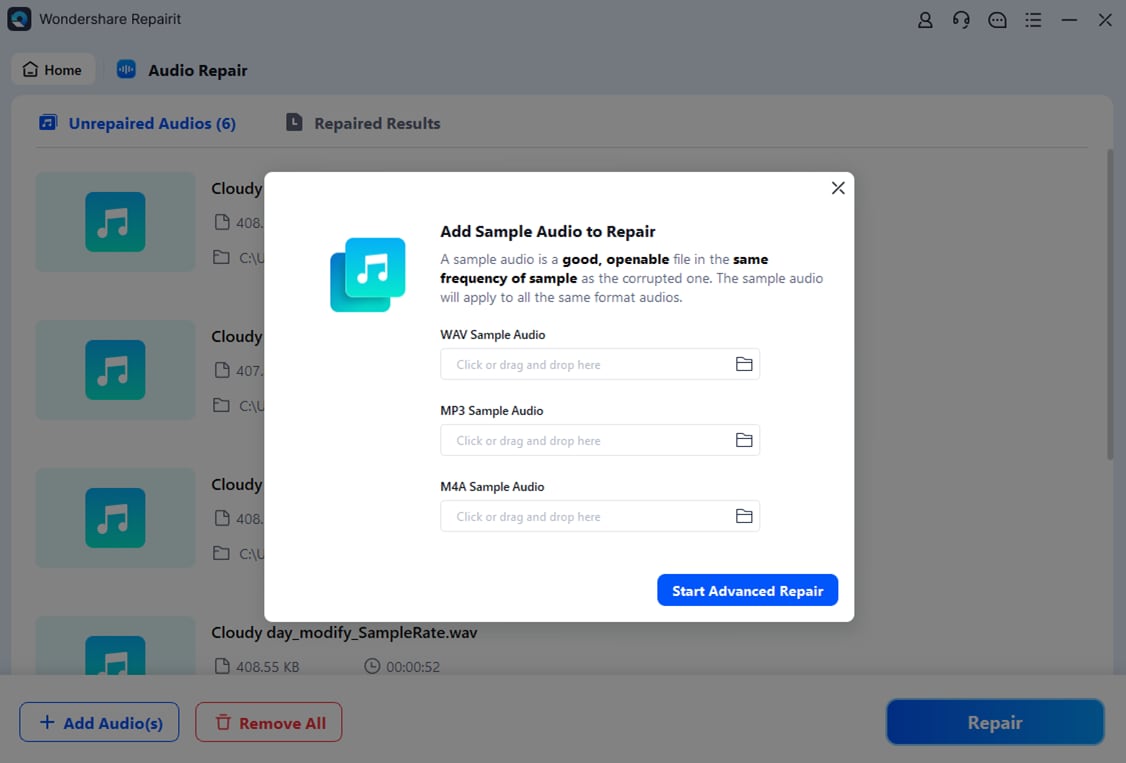
Step 2: Provide Samples and Repair
As you click on "Repair," a new window opens, demanding an audio sample for the process. Add the same format sample file and click "Start Advanced Repair" to initiate the process.
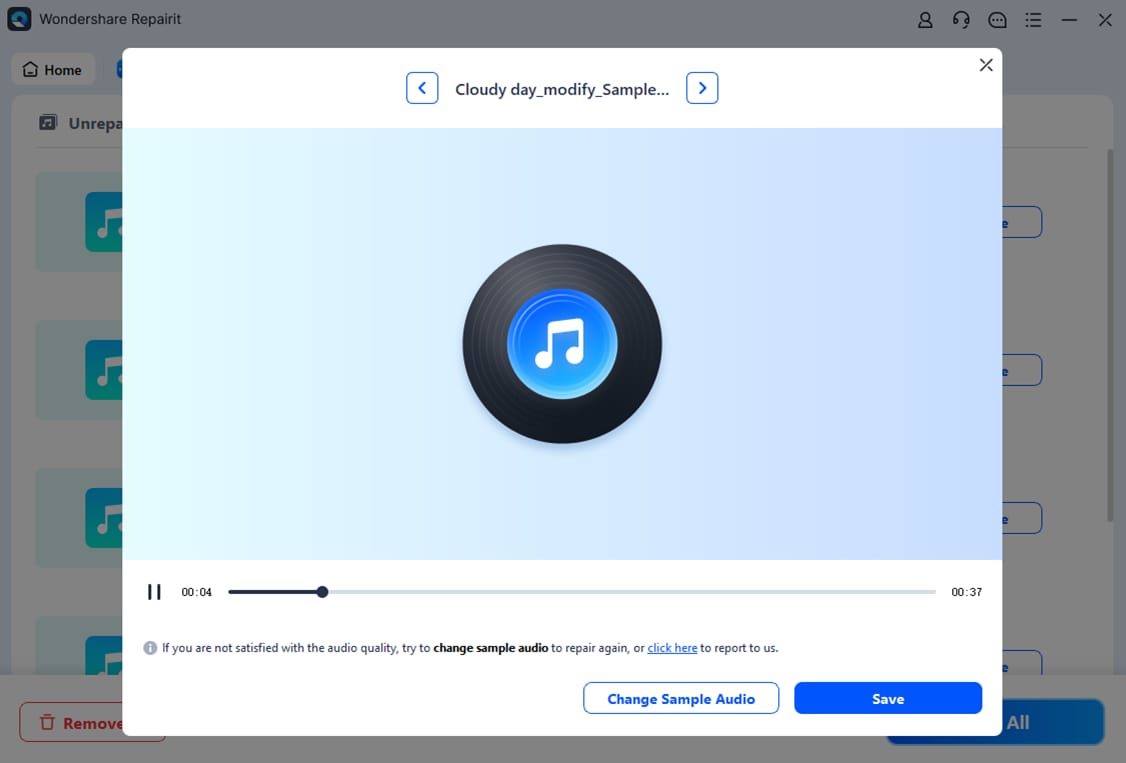
Step 3: View and Export
Once the process concludes, you can view the repaired audio on the new window by clicking on the "Preview" button. Tap on "Save" if you are satisfied with the results.
Fix 5: Run the Windows 10/11 Audio Troubleshooter
Another quick solution that can essentially resolve the issue of sound not working on laptop is through the audio troubleshooter. Being a Windows 10/11 user, you can run the troubleshooter to discover the problem leading to no sound on the laptop. Using the troubleshooter returns you with the perfect results for the problem across your computer if appropriately detected. Try out the following steps to know more about the process:
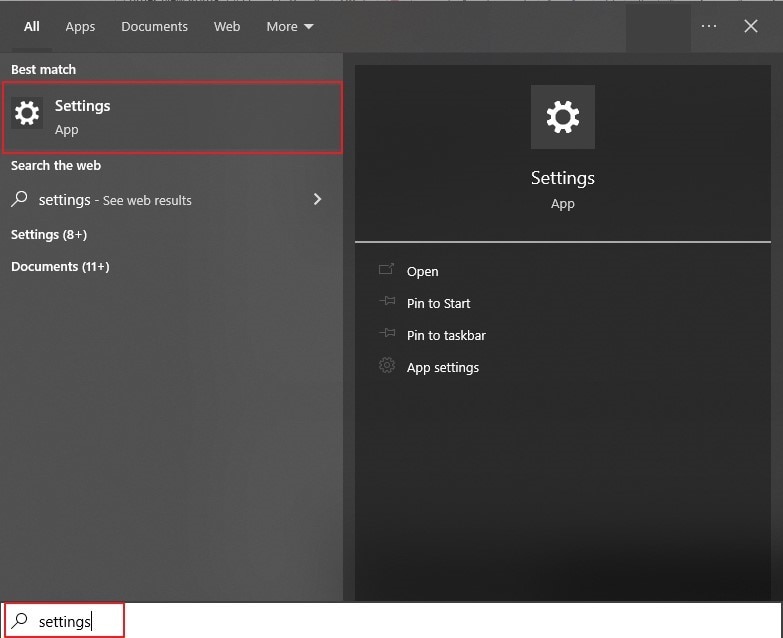
Step 1: Click on the "Search" icon on the taskbar and type in "Settings" to open the main settings of your Windows 10/11 laptop.
Step 2: Lead into the "Update & Security" section from the left panel and locate the "Troubleshooter" option in the list.

Step 3: On the next screen, click on the "Additional Troubleshooter" option.
And locate the "Playing Audio" troubleshooter option in the list. As you click on the "Run the troubleshooter" button, you can resolve the sound issues across your Windows 10/11 laptop automatically.

Fix 6: Update Your Audio Driver
Audio drivers can be a problem that can lead to such sound problems across your laptop. While using Windows 10/11, you should update your audio driver under such circumstances to avoid such sound problems. Updating the audio driver outcasts all outdated settings and bugs that may essentially lead to laptop has no sound issue. Follow the steps to learn how to perform this procedure:
Step 1: Use the "Windows + X" shortcut keys to open a menu with different system settings on your front.
Next, choose the "Device Manager" to launch it in a new window.

Step 2: Lead to the "Sound, video and game controllers" for accessing the specific audio drivers.
As you expand and find the specific audio driver, right-click on the driver and select the option of "Update driver."

Step 3: On the next window, you need to specify the option of "Search automatically for updated driver software" to access the updated driver automatically from a respective source.

Fix 7: Update the IDT High Definition Audio CODEC
If you have the specific IDT High Definition Audio CODEC drivers installed across your Windows 10/11 laptop, they can be a clear reason why there is no sound on your device. If the defined drivers are not up-to-date, you might face such problems. To avoid the issue of laptop audio not working with the IDT High Definition Audio CODEC, follow the steps to update it successfully:
Step 1: Use the "Windows + S" shortcut key combination to open the search bar automatically and type in "Device Manager" to open it.

Step 2: Proceed to the "Sound, video and game controllers" and spot the specific IDT drivers in the list.
You have to right-click and choose "Update Driver" from the displayed sub-menu. As a new window opens, select the option of "Browse my computer for drivers." As you have access to the updates of the drivers, opt for the "Let me pick from a list of available drivers on my computer" option.

Step 3: For the next step, you must ensure that the "Show compatible hardware" option is checked.
Select the "High Definition Audio Device" in the "Model" tab and proceed by clicking "Next" to install the driver successfully.

Fix 8: Uninstall and Reinstall your Audio Driver
Updating audio drivers can be a solution that you can consider to resolve the laptop sound problem. However, if the sound problems across your Windows 10/11 do not resolve regardless of updating audio drivers, it is best to try out the uninstalling and reinstallation process for optimal results. Follow the steps defined as follows to successfully uninstall and reinstall your audio driver:
Step 1: Use the "Windows + R" shortcut key to open the Run program and type in "devmgmt.msc" to open Device Manager in a new window.

Step 2: Proceed into the "Sound, video, and game controllers" section in the list of drivers.
And right-click across the audio driver to select the option of "Uninstall device." As a new pop-up window opens, confirm the process by clicking on "Uninstall."

Step 3: Restart your Windows 10/11 laptop and re-access the "Device Manager."
As you open it on your front, right-click on the name of the machine and select the option of "Scan for hardware changes" to automatically search for the missing audio drivers. If this does not install the driver, you can download them from the manufacturer's website.

Fix 9: Disable the Front Panel Audio Jack
Do you want to desperately resolve the audio not working on laptop issue on your device? If the solutions are not resolving the problems across your laptop, you should consider accessing your respective audio managers. If you have the Realtek drivers installed across your laptop, you can consider disabling the front panel audio jack option from the settings. For that, look across the steps provided below:
Step 1: Use the "Windows + S" key to access the Search option. Type "Realtek HD Audio Manager" to open the platform on a new window.

Step 2: As a new window opens, proceed to the "Folder" icon on the top-right section of the screen. This opens up the "Connector Settings".
Step 3: You need to check the box showing "Disable front panel jack detection" option to resolve the sound problems on your Windows 10/11 laptop.

Fix 10: Disable Windows Audio Enhancements
Audio enhancements can produce many problems for the users if not managed properly. The audio output source you are using might have the option enabled for enhancing audio quality. This usually leads to multiple problems on your device, which includes the problem of sound not working on laptop. Thus, to avoid this, you should consider disabling the option by following the steps provided as follows:
Step 1: Right-click on the "Speaker" icon on the taskbar to select the option of "Sounds" across the sub-menu. Access the "Playback" tab across the new window.

Step 2: With all playback devices displayed across the window, select the default sound device and right-click on it to access the "Properties" option.

Step 3: You need to navigate across the "Enhancements" tab in the next window.
Check the option of "Disable all enhancements" and click on "Apply" to make changes.

Part 3: Tips to Maintain Your Laptop
The sound problem is one of the many problems that can occur across your Windows 10/11 laptop if it is not managed properly. The only way to save yourselves is by maintaining your laptop by following multiple tips. Although there is too much to look into, we have mentioned some important tips that you should consider for maintaining your Windows 10/11 laptop:
- Clean all the vents and speaker outputs on the laptop so that no dust or other particles get stuck.
- Clean out the ports of your laptop that are used to connect to different audio sources and devices.
- Remove all unwanted programs to free out the space across your Windows so that it does not malfunction with the required updates across the laptop.
- Keep all programs, drivers, and software on your computer up-to-date in all cases.
- Make sure that your Windows is updated at all times.
Conclusion
Have you gone through the details provided to resolve the laptop sound not working Windows 10/11? With the list of different solutions to try, you can ensure that your laptop's sound never malfunctions. After solving the main issues, just try the 5 provided tips to ensure you never get stuck in this miserable situation.
People Also Ask
-
Why is my laptop sound not working on Windows 10/11?
Laptop sound may stop working on Windows 10/11 due to muted volume, outdated or corrupted audio drivers, hardware connection issues, or system updates. Checking these basic settings usually solves the "sound not working on laptop" problem quickly. -
How do I fix laptop audio not working if basic settings don't help?
If your laptop audio is still not working after checking drivers and volume, the issue may be with corrupted sound files. In such cases, using a professional repair tool like Wondershare Repairit can help fix damaged audio files and restore sound instantly. -
What is the easiest way to fix 'no sound on laptop' issues?
The easiest way is to start with basic checks: make sure your laptop isn’t muted, test headphones/speakers, and update your audio drivers. For Windows 10/11, running the built-in audio troubleshooter is also effective for quick fixes.