

 TL;DR:
You can blur photo backgrounds manually on iOS and Android by adjusting the f-stop or blur slider on images captured in Portrait mode, or utilize third-party applications for prompt-based, RAW, or AI-assisted editing.
● Native background editing in iPhone and Android galleries strictly requires the original photo to be captured in "Portrait" mode prior to modifying the blur intensity.
● Snapseed is best suited for users needing to refine RAW files with manual lens ratio adjustments, while Fotor and Canva are limited by internet dependency and premium asset paywalls.
● Achieving a natural in-camera blur effect requires shooting with a wide aperture (low f-number) and maximizing the physical distance between the focused subject and the background.
Ask AI for a summary
 ChatGPT
 Perplexity
 Gemini
 Claude
 Grok
Grok
A good photo grabs the attention of the subject and keeps the viewer's focus where it needs to be. When there is a lot of distraction in the background, even a well-timed shot can lose impact. Learning how to blur the background of a photo helps you create a clean, soft, and balanced image.
This simple technique makes portraits look polished and gives outdoor pictures a calm, professional look. In the next manual, you will find easy ways to blur out the background on photos with ease and precision.
Table of Contents
Part 1. How to Blur the Background of a Photo on iPhone/Android [Manually]
Smartphone users have always looked into making their photos look impressive with background blurs. While many have been aware of this method for quite a while, several iPhone and Android users still have no idea how to process it. This section intends to cover the manual techniques of how to blur a photo on an iPhone and Android:
1. For iPhone
Portrait images can be easily adjusted across the Photos App of your iPhone. Once captured, you can edit it across its dedicated editor and make changes to the "f-stop" value to induce background blur within the image. Provided next is a simplified guide to help iPhone users add background blur to their portrait photo:
Step 1. Once you open the "Camera" app, capture a "Portrait" image and navigate into your Photos gallery.
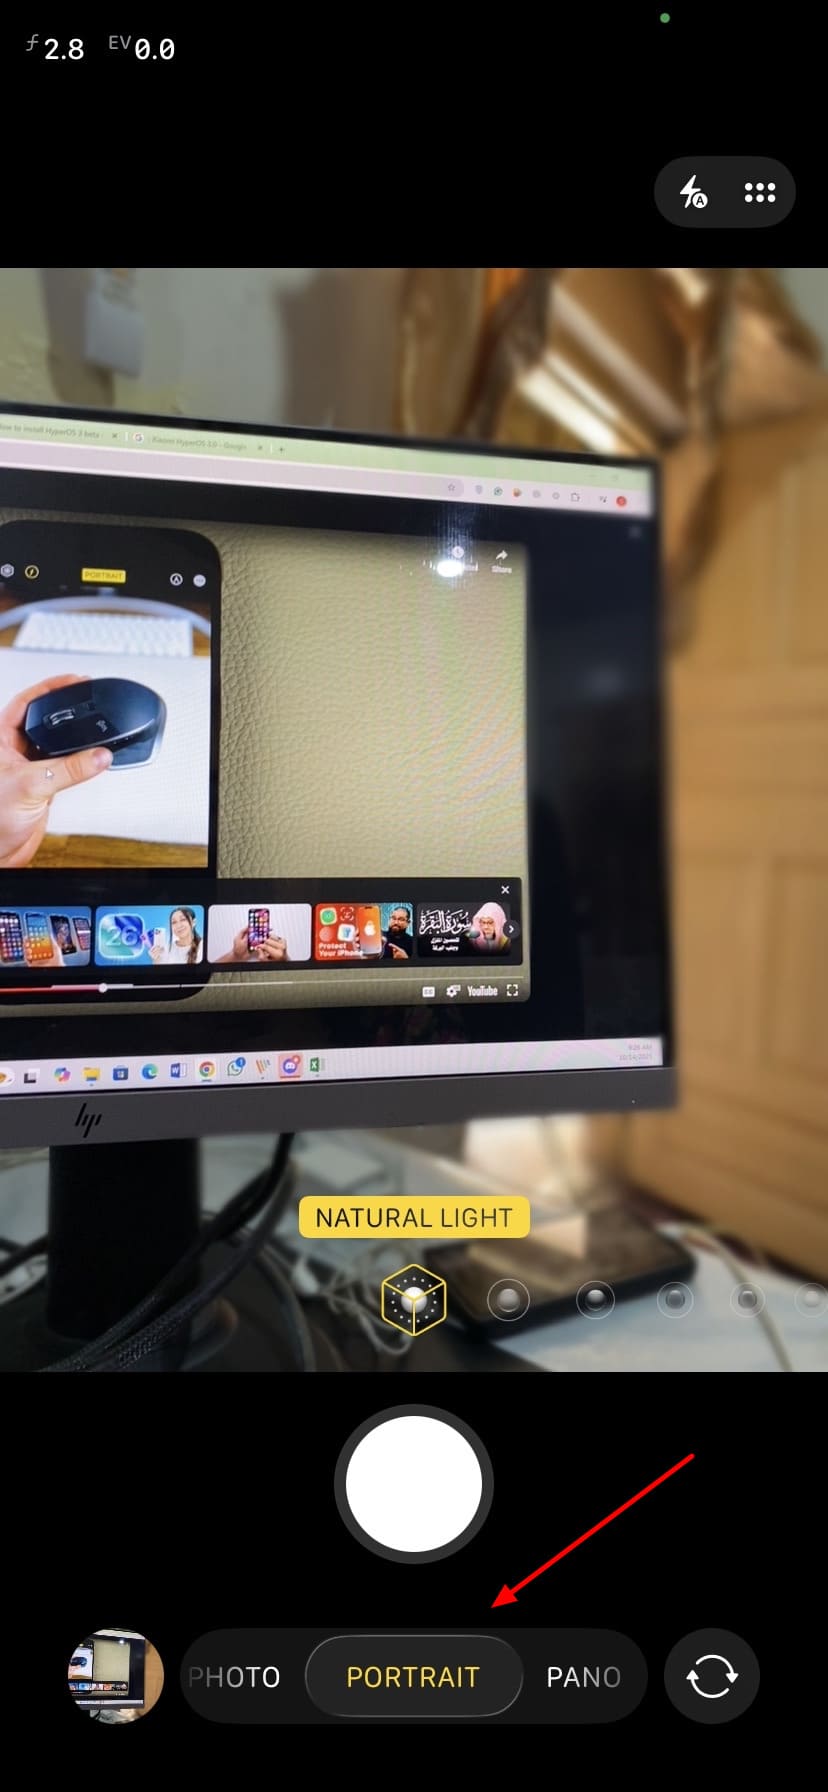
Step 2. Choose the "Adjust" icon at the bottom of the editing interface to start editing the image across your iPhone Photos App.
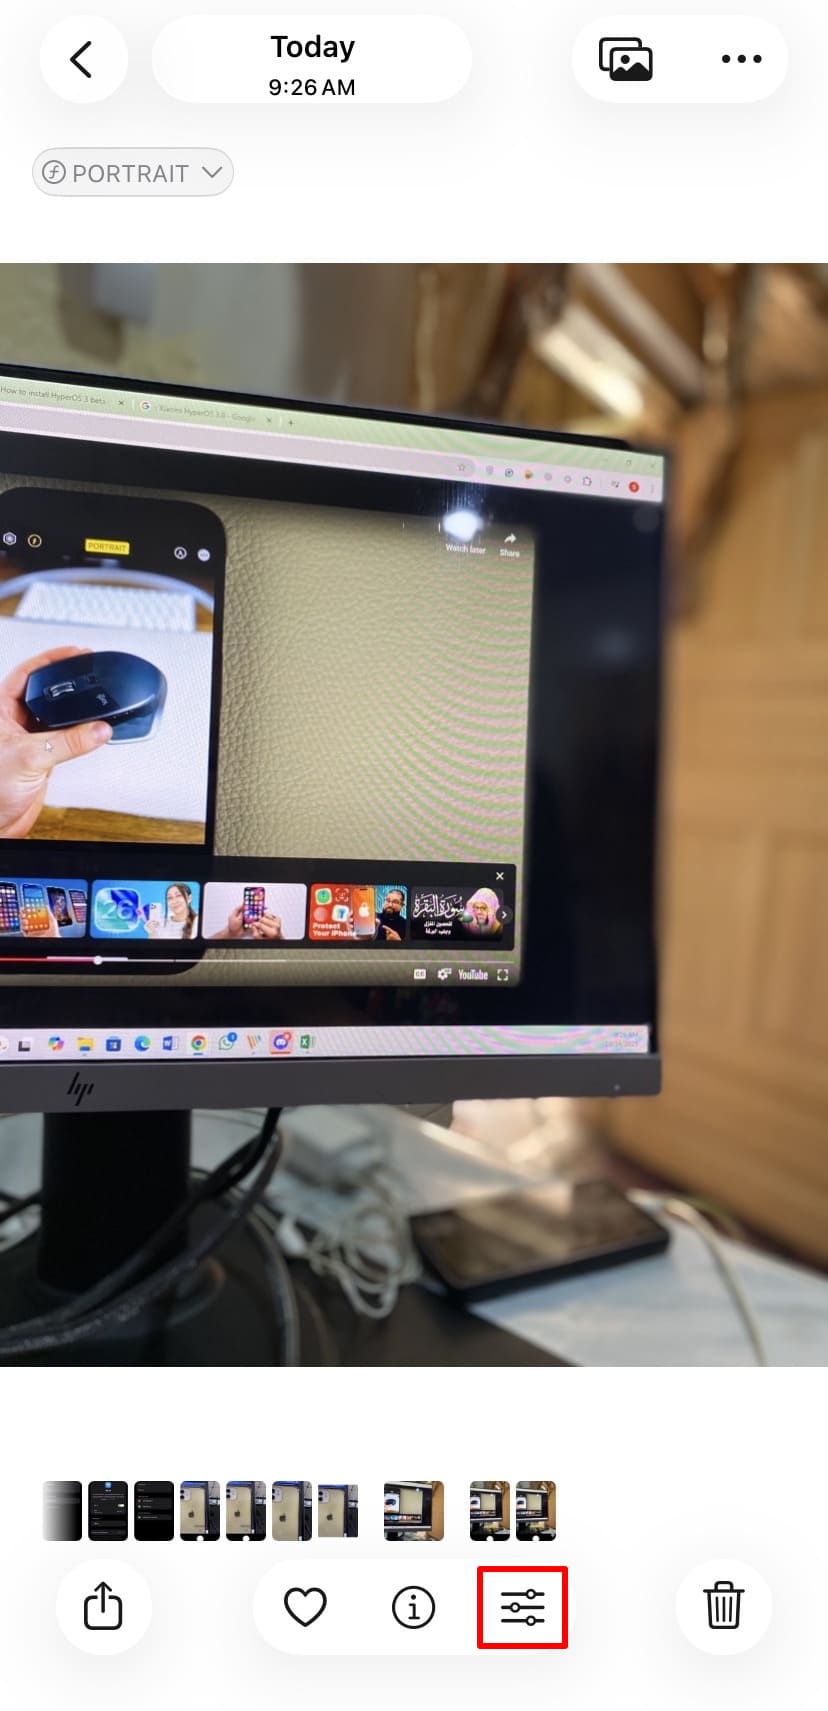
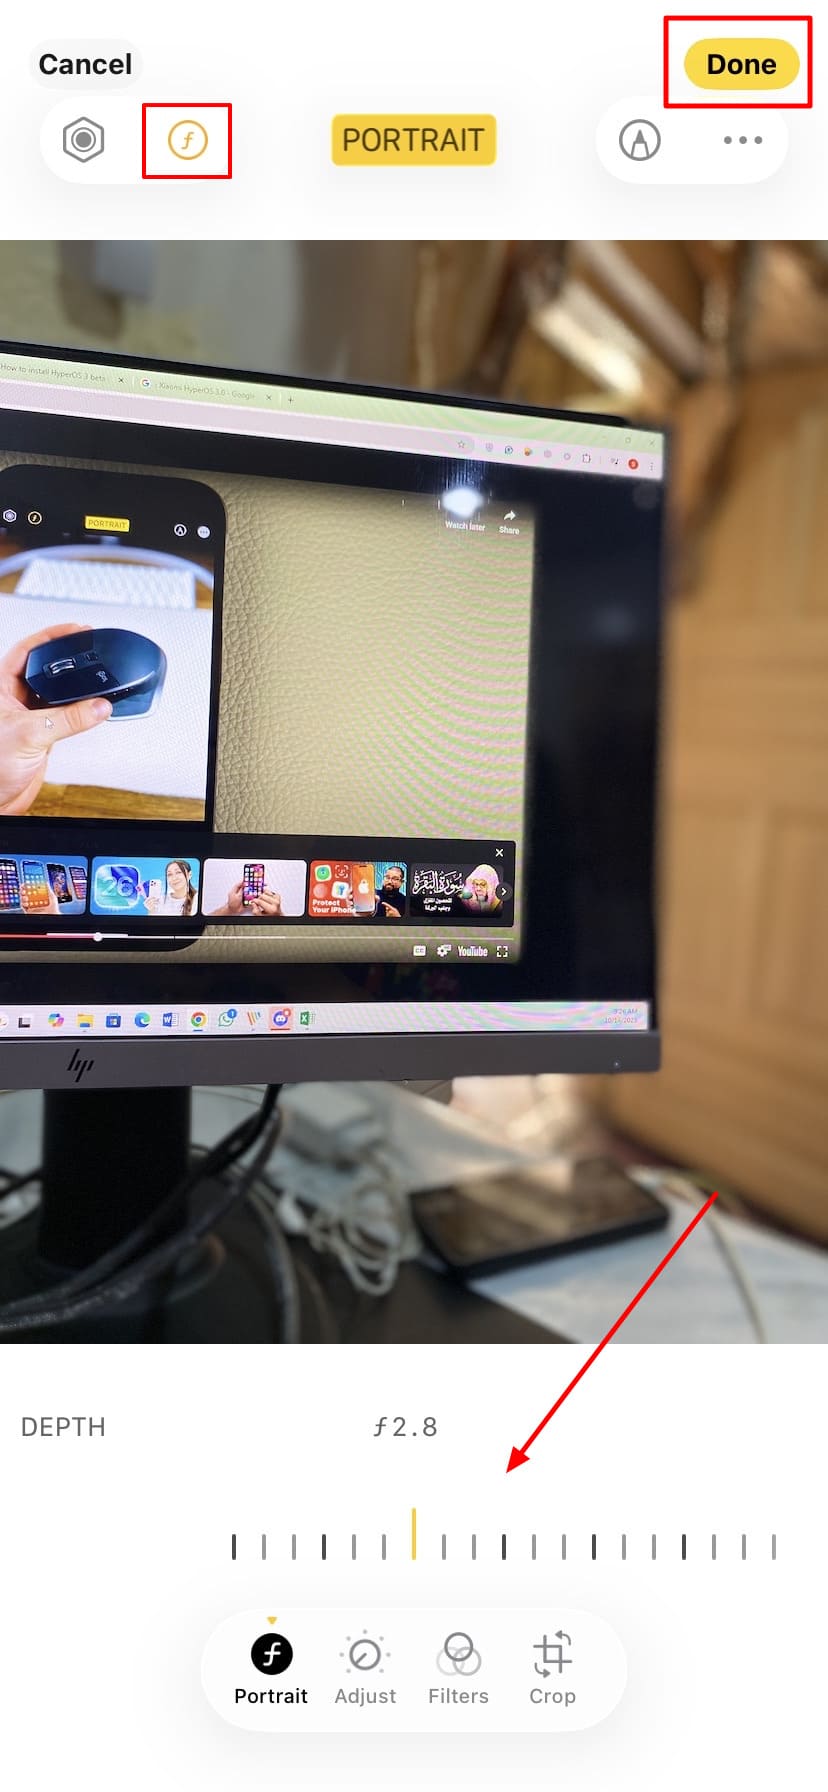
Step 3. Enable the "F-Stop" icon on the top-left and adjust its value using the slider on the bottom. Once edited, use the "Done" button on the top-right to save the results.
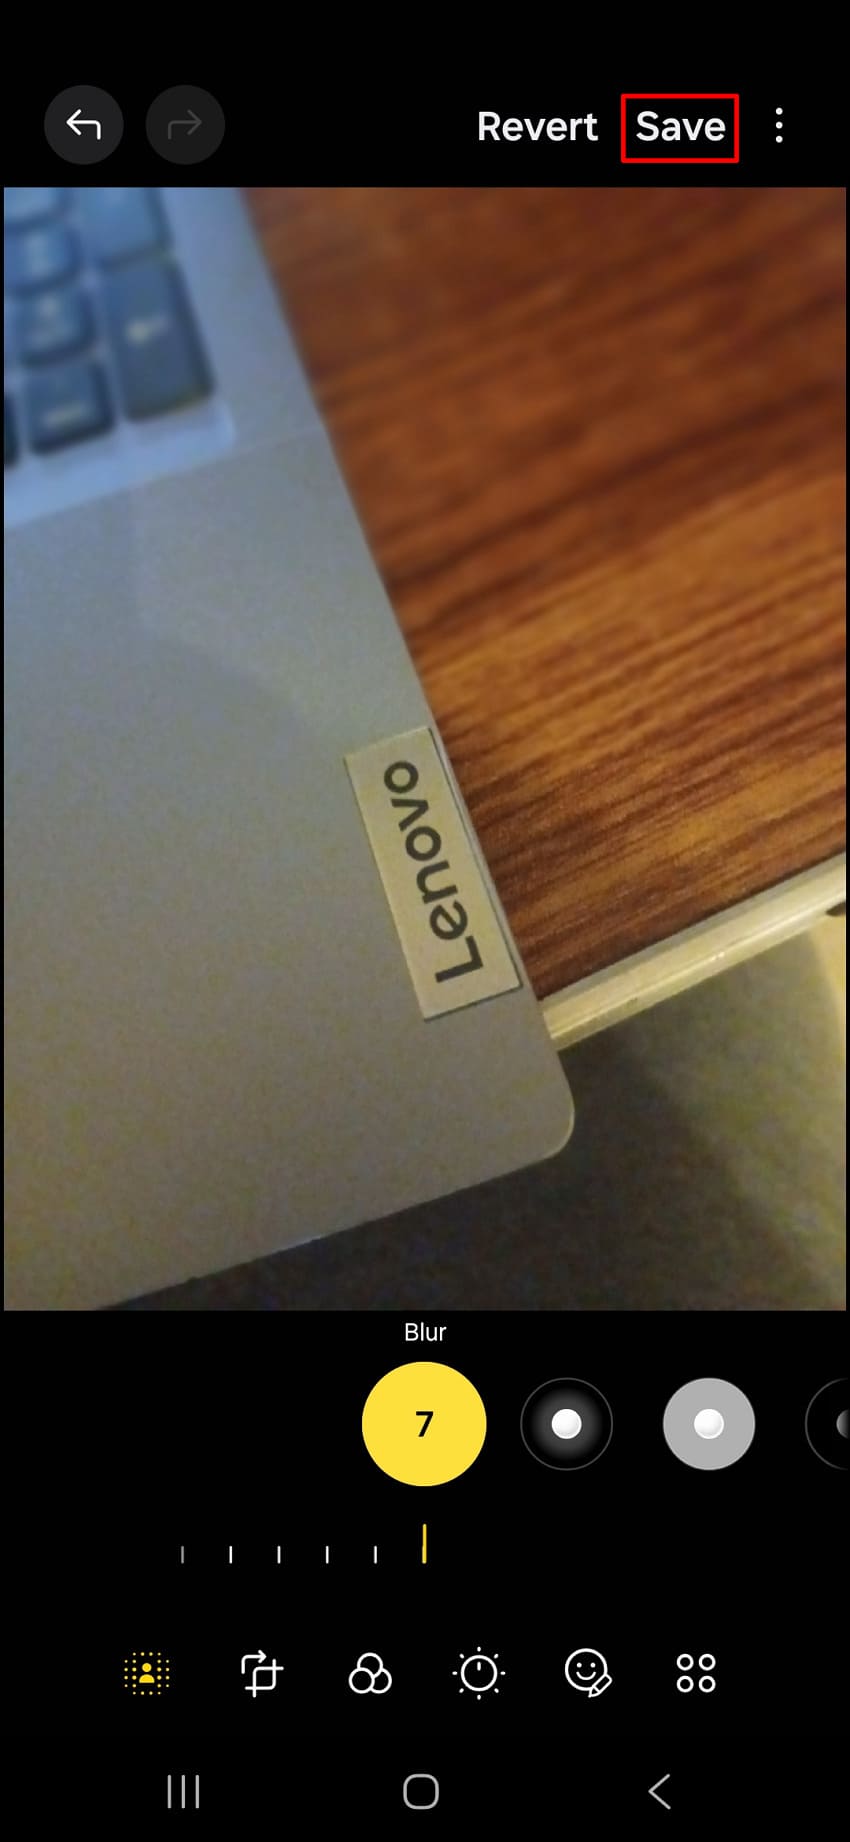
2. For Android
While you've learned how to blur a picture on an iPhone, Android users can have a similar option to make the best out of their images. The following are the steps on how to blur an image background on an Android:
Step 1. After capturing a "Portrait" image, open it up in the gallery and tap the "Edit" icon.

Step 2. Once in the editing interface, look for the "Background Blur" icon and enable its settings.
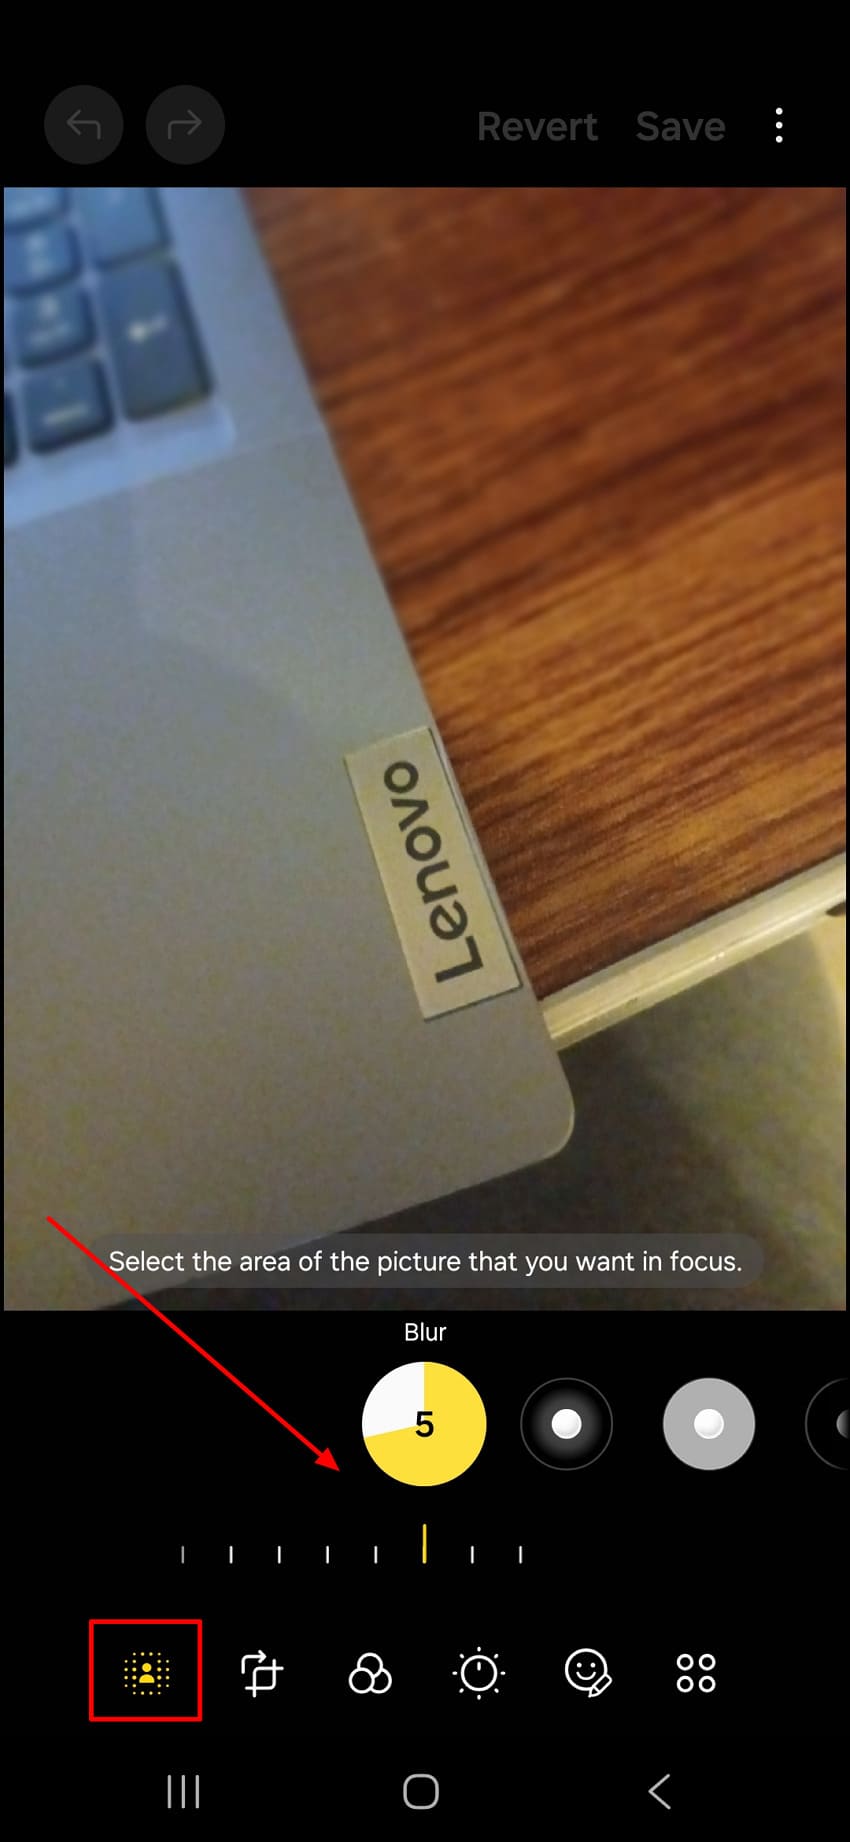
Step 3. Adjust the background blur using the slider and tap across the position where you want to focus on the image. With the changes done, hit the "Save" button at the top to conclude the process across your Android.
Part 2. How to Blur the Background of a Photo Using Apps
While iPhone and Android provide dedicated options for blurring backgrounds, they are not exceptionally accurate. When it comes to how you blur a photo to perfection, a third-party app is best suited for this case. In this section, we'll cover the best apps for iOS and Android users, making background blur an easy task.
1. Repairit App [Android/iOS]
Starting with the most reliable app for Android and iOS users, Repairit App helps blur the background of a photo using the easiest options. With its provisional Text-to-Edit feature, you only require a simple prompt to make noticeable changes to your imported photo. This application features a straightforward interface, allowing users to view the before and after versions of their pictures in the most convenient way.
Along with this textual editing method, Repairit App offers several other functions that make it a go-to option for image editing. You can bring the finest results with a few words across this app, including a dedicated corrupted photo repair option to deal with damaged images.
Key Features
Repairit Al Photo Enhancer
Edit Photos with Words, Create Magic with Al
 Text-to-Edit: Describe it, AI repairs, enhances & colorizes instantly.
-
Memory Revival: Restore old photos, fix scratches & blur, relive details.
-
Creative Freedom: Remove objects & turn ordinary shots into unique stories.
-
Universal Recovery: Rescue corrupted photos from 2,000+ devices & RAW formats, all securely processed.
Detailed Guide to Blur Background of a Photo With Repairit App
Step 1. Access Text to Edit Feature in Repairit App
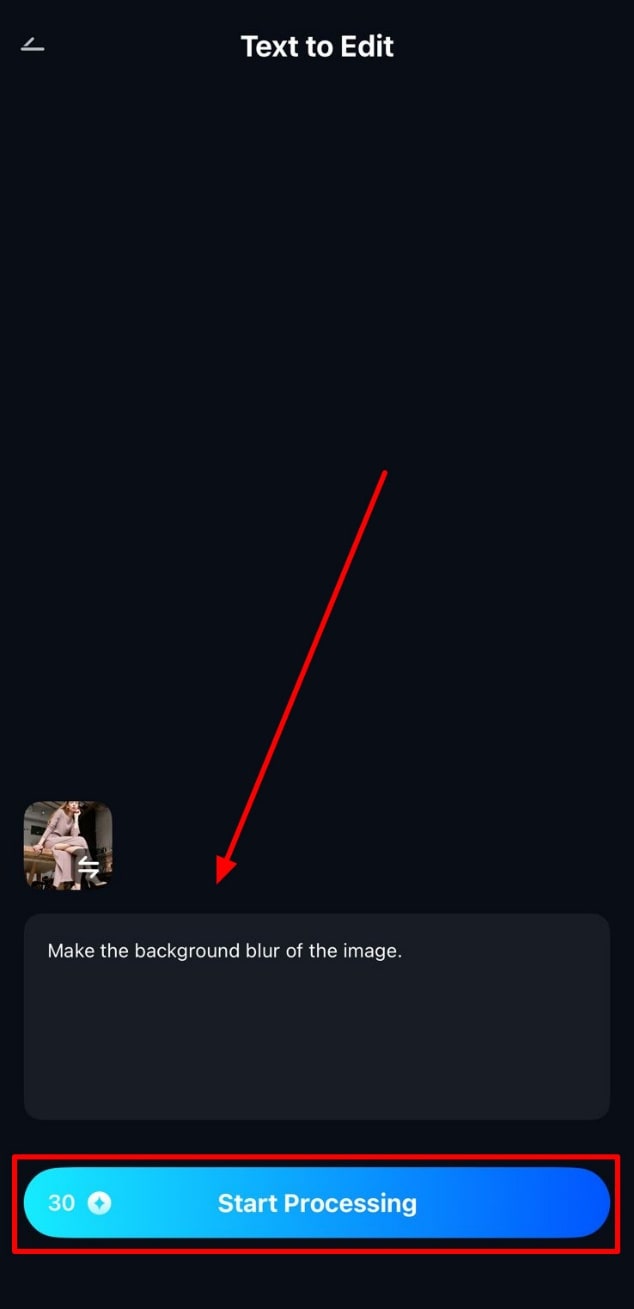
To start the process, launch the Repairit App and access the "Text to Edit" option within the homepage.
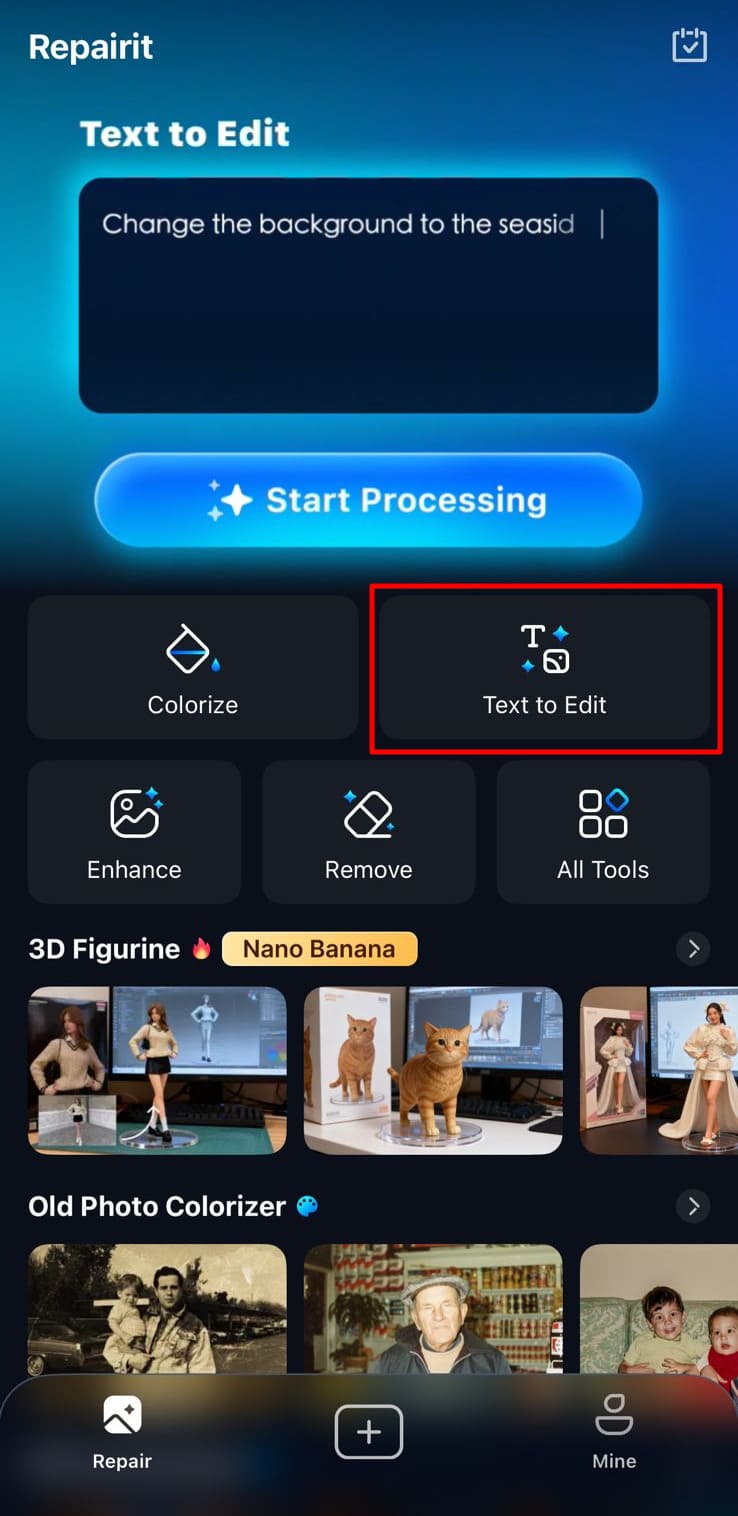
Step 2. Add Prompt to Blur Background
Once you've imported your base image, add in the instructions within the "Prompt" section and hit "Start Processing" to initiate changes.
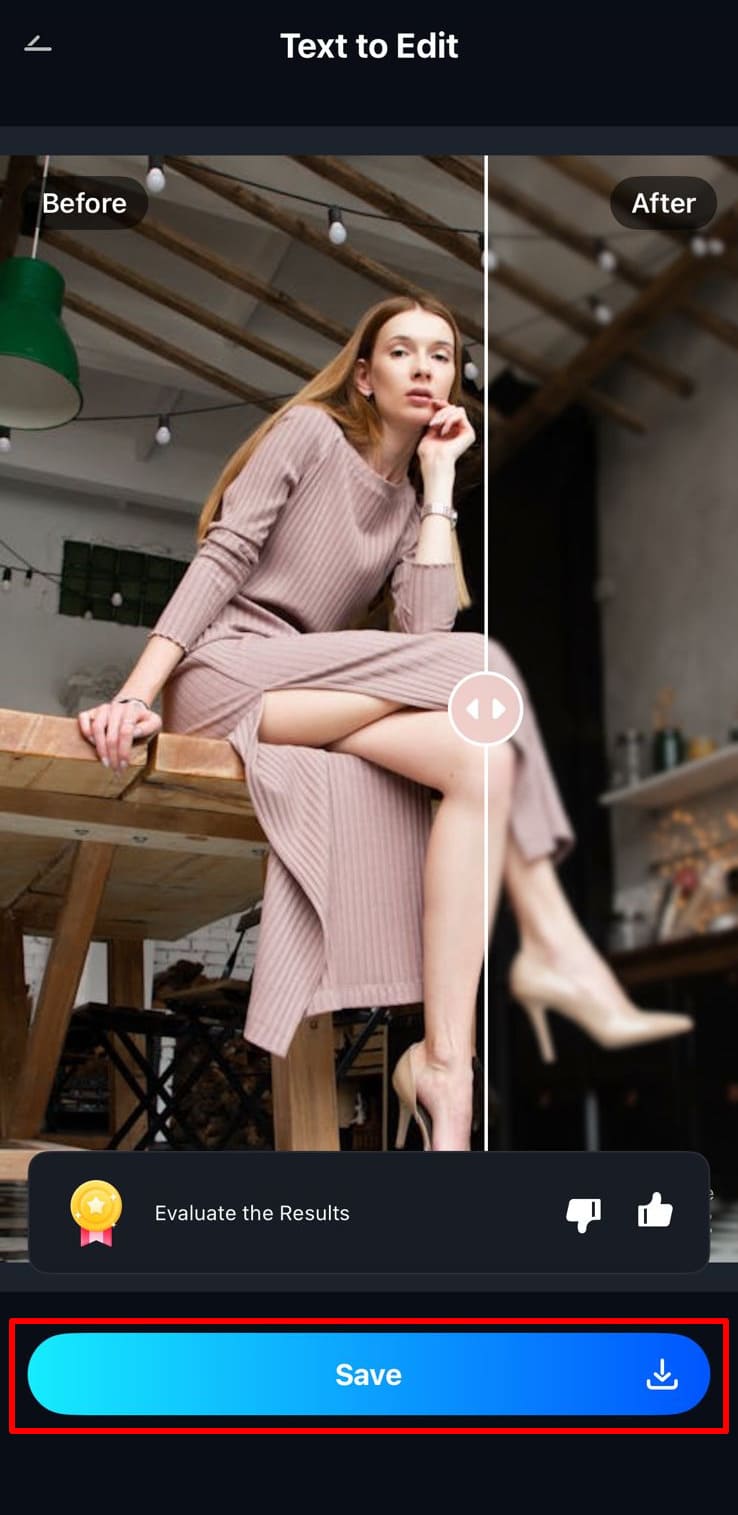
Step 3. Compare and Save Blurred Background Image
With the results on the front, compare the before and after results using the available slider. If you are satisfied with the blurred background image, press "Save" to conclude.
2. Fotor [Android/iOS]
It is a basic photo editing app that will make you enhance images without any effort. You are able to blur the background, change brightness, or place filters according to your style. Besides, the app can correct colors and details in seconds with the help of innovative tools.
It functions well on both mobile and desktop, and therefore, without trouble, one can create clean and professional-looking pictures anywhere. The following is a detailed guide on how to blur pics on iPhone and Android using Fotor:
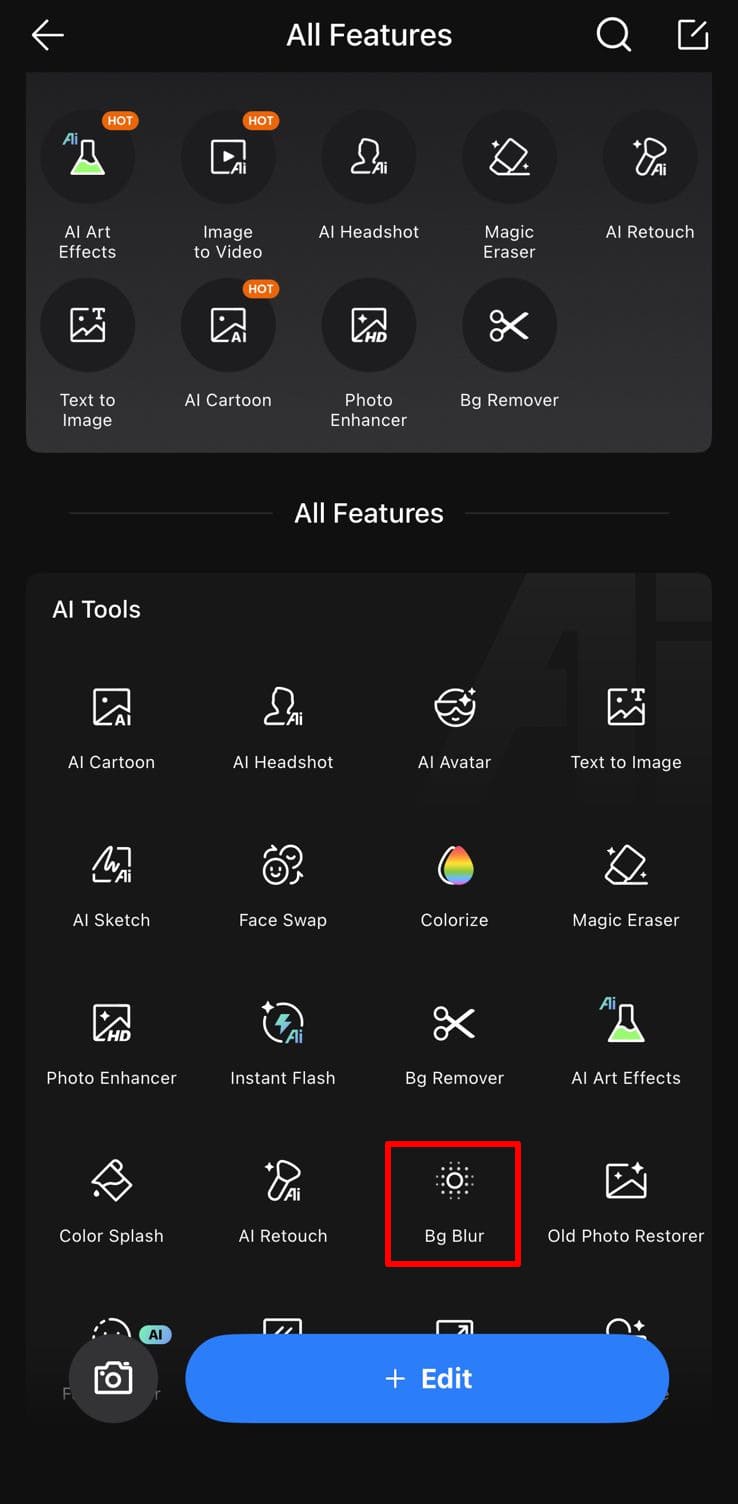
Step 1. Upon launching Fotor, press the "More" tab across the tool's list to move deeper into it. Look for the "BG Blur" tool and tap on it to import your image.
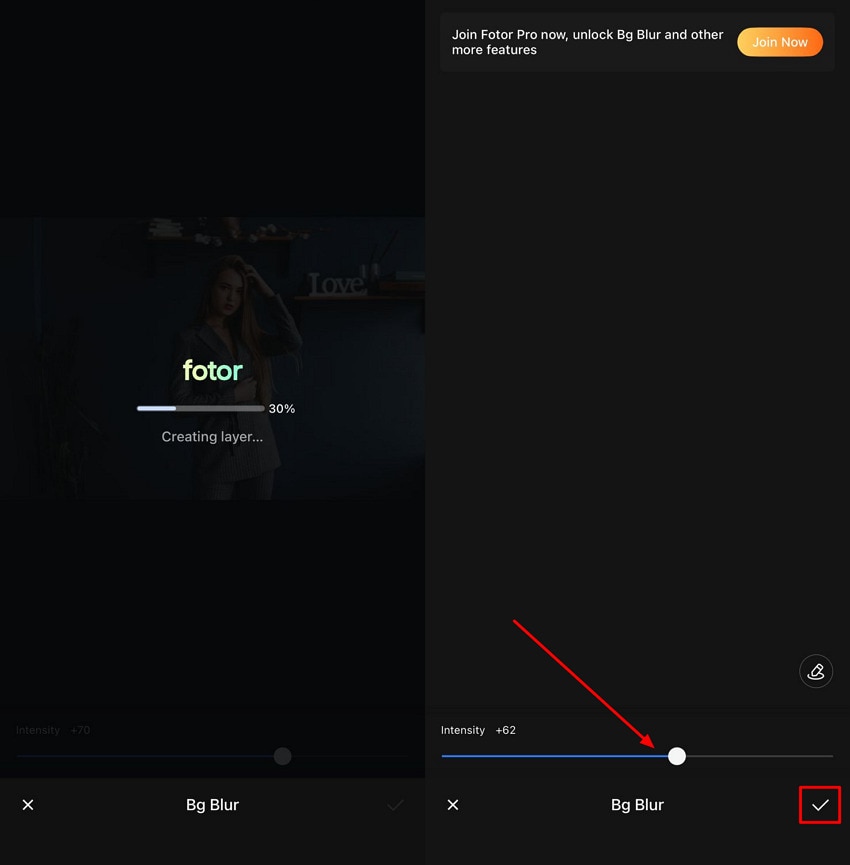
Step 2. After importing the image, Fotor automatically starts processing it for adding background blur. Once the image is processed, use the "Intensity" slider to adjust the background blur and hit the "Tick" mark to proceed towards saving it.
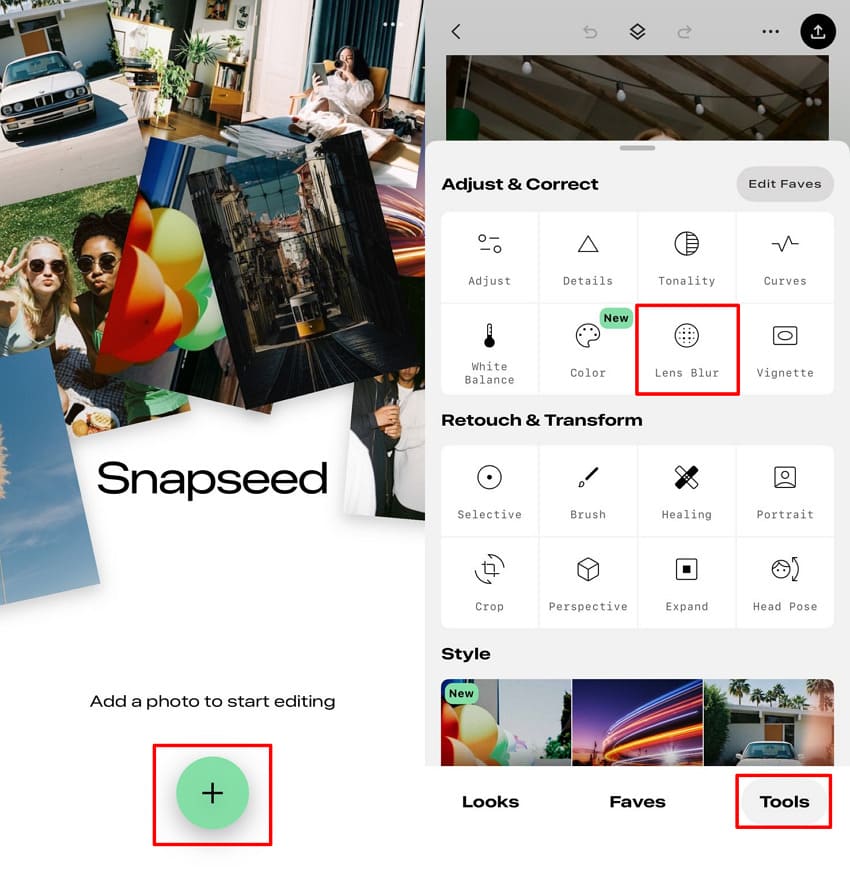
3. Snapseed [Android/iOS]
Snapseed by Google is a product that allows you to have complete control over your images, but it is also easy to use. The Lens Blur button provides a soft focus effect that puts your subject into focus. Light, contrast, and color can be changed using smooth sliders.
It also allows RAW files, which assist a photographer with refining the image and preserving all the details as natural. Look ahead to figure out how to blur a picture on iPhone or Android using Snapseed:
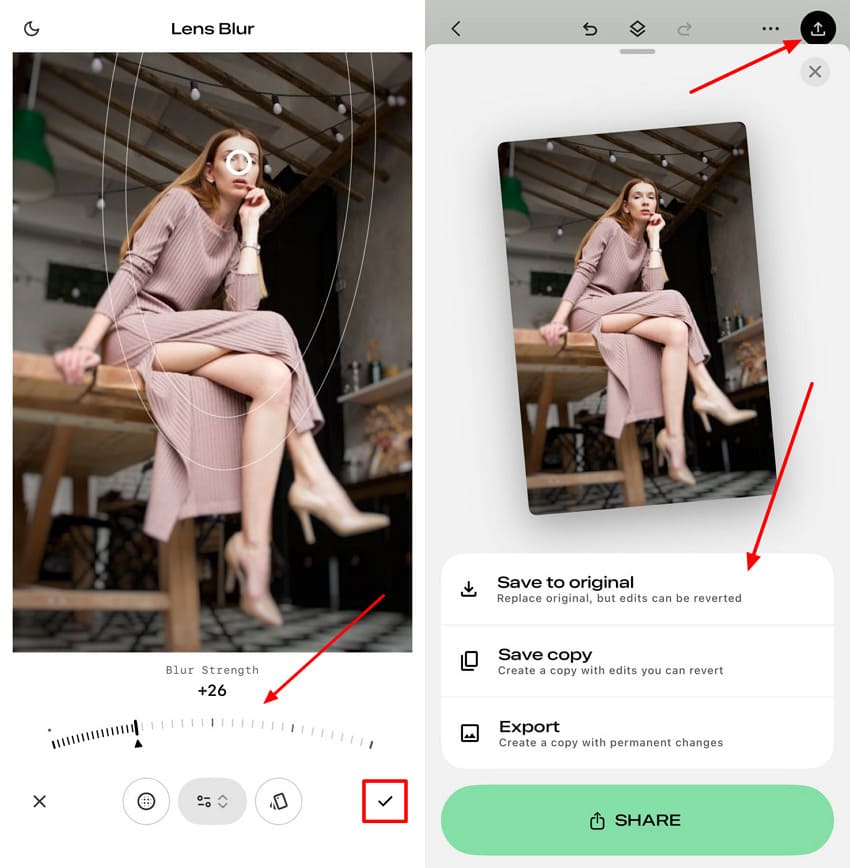
Step 1. As you launch Snapseed, tap the "+" icon to import your raw image. With the image imported, expand the "Tools" section on the bottom-right and choose "Lens Blur" from the available options.
Step 2. While Snapseed automatically applies the filter, adjust the "Intensity" using the slider and the lens ratio with simple pinching. Once you're done editing, hit the "Save" icon and export the results.
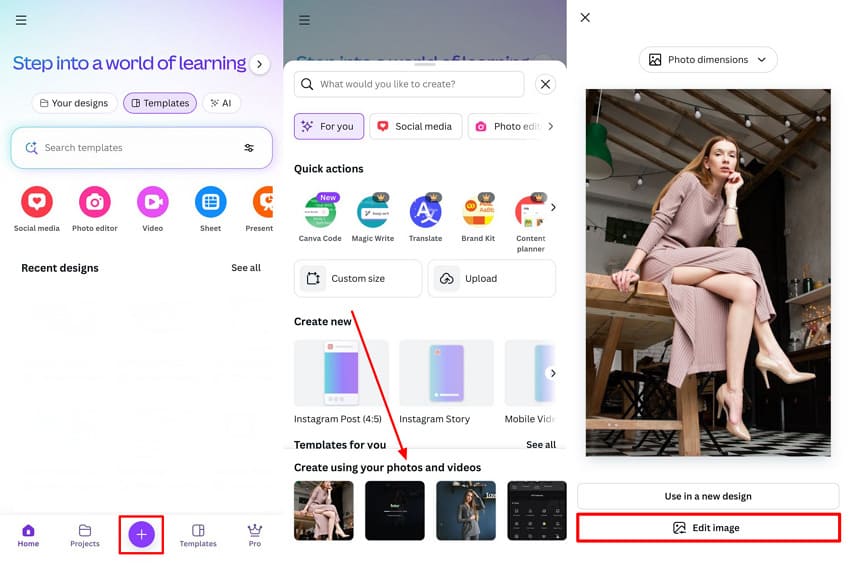
4. Canva [Android/iOS]
Being a free design platform, Canva can be used to create and edit photos easily. You have the option of blurring the background, adding text, or applying any filters to suit your idea. Its easy drag-and-drop features enable it to be simple to create designs that are social media, poster-based, or product-based.
Canva can be used by any person who wishes to receive fast outcomes without having to be trained as a designer. The following are the steps to figure out how to blur background of a photo with the help of Canva:
Step 1. After launching Canva, tap the "+" icon at the bottom and continue adding your image. With the image selected, you will be redirected to a new window where you have to select "Edit image."
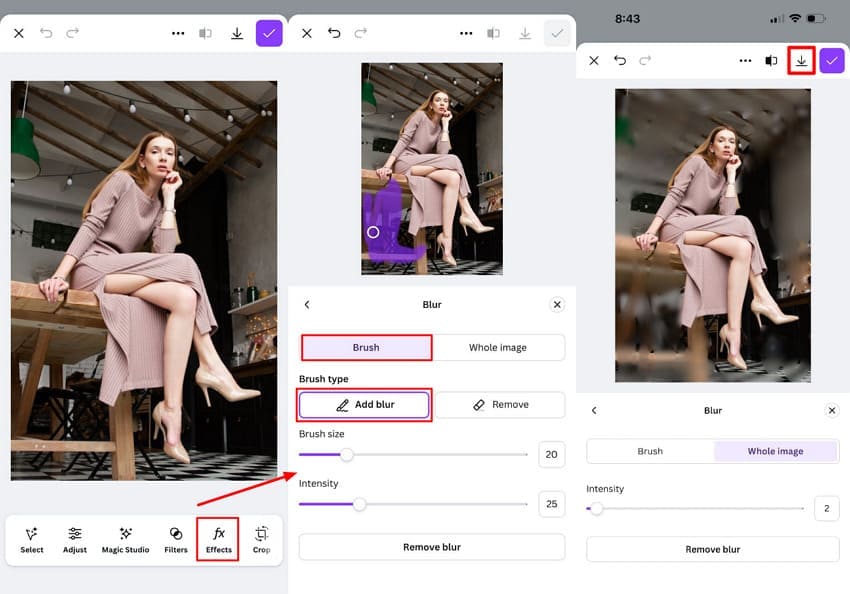
Step 2. As this opens up the editing interface, tap the "Effects" section to choose the "Blur" option. Once it gets active, enable the "Brush" settings, select "Add Blur", and mark the area using your fingers. Use the "Download" icon to save the final photo with the blurred background.
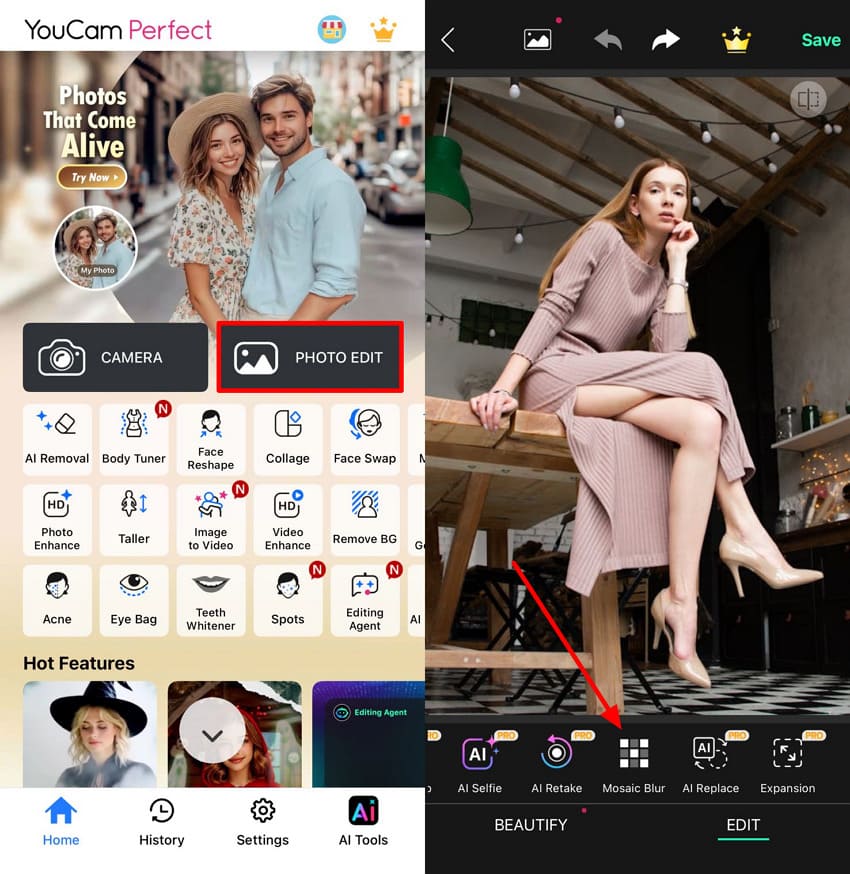
5. YouCam Perfect [Android/iOS]
This photo editor assists you in enhancing any picture to a smooth image within seconds. It offers the features to blur or replace the background, improve the skin, and delete minor imperfections. YouCam Perfect also has filters and beauty effects that appear natural.
It is ideal for individuals who desire bright and clean images to share on social media with minimal effort. The steps below will help you in blurring the photos to perfection with YouCam Perfect:
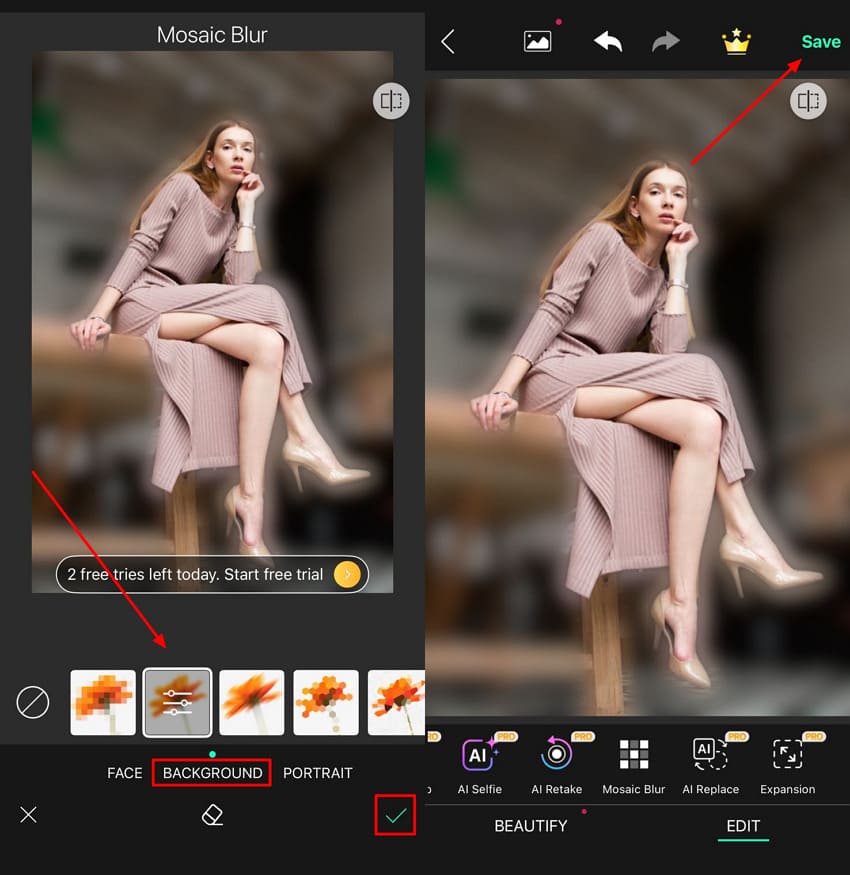
Step 1. Look for the "Photo Edit" option on the homepage for YouCam Perfect to start editing. With the image imported, slide through the options within the editing interface to find "Mosaic Blur."
Step 2. Navigate to the "Background" section and select the appropriate preset to apply background blur. Once done, tap the 'Tick" icon and look for the "Save" button.
Part 3. Pro Tips for Getting the Perfect Background Blur
To create a smooth, natural background blur that feels professional yet real, try these simple tips when learning how to blur the background of a photo:
- Use Proper Distance: Create some distance between your background and subject. The further you go, the more lifelike blur you will have, and as such, your picture will have a natural depth to it.
- Focus on the Subject: Before taking the picture, tap on the person or object you want to highlight. This keeps your subject sharp while the background fades gently out of focus.
- Select Neutral Lighting: Use diffused, early morning, or late afternoon light. It aids in the appearance of the blur, appearing clean and smooth without any severe shadows or undesirable brightness around the object.
- Avoid Busy Backgrounds: Try to keep the background simple. Plain walls, greenery, or sky work best because they let the blur flow naturally and keep all attention on your subject.
- Refine with Repairit App: Once you have taken your photo, just add your image into the Repairit App to clear any blurred or semi-corrupted images. Its AI engine is used to sharpen, improve clarity, and address imperfections to give you the ability to maintain natural tones and depth.
To sum up, learning how to blur the background of a photo helps you create clear, professional, and visually appealing images. Whether you edit manually or through AI, achieving the right blur adds depth and focus to your pictures. Among all tools, the Repairit App stands out for its smart AI precision, fast processing, and simple interface, making photo background editing effortless and natural.
FAQ
-
How to blur the background of an existing photo?
With the help of editing tools or mobile apps like Repairit App, one can blur the background of any photo that is saved. These applications automatically scan your subject and blur the rest of your picture in seconds. -
What are the required camera settings to produce a blur effect?
A wide aperture, low f-number is used to shoot to come up with a beautiful blur. Get close to your subject and maintain a wide gap between your subject and the background, and you will best achieve the ideal outcome. -
Is it possible to blur the background of a photo on my phone?
Most phones now actually have portrait mode with a default blurred background. Photo editing apps also allow you to blur the picture manually after you have taken the picture.

