

 TL;DR:
To fix sound not working in Windows 7, verify physical connections and unmute the system volume, then update your sound card or IDT High Definition Audio CODEC drivers through the Device Manager.
● System-level sound failures can be resolved by launching the services.msc command to restart the Windows Audio service and permanently changing its startup type to Automatic.
● If specific audio files fail to play, they may be corrupted and require Wondershare Repairit, which fixes formats like MP3, M4A, and FLAC on Windows 7 but strictly requires uploading a working sample file to execute the advanced repair.
● For codec incompatibility or unbalanced audio, you can either convert the media using Wondershare UniConverter 14 or right-click your Playback Devices to access the Enhancements tab and enable Loudness Equalization or Room Correction.
Ask AI for a summary
 ChatGPT
 Perplexity
 Gemini
 Claude
 Grok
Grok
Fix Sound on Computer Windows 7
See the reasons why "sound on windows 7 not working" and check out the proven methods on how to fix sound on computer windows 7.
Sound issues can be evolved due to multiple causes on Windows 7. If you are listening to an audio track or online lecture, the sound problems can create a huge hurdle for you. Moreover, if you are watching a YouTube video, your computer’s sound must work normally.
However, if the sound is not coming from the laptop, this article will help you to resolve the issue efficiently. By reading this article, you can discover several ways to fix Windows 7 sound not working quickly.
Part 1: Know What Will Cause Windows 7 No Sound
There can be several reasons for the sound not working in Windows 7. Before jumping into the solutions, let’s discuss the main reasons for this problem.
- Missing Codecs: The player in which you are trying to run your audio or video file may not have the necessary codecs that are required by your PC to play that file. If there is a codec issue, the sound on your computer will not work.
- Problems in Settings: Often, at times, the settings of your computer can get changed accidentally. It may be possible that the volume has been muted in the settings, due to which you are unable to hear the sound.
- Issues with Audio Device: There can be an unidentified issue with audio devices like speakers or headphones that can result in audio not working in Windows 7. A damaged wire of audio devices or any internal issue can cause this problem.
- Wrong Audio Driver: If the sound driver on your PC is not updated or installed properly, a sound issue in your Windows 7 can arise. For this, you would need to install a compatible audio driver on your PC to eliminate this problem.
- Damaged Audio File: You may encounter a damaged or corrupted audio file saved on your PC due to multiple reasons. Thus, if your audio file gets damaged under any circumstances, you won’t be able to listen to the sound properly.
Part 2: Troubleshooting the Sound Not Working in Windows 7 with 9 Fixes
In this section, we will highlight multiple beneficial methods to fix Windows 7 sound not working, along with detailed steps.
Check These Solutions
Fix 1: Update the Sound Card
Many times, the sound card driver on your laptop is not updated, due to which you can face the audio not working in Windows 7 issue. For this, you should update your sound card driver through the following steps:
Step 1: You have to first launch the “Run Command Dialog Box” by using the “Windows Key + R” shortcut.
Following this, write the “devmgmt.msc” command and hit the “Enter” key.

Step 2: Next, locate and expand the “Sound, video, and game controllers” category to find your audio driver.
Following this, right-click on the “Audio Drive” and proceed with the “Update Driver Software” option.

Step 3: A new window displaying the update options will appear on your screen.
And you have to continue with the “Search automatically for updated driver software” option. Now, Windows 7 will search for the driver update and will install it if there is any.

Fix 2: Check the Cables and Connections
Make sure that the wire of the speakers or headphones is not damaged. If there is any problem with your speakers or their wire, you won’t be able to listen to the sound and will face sound on Windows 7 not working issue. Moreover, always connect your speakers or headphones by attaching them to the suitable port of your laptop or computer.

Fix 3: Ensure the Volume is On
Sometimes, the volume button on the computers is turned off accidentally, which causes the Windows 7 no sound issue. For this, navigate to the right bottom side of your task bar and locate the icon of “Volume.” Make sure to unmute the speakers and increase the volume level to listen to the sounds easily on your computer.

Fix 4: Turn to Proactive Audio Repair Tool
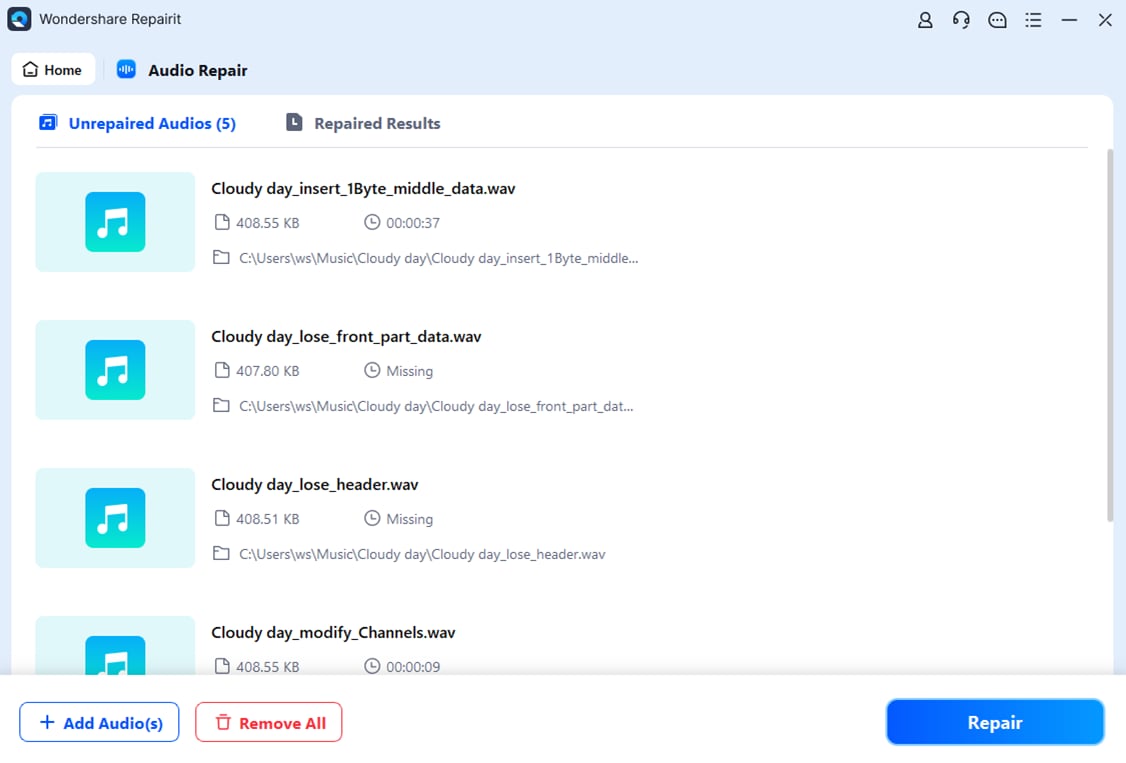
Another possible reason for sound not working in Windows 7 can be damaged audio files on your computer. For this, you would need an efficient tool like Wondershare Repairit that can fix the corrupted audio files without any lengthy procedure.
As this platform has a high repairing rate, it has made huge recognition in the market. Moreover, it supports advanced technology to repair the damaged audio files in their original high quality. Take a look at these features:

Wondershare Repairit - Audio Repair
 Security Verified. Over 7,302,189 people have downloaded it.
-
Repair damaged audios with all levels of corruption, such as audio not working, clipping audio, humming audio, rumbling audio, sibilant audio, out-of-sync audio, etc.
-
Repair audios of diverse formats, including MP3, M4A, FLAC, AAC, WAV, etc.
-
Repair damaged or corrupted audio from multiple devices: portable voice recorder, recording software, shooting apparatus, SD cards, phones, hard drives, USB flash drives, etc.
-
Support Windows 11/10/8/7/Vista, Windows Server 2003/2008/2012/2016/2019/2022, and MacOS 10.13~MacOS 15.
You can repair multiple damaged audio files on this tool as it offers batch processing to save time for the users. With a single click, you can repair audio files belonging to popular audio formats in their original quality.
Do you want to look into the step-by-step guideline on how you can easily repair your audio files? Let us look ahead into the steps:
Step 1: Open Repairit and Add Corrupted Audio File.
Download and install the latest version of Wondershare Repairit.
Launch it on your desktop and lead to the “More Types Repair” tool on the left column. Tap on "Audio Repair" and the “+Add” button to import the corrupted audio file.

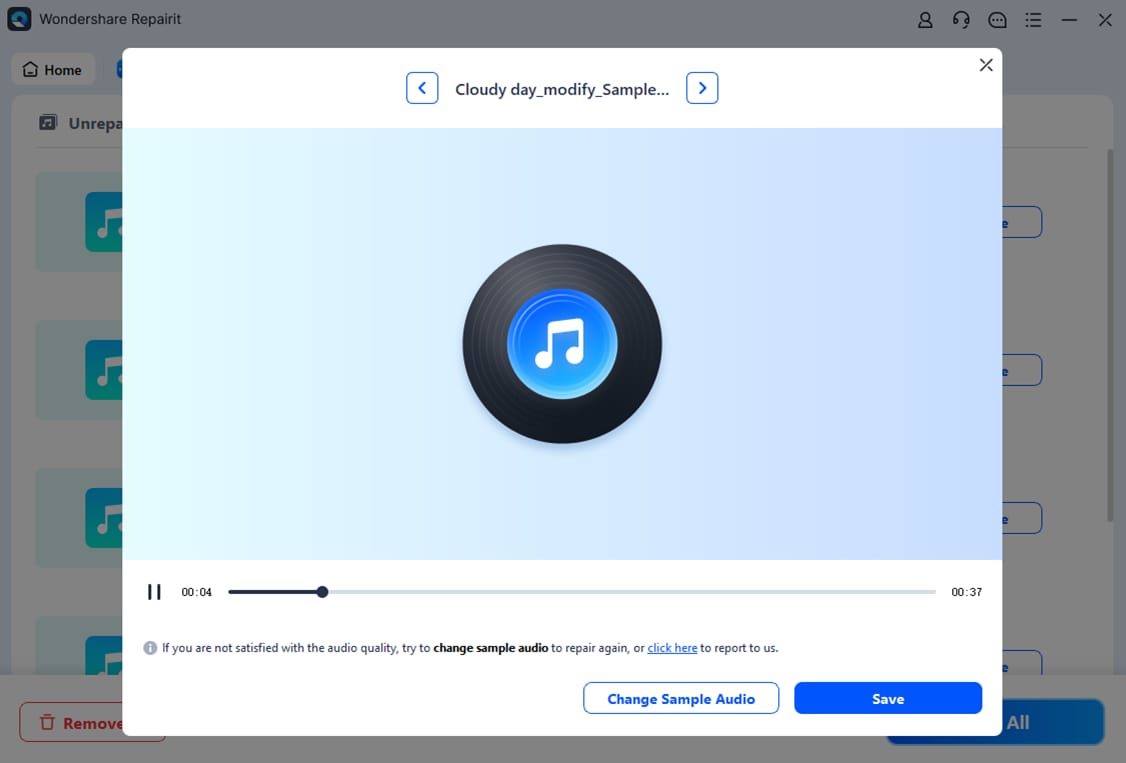
Step 2: Repair Audio File with Sample.
As you import the audio file successfully, proceed to click on the “Repair” button. The platform will display a pop-up asking for a sample audio file. Add the sample file as a reference and click on “Start Advanced Repair.”
Step 3: Check and Save Repaired Audio File.
Repairit successfully repairs the audio file and displays it on the next screen. To check out the repaired file, click on “Preview.” If you are satisfied with the repaired results, tap on “Save.”
Fix 5: Run the Windows Troubleshooter
While using Windows 7, your computer speakers may encounter any unidentified error. For this, you can run the Windows troubleshooter to fix audio playback. Read the below instructions to apply them carefully to resolve Windows 7 sound problem:
Step 1: Initiate the process by going to the “Start menu” on your PC.
On its search bar, type “Troubleshoot” and click on “Troubleshooting” from the results.

Step 2: Under the heading “Hardware and Sound,” tap on the “Troubleshoot audio playback” option.
On the bottom left side, enable the “Advanced” option by clicking on it. Following this, hit the box “Apply repairs automatically.”

Step 3: Now tap on the “Next” option to initiate the process of troubleshooting.
Wait for some time as the troubleshooter will resolve the identified issue meanwhile.

Fix 6: Restart the Audio Services
The audio services of Windows 7 may get disabled accidentally due to any cause. To fix no sound Windows 7, try to restart the audio services through the below steps:
Step 1: Initiate the run utility by pressing “Windows + R” on your keyboard.
Now type the “services.msc” command and hit the “OK” button.

Step 2: On the new appeared window, scroll to the bottom until you locate the “Windows Audio” option.
Right-click on this option and then tap on “Restart” from its menu.

Step 3: Once the audio service gets restarted, right-click on it to select the “Properties”.
Set the startup type to “Automatic” from the drop-down menu and then tap on the “Apply” button.

Fix 7: Change your Audio Format
There is a high possibility that the audio codec of your file is not supported by your media player. For this, you should try to change the audio format of your file to make it compatible with your PC. For the best conversion results, we will recommend Wondershare UniConverter, as it includes tons of features to convert both audio and video files. This tool supports all famous formats and offers 120x faster conversion speed.
It can also convert high-quality audio and video formats without damaging their original quality. It offers batch processing to generate instant results of multiple files at the same time. Moreover, the user interface of UniConverter is simple and well-organized, which makes it stand out among other tools.
Also, it comprises editing features to make the video and audio files flawless and captivating. Follow the steps mentioned below to convert your file format using UniConverter 14 to fix Win 7 no sound:
Step 1: Run Wondershare UniConverter on your computer.
And open its main interface. On its home page, click on the “Converter” option to start the process.

Step 2: A new window will appear from which tap on the “Add File” button to import the files on this tool.
You can either upload audio or video files for the conversion by browsing through your PC.

Step 3: After uploading the desired file, choose the “Output Format” displayed on the bottom of the screen.
Here, you can select from the multiple audio and video file formats easily. Also, choose the preferred quality and file location.

Step 4: After adjusting the settings, click on the “Start All” button.
Wait for some time until the conversion process finishes successfully.

Fix 8: Adjust the Speaker Properties
Another effective method to resolve sound on Windows 7 not working is changing the speaker properties. To adjust the speaker properties, read the following steps:
Step 1: At the bottom right side of your desktop, right-click on the “Volume” icon .
And then tap on “Playback Devices.”

Step 2: Now right-click on your playback device.
And then choose its “Properties.” After opening the properties, navigate to the “Enhancement” tab.

Step 3: At the enhancement tab, you can change multiple settings easily.
For example, Bass Boost will help in increasing the lower frequencies. Virtual Surround helps in converting the surrounding audio as stereo output. The Room Correction option changes the room and speaker properties, whereas Loudness Equalization balances the volume differences to make the sound pleasant for human hearing. You can click on the “Settings” tab of each of these options to change their properties.

Fix 9: Update the IDT High Definition Audio CODEC Driver
If nothing works till now, try to update your IDT High-Definition Audio CODEC Driver to resolve the Win 7 no sound issue. Use the following steps to update your audio driver successfully:
Step 1: Go to the “Start” button and then click on the “Control Panel”.
Now you can see a new window on your screen.

Step 2: From the given options, tap on “System and Security.”.
Now under the section of “System,” click on the “Device Manager” option.

Step 3: Following this, locate the “Sound, game, and video controllers” category.
And click on the “Arrow” icon to expand it. You have to now select the “IDT High Definition Audio Codec” from the expanded options by right-clicking on it. From the displayed options, tap on “Update Driver Software” and follow the on-screen instructions.

This video can help you fix your audio files with a step-by-step guide.
Conclusion
Now you’ve learned that, if the sound is not coming from the laptop, there can be multiple causes of this problem.
In this article, we have mentioned the reasons why sound on Windows 7 is not working along with the possible solutions. Every suggested method is easy to follow and works effectively in fixing this issue on Windows 7. Moreover, we have addressed some powerful tools like Wondershare Repairit Audio Repair and UniConverter that can help you further in resolving the sound problem.
Just give it a shot and have all your problems solved!
People Also Ask
-
What are the common issues of the speakers?
The common issues related to the speakers are audio distortion, incompatible audio format, or blown speakers. High-volume sounds can also badly impact the quality of your speakers. Moreover, popping sounds is another common issue for speakers. To resolve these issues, you can convert the audio formats and can decrease the volume. Also, changing the wires, coil or fabric can fix the problems. -
In what way low sound speakers can be fixed?
To fix this issue, make sure that your device and speakers are attached properly. Also, increase the volume on your device. Furthermore, see whether your device is running the music file or not. Make sure to set the suitable functions or modes of your connected device. -
Can dust impact the quality of speakers?
Yes, dust can badly impact the quality of your speakers. Many users don’t take good care of these speakers, which can result in low-quality sound in the future. In the worst scenario, dust can permanently damage the speakers if you don’t take notice frequently. To avoid this issue, store your speakers in a safe place and cover them when you are not using them. Moreover, clean your speakers frequently to ensure their complete protection. -
Why my PC has no sound all of a sudden?
If your PC suddenly has no sound, try to reboot it to solve the issue. Make sure that the volume button on the desktop settings is not muted and that the hardware device is functioning properly. For this, play any song on your computer to identify the main cause.