
 TL;DR:
Microsoft requires a hardware-based Trusted Platform Module (TPM) 2.0 microchip to encrypt data and install Windows 11, but users lacking a supported chip can bypass this installation block by modifying the Registry Editor.
● Run the "tpm.msc" command to verify your module status, or access the UEFI Firmware Settings via Advanced Startup to manually enable the TPM state on your motherboard.
● To force the Windows 11 installation without a physical TPM chip, open the Registry Editor, navigate to "HKEY_LOCAL_MACHINE\SYSTEM\Setup\MoSetup", create a new 32-bit DWORD named "AllowUpgradesWithUnsupportedTPMOrCPU", and set its value to 1.
● While TPM secures confidential access keys and blocks unauthorized malware execution, it fails to prevent cold boot attacks or online network threats, and its decryption processing can occasionally trigger system slowdowns or application crashes.
Ask AI for a summary
 ChatGPT
 Perplexity
 Gemini
 Claude
 Grok
Grok
“I am trying to install Windows 11 on my PC. But, the installation setup is not working for me. I get an error that says, “This PC must support TPM.” I certainly have no idea how to fix this. Please help!” -- User on the Internet. Have you recently encountered a term called TPM? If you are clueless about it, then do not worry. Our goal is to help you clarify TPM and if it is necessary for Windows 11 update or not. However, if you wish to resolve the TPM error with Windows 11 install, our step-by-step tutorial will help you. Let’s understand what TPM is and how does it work in the next section.
In this article
Part 1: What is TPM, and how does it work?
Trusted Platform Module Technology (TPM) is a technique that helps to protect your PC’s security and privacy using a cryptography technique. In simpler terms, the TPM technique allows your computer to encrypt your data, resulting in hacker prevention.
A TPM is a microchip that is present inside your computer. The plus point is that it provides hardware-based security. If you do not have a TPM chip, you can install it late on as well.
The TPM microchip allows your system to encrypt your essential information through a secret key. Nobody can decrypt your data without that secret key. In the previous version of Windows, it was not mandatory to use TPM. Still, Microsoft has made it compulsory for Windows 11 users.
Windows 11 uses Trusted Platform Module Technology to make sure that your PC remains safe from attackers. Therefore, while installing Windows, you come up with a message that your PC must support TPM.
Part 2: How to Check and Enable TPM on your PC?
If you are trying to eliminate the “This PC must support TPM” error, you can enable TPM on your PC. Also, for people looking for that extra layer of protection and security, follow the below steps to check and enable TPM on your PC.
Steps to Check if TPM 2.0 is Enabled on your PC or Not
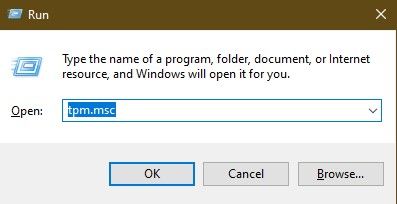
Step 1: Press the Window + R key and open the Run APP.
Step 2: Enter “tpm.msc” in the Run Window and press Enter.
Step 3: Overview of your TPM information.
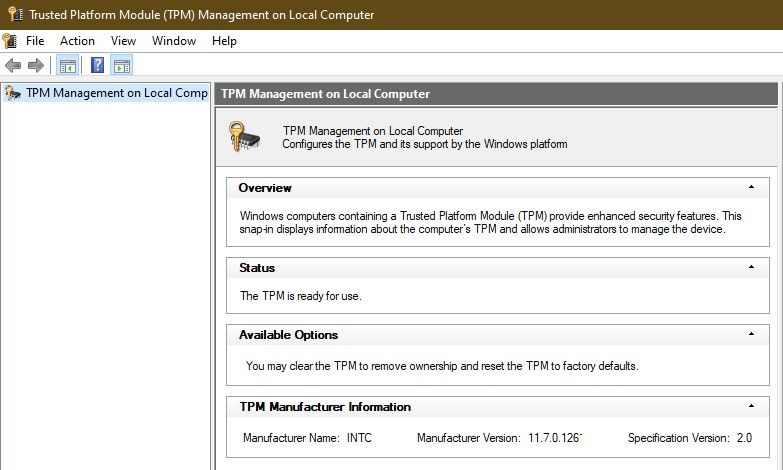
In the TPM Management, see the Status section. If it says “The TPM is ready for use,” you already have the TPM configured. In case it doesn’t, follow the following steps to enable TPM on your PC.
Steps to Enable TPM 2.0 on your PC
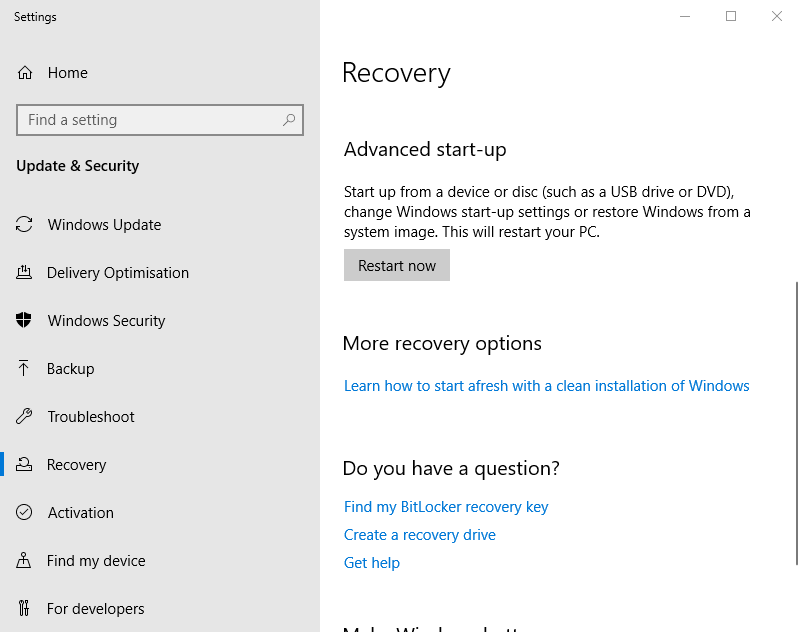
Step 1: Open Settings and then click on Update & Security.
Step 2: Select the Recovery option.
Step 3: From the “Advanced Startup,” hit the Restart now button.
Step 4: Select Troubleshoot.

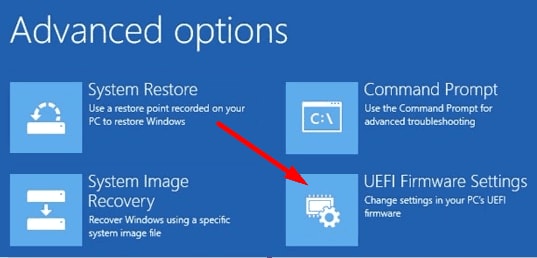
Step 5: Select Advanced Options.
Step 6: Open the UEFI Firmware Settings option.
Step 7: Hit the Restart button.
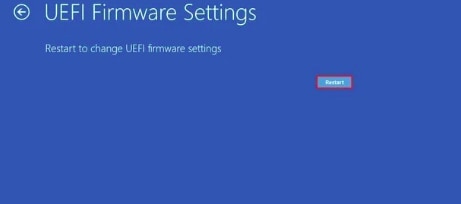
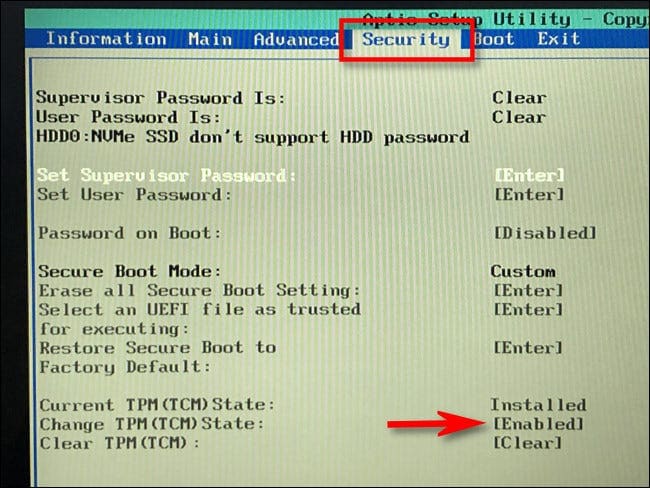
Step 8: Open the boot or the security settings page.
Step 9: Move to the change TPM state, select Enabled, and then hit Enter key.
Step 10: Exit the UEFI settings. Confirm your new changes and restart the computer.
That’s it. Once you have followed the simple steps above, you will end up enabling TPM for your PC.
Part 3: How to Install Windows 11 without TPM?
There can be different reasons why you would wish to bypass the TPM check for Windows 11 installation. One common reason can be your PC does not come with a built-in TPM microchip.
Well, no matter the reason, if you wish to install Windows 11 without TPM, then follow the below steps:
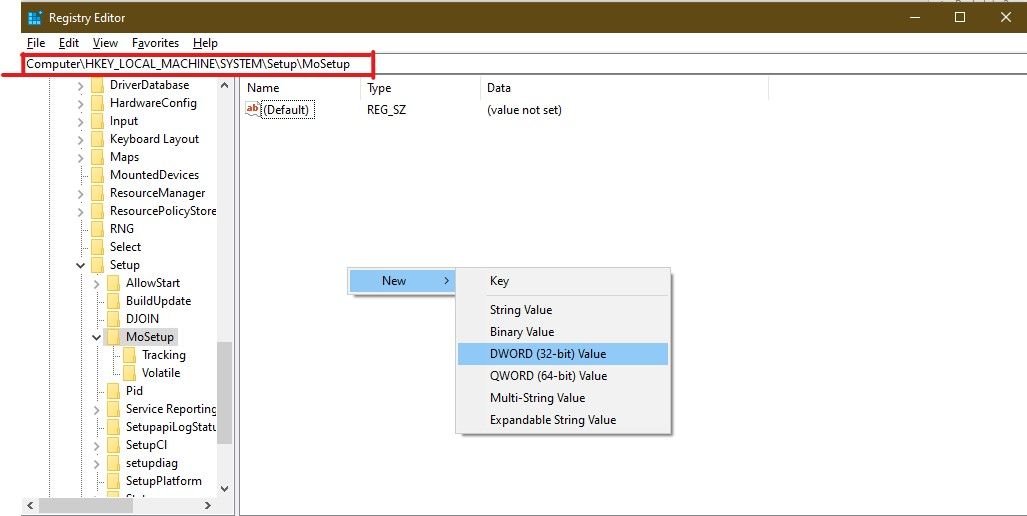
Step 1: From the Search button on the task bar, type “Registry Editor” and open the Registry Editor.

Step 2: Navigate towards the location.
“HKEY_LOCAL_MACHINE\SYSTEM\Setup\MoSetup”
and right-click anywhere on the right-side panel.
Select New from the appeared menu and then choose the D-WORD (32-bit) from the dropdown menu.
Step 3: Rename your newly made key as
“AllowUpgradesWithUnsupportedTPMOrCPU”
Step 4: Once renamed, just double click on your newly created key and set its value to 1.
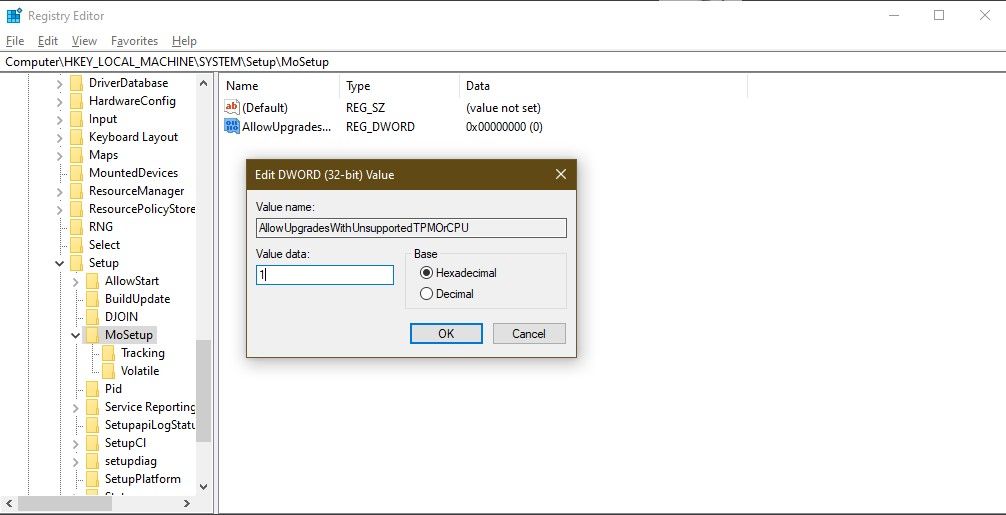
Step 5: Click on the OK button and then restart your computer.
The steps work by creating a registry editor for a fake TPM key. Your PC believes that TPM is enabled, but actually, it is not.
After restarting, try installing Windows 11 again. Hopefully, the “This PC does not support TPM” error will be resolved. You can install Windows 11 without TPM now.
Pros and Cons TPM
In the previous section, you have seen that you can install Windows 11 without TPM. But what happens if you do not use the TPM technology? Let’s see below some key pros and cons of installing Windows 11 with or without TPM.
Pros of TPM
Secure Confidential Information:
TPM's main and most crucial benefit is that it protects confidential information. The information can include your computer’s access key, secret ids etc.
Execution of Authentic Functions:
TPM protects your computer from running any harmful or malware hardware or software functions.
Improved Security:
Because it is not dependent on a software-based operating system, your computer’s security is enhanced.
Secure Information Sharing:
TPM also provides a secure passage of information on your network traffic.
So, considering these high profile security advantages, one can argue that Windows 11 should be installed with TPM. But, let’s see the other side of the story by pointing some critical disadvantages of TPM.
Cons of TPM
No Cold Boot Attack Protection:
The main downside is the possibility of a bug. TPM does not protect against a cold boot attack. Attackers can violate your PC by using any external USB or sending malware through the online internet. The hacker can exploit your PC in both ways, and TPM would not do anything about it.
No Focus for Online Security:
TPM only protects the system from being stolen. On the other hand, it ignores internet threats and attacks on the system or data stored.
System Slows Down:
Its operation takes a long time since its tools use key finders until the correct key is found. The key can take up the processing time your application may use, resulting in the system’s slowness.
Unexpected Errors:
At times, users have also reported that TPM causes unexpected errors during system execution. The research suggests that it happens due to TPM misinterpreting key-values to search for decryption hence crashing your running application.
As the world has moved towards the internet era. The digital world is more connected, and data sharing has been an integral part of it. Therefore, online threat security is much more valuable today than physical theft. So users that wish for fast execution and better online security may avoid TPM and install Windows 11 without it.
But, the choice depends upon you. You may consider a variety of factors before making the final call whether you wish to have Windows 11 with or without the TPM module.
Conclusion
Trusted Platform Module (TPM) is an essential technique that helps to provide your computer with protection and security. Microsoft Windows 11 have made the use of TPM mandatory to add an extra layer for security.
However, TPM can or can not be beneficial for you. On occasions, the TPM requirement of Windows 11 can leave potentially secure computers behind. Therefore, having TPM is like a tradeoff.
On the one hand, you get an extra layer of security. On the other hand, you get an extra burden of hardware protection, which is counter-productive against online hacks.
You can enable TPM for Windows 11 and also bypass TPM for Windows 11 installation following our guide. Also, suppose your essential photos or videos got damaged during Windows 11 installation. In that case, you can repair them back in using Wondershare Repairit software.
Suppose your photo/video gets corrupted because of BSOD. In that case, you can use Wondershare Repairit software for a swift recovery.