

 TL;DR:
To fix external speakers producing no sound on Windows 10/11, sequentially rule out physical hardware connection issues before setting the speakers as the default playback device and updating the audio drivers in Device Manager.
● Disable HDMI sound in your playback settings or turn off the front panel jack detection within the Realtek HD Audio Manager to prevent the OS from routing audio to disconnected outputs.
● Restart the Windows Audio Service using the services.msc run command, or execute an sfc/scannow scan via an administrative Command Prompt to repair deeper system file errors preventing audio playback.
● Revert to a previous Windows System Restore point if the hardware failed immediately following a recent OS update, or use Wondershare Repairit Audio Repair if the issue is isolated to specific corrupted audio files rather than system-wide output.
Ask AI for a summary
 ChatGPT
 Perplexity
 Gemini
 Claude
 Grok
Grok
You may consider using external speakers for better sound outputs. However, using such speakers, there are many problems involving the external speakers and their connection with the computer. The problem can occur in any section from the speakers' connection with the computer to its sound drivers.
To answer the problem of sound plugged in but no sound on Windows 10/11, many inappropriate settings result in such a concerning situation across the device. This article is based on providing users with a comprehensive guide explaining how they can avoid problems with their speakers.
Table of Contents
Fix 1: Run the Audio Troubleshooter
Checking the audio troubleshooter for any unprecedented errors is a great way to discover issues with your sound device. The troubleshooter gives you a perfect description of the problem in the external sound device and provides a detailed result for the issue to resolve all detected problems.
Go through the following steps to learn more about how you can use the audio troubleshoot to solve sound plugged in but no sound Windows 10/11:
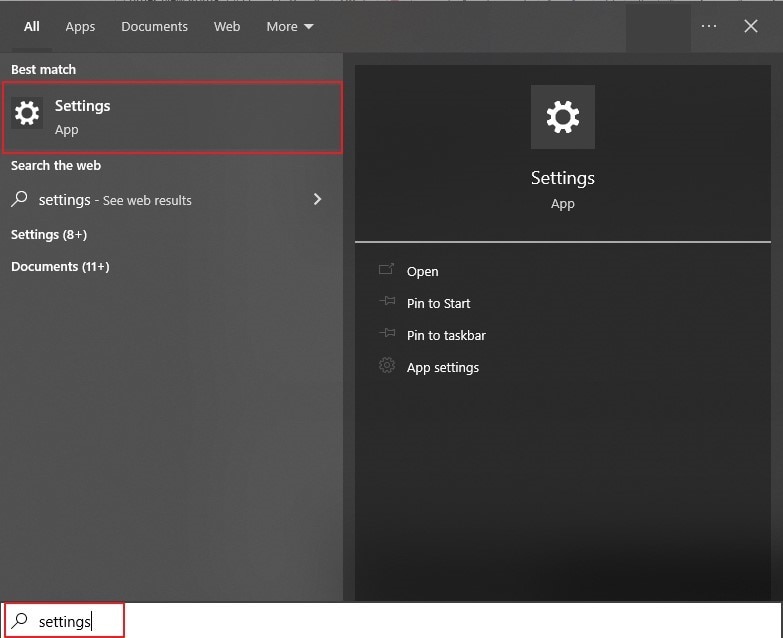
Step 1: Use "Windows + I" to open the Search bar on your front.
Type in "Settings" to lead to a new window.
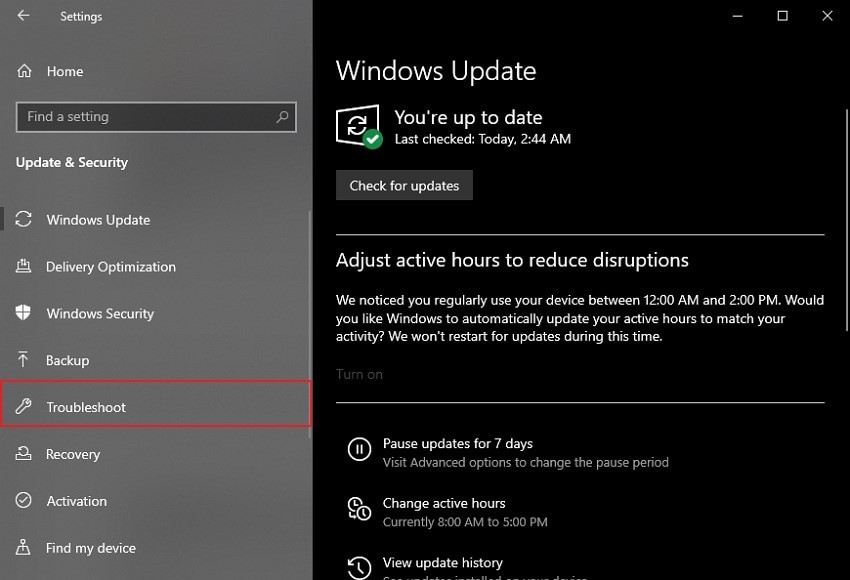
Step 2: Lead in to the "Updates & Security" section to locate the "Troubleshoot" tab across the protruding menu.
Locate "Additional Troubleshooters" out of the available options across the window.
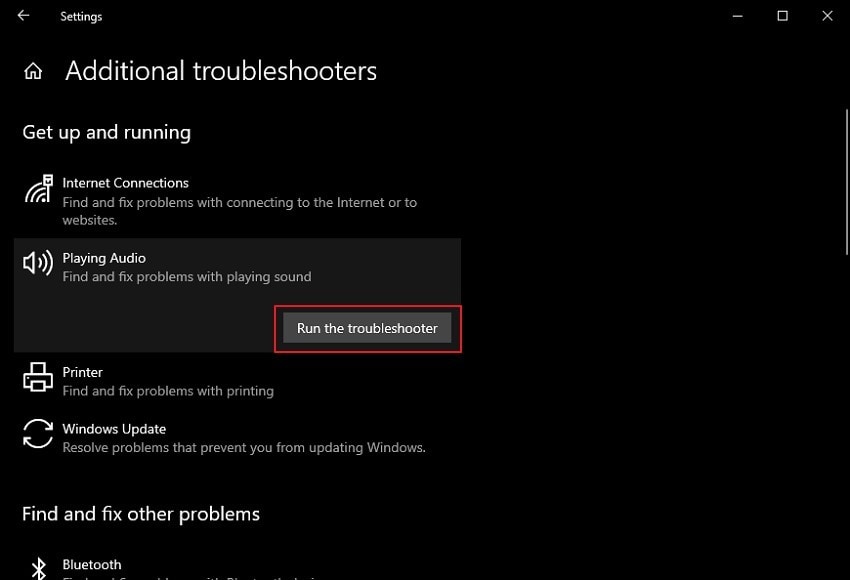
Step 3: As you find the "Playing Audio" troubleshooter in the list, click on the "Run the troubleshooter" button.
In order to launch the troubleshooter and resolve all problems with the connected sound.
Fix 2: Update the Audio Driver
As outdated drivers complicate the device's settings, it gets essential to get it updated to avoid malfunction. Follow through the steps to learn more about this technique of solving sound plugged in but no sound Windows 10/11:
Step 1: Open the "Device Manager" by searching for it across the "Search" feature present in the taskbar.

Step 2: As the window opens upfront, lead into the "Sound, video, and game controllers" section to locate the respective sound driver.

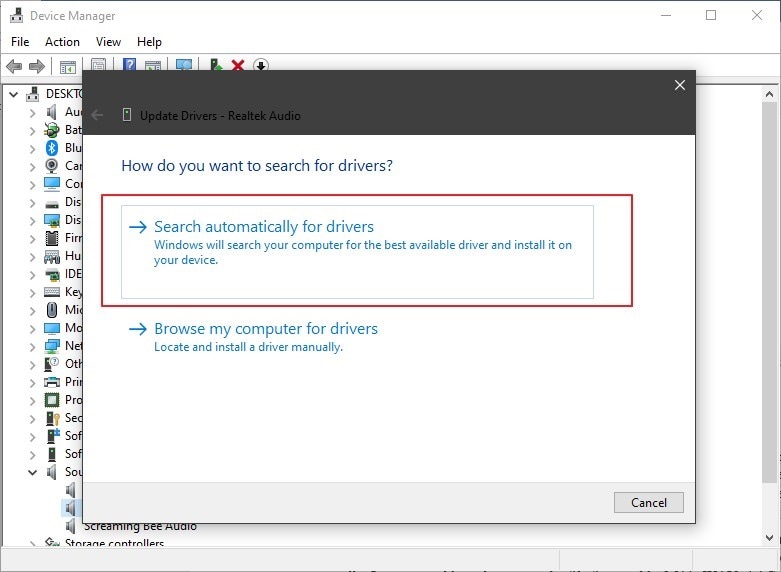
Step 3: On locating the driver successfully, right-click to select the option of "Update driver" across the menu.
Specify the device to locate the drivers for the device automatically.
Fix 3: Check the Hardware Problems
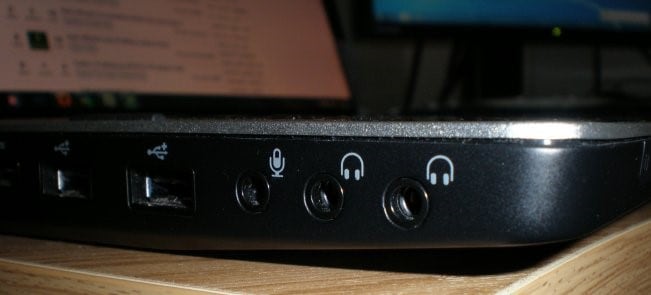
Since you are connecting external speakers across your computer, the speaker jack may cause problems. For example, you might have inserted the wrong pin within the jack, as multiple jack options are available across computers to connect with speakers.
Furthermore, keep a check on the device used to power the speakers. If the speakers are not operating correctly, there can be power issues in the connecting wires or slots, which leads to such miserable situations. Some speakers have an LED light attached, showing their power status. Ensure the light is consistent, ensuring that the speaker is correctly connected to the computer.
Fix 4: Check If the Audio has Problem Inside
The issue of sound plugged in but no sound Windows 10/11 is not always caused by sound devices and drivers on your computer. Sometimes, the problem is within the sound instead of the device running it. In such situations, you need to have a proper repair tool that provides you with the ability to repair all corrupted audio files with ease.
Wondershare Repairit - Audio Repair is known as the go-to solution in audio repair across the market. This repair tool caters to most user scenarios that lead to audio corruption across the device. Furthermore, with the ability to repair all files automatically, Wondershare Repairit is known to be the easiest available technique to check the problems across audio files.
This tool utilizes the sample audios provided by the user in the repairing process and gives away the perfect result under high quality. Such a tool is definitely recommended for checking the audio file that has a problem inside.

The main features of Wondershare Repairit - Audio Repair

-
Repair damaged audios with all levels of corruption, such as audio not working, clipping audio, humming audio, rumbling audio, sibilant audio, out-of-sync audio, etc.
-
Repair audios of diverse formats, including MP3, M4A, FLAC, AAC, WAV, etc.
-
Repair damaged or corrupted audios from mutiple devices: portable voice recorder, recording software, shooting apparatus, SD cards, phones, hard drives, USB flash drives, etc.
-
Compatible with Windows PC, Mac OS, and supports PC to mobile transferring/sharing.
Fix 5: Configure the Audio Settings
Another concern that involves the problem of sound plugged in, but no sound Windows 10/11 involves incorrect audio settings across the computer. With improper settings set across the device, there is a clear chance that the sound won't function properly on the device. Under such circumstances, you need to know the perfect method to configure all audio settings properly. We shall provide you with a detailed overview of the steps that are used to configure the audio settings with ease:
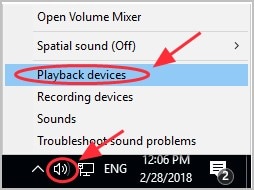
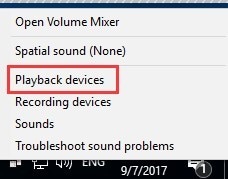
Step 1: Proceed to the "Speaker" icon on the taskbar at the bottom of the screen.
And right-click to select the option of "Playback devices."
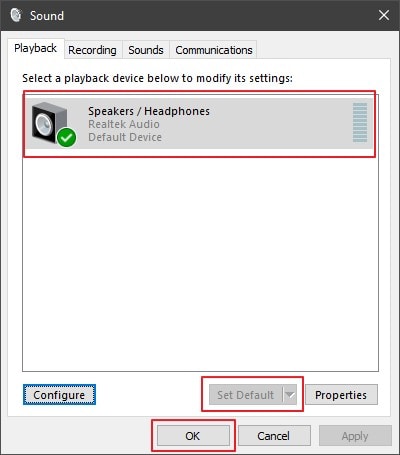
Step 2: As a new screen opens up, lead into the "Playback" tab.
And right-click on a space within the screen to open the drop-down menu to checkmark the "Show Disabled Devices" and "Show Disconnected Devices" options.

Step 3: To configure your computer's settings properly, select the audio device and click on the "Set Default" button across the screen.
The selected device should have a green icon across it. Next, tap on "OK" to apply all changes in the audio settings.
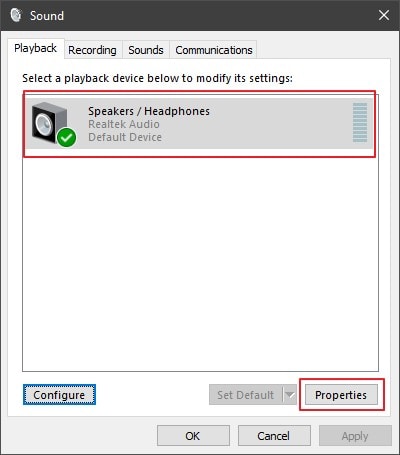
Step 4: If the problem across the speakers does not resolve, you need to go across the same "Playback" section.
And select the audio device you've set as default. Click on the "Properties" button to lead to a new pop-up window.
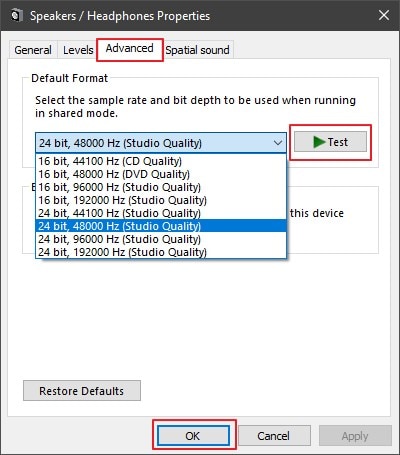
Step 5: Proceed to the "Advanced" tab and lead to the settings set across the "Default Format" section.
Set a proper sample rate and bit depth from the provided options across the drop-down menu, and click "Test" to check for sound. If you hear a sound, click "OK" to save all configuration settings.
Fix 6: Disable the HDMI Sound
There is a technique available for using an HDMI cable for transferring audio. At times, when you have connected certain devices that support HDMI sound, there is a chance that such options are configured across the audio settings and are set across HDMI sound, even if it is disconnected.
To configure the settings for your external speakers, you will have to disable the HDMI sound across your computer, for which you need to follow the steps as shown below:
Step 1: Right-click on the "Speaker" icon on the taskbar.
And select the option of "Playback devices" from the pop-up menu.
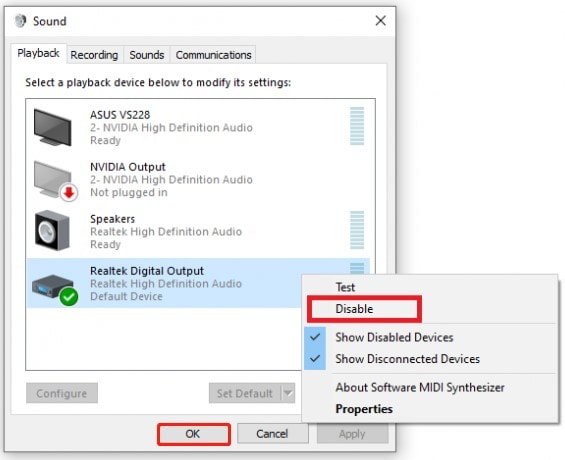
Step 2: Lead into the "Playback" tab.
And right-click on the HDMI sound device to select the option of "Disable" from the list. Following this, save the settings by clicking on "OK."
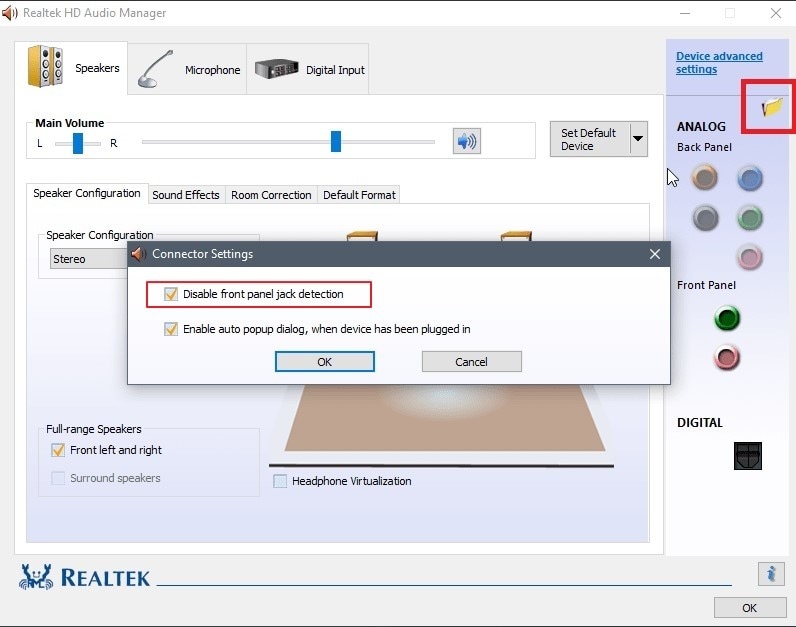
Fix 7: Disable the Front Panel Jack Detection
Windows operate its sound under different audio managers. If you are facing the consistent problem of sound plugged in but no sound in Windows 10/11, you should check out your Realtek drivers installed across the computer. If these sound drivers are operating across your Windows computer, you should consider disabling the front panel audio jack option from its settings. Then, follow the steps for a better understanding of the procedure:
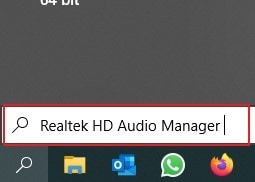
Step 1: Open the "Search" tab on your Windows computer by using the shortcut key of "Windows + S."
Type "Realtek HD Audio Manager" in the available space and open it on a new window.
Step 2: On the new window, click on the "Folder" icon in the top-right corner.
It will lead you to the "Connector Settings."
Step 3: On the next window, check the option of "Disable front panel jack detection" to resolve the sound issues in your Windows device.
Fix 8: Restart Audio Service
You can run different services to function the hardware across the Windows device. Audio Service is one service responsible for managing the audios on the computer. In such cases, restarting the Audio Service may be the most appropriate process to execute, which is covered through the following steps:
Step 1: You need to access the "Search" bar on the taskbar and open the Run Program across your computer.
Following this, type the command "services.msc' to open a new window.
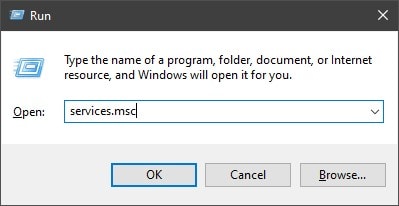
Step 2: This shall open your computer's "Windows Services" screen.
Scroll down to find the option of "Windows Audio Service" in the available list.

Step 3: Right-click on the option to select the "Restart" option from the drop-down menu.
It will restart the sound services across your computer and resolve all prevalent issues with the computer.

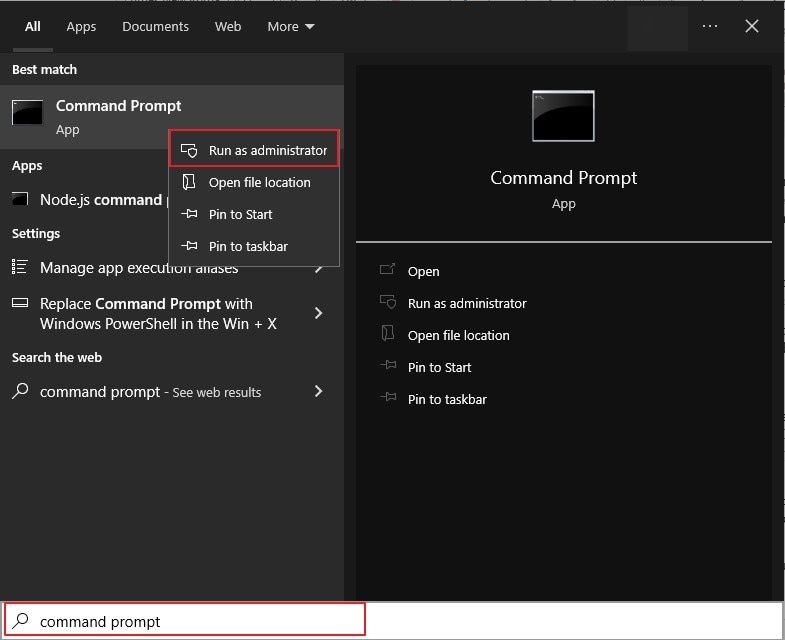
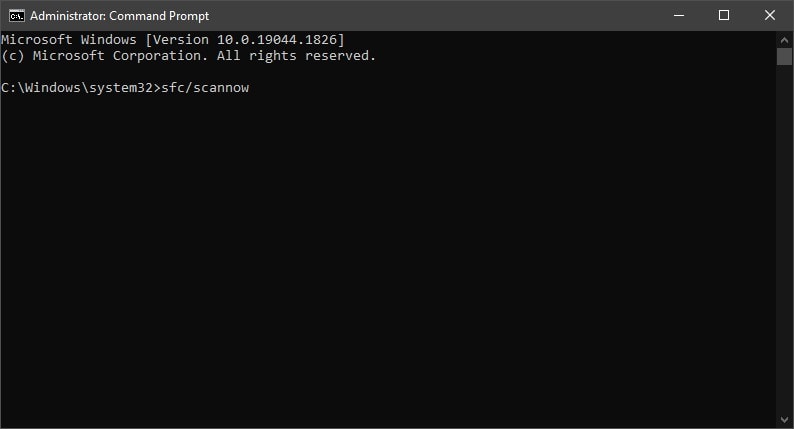
Fix 9: Perform an SFC Scan
If the sound is plugged in, but no sound Windows 10/11 problem is not resolved under any provided solution, you need to lead to more in-depth solutions that would effectively resolve the sound problem on your device. For this, you need to check through the system files using the Command Prompt terminal, which would cast out all issues within your Windows 10/11 sound system. Then, look ahead into the steps for a better understanding:
Step 1: Use the "Search" icon on the taskbar to open the search bar where you need to type in "Command Prompt."
Right-click on the option to select the "Run as administrator" configuration.
Step 2: Next, type the command "sfc/scannow" in the Command Prompt window and tap "Enter."
After some time, the complete scan would conclude and would display the errors on the screen. All detected errors will also be repaired. Close the console to conclude the scan.
Fix 10: Rollback Your Windows System
Your computer might have gone through a recent system update which may have led to multiple system problems on your device, including sound issues. To answer this sound plugged-in but no sound Windows 10/11 issue on your computer, you may have to roll back your Windows system to an earlier version to resolve the problem. Go through the solution provided in steps as follows:
Step 1: Use the "Windows + S" shortcut key to open the "Search" pop-up on your Windows.
Type in "Create a restore point" in the provided space and tap "Enter" to open up a new window. Click on the "System Restore" option in the next window to open the wizard.
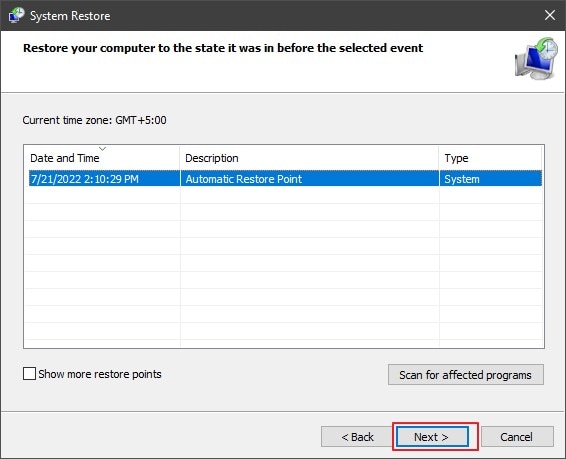
Step 2: On the new screen, click on "Next" and select a restore point that is automatically created.
After that, click "Next" to continue the restoration process.
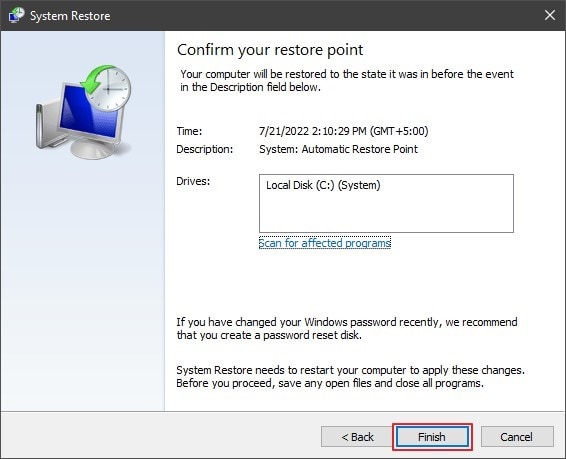
Step 3: On the next window, click "Finish" to restore your computer to an earlier date.
As the process concludes, a prompt message appears on the window.
FAQs
-
Q1. What are the best external speakers I can find in the market?
-
A1: You can try finding any of these external speakers according to your sound requirements. These speakers have different utilities and properties, which makes them the best in the niche:
- Sonos Roam
- Polk Atrium 4
- V-Moda Remix
- Ultimate Ears Wonderboom 2
-
Q2. How to select the perfect external speaker for your computer?
-
A2: Every external speaker is special for its characteristics; however, not all of them suit your requirements.
To find out the best speaker for your computer, you should be clear with your objectives of using the speaker for a specific purpose. Following this, be aware of the budget and ensure that the balance in sound quality and loudness is maintained across the device. -
Q3. What should I do to protect my external speakers?
-
A3: To protect your external speakers, you should avoid letting excess dust set itself on the speaker. This can be avoided by cleaning your speakers at all times and providing them with a properly ventilated environment so they do not get dusty. In addition, ensure the speakers are not exposed to power surges as it might damage their internal functions.
Conclusion
Are you now confused over the problem of sound plugged in but no sound in Windows 10/11? With the solutions provided above, we hope you won't encounter any sound problems on your computer. You have to go through the provided details in depth to figure out the right approach for your external speakers in this case.