

 TL;DR:
Resolving a Mac with no sound requires reconfiguring audio output preferences, restarting core audio processes, or performing an NVRAM reset specific to your hardware model.
● Force quitting the "coreaudio" process via the macOS Activity Monitor forces the system to restart its audio inputs and outputs to clear underlying functionality glitches.
● Resetting the NVRAM requires holding Command-Option-P-R for 20 seconds during power-on for Intel chip MacBooks, while M1 chip models automatically test and repair the NVRAM during a standard device restart.
● If system settings are correct but playback still fails, the specific audio file may be corrupted and requires a dedicated repair platform like Wondershare Repairit Audio Repair to restore.
Ask AI for a summary
 ChatGPT
 Perplexity
 Gemini
 Claude
 Grok
Grok
Fix Mac Sound Not Working
Check out why "sound not working on MacBook" and the methods to fix the "Mac sound not working" issue.
MacBooks have made a considerable consumer base worldwide and have been leading the tech world from the front for the last decade. Although Mac is known for its explicit functionality, there are multiple problems that have been reported related to the device over time. The problem involving Mac sound not working is quite common; however, it can get a menace if not handled properly.
This article will address solutions that would provide a proper guideline to avoid the problem of sound not working on MacBook. It would help if you went through these methods to know more about how such a problem can be avoided.
Table of Contents

Part 1: What Will Cause Mac No Sound?
It is a surprise to get such a problem across your Mac. What should you do if you find your Mac audio not working?
Before we lead to the fixes that would help you fix this problem on your device, you must be aware of the causes that are leading to such a condition. A review of the reasons will help you realize the best fix that'd fit your case and would also help you in understanding how you can essentially avoid it.
- If you do not hear any sound from your Mac's speakers, you should definitely check if a particular audio device, cabled or wireless, is connected to your Mac.
- You might face hardware problems with your Mac as they might be damaged for uncertain reasons. This can also occur because dust and other particles are stuck between the speaker on your Mac.
- The output audio device selected across the Mac Settings may have changed unnecessarily, leading to the audio not working on mac error.
- There might be compatibility or accessibility problems within your Mac, which includes issues across the PRAM and NVRAM.
- Your Mac may be outdated, which is why there are multiple bugs that are bothering multiple functions across the device.
- The audio file you may use to run across your Mac may be corrupted or may have gotten corrupted for uncertain reasons such as a virus or malware attack.
Part 2: 6 Methods to Fix Mac Sound Not Working
We shall now assert our focus on the solutions that can be tried out to fix the issue of sound not working on the MacBook. Whether you own a MacBook Air or a MacBook Pro, the process of executing the problem out of the device is relatively the same.
So keep a check across the functionality of these procedures for a better bird's eye view of how a user can save themselves from having no volume on the MacBook.
Fix 1: Restart Your MacBook
You can start by restarting your MacBook Air or Pro to resolve the problem of no sound coming from the MacBook. Essentially, some issues involving the MacBooks are temporary and can be fixed with a jump start. This jump-start can be executed by restarting your device properly. To do this, you need to look ahead into the simple steps as follows:
Step 1: Click on the "Apple" icon on the top-left side of the screen.
And select "Restart" from the set of options provided in the drop-down menu.

Step 2: As the device is opted to restart, a prompt pop-up will appear on the screen.
a prompt pop-up is asking for confirmation. Click on the "Restart" button again to restart your MacBook Pro or Air successfully.

Fix 2: Update your macOS
The second solution that can be tested to resolve any underlying software problems across the MacBook is to update the macOS, if available. Usually, an outdated macOS leads to multiple issues across the device, which involves software glitches and issues such as volume not working on Mac. For this, it is advised that you should follow the steps described below to update your macOS successfully:
Step 1: Tap on the "Apple" icon on the top-left section of the screen.
And select 'System Preferences' across the drop-down menu.

Step 2: On the window that pops open, click on the 'Software Update' option.
And proceed to the next screen to check whether an update for macOS is available across your device.

Step 3: Click on the "Update Now" button.
In order to initiate the update for your MacBook Air or Pro.

Fix 3: Change the Audio Output Across Your Mac
This is another impressive and straightforward fix that you can consider to manage the problem of MacBook no sound. Changing the audio output across the device will help you reconfigure the sound settings and help you ensure that the correct output is selected across the device for the sound output. For this, look ahead into the steps featured below for a better understanding of how you can change the audio output with ease:
Step 1: Open the Apple menu by clicking on the icon across the top-left side of the screen.
Select "System Preferences" to proceed with the process.

Step 2: Click on the "Sound" button on the next window.
In order to open the sound settings across your Mac.

Step 3: Lead to the "Output" tab across the next screen.
And select the audio output you need to set for the sound across your Mac. After configuring the output, you can also check if the output volume is muted or not. Use the slider to set the sound intensity of the audio output.

Fix 4: Try Repairing your Audio File
As stated before, there is a deliberate chance that the audio file you are trying to play on your Mac is not fit to function.
This may be due to the file getting corrupted for uncertain reasons. Rather than issues across the software or hardware of your Mac, there is a clear chance that the audio file may be corrupted. Thus, you need a proper repair tool acting for this purpose.
We are delighted to introduce you to Wondershare Repairit Audio Repair, a platform that features a cohesive system for repairing corrupted audio files. With easy accessibility and functionality, the platform ensures a high-quality result for the user, which does not make them regret their choice in selecting the right platform. See more features from the below part:

Wondershare Repairit - Audio Repair
 Security Verified. Over 7,302,189 peop le have downloaded it.
-
Repair damaged audios with all levels of corruption, such as audio not working, clipping audio, humming audio, rumbling audio, sibilant audio, out-of-sync audio, etc.
-
Repair audios of diverse formats, including MP3, M4A, FLAC, AAC, WAV, etc.
-
Repair damaged or corrupted audios from mutiple devices: portable voice recorder, recording software, shooting apparatus, SD cards, phones, hard drives, USB flash drives, etc.
-
Support Windows 11/10/8/7/Vista, Windows Server 2003/2008/2012/2016/2019/2022, and macOS 10.12~macOS 14.
Since you are looking for a guide explaining how you can repair an audio file, go through the steps provided below for a better understanding:
Step 1: Launch Wondershare Repairit For Mac.
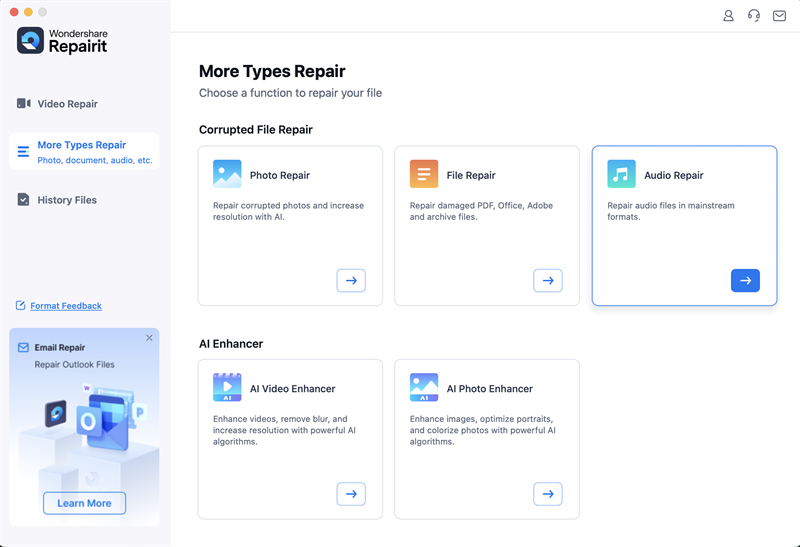
Start by launching the tool on your MacBook after installing it successfully. As you launch Repairit on your Mac, lead into the "More Types Repair" section, and select "Audio Repair". Click on the "+Add" button to add the audio file that is corrupted.
Step 2: Repair File with Sample.
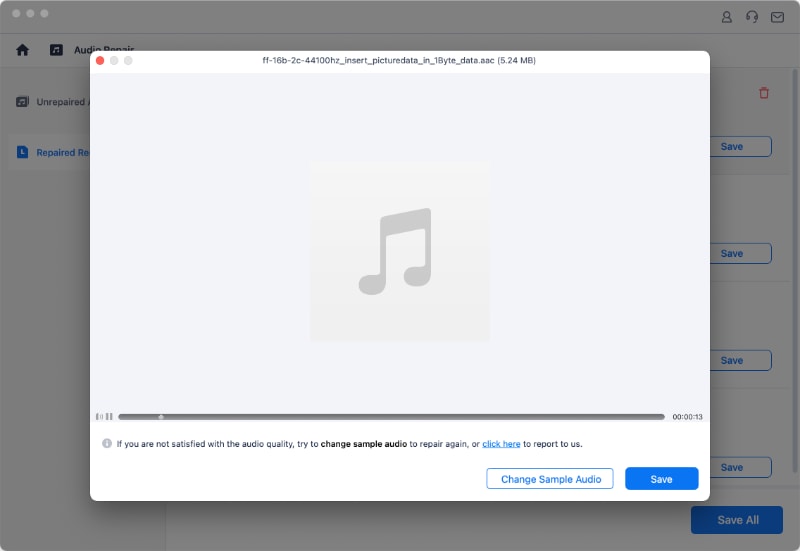
Click on "Repair" to start the process. A prompt immediately appears on the screen asking for a sample audio file as a reference. Add a sample audio file and click "Start Advanced Repair" to initiate the process.

Step 3: Export After Previewing.
As the file gets repaired, it is displayed across the next window. Click on "Preview" to check the file quality and tap "Save" to export the file once satisfied with the results.
This video can help you fix your corrupted audio files with a step-by-step guide.
Fix 5: Check and Reset the NVRAM on Your Mac
The older MacBooks were known to use the PRAM, where the P stands for the word "Parameter." As this terminology is directly pointing to the Random Access Memory of the Mac, problems across it are quite uncommon among Mac users. Problems in start-up and other functions, including the sound of the Mac, may arise due to issues across the RAM. As modern Macs use the NVRAM as an alternative, the process of having them reset is similar to that of the PRAM.
We shall look at the resetting techniques for both the M1 Chip MacBooks and Intel Chip MacBooks. To resolve the problem of audio on mac not working, it is perfect for trying out these simple steps for effective resolution:
For M1 Chip Mac
If you have a MacBook Pro or Air with the M1 Chip, you need not worry about resetting the NVRAM on the device. The NVRAM is automatically tested across the startup across the Mac, and if there are problems across it, they are automatically resolved. However, if you feel that the Mac is not functioning properly, you can restart your Mac so that it re-assesses and inspects the NVRAM for any error.
For Intel Chip Mac
Users who have MacBook Air or Pro with an Intel chip should follow the steps as shown below:
Step 1: You need to turn off your Mac.
For this, go across the Apple icon on the top and select the 'Shut Down' option.

Step 2: Restart the Mac by pressing the "Power" button.
As the Mac turns on, use the shortcut key of "Command-Option-P-R" and hold this for about 20 seconds.

Step 3: Let the Mac start normally.
Once it is turned on, check the Startup Disk, Display, Date, Time, and System Preferences for any irregularities. Also, try to turn on the audio and check if it is working properly.
Fix 6: Try Restarting the Core Audio
Core Audio on Mac is designed to power up the sound inputs and outputs across the device. Therefore, there is a chance that the problem of MacBook no sound won't resolve, which then requires restarting this component to resolve the issues on your Mac. Follow through the steps to know more about this:
Step 1: Turn on "Activity Monitor" on your Mac and type "coreaudio" in the search bar.
With the results displayed on the screen, double-click on the provided option to open a new window.

Step 2: Click the "Quit" button across the window.
And select "Force Quit" to kill the Core Audio function and restart it successfully on your Mac.

Fix 7: Try a Different Application
The problem of no sound coming from MacBook Air or Pro may not be due to any issue across the system settings. However, there might be a case where the issue would involve the application you are using for this process. Regardless of the application you are using, try to shift yourselves to another application. This might resolve the fundamental issue of having no sound output.
Part 3: Tips to Avoid Causing Sound Problems on Your Mac
The fixes provided above might be comprehensive for your problems, but the question that comes into any user's mind is why they should get into such a problem in the first place? This leads to the need for some tips that should be implemented to avoid sound problems across your Mac.
So follow the tips provided below to prevent the volume from not working on Mac:
- You should always keep your Mac updated so that the operating system does not malfunction for any reason that may affect your volume settings.
- If you are using any application to operate the audio on your Mac, ensure that it is properly updated to not malfunction and corrupt the audio files.
- Considering you have connected any external audio device with the computer, keep a check on the wires and connectors as they might loosen up.
- If you've connected a Bluetooth audio device to your Mac, keep it charged so that it does not disrupt the connection with the Mac.
- Keep the Mac clean from all dust and other particles that might get stuck across your speaker and disrupt the audio output.
Conclusion
With a focus on the solutions that can be used to resolve the problem of audio not working on mac, this article has provided a complete blueprint on how a user can save themselves from such a basic problem on their Mac. Follow the guidelines mentioned above to protect yourself from facing sound problems on your Mac.
People Also Ask
-
Why is my MacBook not playing any sound?
This could be due to incorrect output settings, muted volume, outdated macOS, or audio file issues. Check your sound settings and update the system if needed. -
How do I fix corrupted audio on my Mac?
If the audio file is damaged, use Wondershare Repairit - Audio Repair to fix it in 3 steps. Try it free. -
Is there a built-in audio repair tool on Mac?
No built-in audio repair exists, but you can use professional tools like Repairit for advanced fixes.